
In computer vision based deep learning, the amount of image plays a crucial role in building high accuracy neural network models. When we do not have enough images, we can always rely on image augmentation techniques in deep learning. Image augmentation in deep learning can substantially increase the size of our dataset. This can help to:
- Have a more diverse set of images to train the deep neural network model on.
- Get rid of the problem of less availability of data.
So, in this article, we will see different image augmentations that we can apply while carrying out deep learning training. We will take a practical approach with:
- PyTorch image augmentation techniques for deep learning.
- Using albumentations library for deep learning image augmentation.
What Dataset Will We Use?
We will use the Caltech-256 image dataset in this article.
The dataset contains a total of 30607 images ranging over 256 categories. Although we will not need the knowledge of the categories in this article, as we will not carry any deep learning image recognition task. We will only implement different image augmentation techniques and how they affect the run time of our program.
If you need to download the dataset, then you can do it here.
The following are some images from the Caltech-256 dataset.

After downloading is complete, you will have a 256_ObjectCategories.tar file. Extract this file and you will find photographs of all the categories inside 256_ObjectCategories folder. Keep this folder in your current working directory.
What Will We Cover in This Article?
- What are the different types of image augmentation techniques?
- Using PyTorch for image augmentation.
- Using albumentations library for image augmentation.
- Drawing a time comparison for image augmentation.
What are the Different Types of Image Augmentations Techniques?
When carrying out deep learning tasks involving images, you can use a host of image augmentation techniques.
But in this article, we will focus on those which we will implement through programming. Let’s take a look at some of those:
- Resize: resizing of images. This helps in particular when you have very high dimensional images and want to resize them to lower the resolutions. This can make deep learning neural network training much faster.
- Cropping: we can do cropping of an image. In particular, programmatically, we do Center Cropping and Random Cropping of an image.
- Flipping: flipping an image, either vertically or horizontally can change its orientation.
- Rotating: we can also rotate an image by certain degrees.
Installing the Albumentations Library
If you have not installed the albumentations library, then you can type the following command in the command line.
!pip install albumentations
Now, let’s move on to the data preparation stage.
First, we will prepare our data, then we will move on to augment the images.
Importing All the Required Modules
In this section, we will import all the modules and libraries that we will need further along.
# imports
import torch
import torchvision.transforms as transforms
import glob
import matplotlib.pyplot as plt
import numpy as np
import torchvision
import time
import albumentations as A

from torch.utils.data import DataLoader, Dataset
from PIL import Image
The following are some of the important modules in the above code block.
torchvision.transforms: to apply image augmentation and transforms using PyTorch.glob: it will help us to make a list of all the images in the dataset.matplotlib: to plot the images.albumentations: to apply image augmentation using albumentations library.DataLoaderandDataset: for making our custom image dataset class and iterable data loaders.PIL: to easily convert an image to RGB format.
Making a List of All the Images
All the images are saved as per the category they belong to where each category is a directory. We can use glob module to get all the image names and store those as a list.
The following code stores all the image names in a list.
image_list = glob.glob('256_ObjectCategories/*/*.jpg')
print(len(image_list))
30607
So, image_list stores all the image names and there are 30607 images in total.
Using PyTorch Transforms for Image Augmentation
We will first use PyTorch for image augmentations and then move on to albumentations library.
We will apply the same augmentation techniques in both cases so that we can clearly draw a comparison for the time taken between the two.
Defining the PyTorch Transforms
PyTorch transforms module will help define all the image augmentation and transforms that we need to apply to the images.
The following code defines all the transforms that we will apply to the images.
# define pytorch transforms
transform = transforms.Compose([
     transforms.ToPILImage(),
     transforms.Resize((300, 300)),
     transforms.CenterCrop((100, 100)),
     transforms.RandomCrop((80, 80)),
     transforms.RandomHorizontalFlip(p=0.5),
     transforms.RandomRotation(degrees=(-90, 90)),
     transforms.RandomVerticalFlip(p=0.5),
     transforms.ToTensor(),
     transforms.Normalize((0.5, 0.5, 0.5), (0.5, 0.5, 0.5)),
     ])
So, first, at line 3 we are converting the image into PIL format. Then lines 4 to 9 apply the transforms, namely, Resize, CenterCrop, RandomCrop, RandomHorizontalFlip, RandomRotation, RandomVerticalFlip. Lines 10 and 11 convert the images to tensors and normalize the images as well.
PyTorch Transforms Dataset Class and Data Loader
Here, we will write our custom class. And then, we will prepare the dataset and data loader that will use the PyTorch transforms and image augmentations.
# PyTorch image augmentation module
class PyTorchImageDataset(Dataset):
    def __init__(self, image_list, transforms=None):
        self.image_list = image_list
        self.transforms = transforms

    def __len__(self):
        return (len(self.image_list))

    def __getitem__(self, i):
        image = plt.imread(self.image_list[i])
        image = Image.fromarray(image).convert('RGB')
        image = np.asarray(image).astype(np.uint8)
        if self.transforms is not None:
            image = self.transforms(image)

        return torch.tensor(image, dtype=torch.float)
The above code block defines the PyTorchImageDataset() module.
- Line 4 initializes the
self.image_listwith theimage_listthat we have defined before. Line 5 initializes thetransforms. - In
__getitem__()(from line 10), we are first reading an image from the list based on the index value. Then PIL Image converts the image into 3-channels RGB format. Line 13 converts the image into NumPy array anduint8data type. - After that, we apply the PyTorch transforms to the image, and finally return the image as a tensor.
Now, let’s initialize the dataset class and prepare the data loader.
pytorch_dataset = PyTorchImageDataset(image_list=image_list, transforms=transform)
pytorch_dataloader = DataLoader(dataset=pytorch_dataset, batch_size=16, shuffle=True)
While initializing the PyTorchImageDataset(), we apply the transforms as well. Then we prepare the data loader with a batch size of 16.
Visualizing a Single Batch of Image
We can visualize a single batch of the image now. Plotting the images will give us an idea of how the transforms are being applied.
The following block of code defines a function show_img() that we can use to visualize the images.
def show_img(img):
    plt.figure(figsize=(18,15))
    # unnormalize
    img = img / 2 + 0.5
    npimg = img.numpy()
    npimg = np.clip(npimg, 0., 1.)
    plt.imshow(np.transpose(npimg, (1, 2, 0)))
    plt.show()
At line 4 we unnormalize the images which is very important for the proper visualization of images. Clipping the values (line 6) is also another important step that we are carrying out.
We just have to extract a single batch of images now and call the show_img() function.
data = iter(pytorch_dataloader)
images = data.next()

# show images
show_img(torchvision.utils.make_grid(images))
The above code block should give an output something similar to the following.
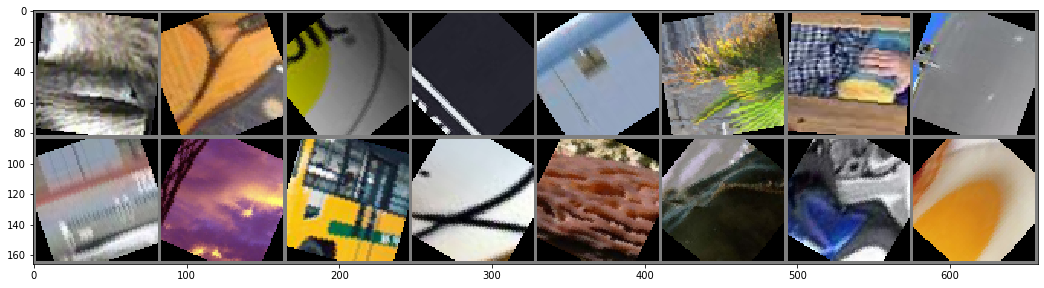
We can clearly see that the image augmentations have been applied. All the images have been randomly cropped, resized, and rotated as well.
Time Taken for Total Dataset Augmentation
Although, we are not doing any deep learning classification in this article, still, most of the time it is our ultimate objective. Augmenting all the images in the dataset takes time.
And when doing it during training when the images pass through the data loaders, then the training time per epoch can increase substantially.
Let’s see what is the total amount of time that it takes to augment all the images in the dataset.
start = time.time()
for i, data in enumerate(pytorch_dataloader):
    images = data
end = time.time()
time_spent = (end-start)/60
print(f"{time_spent:.3} minutes")
3.6 minutes
We get the above time after running the code in Google Colab. I have used Google Colab so as to make it free of hardware-specific runtimes. You can also find the Colab notebook here.
So, what do the 3.6 minutes actually mean? In simple terms, on top of the total per epoch training time, it will also take an extra 3.6 minutes if you carry out all the above image augmentations. It is a lot of time if you are thinking of training a model for more than a few hundred epochs.
Using Albumentations Library for the Image Augmentations
From here on, we will use the albumentations library to learn how to do image augmentation. The main purpose is to get acquainted with another library other than PyTorch to carry out image augmentation for deep learning.
We will need to write another custom dataset class for using the albumentations library. This is because the approach is a bit different than using the PyTorch transforms module.
The following code block is the custom dataset module.
# custom dataset class for albumentations library
  class AlbumentationImageDataset(Dataset):
    def __init__(self, image_list):
        self.image_list = image_list

        self.aug = A.Compose({
        A.Resize(200, 300),
        A.CenterCrop(100, 100),
        A.RandomCrop(80, 80),
        A.HorizontalFlip(p=0.5),
        A.Rotate(limit=(-90, 90)),
        A.VerticalFlip(p=0.5),
        A.Normalize((0.5, 0.5, 0.5), (0.5, 0.5, 0.5)),
        })

    def __len__(self):
        return (len(self.image_list))

    def __getitem__(self, i):
        image = plt.imread(self.image_list[i])
        image = Image.fromarray(image).convert('RGB')
        image = self.aug(image=np.array(image))['image']
        image = np.transpose(image, (2, 0, 1)).astype(np.float32)

        return torch.tensor(image, dtype=torch.float)
We initialize the self.image_list as usual. Then starting from line 6, the code defines the albumentations library’s image augmentations.
Note that these are the same augmentation techniques that we are using above with PyTorch transforms as well. In __getitem__(), we apply the augmentations to the image at line 22. After transposing the height, width, and channels of the image, we return the image as a torch tensor.
The following code initializes the dataset class and prepares the data loader.
alb_dataset = AlbumentationImageDataset(image_list=image_list)
alb_dataloader = DataLoader(dataset=alb_dataset, batch_size=16, shuffle=True)
Visualizing the Images
Now, we can visualize the augmented images by calling the show_img() function that we have defined earlier.
# show images
show_img(torchvision.utils.make_grid(images))
You can see some of the augmented images below.

We are getting rotated, cropped, and flipped images as expected.
Now, let’s check how much time it takes to apply the augmentations over the entire dataset.
start = time.time()
for i, data in enumerate(alb_dataloader):
    images = data
end = time.time()
time_spent = (end-start)/60
print(f"{time_spent:.3} minutes")
3.89 minutes
So, in Colab it took around 3.9 minutes. The results are not very different from PyTorch transforms. Obviously, in Colab, we are getting high-end processors to carry out the processing. In lower-end machines with less powerful processors, it may take even longer.
Solutions to Long Preprocessing Run Times
- One of the solutions is to save the augmented images on the disk and then load them during training. But the downside is that, if you have millions of images, then it will take a lot of space in your system’s disk.
Again, you can find the Colab notebook with the article’s code here. You can play around, apply more augmentation techniques, and let me know about your new findings. Maybe you will find a faster way to carry out the image augmentations.
More Materials to Enhance Your Knowledge
The following are some research papers, articles, and resources, to get you on with deep learning image augmentation techniques.
Papers and Articles
- A survey on Image Data Augmentation for Deep Learning, Connor Shorte and Tagi M. Khoshgoftaar.
- Data augmentation for improving deep learning in image classification problem, Agnieszka Mikołajczyk, Michał Grochowski.
- https://paperswithcode.com/task/image-augmentation.
Other Resources
Summary and Conclusion
In this article, you learned how to carry image augmentation using the PyTorch transforms module and the albumentations library. Obviously, these are just the basics, but you will now be able to move forward on your own. Let me know your thoughts or any doubts that you have in the comment section.
You can contact me using the Contact section. You can also find me on LinkedIn, and X.

Great Article
Using cv2 for image processing instead of PIL may speed up the processing time
Thanks for the suggestion, George. Will try that.
I’ve been looking for some blogs that have projects using PyTorch. And, I have stumbled upon to your site this morning. I glanced some of the tutorials (w/o running any code). These are quite impressive and exactly what I have been searching for so long. Do you have any YouTube channel? I have started following you on Twitter.
Hello Akash. Thank you for the kind words. I don’t have a YouTube channel yet. The only reason is I don’t get much time after writing the blog posts. I will surely keep trying though.