
In this post, you will learn how to use the Albumentations library for bounding box augmentation in deep learning and object detection.
Carrying out augmentation in deep learning and computer vision is pretty common. And we do that in image classification almost all the time. Augmentation in image classification helps prevent overfitting of the model on the training data to a great extent. We get more generalizable models which perform better on unseen data. One of the main reasons for such a result is that the training data become considerably varied and difficult because of the image augmentation. This means that in deep learning and computer vision, it’s not only image classification that would benefit from image augmentation. Other fields of computer vision that use deep learning and neural network models would also benefit from this. What about object detection?
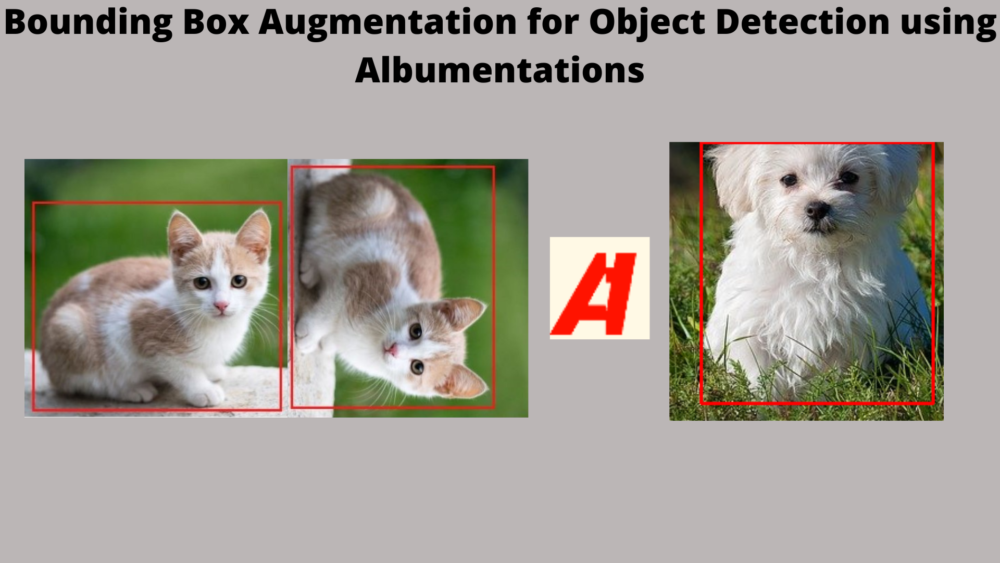
We can carry out image augmentation for object detection too. But we need to be a bit more careful. This is because we need to take care that we are augmenting the bounding boxes too with respect to the augmented image.
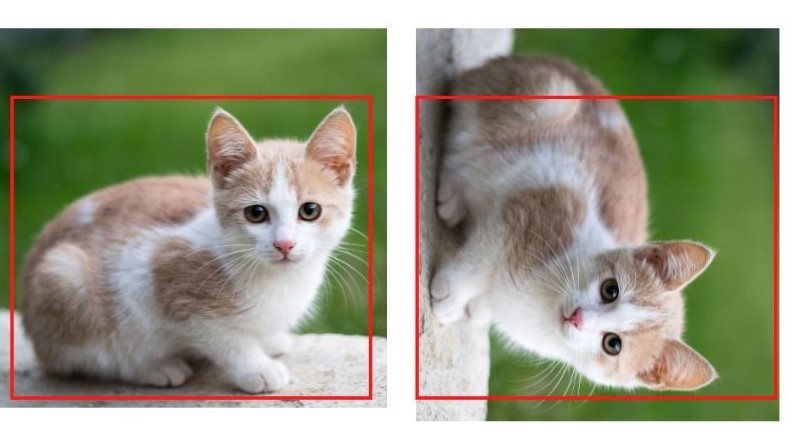
In object detection, we do not want the result to be like the right image in the above figure. We can see that although we rotate the image, the bounding boxes are still of the original orientation. The bounding boxes will also have to be augmented/rotated. If we carry out the correct augmentation for the bounding box as well, the result will be something similar to the following.
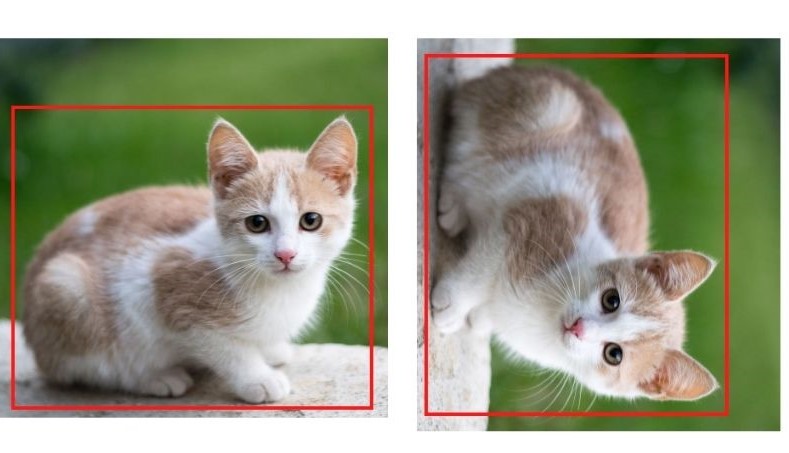
Now, we can see that the bounding boxes are correct even after augmenting the image.
Albumentations for Image Augmentation
The above might seem a bit tedious or even a difficult task in the beginning. And to be fair, doing this manually, can be difficult and even error-prone.
This is where Albumentations will help. If you have followed my previous image classification posts and tutorials, then you will see the usage of Albumentations in a lot of them. It’s really easy to use and provides a host of augmentation techniques. And for object detection too. In this post, we will use Albumentations to learn more about bounding box augmentation
And if you are completely new to Albumentations, then you may check out one of my previous posts, where we compare the image classification augmentation techniques in PyTorch and Albumntations.
That said, let’s now move on to the next section.
Directory Structure
Let’s take a look at the directory structure of the project we are dealing with in this post.
│   bbox_transform.py
│   draw_boxes.py
│
├───images
│       dog1.jpg
│       dog1_coco.csv
│       dog1_voc.xml
│       dog1_yolo.txt
- We have to Python files,
bbox_transforms.pyanddraw_boxes.py. - Then we have an
imagesdirectory which contains a single image of a dog that we will appply the augmentations to. Along with that the we have a CSV, an XML, and a text file containg the bounding box annotation in COCO, Pascal VOC, and YOLO format. Although we will not use these files directly, still, they ensure that we do not lose the correct bounding box annotations anytime while writing the code.
If you have downloaded the zip file for this post, then you already have everything in place.
A Few Prerequisites
You may need two install a few libraries before we move into the coding section of this post.
Well, the two main libraries that we need for this post are OpenCV and Albumentations. You may already have both, or only one, or none. In any case, they are fairly simple to install using the pip.
Install Albumentations:
pip install -U albumentations
Install OpenCV:
pip install opencv-python
In both cases, the latest versions will be installed. And that’s it. You are ready to follow along with the rest of the post.
Bounding Box Augmentation using Albumentations
From here, we will start the coding part of the tutorial. We already know there are two Python files. One contains a few helper functions, and the other is one is the main runnable script.
Helper Functions to Preprocess and Draw Bounding Boxes
After we carry out the bounding box augmentation using Albumentations, we need to draw the bounding boxes on the augmented image. Sometimes, the bounding boxes are in a different format than we need. This depends on the data format we choose, one of coco, voc, or yolo. This means that every time we have to preprocess the bounding boxes a bit differently before annotating them over the image.
We will write the code for the preprocessing and drawing in this section. All the code here will go into the draw_boxes.py file.
Function to Draw the Bounding Boxes on the Augmented Image
We have two functions in this file. Let’s start with the import statement and the first draw_boxes() function.
import cv2

def draw_boxes(image, bboxes, format='coco'):
    """
    Function accepts an image and bboxes list and returns
    the image with bounding boxes drawn on it.

    Parameters
    :param image: Image, type NumPy array.
    :param bboxes: Bounding box in Python list format.
    :param format: One of 'coco', 'voc', 'yolo' depending on which final
        bounding noxes are formated.

    Return
    image: Image with bounding boxes drawn on it.
    box_areas: list containing the areas of bounding boxes.
    """
    image = cv2.cvtColor(image, cv2.COLOR_RGB2BGR)
    box_areas = []

    if format == 'coco':
        # coco has bboxes in xmin, ymin, width, height format
        # we need to add xmin and width to get xmax and...
        # ... ymin and height to get ymax
        for box_num, box in enumerate(bboxes):
            xmin = int(box[0])
            ymin = int(box[1])
            xmax = int(box[0])+int(box[2])
            ymax = int(box[1])+int(box[3])
            width = int(box[2])
            height = int(box[3])
            cv2.rectangle(
                image,
                (xmin, ymin), (xmax, ymax),
                color=(0, 0, 255),
                thickness=2
            )
            box_areas.append(width*height)

    if format == 'voc':
        for box_num, box in enumerate(bboxes):
            xmin = int(box[0])
            ymin = int(box[1])
            xmax = int(box[2])
            ymax = int(box[3])
            width = xmax - xmin
            height = ymax - ymin
            cv2.rectangle(
                image,
                (xmin, ymin), (xmax, ymax),
                color=(0, 0, 255),
                thickness=2
            )
            box_areas.append(width*height)

    if format == 'yolo':
        # need the image height and width to denormalize...
        # ... the bounding box coordinates
        h, w, _ = image.shape
        for box_num, box in enumerate(bboxes):
            x1, y1, x2, y2 = yolo2bbox(box)
            # denormalize the coordinates
            xmin = int(x1*w)
            ymin = int(y1*h)
            xmax = int(x2*w)
            ymax = int(y2*h)
            width = xmax - xmin
            height = ymax - ymin
            cv2.rectangle(
                image,
                (xmin, ymin), (xmax, ymax),
                color=(0, 0, 255),
                thickness=2
            )
            box_areas.append(width*height)
    return image, box_areas
The above code may seem long, but it is quite simple.
- The
draw_boxes()function accepts the augmented image, the augmented bounding boxes, and the bounding box data format as parameters. We need the data format to properly preprocess the bounding boxes before drawing them. - First, we convert the image from RGB to BGR color format as we will be using
cv2for annotations. And we initialize onebox_areaslist as well which will hold the areas of the bounding boxes. We will see the usefulness of this list in the runnable script. - Then we have three
ifstatements checking the dataformat.- If the
formatiscoco, then we need to calculate thexmaxandymaxcoordinates from thexmin,ymin, andwidth,heightof the bounding boxes. As the default format of COCO is[xmin, ymin, width, height]. - If the
formatisvoc, then we just extract the coordinates and draw them. The default format for Pascal VOC dataset is[xmin, ymin, xmax, ymax]. - For the
yolodataformat, we need to carry some extra steps. YOLO has the default format for bounding as boxesnormalized[x_center, y_center, width, height]. Therefore, on line 61, we call theyolo2bbox()function to get the coordinates in[xmin, ymin, xmax, ymax]format. Then we denormalize them and annotate the image usingcv2.
- If the
In each case, we calculate the area of the bounding boxes and append them to box_areas list. At the end of the function, we return the annotated image and the list containing the bounding box areas.
Only, one more thing is left in this Python file. the yolo2bbox() function.
def yolo2bbox(bboxes):
    """
    Function to convert bounding boxes in YOLO format to
    xmin, ymin, xmax, ymax.

    Parmaeters:
    :param bboxes: Normalized [x_center, y_center, width, height] list

    return: Normalized xmin, ymin, xmax, ymax
    """
    xmin, ymin = bboxes[0]-bboxes[2]/2, bboxes[1]-bboxes[3]/2
    xmax, ymax = bboxes[0]+bboxes[2]/2, bboxes[1]+bboxes[3]/2
    return xmin, ymin, xmax, ymax
Without going over the details:
- The
yolo2bbox()function accepts the bounding boxes in it’s nativenormalized[x_center, y_center, width, height]format and returns the normalizedxmin,ymin,xmax, andymaxvalues. - And in the previous code block, we have already seen how we denormalize the coordinates and use them for annotations.
This is all we need for the draw_boxes.py file.
Code for Bounding Box Augmentation using Albumentations
Now, we will write the code in the other Python file, that is bbox_transform.py. This is the runnable script that we will execute from the command line.
There are a few important details about using Albumentations for bounding box augmentation that we will cover as we keep on writing the code.
Starting with the import statement and the argument parser.
import cv2
import albumentations as A
import argparse

from draw_boxes import draw_boxes

# construct the argument parser
parser = argparse.ArgumentParser()
parser.add_argument(
    '-f', '--format', help='bbox transform type',
    default='coco', choices=['coco', 'voc', 'yolo']
)
parser.add_argument(
    '-ma', '--min-area', dest='min_area',
    help='provide value > 0 if wanting to ignore bbox after \
        augmentation under a certain threshold',
    default=0, type=int
)
args = vars(parser.parse_args())
- We import
albumentationswith the aliasAanddraw_boxesfunction from thedraw_boxesmodule. - For the argument parser we have two flags.
- The
--formatflag will specify which bounding box annotation to use. We specify one ofcoco,voc, oryolo. - The other one is
--min-area. This is bit of an interesting and important one as well. While applying random augmentation to an image, especially for an object detection dataset, we may actually miss the object of interest in the final image. For example, we have a dog as the object of interest in our image. If we apply random crop, then in some cases a considerable part of the dog might get cropped. We might be left, say, only with the ear of the dog in the image. And we don’t want the bounding box to be drawn for such a small area, like the ear only. Instead let’s drop out that bounding box instance completely. That’s what--min-areawill do. Whenever the value is great than 0 (default value), say 8000, then the augmented bounding boxes having an area of less than 8000 pixels will not be annotated. This is to avoid training a deep learning model on confusing and possibly misleading object instances. We will see this in action while executing the code.
- The
Read the Image and Define the Bounding Box Coordinates
We will read the image using cv2 and convert it to RGB color format. We will also define the bounding box coordinates for different dataset formats.
# read image and convert to RGB format
image = cv2.imread('images/dog1.jpg')
image = cv2.cvtColor(image, cv2.COLOR_BGR2RGB)

# bbox in COCO format
bboxes_coco = [
    # xmin, ymin, width, height
    [193, 108, 208, 272]
]
# bbox in Pascal VOC format
bboxes_voc = [
    # xmin, ymin, xmax, ymax
    [193, 108, 401, 380]
]
# bbox in YOLO format
bboxes_yolo = [
    # normalized[x_center, y_center, width, height]
    [0.464105, 0.573096, 0.324689, 0.640049]
]

# class labels list containing all the class names
class_labels = ['dog']
You can see that we have three different bounding box annotations according to the dataset format. The comments also provide information on what the values indicate. Note that the values is a list of lists. This will help when we have multiple objects in a single image. We have only one in our case, though.
We also have a class_labels list that contains the class names. Here, it contains only dog.
Applying the Augmentations
The next code block applies the augmentation and returns the augmented image as well the augmented bounding boxes. Let’s write the code first, then we will get into the explanation.
# apply the transforms according to the bbox data format
if args['format'] == 'coco':
    # coco transforms
    transform = A.Compose([
        A.RandomCrop(width=250, height=250, p=1),
    ], bbox_params=A.BboxParams(
        format='coco', label_fields=['class_labels'],
        min_area=args['min_area']
    ))

    transformed_instance = transform(
        image=image, bboxes=bboxes_coco, class_labels=class_labels
    )

    transformed_image = transformed_instance['image']
    transformed_bboxes = transformed_instance['bboxes']

elif args['format'] == 'voc':
    # pascal voc transforms
    transform = A.Compose([
        A.RandomCrop(width=250, height=250, p=1),
    ], bbox_params=A.BboxParams(
        format='pascal_voc', label_fields=['class_labels'],
        min_area=args['min_area']
    ))

    transformed_instance = transform(
        image=image, bboxes=bboxes_voc, class_labels=class_labels
    )

    transformed_image = transformed_instance['image']
    transformed_bboxes = transformed_instance['bboxes']

elif args['format'] == 'yolo':
    transform = A.Compose([
        A.RandomCrop(width=250, height=250, p=1),
    ], bbox_params=A.BboxParams(
        format='yolo', label_fields=['class_labels'],
        min_area=args['min_area']
    ))

    transformed_instance = transform(
        image=image, bboxes=bboxes_yolo, class_labels=class_labels
    )

    transformed_image = transformed_instance['image']
    transformed_bboxes = transformed_instance['bboxes']

# draw the bounding boxes on the tranformed/augmented image
annot_image, box_areas = draw_boxes(
    transformed_image, transformed_bboxes, args['format']
)

print(f"Area bboxes: {box_areas}")
cv2.imshow('Image', annot_image)
cv2.waitKey(0)
- The first thing we are checking in the above code block is the dataset
formatprovided in the command line argument. This we need to properly define thebbox_paramsargument while composing the transforms/augmentations. - The
bboxparamsdefines an instance ofBboxParamsthat accepts the datasetformat, thelabel_fields, and themin_area. This is where everything we have defined till now falls into place. - After defining the
transformaccording to the datasetformat, we pass theimage, the bounding boxes list (bboxes_), and theclass_labels. We store the result intransformed_instance. - We then extract the
transformed_imageandtransformed_bboxesfrom theimageandbboxeskeys of thetransformed_instancedictionary. - Line 90 invokes the
draw_boxesfunction which returns the final annotated image and the augmented bounding box area. - We then print the bounding box area, and visualize the annotated image on the screen.
After all this, one question remains. Why return and print the augmented bounding box area? If you remember, we have a min_area argument that will discard the augmented bounding box if the area is less than the specified area. When we visualize the image and see that there are no bounding boxes around the object, which will be very insignificant in such a case, then the area list will also be empty. This is only for our own satisfaction and to make the concept more concrete. In all other cases, there should be some number in the returned list. Maybe 16000, or 21000, indicating the area of the bounding box in pixels.
This is all we need in terms of coding. The rest of the things will start to become clearer once we execute the code and visualize the results.
Execute bbox_transform.py
While executing the bbox_tranform.py script from the command line, we will try to achieve four things:
- We will execute once with
cocoas the data format. - Then with
vocdata format. - And with
yoloas the data format as well. - Along with that we will also see a case where the augmented bounding box area is less than the
min_areaand therefore the image does not get annotated.
We need to note here that we are applying random cropping to the image. So, to see a case where the augmented bounding box is less than the min_area might take a few trials of executing the script. Also, there should not be much difference between the augmented images of the three data formats as all three go through the same set of transforms.
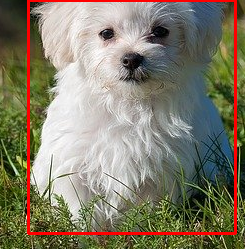
With coco Data Format
All the commands are run from the command line/terminal from the directory where bbox_transform.py file is present.
python bbox_transform.py --format coco
And we also get the bounding box area as the output.
Area bboxes: [25149]
The following is the image output.
We can see how the random crop augmentation leaves only half of the dog in the image.
With voc Data Format
Next, with --format as voc.
python bbox_transform.py --format voc
The bounding box area.
Area bboxes: [15192]
We can clearly see that the bounding box area is less than the previous case and that is reflected in the augmented image also.
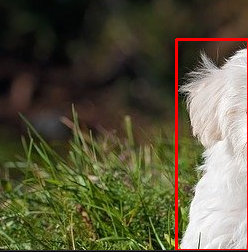
With yolo Data Format
Now, with yolo as the data format.
python bbox_transform.py --format yolo
The following is the transformed bounding box area that we get.
Area bboxes: [48231]
The augmented bounding box area is the largest that we have till now. Let’s take a look at the image.
Almost the entire dog is present in the image and therefore, the bounding box area is so high.
Trying Out an Effective min_area Execution
Finally, let’s try to find a case where no bounding boxes get drawn because of the min_area argument. We will try with --min-area=8000. You might need to execute a few times to find such a case.
python bbox_transform.py --format yolo --min-area 8000
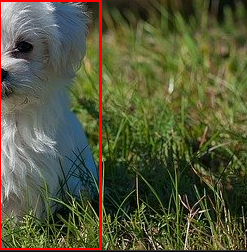
The following image shows a case where the augmented bounding box area is less than 8000, and therefore, the dog is not annotated.
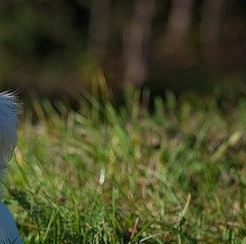
Here, only a bit of the dog’s ear is visible which obviously will be less than 8000 pixels. Also, you will get an empty list for the bounding box areas as the min_area criteria is not satisfied.
Further Exploration
This tutorial covers only the basics of bounding box augmentation using Albumentations. In the next tutorial, we will see what are some of the effective augmentation techniques that we can apply to object detection in deep learning. In the meantime, you may explore the library even more on your own.
Summary and Conclusion
In this tutorial, you learned how to use Albumentations for bounding box augmentation. This is a very helpful technique to train robust deep learning object detection models. We covered the very basics in this tutorial. In future tutorials, we will dive even deeper. I hope that this tutorial was helpful to you.
If you have any doubts, thoughts, or suggestions, please leave them in the comment section. I will surely address them.
You can contact me using the Contact section. You can also find me on LinkedIn, and X.

Can you please make a video on ” how to run this augmentation process in google colab for folder having images and labels”… it would be a great help anf tutorial for us. please
Hi Prav. I generally don’t create videos for my tutorials. It’s not like I don’t want to. Actually, most of my time is spent on writing the content here and very little time is left after that for making videos. I hope you understand.
Hey Sovit. I have the same problem. Please post a way to augment images in a folder.
Hello Ali. If you are looking for augmenting images and then saving the augmented images onto the disk, then the following post may help you.
https://debuggercafe.com/dataset-expansion-using-image-augmentation-for-deep-learning/
Look for the following heading in the above article “Expanding the Chessman Image Dataset using Image Augmentation”
Please let me know if you are looking for something else.
Hi, ‘Download the Source Code for this Tutorial’ links do not work. Nothing happens when clicked.
Hello. Sorry that you are facing issues. Can you please try another browser and check again. It will be better to use Chrome but any of the recent ones should really work fine. Please let me know if the issues persists.