
In this tutorial, we will use Albumentations to apply different augmentations to bounding boxes in object detection. Note that we will not carry out any object detection training or inference in this tutorial. Rather this is a continuation of the previous tutorial. In our last tutorial, we went over the basics of using the Albumentations library for bounding box augmentation in object detection. We covered:
- Different dataset formats that Albumentations supports, such as MS COCO, Pascal VOC, and YOLO.
- Post processing the bounding box coordinates for different data format after the augmentation.
- We also saw how the
min_areaargument in Albumentations affects the augmentations of bounding boxes.
As we are over with the basic concepts in Albumentations, we will cover the following topics in this tutorial:
- We will see the different types of augmentations that Albumentations provides for bounding boxes in object detection.
- We wil create different presets for transforms so that we can easily apply and compare the augmentations applied.
- Along with that, we will also analyze what may be some of good augmentations in Albumentations that we can apply to the bounding boxes.
After this tutorial, I hope that you will be well equipped to use Albumentations for applying augmentations to bounding boxes in your own object detection projects.
So, let’s move on to the next section.
Directory Structure
The following block shows the directory structure we will follow for this tutorial.
│   bbox_transform.py
│   transforms.py
│   utils.py
│
├───images
│   │   coco_annotations.csv
│   │   image_1.jpg
│   │   voc_annotations.zip
│   │   yolo_annotations.zip
│   │
│   ├───voc_annotations
│   │       image_1.xml
│   │
│   └───yolo_annotations
│           image_1.txt
│
├───outputs
│       out_preset_1_1.jpg
│       out_preset_1_2.jpg
│       ...
- Immediately inside the parent project directory we have three Python files. The
bbox_transform.pyfile is the executable script that we will run from the command line. The other two files will act as modules that we will import intobbox_transforms.py. The content of these files will become clear once we start the coding part of the tutorial. - The
imagesdirectory contains only one image, that is,image_1.jpg. Along with that it contains the files holding the annotations for different data formats, like MS COCO, Pacal VOC, and YOLO. This is just like we had in the previous tutorial. - And the
outputsdirectory will hold all the transformed/augmented images after we run thebbox_transforms.pyscript.
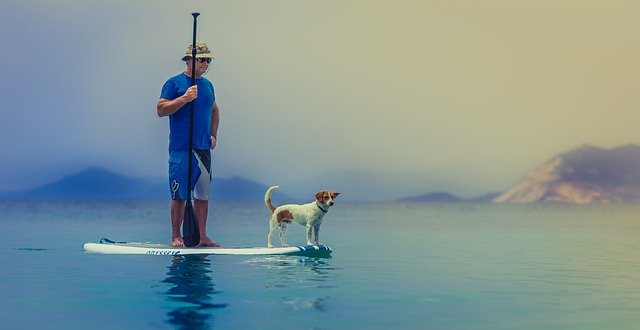
If you are curious, we are using the following image in this tutorial.
If you download the zip file for this tutorial, then you are already set with the directory structure. In that case, although the code is already present, I still recommend going through the post before executing them. That will give you a better understanding of the concepts.
Albumentations Library Version
In this tutorial, we are using Albumentations version 1.10. I recommend using whatever the latest version is available at the time you are reading this tutorial. It is the best way to go as many new features are being added to the library regularly.
If you need to install the library, it is very simple to do so using pip.
pip install -U albumentations
As of now, all the preliminary stuff is complete. Let’s get into the coding part of the tutorial.
Applying Augmentations to Bounding Boxes using Albumentations
We have three Python files for this tutorial. They are:
utils.pytranforms.pybbox_transforms.py
We will write the code in each of them in the above specific order.
Utilities and Helper Functions
We will write a few helper functions in the utils.py file.
There are two functions to be exact, one for drawing the transformed bounding boxes, and one for saving output image to disk.
Helper Function to Draw Bounding Boxes
In the previous tutorial, we wrote a function to draw bounding boxes for three different datasets’ annotations formats. Here, we deal with the COCO annotations only to keep things simple. So, the function will also be pretty simple.
The following code block contains the import statements and the draw_boxes() function.
import cv2
import os

def draw_boxes(image, bboxes):
    """
    Function accepts an image and bboxes list and returns
    the image with bounding boxes drawn on it.

    Parameters
    :param image: Image, type NumPy array.
    :param bboxes: Bounding box in Python list format.

    Return
    image: Image with bounding boxes drawn on it.
    """
    image = cv2.cvtColor(image, cv2.COLOR_RGB2BGR)
    # coco has bboxes in xmin, ymin, width, height format
    # we need to add xmin and width to get xmax and...
    # ... ymin and height to get ymax
    for box_num, box in enumerate(bboxes):
        xmin = int(box[0])
        ymin = int(box[1])
        xmax = int(box[0] + box[2])
        ymax = int(box[1] + box[3])
        cv2.rectangle(
            image,
            (xmin, ymin), (xmax, ymax),
            color=(0, 0, 255),
            thickness=2
        )
    return image
We need the cv2 and os modules for this file, that we are importing at the beginning.
The draw_boxes() function accepts the augmented image and a list containing the augmented bounding boxes. As we are dealing with the COCO annotations here, so the bounding boxes contain the coordinates in [xmin, xmax, width, height] format. After converting the image to BGR color format for OpenCV annotations, we extract the xmax and ymax coordinates as well.
Then we annotate the image with the bounding boxes and return the final image.
Helper Function to Save Image
We have a very simple function to save the resulting augmented image to disk.
def save_image(image, preset):
    all_images = os.listdir('outputs')
    num_images = len(all_images)
    cv2.imwrite(f"outputs/out_{preset}_{num_images+1}.jpg", image)
The save_image() function takes in the augmented image and a preset variable as parameters.
The preset is a string that we pass through the command-line argument while executing the runnable script. It defines one of the four augmentation presets that we want to apply to the image. These we will take care of in the transforms.py file. The function just counts the images already present in the outputs folder and saves the current image by appending the preset name so that later on we can easily recognize which preset was applied to each image.
This completes the code we need for the utils.py file.
Code for Defining the Preset Transforms
In this tutorial, we are experimenting with different augmentations/transforms for object detection using Albumentations. Instead of changing our code for different augmentations each time, we can define a few presets. This will allow us to easily check out how different augmentations/transforms affect the image and the corresponding bounding boxes.
We will do that in the transforms.py file. In total, we will define four different augmentations presets.
Writing the code will make things clearer.
Starting with the import and defining all the augmentation preset functions.
import albumentations as A

def transforms_preset_1(min_area):
    preset = A.Compose([
        A.RandomCrop(width=300, height=300, p=1.0),
    ], bbox_params=A.BboxParams(
        format='coco', label_fields=['class_labels'],
        min_area=min_area
    ))
    return preset

def transforms_preset_2(min_area):
    preset = A.Compose([
        A.RandomBrightnessContrast(p=0.5),
        A.CLAHE(p=0.5)
    ], bbox_params=A.BboxParams(
        format='coco', label_fields=['class_labels'],
        min_area=min_area
    ))
    return preset

def transforms_preset_3(min_area):
    preset = A.Compose([
        A.RandomBrightnessContrast(p=0.5),
        A.CLAHE(p=0.5),
        A.Flip(p=0.5)
    ], bbox_params=A.BboxParams(
        format='coco', label_fields=['class_labels'],
        min_area=min_area
    ))
    return preset

def transforms_preset_4(min_area):
    preset = A.Compose([
        A.RandomBrightnessContrast(p=0.5),
        A.Solarize(p=0.5),
        A.Blur(p=0.5),
        A.RandomFog(p=0.5),
        A.CLAHE(p=0.5),
        A.Flip(0.5),
        A.RandomRotate90(0.5),
        A.MotionBlur(p=0.2),
        A.MedianBlur(blur_limit=3, p=0.1),
    ], bbox_params=A.BboxParams(
        format='coco', label_fields=['class_labels'],
        min_area=min_area
    ))
    return preset
Seems like there is a lot going in the above code block. But we need to understand just one function to understand the rest.
- We have four functions, from
transforms_preset_1()totransforms_preset_4(). - Each of them accept just one parameter, that is
min_area, which we use while defining the transforms. In the previous post, we have already seen how themin_areaargument affects the resulting bounding boxes. - If we take a look at the
transforms_preset_1()function, there is apresetvariable holding the composition of augmentations. We just apply the random crop augmentation in that function and return thepreset. - The rest of the three functions also contain a
presetvariable holding different augmentation compositions. And with each passingpreset, we keep on increasing the number of augmentations to apply. To get an idea of what each augmentation technique does individually, you may take a look at this great demo website by Albumentations. You get to play around with different augmentations without dealing with any complex code.
Combined, in all the four functions, we have the following augmentations:
RandomCropRandomBrightnessContrastCLAHEFlipSolarizeBlurRandomFogCLAHEFlipRandomRotate90MotionBlurMedianBlur
If you are interested in what each of them does, please have a look here.
Dictionary Mapping to the Transforms
When we execute the runnable script, then we pass an argument to choose which augmentation preset to use. But how do we choose from these functions? Well, we can define a simple dictionary mapping the preset names to different functions.
TRANSFORMS_DICT = {
    'preset_1': transforms_preset_1,
    'preset_2': transforms_preset_2,
    'preset_3': transforms_preset_3,
    'preset_4': transforms_preset_4,
}
That’s it. We have four preset strings (from the command line argument). And each of them maps to one of the four functions. In the future, you may easily add more preset functions if you want.
In case you are excited to check out how different augmentations affect the image, you can define a number of functions each holding a single augmentation. That way, you just need to change the command line argument string instead of changing the code each time. For our case, we will keep these four presets for now.
Script for Applying the Augmentations to Bounding Boxes using Albumentations
Here, we will write the code that will actually apply the augmentations to the images.
This code will go into the bbox_transform.py file, which is the executable Python script.
Let’s start with the import statements and construct the argument parser.
import cv2
import argparse

from utils import draw_boxes, save_image
from transforms import TRANSFORMS_DICT

# construct the argument parser
parser = argparse.ArgumentParser()
parser.add_argument(
    '-ma', '--min-area', dest='min_area',
    help='provide value > 0 if wanting to ignore bbox after \
        augmentation under a certain threshold',
    default=0, type=int
)
parser.add_argument(
    '-tr', '--transforms', help='which bbox transform preset to apply',
    choices=['preset_1', 'preset_2', 'preset_3', 'preset_4'],
    default='preset_1'
)
args = vars(parser.parse_args())
- We are importing
draw_boxesandsave_imagefrom theutilsmodule. We also need theTRANSFORMS_DICTdictionary fromtransformsmodule. - For the argument parser we have two flags. The
--min-areaflag is for defining themin_areaargument value when composing the transforms. And the--transformsis for selecting one of the four preset options for augmentations. Whichever preset we pass, the corresponding augmentation function will be executed and applied.
Read the Image, Define the Bounding Box Coordinates, and Apply the Augmentations
Before we can apply the augmentations, we need to:
- Read the image.
- Define the ground truth bounding box coordinates for the person and dog. These are the two objects we have in our image.
- Define a list containg the labels,
personanddog.
The following code block takes care of all the above points, applies the augmentations, and saves the resulting image to disk as well.
# read image and convert to RGB format
image = cv2.imread('images/image_1.jpg')
image = cv2.cvtColor(image, cv2.COLOR_BGR2RGB)

# bbox in COCO format
bboxes_coco = [
    # xmin, ymin, width, height
    [155, 40, 66, 210],
    [262, 182, 81, 68]
]

# class labels list containing all the class names
class_labels = ['person', 'dog']

transforms = TRANSFORMS_DICT[args['transforms']]
# coco transforms
transform = transforms(args['min_area'])

transformed_instance = transform(
    image=image, bboxes=bboxes_coco, class_labels=class_labels
)
transformed_image = transformed_instance['image']
transformed_bboxes = transformed_instance['bboxes']

# draw the bounding boxes on the tranformed/augmented image
annot_image= draw_boxes(transformed_image, transformed_bboxes)
cv2.imshow('Image', annot_image)
cv2.waitKey(0)
save_image(annot_image, args['transforms'])
After reading the image, we are converting it to RGB color format on line 23 as OpenCV reads the image in BGR format.
We have a list of lists, that is bboxes_coco, containing the bounding box coordinates for the person and the dog in the COCO annotation format (line 26).
The class_labels list contains the two class names in our image. It can be anything else as well, maybe even, human and animal. We just need to be sure that we use relevant and easily recognizable names.
On line 35, we map the preset from the command line argument using TRANSFORMS_DICT dictionary. The resulting transforms function composition is stored in the transform variable. Then on line 37, we call the function by passing the min_area argument.
The actual augmentations or transforms take place on line 39. We extract the transformed images and bounding boxes on lines 42 and 43 respectively.
Line 46 calls the draw_boxes() which returns the image annotated with the bounding boxes. Note that for annotation, we are passing the augmented image to the draw_boxes() function. This is because the bounding boxes are also augmented and they can be annotated correctly only on the augmented image.
Finally, we are showing the resulting image on the screen and saving it to disk with the correct preset name.
This completes all the code we need for this entire tutorial. Next, we will execute the code and see what kind of results different augmentation techniques give.
Executing bbox_transform.py
We will now execute the bbox_transform.py script for applying augmentations to the bounding boxes using Albumentations. As you might have noticed by now, most of the augmentations that we have defined above have a probability of 0.5. So, while selecting a preset, all the augmentations from that preset might not be applied at once. For that reason, starting from preset_2, we will execute the script a few times for each of the presets. That will give us a good idea of how the augmentations are affecting the image and the bounding boxes.
Executing with preset_1
From the project directory, where the bbox_transform.py script is present, execute the following command in the command line/terminal.
python bbox_transform.py --transforms preset_1
Following is the output that we get for preset_1.
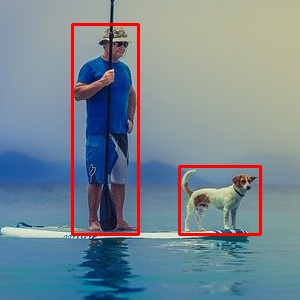
As we are just applying RandomCrop to the image here, so, the image size has been reduced. The two objects are still in the image. Try running the script a few more times with the same preset. You will surely get different results.
Executing with preset_2
Let’s check out how RandomBrightnessContrast and CLAHE affect the image.
python bbox_transform.py --transforms preset_2
The following are results from four different runs with the same preset.
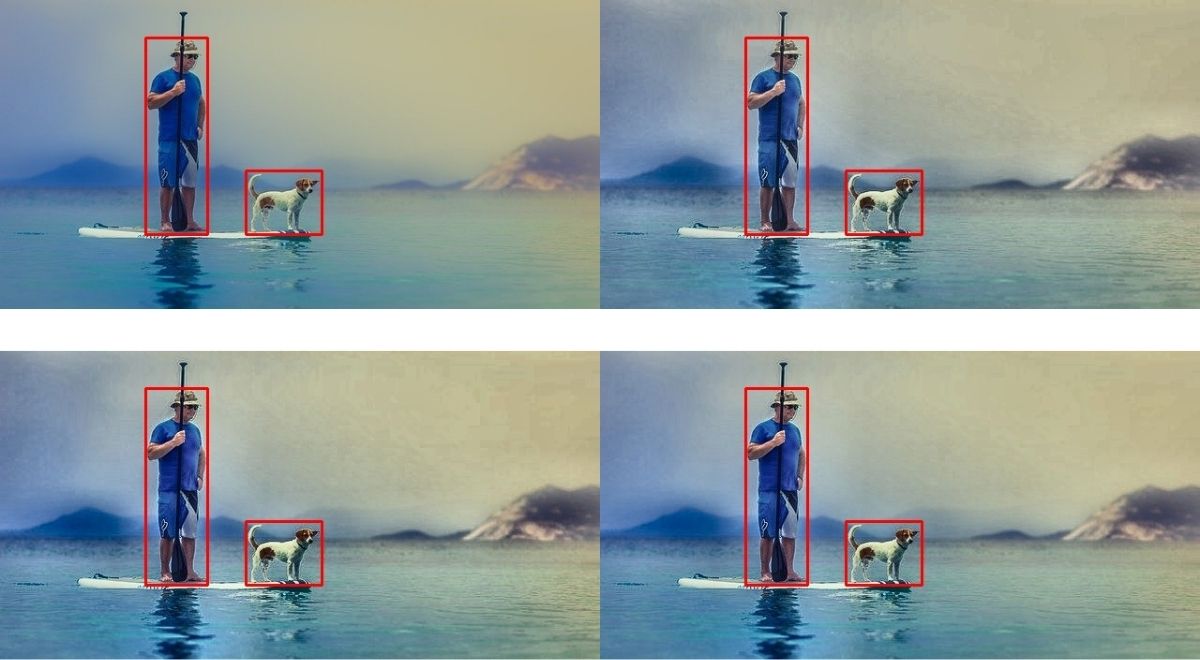
Starting clockwise from top-left. We can see that the first image does not contain any augmentations. In the second we have both of them applied. And the third and fourth ones have different levels of contrast. They are subtle but present.
Executing with preset_3
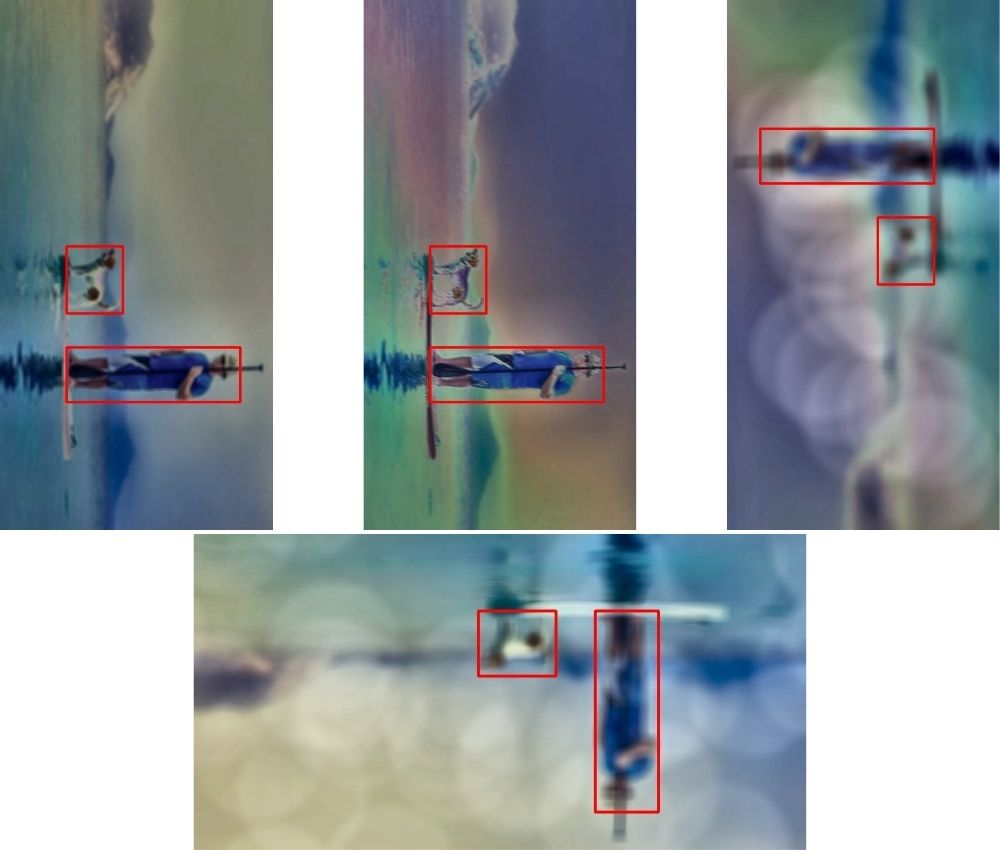
preset_3 has an additional Flip augmentation that may randomly flip the image vertically or horizontally.
python bbox_transform.py --transforms preset_3
Let’s take a look at a few results.

We can clearly see images with random flips and with random brightness and contrast ratios as well.
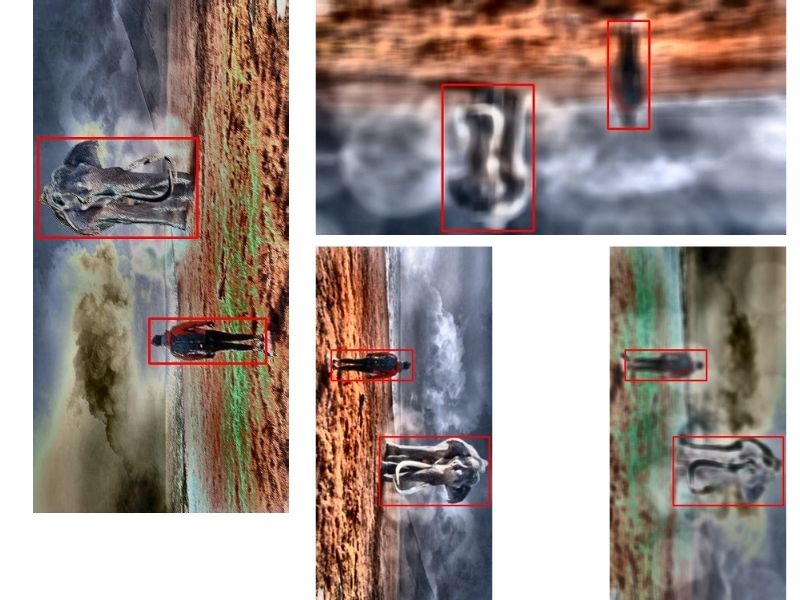
Executing with preset_4
preset_4 has the highest number of augmentations, a total of 9. This is going to be exciting. Let’s run the script.
python bbox_transform.py --transforms preset_4
Okay, it’s really difficult to individually point out the augmentations here, as it looks like a lot of them were applied at once. We can see flip, contrast changes, solarize, and even blur. I am sure that running the script more will give even further varied results. Do try that on your own and provide your findings in the comment section.
Takeaways and Next Steps
- From the above experiments and results it is pretty clear that applying such augmentations to an object detection project will help build really robust neural network models.
- But we need to be a bit careful as well. We should not add any such augmentations which might be misleading or too difficult to a model to learn. One example can be very high blur values which completely masks the object but the bounding boxes are still present.
- Do try utilizing a few of the augmentations in your own object detection projects.
- Try posting your findings in the comment section whether the model was able to perform better after applying the augmentations.
Summary and Conclusion
In this tutorial, you learned how to apply different augmentations to bounding boxes in object detection using the Albumentations library. We saw how different augmentations affect an image and which might be good ones for an object detection project. I hope that this tutorial was helpful to you.
If you have any doubts, thoughts, or suggestions, please leave them in the comment section. I will surely address them.
You can contact me using the Contact section. You can also find me on LinkedIn, and X.

7 thoughts on “Applying Different Augmentations to Bounding Boxes in Object Detection using Albumentations”