
Fine-tuning language models to follow instructions is a major step in making them more useful. In this article, we will train the GPT2 model for following simple instructions. Instruction tuning GPT2 on the Alpaca dataset will reveal how well very small language models perform at following instructions.

In particular, we will train the GPT2 base model which contains just 124 million parameters. This is much smaller than what the industry considers as SLMs (Small Language Models), which us typically 7 bllion (7B) parameters. In fact, any language model below 3 billion parameters can be a challenge to to train for instruction following. However, in future posts, we will train many such models and see how far we can push the envelope forward. This post is a starting point for this.
In the last article, we attempted something similar. We trained the OPT-125M model for instruction following on the Open Assistant Guanaco dataset. It was a simple process as the dataset already contained the text field in the necessary format. This article will use the Alpaca dataset which requires some amount of preprocessing to get the text ready in the appropriate format and will also add another dimension to using different datasets.
With the use of the Hugging Face SFT Trainer (Supervised Fine-Tuning) pipeline, a lot of the process will become simpler.
We will cover the following topics in this article
- We will start with the discussion of the Alpaca dataset that we will use for instruction tuning the GPT2 base model.
- Then we will directly move to the coding section where:
- First, we will load the Alpaca dataset and preprocess it.
- Second, load the GPT2 model for instruction tuning.
- Third, define the training arguments, and the SFT Training pipeline and start the training.
- After training, we will test the model on some simple instructions.
The Alpaca Instruction Tuning Dataset
The Alpaca dataset is one of the most popular datasets for instruction tuning language models. This dataset was used to train the Stanford Alpaca model which is an instruction-tuned version of Llama 2.

The dataset contains 52000 samples which were generated using the text-davinci-003 model and were refined later. You can find more details about the data generation process here on GitHub.
We will be directly downloading the dataset from Hugging Face datasets.
The Alpaca Instruction Format
Almost all instruction tuning datasets have a slightly different format. In this regard, the Alpaca dataset contains four columns: instruction, input, output, and text.
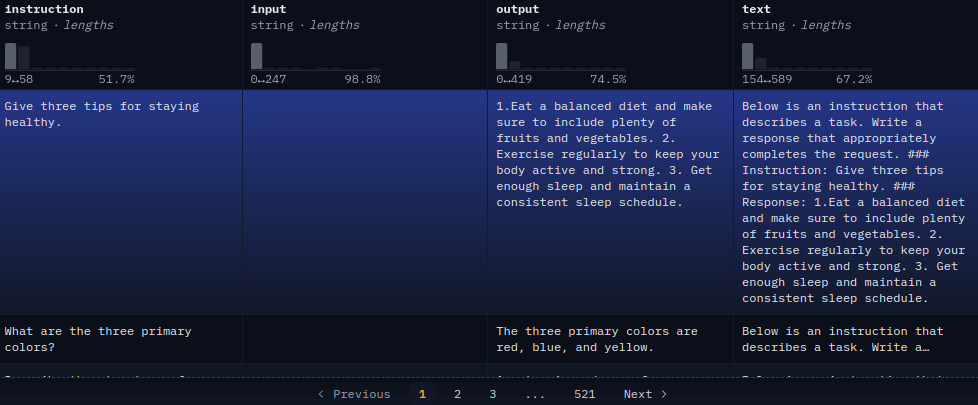
The first three columns represent the following respectively:
- instruction: The instruction given by the human prompter to the language model.
- input: If any additional input text is needed. If not, then this column remains empty.
- output: The expected output from the language model.
The final text column concatenates the above three with slight modifications. First, we can see that the text contains a string before the instruction for the model on what to do with the following instruction and text. Then we have the instruction, the input if needed, and then a response. It contains the following order: ### Instruction: … ### Input: … ### Response: …
As we saw in the previous article, it will just be simpler to use the text column as the input when initializing the SFT Trainer pipeline. However, there are a few issues with that. We do not always want to prepend the instruction with the extra text. Also, some of the ### Input: is followed by No text which is not necessary as it can just be empty.
Here, we will use a simple preprocessing function and concatenate the first three columns to generate the input text. We will see to this in the coding section.
Download Code
Project Directory Structure
Following is the directory structure of the project.
├── outputs
│   └── gpt2_alpaca_preprocess_fn
│       ├── best_model
│       └── logs
├── gpt2_alpaca.ipynb
├── inference.ipynb
└── requirements.txt
- The
outputsdirectory contains the best model and the training logs. - In the root directory, we have a training notebook, an inference notebook, and the requirements file.
All the Jupyter notebooks along with the best model weights are available for download via the download section.
Libraries and Dependencies
Along with PyTorch as the base framework, we will need several of the Hugging Face libraries to run the code in this article.
- accelerate
- transformers
- trl
- datasets
You can install all of this using the requirements.txt file that comes with the downloadable zip file.
pip install -r requirements.txt
Instruction Tuning GPT2 on Alpaca Dataset
Let’s jump into the coding section now. A lot of the code will be similar to the previous post where we fine-tuned the OPT-125M model. So, we will refer to that article if needed. The training code is present in the gpt2_alpaca.ipynb notebook.
Starting with all the import statements.
import os
import torch

from datasets import load_dataset
from transformers import (
    TrainingArguments,
    AutoModelForCausalLM,
    AutoTokenizer,
    pipeline,
    logging,
)
from trl import SFTTrainer
One of the important classes is the SFTrainer from the trl library that we import above.
Training and Dataset Configurations
Now, let’s define all the important configurations and hyperparameters that we will use throughout the training process.
batch_size = 16
num_workers = os.cpu_count()
max_steps = 3000
bf16 = False
fp16 = True
gradient_accumulation_steps = 2
context_length = 256
logging_steps = 500
save_steps = 500
learning_rate = 0.0001
model_name = 'openai-community/gpt2'
out_dir = 'outputs/gpt2_alpaca_preprocess_fn'
Most of them are self-explanatory. A few of the important ones are bf16, fp16, gradient_accumulation_steps, and context_length. You can find detailed explanations for them in the previous article. We are skipping the explanation for brevity here.
The out_dir is where the best model and the training logs will be stored. The training pipeline will create this directory automatically.
Also, take note of the model_name that we are using. It is the GPT2 base tag from the Hugging Face library.
Loading the Alpaca Instruction Tuning Dataset
Let’s get on to load the dataset now.
dataset = load_dataset('tatsu-lab/alpaca')

print(dataset)
We simply use the load_data function and provide the tag of the model. Printing the dataset provides us with the columns and the number of samples in the dataset.

Note that all the samples belong to the training set. Later we need to split them into a training and a validation set.
Now, let’s print one sample from the text column and check the structure.

As we can see, this sample from the dataset does not contain an ### Input:, it just contains an instruction and a response.
Now, let’s divide the dataset into a training and a validation set.
full_dataset = dataset['train'].train_test_split(test_size=0.05, shuffle=True)
dataset_train = full_dataset['train']
dataset_valid = full_dataset['test']

print(dataset_train)
print(dataset_valid)
After splitting, there are 49401 training samples and 2601 validation samples. It is worthwhile to note that we are also shuffling the dataset before splitting. It is safe to do so with this dataset as one sample does not continue into the following one as a chat conversation. However, we need to be careful as there are instruction tuning datasets that do contain samples where the conversation continues from one to another.
The Preprocessing Function
In the dataset exploration section, we discussed that we will use a preprocessing function to concatenate the instruction, input, and output columns. It is actually quite simple to carry out.
def preprocess_function(example):
    """
    Formatting function returning a list of samples (kind of necessary for SFT API).
    """
    text = f"### Instruction:\n{example['instruction']}\n\n### Input:\n{example['input']}\n\n### Response:\n{example['output']}"
    return text
That’s all we need. We pass an example to the preprocess_function and create a text variable. It contains an Instruction followed by a new line, then two new lines followed by the input, and finally the response preceded by two more new lines.
The final samples will look like the following:
### Instruction:
In this task, you are given two items from a list and need to describe how
they are different from each other.

### Input:
Musk Ox and Bactrian Camel

### Response:
The Musk Ox is a large, horned mammal native to the Arctic tundra that has
a long, thick coat of fur. The Bactrian Camel is a large, long-necked mammal
native to the cold deserts of Central Asia that has two humps of fat on its
back. The Musk Ox is much larger than the Bactrian Camel, which is only about
half its size. The Musk Ox also has more of a hide that keeps it warm, while
the Bactrian Camel's fur is shorter and not as warm. The Bactrian Camel can
also live in much drier climates than the Musk Ox.
This creates a proper structure that will remain constant throughout the training, and the GPT2 model will be able to learn the instructions, the input, and the response.
As we are using the SFT Trainer pipeline, a lot of the processing will be handled by it. We just need to pass this function while initializing the pipeline.
Initializing the GPT2 Base Model for Instruction Tuning
Initializing the model is just as easy. We just need to consider whether to load it in FP16 or BF16 mode.
if bf16:
    model = AutoModelForCausalLM.from_pretrained(model_name).to(dtype=torch.bfloat16)
else:
    model = AutoModelForCausalLM.from_pretrained(model_name)

print(model)
# Total parameters and trainable parameters.
total_params = sum(p.numel() for p in model.parameters())
print(f"{total_params:,} total parameters.")
total_trainable_params = sum(
    p.numel() for p in model.parameters() if p.requires_grad)
print(f"{total_trainable_params:,} training parameters.")
The GPT2 base model contains 124.5 million parameters.
Initializing the Tokenizer
The following code block initializes the GPT2 tokenizer.
tokenizer = AutoTokenizer.from_pretrained(
    model_name,
    trust_remote_code=True,
    use_fast=False
)
tokenizer.pad_token = tokenizer.eos_token
As the GPT2 tokenizer does not contain a padding token by default, we initialize it with the EOS (End of Sequence) token.
If you wish to know how to create a tokenizer and how it works in a simplified manner, then the following two articles will surely help you.
- Getting Started with Text Classification using Pytorch, NLP, and Deep Learning
- Disaster Tweet Classification using PyTorch
Training the GPT2 Model on the Alpaca Dataset
Now, it is time to define the training arguments and the SFT Trainer pipeline.
Note: The training shown in this article were carried on a system with Kaggle kernel with 16 GB P100 GPU.
training_args = TrainingArguments(
    output_dir=f"{out_dir}/logs",
    evaluation_strategy='steps',
    weight_decay=0.01,
    load_best_model_at_end=True,
    per_device_train_batch_size=batch_size,
    per_device_eval_batch_size=batch_size,
    logging_strategy='steps',
    save_strategy='steps',
    logging_steps=logging_steps,
    save_steps=save_steps,
    save_total_limit=2,
    bf16=bf16,
    fp16=fp16,
    report_to='tensorboard',
    max_steps=max_steps,
    dataloader_num_workers=num_workers,
    gradient_accumulation_steps=gradient_accumulation_steps,
    learning_rate=learning_rate,
    lr_scheduler_type='constant',
)
The above initializes all the necessary arguments using the TrainingArguments class.
Now, the SFTTrainer.
trainer = SFTTrainer(
    model=model,
    train_dataset=dataset_train,
    eval_dataset=dataset_valid,
    max_seq_length=context_length,
    tokenizer=tokenizer,
    args=training_args,
    formatting_func=preprocess_function,
    packing=True
)
This is where we pass the model, the training and evaluation datasets, the tokenizer, and the preprocessing function. We are also passing packing=True which will concatenate different samples of similar lengths into a single batch.
We can call the get_train_dataloader function of the trainer instance to visualize the concatenated samples.
dataloader = trainer.get_train_dataloader()
for i, sample in enumerate(dataloader):
    print(tokenizer.decode(sample['input_ids'][0]))
    print('#'*50)
    if i == 5:
        break
Here is an example:
### Input:


### Response:
Wet behind the ears means to lack experience or maturity.<|endoftext|>### Instruction:
Create a paragraph to describe the moon.

### Input:


### Response:
The moon is a fascinating celestial body in the night sky, its face illuminated by
the sun's light yet mysterious in its many moods. Seen from Earth, the moon
appears to change shape and size, going from a full crescent to a vibrant
full circle, thrilling us with its captivating sight. Its dusty grey-brown
surface offers clues to its age, with craters testifying to its tumultuous
history. It is a source of endless wonder and beauty, a constant reminder
of our place in the universe.<|endoftext|>### Instruction:
Create a headline that summarizes the concept of machine learning.

### Input:


### Response:
Unlocking The Power of Machine Learning: Harnessing AI for Real-World
Possibilities.<|endoftext|>### Instruction:
Describe the most difficult problem you ever solved

### Input:


### Response:
The most difficult problem I ever solved was a programming challenge.
It involved creating and optimizing an algorithm that could process large
Observing closely reveals two things:
- A sample does not always start with ### Instruction: as they are packed according to sequence length randomly. It can also end abruptly when the
sequence_lengthis reached. - Each new sample is preceded by the <|endoftext|> token.
Now, let’s start the training.
history = trainer.train()
After training, we save the best model and tokenizer to disk.
model.save_pretrained(f"{out_dir}/best_model")
tokenizer.save_pretrained(f"{out_dir}/best_model")
Analyzing the Results
Following are the training logs and the validation loss graphs.
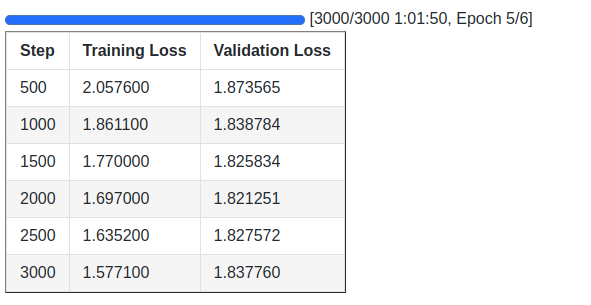
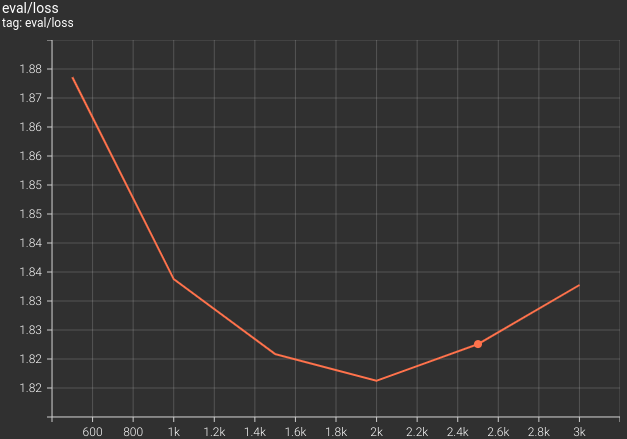
We obtain the best model after 2000 steps where the validation loss is 1.821. After training, this model gets loaded to memory that we saved to the best_model directory.
Inference using the Instruction Tuned GPT2 Base Model
Let’s move on to the inference part now. Using the instruction tuned GPT2 model for text generation is extremely simple. We load the model just as any other pretrained model using the Transformers library.
The code for carrying out inference using the trained model is in the inference.ipynb notebook.
Starting with the import statements.
from transformers import (
    AutoModelForCausalLM,
    logging,
    pipeline,
    AutoTokenizer
)

import torch
Next, we set the computation device, load the model, and tokenizer, and set the padding token.
device = torch.device('cuda' if torch.cuda.is_available() else 'cpu')

model = AutoModelForCausalLM.from_pretrained('outputs/gpt2_alpaca_preprocess_fn/best_model/')
tokenizer = AutoTokenizer.from_pretrained('outputs/gpt2_alpaca_preprocess_fn/best_model/')

tokenizer.pad_token = tokenizer.eos_token
Then define the text generation pipeline.
pipe = pipeline(
    task='text-generation',
    model=model,
    tokenizer=tokenizer,
    max_length=256, # Prompt + new tokens to generate.
    device_map=device
)
In the above code block, the max_length is the number of tokens the model should generate including the prompt that we provide to it.
Then we define a prompt template.
template = """### Instruction:
{}

### Input:
{}

### Response:
{}"""
This is in the same format as we did during the instruction tuning of the GPT2 model. Next, we will format the prompt.
instructions = 'Write three tips for staying healthy.'
inputs = ''
response = ''
prompt = template.format(instructions, inputs, response)
In the first case, we do not provide any input, just an instruction.
Now, call the pipeline along with the appropriate arguments.
outputs = pipe(
    prompt,
    do_sample=True,
    temperature=0.7,
    top_k=50,
    top_p=0.95,
    repetition_penalty=1.1,
)
print(outputs[0]['generated_text'])
The arguments that we use above are necessary to generate good outputs when using a smaller instruction tuned model, like the GPT2 base model.
- The
do_sample,top_k, andtop_parguments tell the model to use different sampling strategies while generating the text. - And the
repetition_penaltyensures that the same text does not get generated over and over again.
We get the following output.
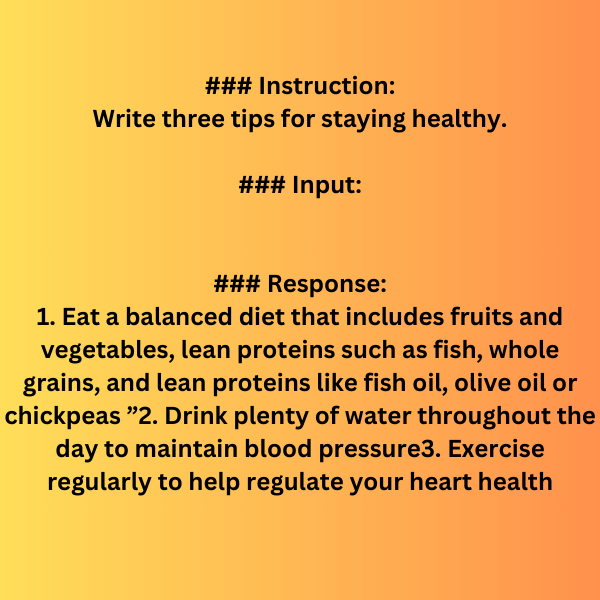
The points seem good enough for such a small model. In fact, the model was able to follow the instruction and generate exactly three points.
Let’s try another example.
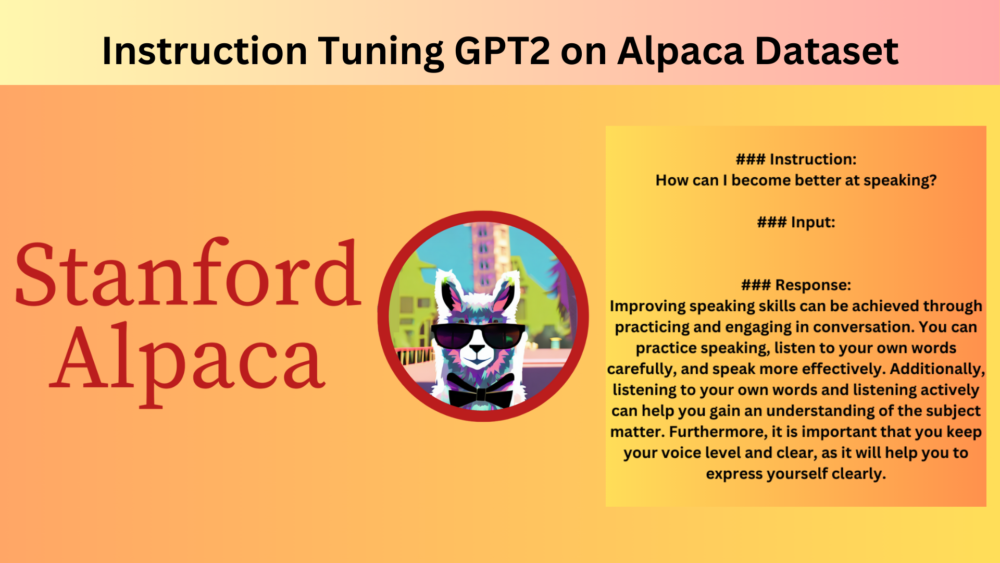
instructions = 'How can I become better at speaking?'
inputs = ''
response = ''
prompt = template.format(instructions, inputs, response)

outputs = pipe(
    prompt,
    do_sample=True,
    temperature=0.7,
    top_k=50,
    top_p=0.95,
    repetition_penalty=1.1,
)
print(outputs[0]['generated_text'])
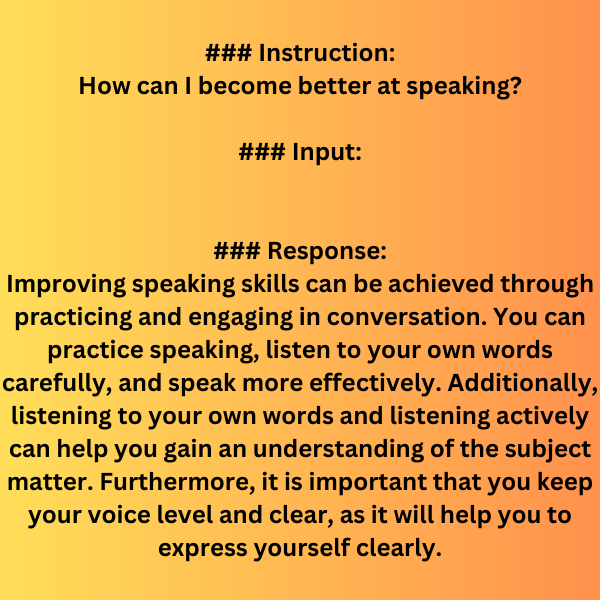
Although the points seem plausible enough, there is some repetition towards the end. However, the output is not at all bad for such a small model.
Further Reading
- Transformer Neural Network
- Text Generation with Transformers
- Character Level Text Generation using LSTM
- Word Level Text Generation using LSTM
Summary and Conclusion
In this article, we trained the GPT2 base model for instruction following on the Alpaca dataset. We started with the discussion of the dataset, it’s preprocessing, defining the model & tokenizer, training, and finally inference. We explored each part in detail. During inference, we also figured out where the model needs improvements. In future articles, we will use much larger models for training on such datasets. I hope this article was worth your time.
If you have any doubts, thoughts, or suggestions, please leave them in the comment section. I will surely address them.
You can contact me using the Contact section. You can also find me on LinkedIn, and X.

7 thoughts on “Instruction Tuning GPT2 on Alpaca Dataset”