
In deep learning, moving from image classification to object detection can pose a lot of practical problems. From a very practical perspective, object detection is more difficult compared to image classification, at least most of the time. In the last article, we created a simple project for bird species classification using the Caltech UCSD 200 Bird Species dataset. Let’s take a step forward and expand the project in this article. We will use the same dataset in this article for bird species detection using deep learning and PyTorch.
In this last article, we discussed how deep learning and computer vision can be used for wildlife. The very first steps in this direction are image recognition and object detection.
After training the EfficientNetB1 model for bird species recognition in the last article, we will shift our focus to detection on this one.
Before getting into the technical depths of the article, let’s see what we will cover here.
- We will start with a discussion of the dataset and how to convert the Caltech UCSD 200 Bird species recognition dataset into a detection dataset.
- Next, we will move on to discuss the models that we will train and the experiments to carry out.
- After training each model, we will analyze the training results.
- Finally, we will use the best trained model for inference on different images and videos. This will give us a proper idea of the strength and weaknesses of the model.
This is a completely practical post. We will mostly focus on the models that we train, the results that we get, and the best-performing models. All the code will be completely accessible in case you need to train your own models. But we will not focus much on the coding perspective.
The Caltech UCSD Bird Species Dataset for Detection
We will use the Caltech UCSD 200 Bird Species dataset for bird species detection in this project. This is originally an image classification dataset. We can easily use the dataset to train a deep image classification model to recognize 200 species of birds!
But that’s not all. The dataset also comes with a text file that provides the bounding box information for detecting the birds. In fact, it also comes with the information to detect different body parts of the bird.
But we will solely be focusing on detecting the entire bird instead of individual parts.
Converting the Caltech Bird Species Recognition Dataset into Detection Dataset
In the original dataset, there is a bounding_boxes.txt file that contains bounding box information about each of the 11788 birds spanning over 200 species.
The structure of the file is like the following:
1 60.0 27.0 325.0 304.0
2 139.0 30.0 153.0 264.0
3 14.0 112.0 388.0 186.0
4 112.0 90.0 255.0 242.0
5 70.0 50.0 134.0 303.0
6 33.0 53.0 251.0 395.0
7 7.0 75.0 420.0 262.0
.
.
.
11786 190.0 102.0 198.0 202.0
11787 3.0 20.0 408.0 307.0
11788 20.0 113.0 177.0 263.0
Each line contains the image number and the box information in
Another file called train_test_split.txt contains the train/test split information for the images. As of this file, 5994 images belong to the training set and 5794 images belong to the test set.
Using the information from the bounding box file, coupled with a simple script, I created an object detection dataset with the same split as the official dataset recommends. All the annotation files are in XML format.
The final dataset structure looks like the following:
cub_200_2011_xml
├── train_images
├── train_labels
├── valid_images
└── valid_labels
The train_images folder contains the training images from the original split and valid_images contains the test images. Similarly, we have the train_labels and valid_labels containing the XML annotations files.
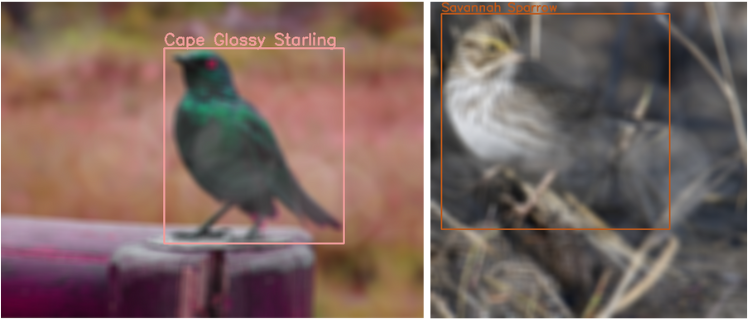
The following are a few annotated images from the dataset after converting to the XML format.
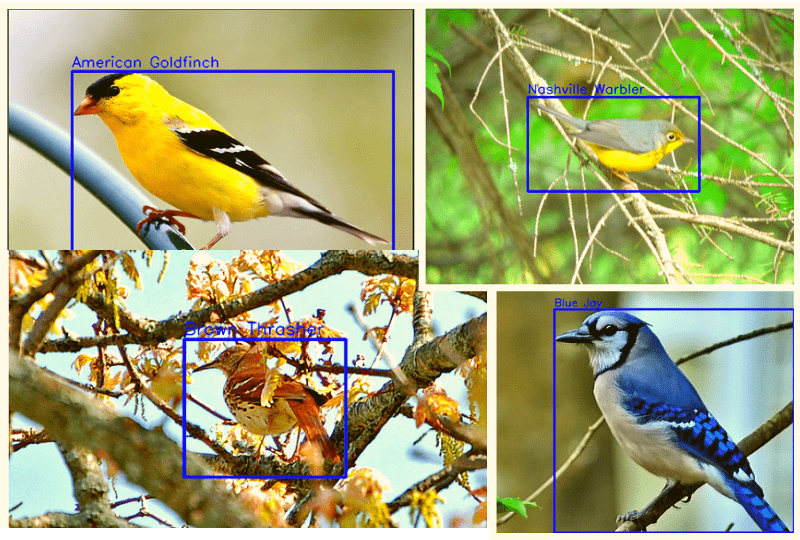
It is pretty clear that the dataset contains images of birds from varied conditions. In fact, some of the background and foreground information will put up a nice challenge against learning the environmental context.
But there is one issue here. Each image contains just one bird in it. This may pose a problem as the model may not be able to learn the context of multiple birds in a single image. Still, it is difficult to say anything before training a model.
That’s all the dataset discussion we need. To access the bird species detection dataset easily, I have made it public on Kaggle.
You may go ahead and download the CUB 200 Bird Species XML Detection Dataset from Kaggle.
The PyTorch Faster RCNN Training Pipeline
We will use the PyTorch Faster RCNN Training Pipeline to train the Faster RCNN object detection models for this project.
I have been developing this project for quite some time now and it supports some nice features such as:
- Multiple COCO pretrained models and ImageNet pretrained backbones.
- Local and Weights&Biases logging.
- Easy image and video inference pipeline.
- Resuming training.
Download Code
If you wish to train the models locally, you can clone the repository first.
git clone https://github.com/sovit-123/fasterrcnn-pytorch-training-pipeline.git
In case you use the Ubuntu OS, you can directly install the requirements.
pip install -r requirements.txt
If you are on Windows OS, please follow this installation guide.
If you want to know about the library in a bit more detail, you may explore the repository before moving forward.
Bird Species Detection Project Directory Structure
The project directory has the following structure.
.
├── fasterrcnn-pytorch-training-pipeline
│   ├── data
│   ├── data_configs
│   ├── docs
│   ├── example_test_data
│   ├── models
│   ├── notebook_examples
│   ├── outputs
│   ├── __pycache__
│   ├── readme_images
│   ├── torch_utils
│   ├── utils
│   ├── wandb
│   ├── _config.yml
│   ├── datasets.py
│   ├── eval.py
│   ├── inference.py
│   ├── inference_video.py
│   ├── __init__.py
│   ├── requirements.txt
│   ├── run.sh
│   └── train.py
└── input
    ├── cub_200_2011_xml
    │   ├── train_images
    │   ├── train_labels
    │   ├── valid_images
    │   └── valid_labels
    ├── inference_images
    │   ├── american_goldfinch_1.jpg
    │   ├── american_goldfinch_2.jpg
    │   ├── nighthawk_1.jpg
    │   └── nighthawk_collage.png
    ├── inference_videos
        └── video_1.mp4
- The
fasterrcnn-pytorch-training-pipelineis the repository that we cloned above. We are most interested in thetrain.py,inference.py, andinference_video.pyscripts. - Then we have the
inputdirectory which contains the training and inference data.
The zip file that comes with this post contains the model that has been trained on the bird species dataset. So, you can directly run inference on images and videos of your choice in case you don’t want to train the model.
Bird Species Detection using Faster RCNN MobileNetV3 FPN
Let’s jump into the experimentations of this article. We will be training the Faster RCNN MobileNetV3 FPN Large model for bird species detection. In fact, we will carry out two different experiments.
- One training without any augmentations.
- And another with image-level augmentations using Albumentations.
Without any further delay, let’s jump into the experiments and results.
The Bird Detection Dataset YAML File
Before we can start the training, we need to prepare the dataset YAML file that will stay inside the data_configs directory. This will contains the path to the images, labels, the class names, and the number of classes. We will call this file cub_200_2011.yaml.
# Images and labels direcotry should be relative to train.py
TRAIN_DIR_IMAGES: '../input/cub_200_2011_xml/train_images'
TRAIN_DIR_LABELS: '../input/cub_200_2011_xml/train_labels'
VALID_DIR_IMAGES: '../input/cub_200_2011_xml/valid_images'
VALID_DIR_LABELS: '../input/cub_200_2011_xml/valid_labels'

# Class names.
CLASSES: [
    '__background__',
    "Brewer Blackbird",
    "Red Cockaded Woodpecker",
    "Brewer Sparrow",
    "Loggerhead Shrike",
    "Red Faced Cormorant",
    ...
    "Blue Winged Warbler",
    "Red Breasted Merganser"
]

# Number of classes (object classes + 1 for background class in Faster RCNN).
NC: 201

# Whether to save the predictions of the validation set while training.
SAVE_VALID_PREDICTION_IMAGES: True
The above block does not show all the classes as there are 200 classes. The total number of classes will be the number of object classes in addition to the background class, so 201 in this case.
Faster RCNN MobileNetV3 Large FPN Training without Augmentations
For the first experiment, we will not use any augmentations. To start the training, you can execute the following command within in the fasterrcnn-pytorch-training-pipeline directory.
python train.py --model fasterrcnn_mobilenetv3_large_fpn --epochs 75 --batch 4 --name fasterrcnn_mobilenetv3_large_fpn_cub_200_2011_75e --data data_configs/cub_200_2011.yaml
The following are short explanations of the different flags used in the above command.
--model: The model name that we want to use.--epochs: Number of epochs we want to train for.--batch-size: Batch size for each iteration of data loader.--no-mosaic: A boolean flag stating that we don’t want to use mosaic augmentation.--project-name: An elaborative name that will create a directory with the same name for saving the results.--config: Path to the dataset YAML file.
The following is the output and mAP from the validation loop for the best epoch (epoch 71).
Average Precision  (AP) @[ IoU=0.50:0.95 | area=   all | maxDets=100 ] = 0.5660839092987016
Average Precision  (AP) @[ IoU=0.50      | area=   all | maxDets=100 ] = 0.7106208349536881
Average Precision  (AP) @[ IoU=0.75      | area=   all | maxDets=100 ] = 0.665367934859014
Average Precision  (AP) @[ IoU=0.50:0.95 | area= small | maxDets=100 ] = -1.0
Average Precision  (AP) @[ IoU=0.50:0.95 | area=medium | maxDets=100 ] = -1.0
Average Precision  (AP) @[ IoU=0.50:0.95 | area= large | maxDets=100 ] = 0.5660839092987016
Average Recall     (AR) @[ IoU=0.50:0.95 | area=   all | maxDets=  1 ] = 0.7620266813077533
Average Recall     (AR) @[ IoU=0.50:0.95 | area=   all | maxDets= 10 ] = 0.7621766813077534
Average Recall     (AR) @[ IoU=0.50:0.95 | area=   all | maxDets=100 ] = 0.7621766813077534
Average Recall     (AR) @[ IoU=0.50:0.95 | area= small | maxDets=100 ] = -1.0
Average Recall     (AR) @[ IoU=0.50:0.95 | area=medium | maxDets=100 ] = -1.0
Average Recall     (AR) @[ IoU=0.50:0.95 | area= large | maxDets=100 ] = 0.7621766813077534
We are tacking the mAP (Mean Average Precision) object detection metric to evaluate the model.
For more insights, we can take a look at the mAP graphs.
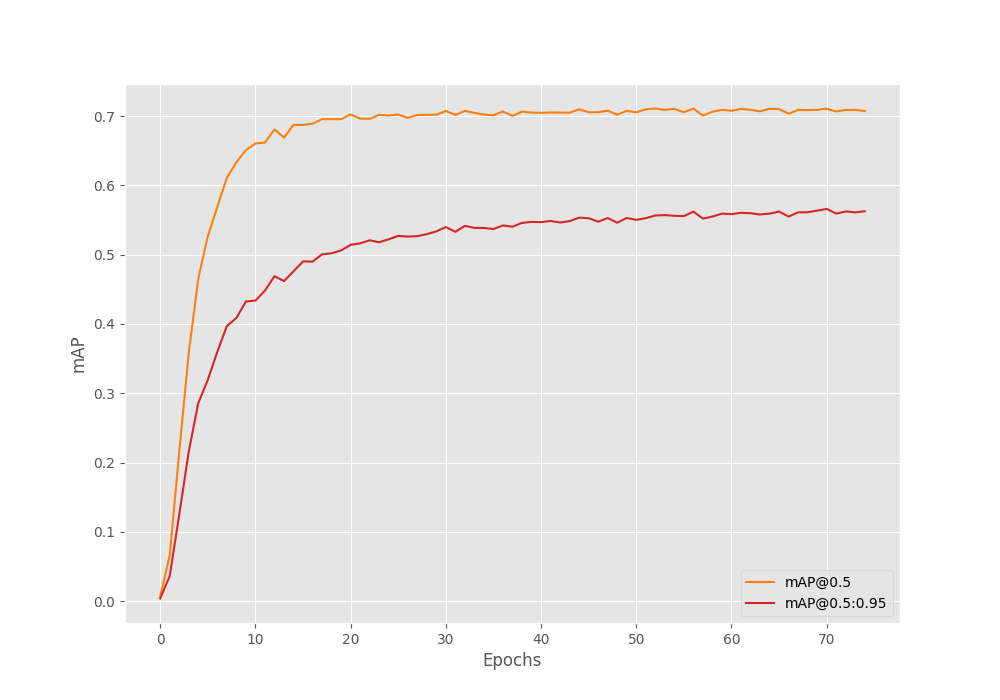
Without augmentation, we have the highest mAP of 56.6 which is pretty good. By the end of the training, the 0.50:0.95 is starting to plateau a bit. This is most probably because the model is not getting any new information to learn.
Faster RCNN MobileNetV3 Large FPN Training with Augmentations
To train with augmentation, we can simply pass the --use-train-aug flag while executing the training command. Doing so will make the data loader use the following augmentations from utils/transforms.py.
- MotionBlur
- Blur
- RandomBrightnessContrast
- ColorJitter
- RandomGamma
- RandomFog
- MedianBlur
Applying the above augmentations randomly will make the training images look similar to the following.
Applying the above augmentations will make the dataset slightly more challenging to learn. This can help to improve the mAP by letting us train the model for longer by adding regularization.
Let’s start the training with the above augmentations.
python train.py --model fasterrcnn_mobilenetv3_large_fpn --epochs 75 --batch 4 --use-train-aug --name fasterrcnn_mobilenetv3_large_fpn_cub_200_2011_75e_aug --data data_configs/cub_200_2011.yaml
As you can see, we are passing --use-train-aug as the extra flag here.
Here are the results from the best epoch.
Average Precision  (AP) @[ IoU=0.50:0.95 | area=   all | maxDets=100 ] = 0.5814547479604053
Average Precision  (AP) @[ IoU=0.50      | area=   all | maxDets=100 ] = 0.7327179656112837
Average Precision  (AP) @[ IoU=0.75      | area=   all | maxDets=100 ] = 0.6889775081625306
Average Precision  (AP) @[ IoU=0.50:0.95 | area= small | maxDets=100 ] = -1.0
Average Precision  (AP) @[ IoU=0.50:0.95 | area=medium | maxDets=100 ] = -1.0
Average Precision  (AP) @[ IoU=0.50:0.95 | area= large | maxDets=100 ] = 0.5814547479604053
Average Recall     (AR) @[ IoU=0.50:0.95 | area=   all | maxDets=  1 ] = 0.7696470830245825
Average Recall     (AR) @[ IoU=0.50:0.95 | area=   all | maxDets= 10 ] = 0.7701304163579158
Average Recall     (AR) @[ IoU=0.50:0.95 | area=   all | maxDets=100 ] = 0.7701304163579158
Average Recall     (AR) @[ IoU=0.50:0.95 | area= small | maxDets=100 ] = -1.0
Average Recall     (AR) @[ IoU=0.50:0.95 | area=medium | maxDets=100 ] = -1.0
Average Recall     (AR) @[ IoU=0.50:0.95 | area= large | maxDets=100 ] = 0.7701304163579158
With augmentation, the model was learning even till the end of training. This time, we achieve a much higher mAP of 58.14.
Following is the mAP graph after the training completes.
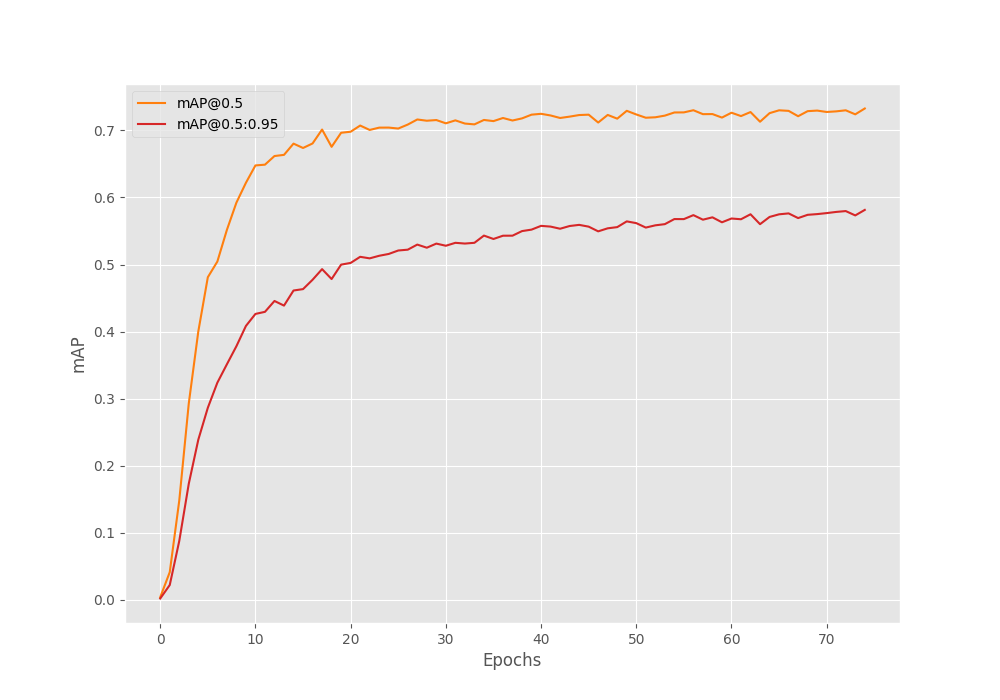
From the mAP graph, it looks like we could have trained slightly longer. The curve seems to be moving up still.
Inference using the Best Model Trained on the Bird Species Detection Dataset
In this section, we will run inference using several real-life scenarios and images from the internet. We will also carry out inference on videos.
For all the inference experiments, we will use the best model that was trained using image augmentations.
You can also run inference on images and videos of your choice.
Image Inference for Bird Species Detection
The images that we will carry out inference on are present in the input/inference_images directory. You can provide the path to your images if you are running inference on your local system. There are several images and we will take a look at in each case.
We can execute a command similar to the following to carry out inference on images.
python inference.py --weights outputs/training/fasterrcnn_mobilenetv3_large_fpn_cub_200_2011_75e_aug/best_model.pth --input ../input/inference_images/ -t 0.5
In the above command -t signifies the confidence threshold for visualization filtering. This command will run inference on all the images in a directory.
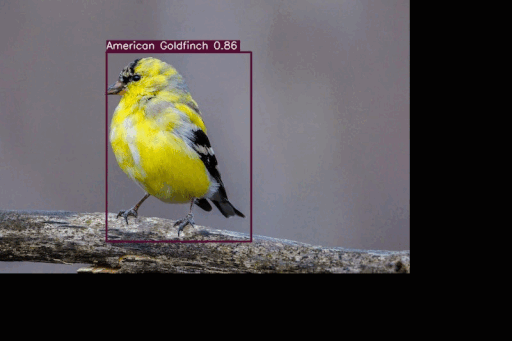
One of the images is that of an American Goldfinch which the model predicts correctly.

It makes the correct prediction with 86% confidence which is pretty good.
Next, we have four individual images of Nighthawk birds.
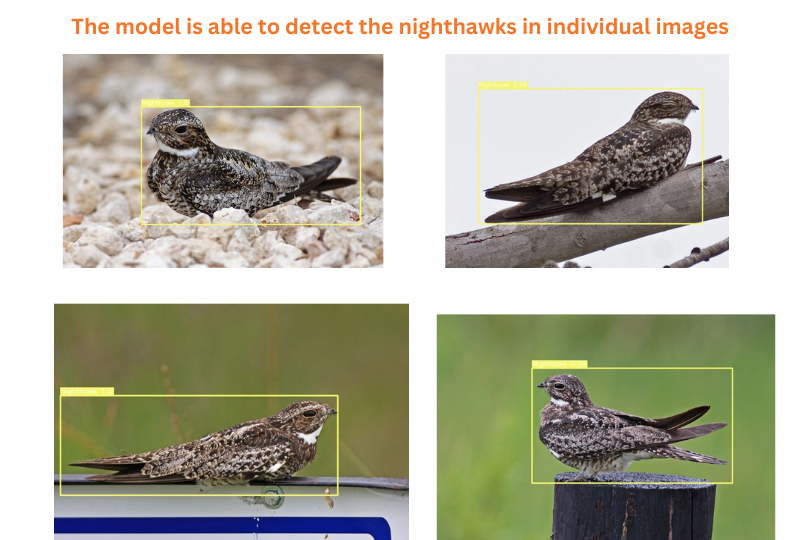
In the above image, the individual results have been merged into a single image. We can see that when we give a single image as input to the model, it is able to detect the birds correctly.
Now, the following image shows the results when we form a collage of all four images and give it as an input to the model.
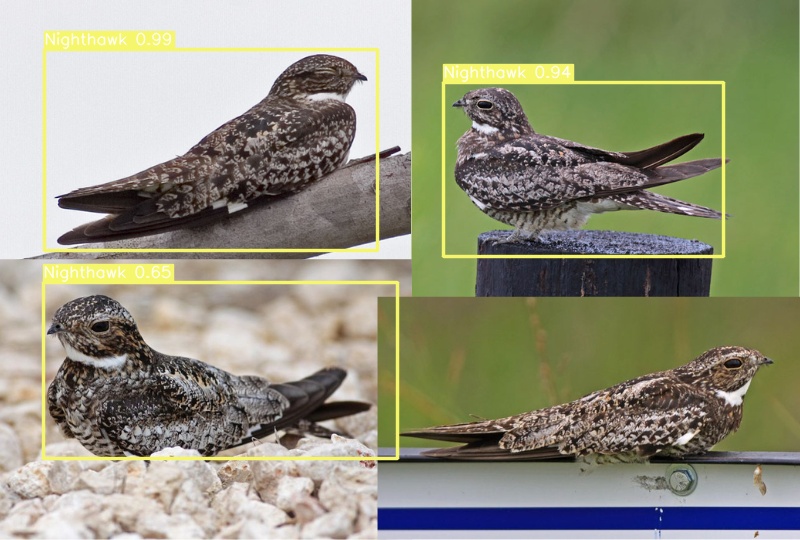
Here, the model fails to predict one of the birds. If you remember, all the training images in the dataset have a single bird. That may be one of the reasons why the model is finding it difficult to detect multiple birds in a single image.
Video Inference for Bird Species Detection
For the final inference experiment, let’s run detection on a video. The following result shows a video containing a Groove-Billed Ani bird.
python inference_video.py --weights outputs/training/fasterrcnn_mobilenetv3_large_fpn_cub_200_2011_75e_aug/best_model.pth --input ../input/inference_videos/video_1.mp4 --show-image -t 0.5
In the initial frames, the model is either unable to detect the bird or is detecting it wrongly. Starting from around 10 seconds, the detection appears correct, although there still appears to be some misclassification.
This shows another limitation of the model failing from different angles.
Further Experiments
You can try training for even longer using different augmentations.
Or you may choose to train a larger and more powerful model, like Faster RCNN ResNet50 FPN V2. In any case, there are a lot of scopes to improve the project even further.
Summary and Conclusion
In this article, we extended a simple bird species classification project into a detection project. We carried out two different training experiments and analyzed how training with augmentations improved the precision of the model. We also go to know the limitations of the model during different inference experiments. I hope that this a good learning experience for you.
If you have any doubts, thoughts, or suggestions, please leave them in the comment section. I will surely address them.
You can contact me using the Contact section. You can also find me on LinkedIn, and X.

I can’t find file “cub_200_2011.yaml” in the file Source Code for this Tutorial. Can you send it to me. Many thanks
Hello. It is defined in the “The Bird Detection Dataset YAML File” in the blog post.
I will try to include it if I have forgtten.
can you give me file “cub_200_2011.yaml” can you put an explanation of opening
Hello Manar. I have updated the download file. Now the YAML file should be available after extracting it.
Houw to run the program please
You can use this command.
python train.py –model fasterrcnn_mobilenetv3_large_fpn –epochs 75 –batch-size 4 –no-mosaic –use-train-aug –project-name fasterrcnn_mobilenetv3_large_fpn_cub_200_2011_75e_aug –config data_configs/cub_200_2011.yaml
Other details and commands are also in the blog post.
whee i have to execute this repositry
Hello Priyanka. After downloading the source code, you can execute the code in your local system.
“In logging.py, an AttributeError occurred during the import of wandb. In validate.py, a ModuleNotFoundError was encountered with the statement from torch_utils.engine import evaluate. Also, is this project intended for identifying bird species and their types? Could you please provide a guide on executing this project in Visual Studio Code (VS Code) to better understand the process?”
Hello Pavani. I recently updated the code on GitHub and because of that maybe some of the errors are occurring. I will try to update the article here as soon as possible.
The trained model can detect 200 different species of birds, if that’s what you are asking. All these bird species are unique to each other.
UPDATE
I have updated all the commands according to the latest repository. Please be sure to execute all the commands within the `fasterrcnn-pytorch-training-pipeline` folder after cloning it. Also don’t forget to do `pip install -r requirements.txt` after cloning.
For the inference part, you will need to download the images/videos. I have not inlcuded the inference data in the zip file as they were Google images.