
Out of the numerous real life problems that deep learning and object detection can solve, traffic light detection is one of them. Traffic light detection is one of the major components of autonomous cars. But for obvious reasons, we are not trying to solve the problem of self-driving cars here. Instead, we are going to solve a much more approachable problem. We will be doing small scale traffic light detection using PyTorch in this article.
Why small scale? Because we will be using a small dataset, around 1000 training images. There are many huge datasets for traffic light detection. But we will start small. Surely, it is not going to be state-of-the-art. But it is going to be fun and we will learn a lot through a lot of experiments.
If you have been following some of my previous object detection articles, then you may notice that we are using Faster RCNN models. In this article also, we will use Faster RCNN models for training on the small scale traffic light dataset. I have been developing the library for some time now and it performs pretty well. We will get into more details later.
Note: We will soon start covering much more advanced topics with more advanced models, complex datasets, and more, stay tuned.
For now, let’s list the topics that we will cover in this article.
- For the coding part, we will not go into much detail. Rather we will dive into the approach, the thought process, and the steps.
- We will also cover the traffic light detection dataset in detail.
- We will train two models with different settings. After training, we will choose the best model for running inference.
Let’s dive into the article without any delay.
The Small Scale Traffic Light Dataset
We will be using a part of the SJTU Small Traffic Light Dataset.
This dataset has two different sets. One containing 1222 images and another containing 4564 images. Combined, the dataset has 5786 images. But we will use the 1222 image set in this article. And that’s why I want to call it small scale traffic light detection.
The dataset contains 5 different classes:
- red
- yellow
- green
- off
- wait_on
All the dataset annotations are present in the Pascal VOC XML format.
At first glance, the scenes in the dataset look complicated & varied, and the traffic lights (objects) appear pretty small.
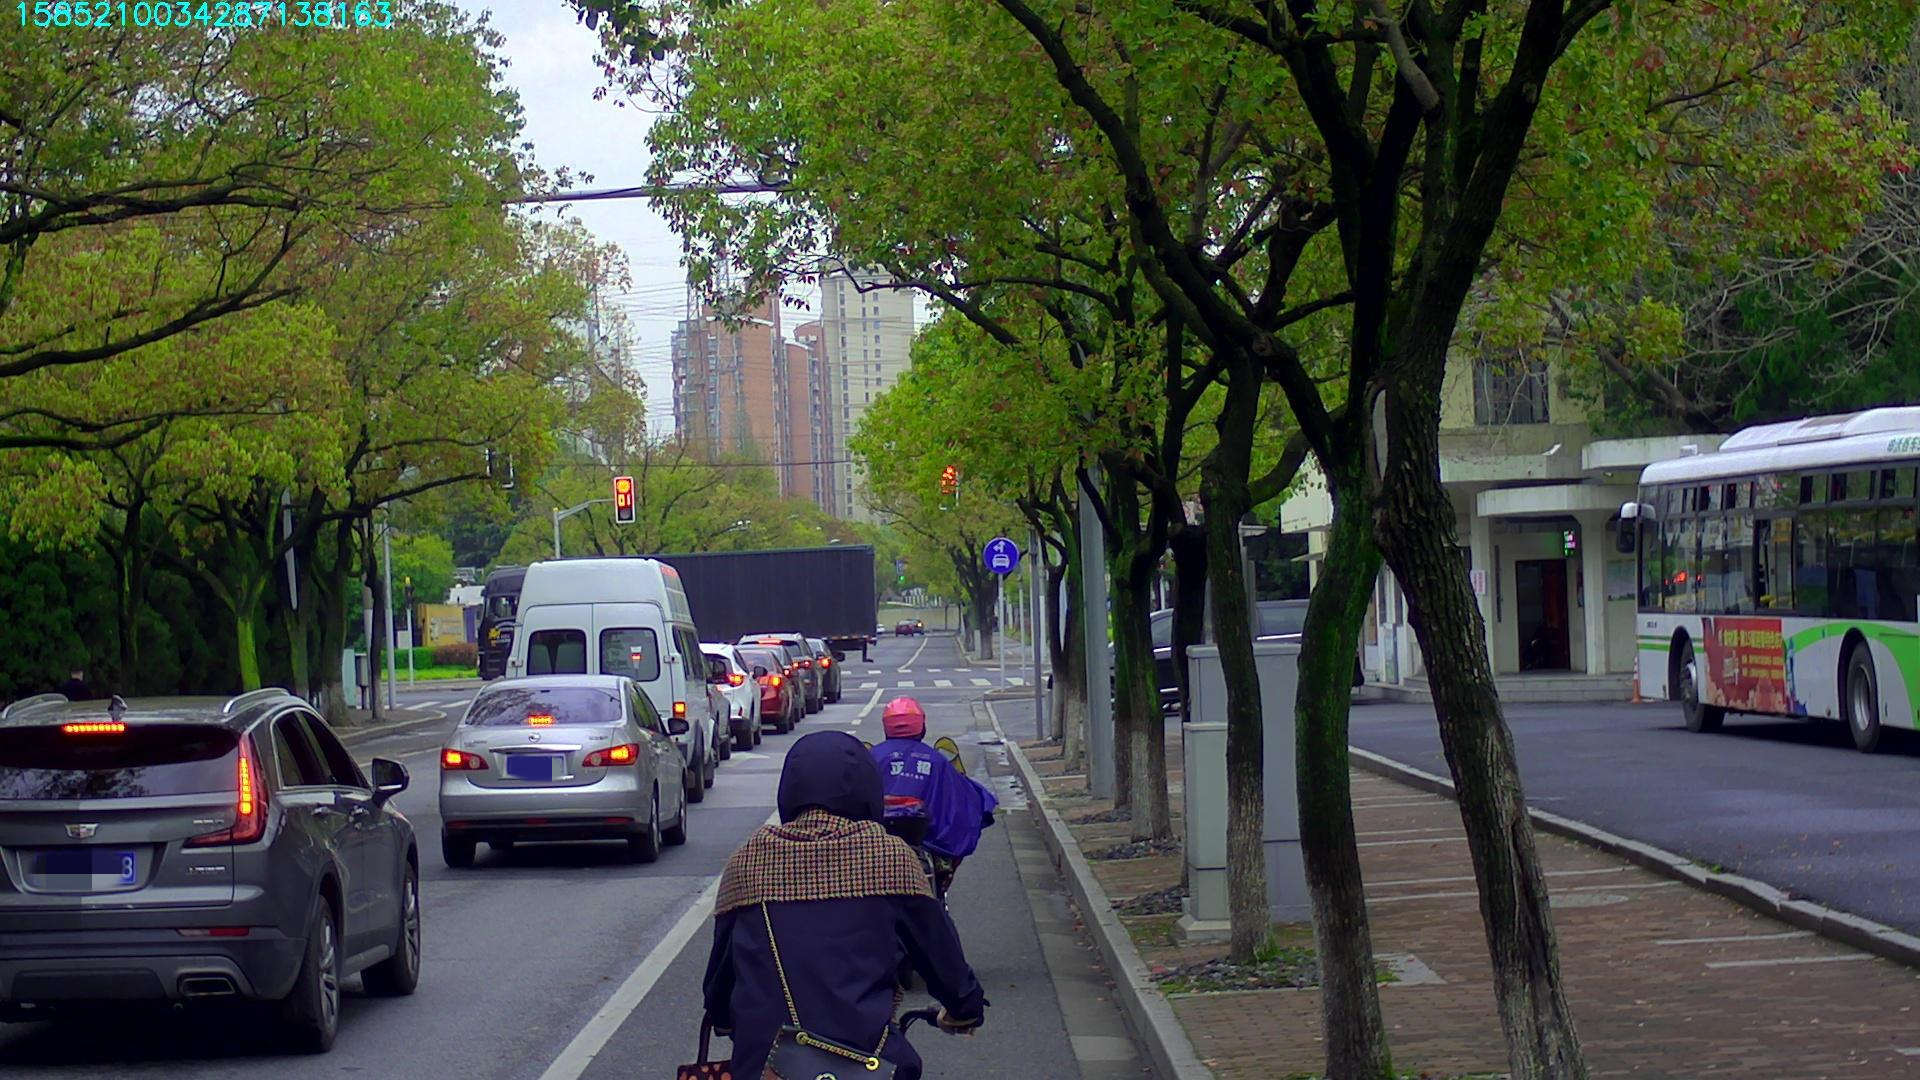
In fact, it is a challenging dataset. And we will try to achieve the best results that we can with the limited number of images that we have.
Download the Dataset from Kaggle
You do not need to worry about downloading the correct dataset and arranging it in the proper structure.
I have already uploaded the version that we will be using on Kaggle.
After downloading and extracting the dataset, you will find the following structure.
├── README.txt
├── S2TLD_1080x1920
│   ├── Annotations
│   ├── class.txt
│   ├── JPEGImages
│   ├── train_annotations
│   ├── train_images
│   ├── valid_annotations
│   └── valid_images
└── s2tld.yaml
Inside, the s2tld directory, we have the S2TLD_1080x1920 subdirectory containing the dataset.
- The
Annotationsdirectory contains the original XML annotations. And theJPEGImagescontains the original images. - But the dataset is already divided into a training and validation set. The
train_annoatations,train_images,valid_annotations, andvalid_imagesdirectories contain the respective splits. We will be using the data from these directories. - The
s2tld.yamlis a sample YAML file containing the dataset information.
Following are some of the annotated images from the dataset.
Faster RCNN Repository for Training the Model
As discussed previously, we will use the code from the Faster RCNN Training Pipeline repository for training the models.
You can easily clone and install the requirements. Just be sure to create a new environment for this in case you are planning to train the models yourself.
Download Code
Clone the Repository
git clone https://github.com/sovit-123/fasterrcnn-pytorch-training-pipeline.git
cd fasterrcnn-pytorch-training-pipeline
Install the Requirements
If you are using Ubuntu OS, then you can install the requirements easily with a single command.
pip install -r requirements.txt
If you are on Windows OS, please follow the Windows installation guide.
Project Directory Structure
The following is the small scale traffic light detection directory structure.
├── fasterrcnn-pytorch-training-pipeline
│   ├── data
│   ├── data_configs
│   ├── docs
│   ├── example_test_data
│   ├── models
│   ├── notebook_examples
│   ├── outputs
│   ├── __pycache__
│   ├── readme_images
│   ├── torch_utils
│   ├── utils
│   ├── wandb
│   ├── _config.yml
│   ├── datasets.py
│   ├── eval.py
│   ├── inference.py
│   ├── inference_video.py
│   ├── __init__.py
│   ├── README.md
│   ├── requirements.txt
│   └── train.py
└── input
    ├── inference_videos
    └── s2tld
- The
fasterrcnn-pytorch-training-pipelineis the cloned repository which contains all the code that we need. We will be using thetrain.py,eval.py, andinference_video.pyscripts for the small scale traffic light detection project. - The
inputdirectory contains the dataset and we have already seen the contents ofs2tlddirectory in the previous section. Theinference_vidoesdirectory contains the videos that we will run inference on.
The zip that comes with this article contains the best trained model. You can use this file to directly run inference on the images and videos of your choice.
Small Scale Traffic Light Detection using Faster RCNN and PyTorch
Let’s jump into the interesting parts of the article, that is, running experiments, analyzing the results, and detecting traffic lights in images and videos.
The Traffic Light Dataset YAML File
Before we can run the training experiments, we need to create the dataset YAML file that will go into fasterrcnn-pytorch-training-pipeline/data_configs directory.
We can name it s2tld.yaml and it has the following contents.
# Images and labels direcotry should be relative to train.py
TRAIN_DIR_IMAGES: '../input/s2tld/S2TLD_1080x1920/train_images'
TRAIN_DIR_LABELS: '../input/s2tld/S2TLD_1080x1920/train_annotations'
VALID_DIR_IMAGES: '../input/s2tld/S2TLD_1080x1920/valid_images'
VALID_DIR_LABELS: '../input/s2tld/S2TLD_1080x1920/valid_annotations'

# Class names.
CLASSES: [
    '__background__',
    'red', 'yellow', 'green',
    'off', 'wait_on'
]

# Number of classes (object classes + 1 for background class in Faster RCNN).
NC: 6

# Whether to save the predictions of the validation set while training.
SAVE_VALID_PREDICTION_IMAGES: True
This contains the path to training and validation images & labels. It also contains the class names present in the dataset. The training script gets all the data related information from this file.
After this file is in the proper directory, the following is the structure of data_configs.
data_configs/
├── ...
├── s2tld.yaml
├── ...
└── voc.yaml
Along with some predefined YAML files, now it has the s2tld.yaml file as well.
We will carry out two training experiments in the next few sections. The important difference between the two will be in the augmentations that we apply.
- One experiment will be without any augmentations and with just resizing.
- The second experiment will apply a lot of augmentations using the albumentations library.
Also, we will be training the Faster RCNN MobileNetV3 Large FPN model. It is small enough to run in real-time even on a mid-range GPU, yet capable enough to give decent results.
In case, you want to learn more about the new Faster RCNN V2 models, then you will find Object Detection using PyTorch Faster RCNN ResNet50 FPN V2 very useful.
Traffic Light Detection Training without Augmentations
Let’s start with the training experiment without any augmentations.
In the following two sections, all the training commands are executed from the terminal within the fasterrcnn-pytorch-training-pipeline directory.
All the training and inference experiments were done on a system with 10 GB RTX GPU, 10th generation i7 CPU, and 32 GB RAM.
To start the training, you can execute the following command.
python train.py --model fasterrcnn_mobilenetv3_large_fpn --epochs 100 --img-size 800 --no-mosaic --config data_configs/s2tld.yaml --project-name fasterrcnn_mobilenetv3_large_fpn_100e_noomsaic
Let’s go over the command line arguments:
--model: The name of the model that we want to train.--epochs: The number of epochs we want to train for.--img-size: Image size to resize to. As the traffic lights are very small objects, we are keeping the image size relatively large here, which is 800×800.--no-mosaic: A boolean flag indicating not to apply mosaic augmentation. From experiments, I found that this model does not give good results when applying mosaic augmentations.--config: The path to the dataset configuration file, that is, the YAML file.--project-name: A comprehensive directory name for storing the results inoutputs/training.
We will use the Mean Average Precision (mAP) object detection metric to evaluate the models.
The following is the validation mAP from the best epoch (epoch 97).
Average Precision  (AP) @[ IoU=0.50:0.95 | area=   all | maxDets=100 ] = 0.3435995837900538
Average Precision  (AP) @[ IoU=0.50      | area=   all | maxDets=100 ] = 0.8026438458247013
Average Precision  (AP) @[ IoU=0.75      | area=   all | maxDets=100 ] = 0.22320251642754113
Average Precision  (AP) @[ IoU=0.50:0.95 | area= small | maxDets=100 ] = 0.33231065494716394
Average Precision  (AP) @[ IoU=0.50:0.95 | area=medium | maxDets=100 ] = 0.5552624548169103
Average Precision  (AP) @[ IoU=0.50:0.95 | area= large | maxDets=100 ] = -1.0
Average Recall     (AR) @[ IoU=0.50:0.95 | area=   all | maxDets=  1 ] = 0.33715953295530754
Average Recall     (AR) @[ IoU=0.50:0.95 | area=   all | maxDets= 10 ] = 0.42061258459850004
Average Recall     (AR) @[ IoU=0.50:0.95 | area=   all | maxDets=100 ] = 0.42061258459850004
Average Recall     (AR) @[ IoU=0.50:0.95 | area= small | maxDets=100 ] = 0.413665213005652
Average Recall     (AR) @[ IoU=0.50:0.95 | area=medium | maxDets=100 ] = 0.598160173160173
Average Recall     (AR) @[ IoU=0.50:0.95 | area= large | maxDets=100 ] = -1.0
The model reached a maximum mAP of 34.59 on epoch 97. Following is the mAP graph.
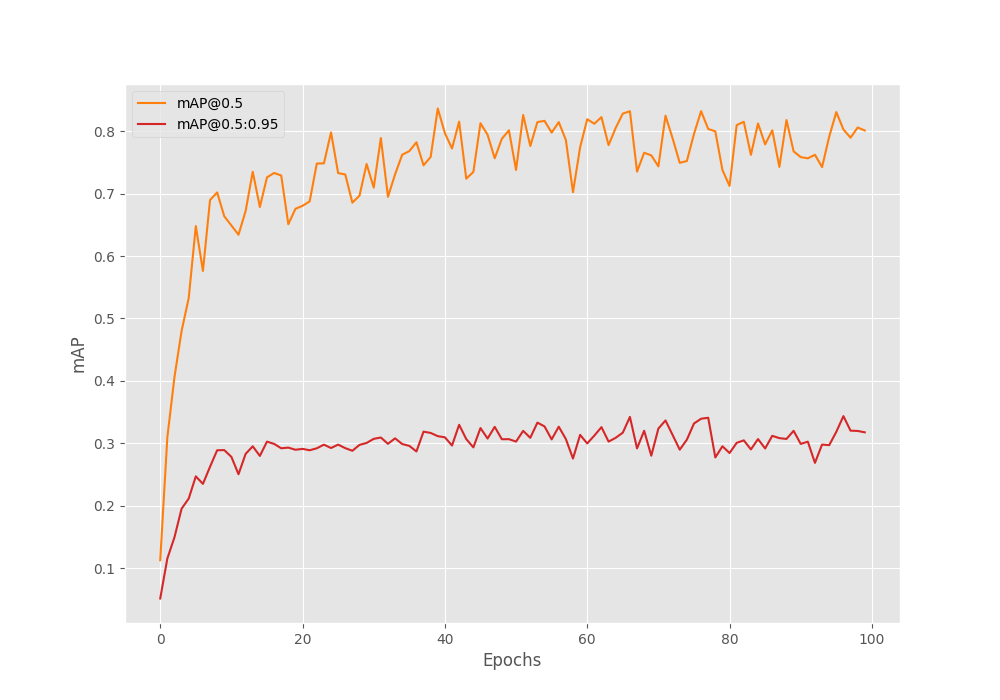
We can see that the model does not improve much after 80 epochs. The only sudden spike is on epoch 97 where we have the best mAP. This looks like overfitting.
Traffic Light Detection Training with Augmentations from Albumentations
The utils/transforms.py has all the training augmentations that will be applied to the images. The following are the augmentations that are applied during training.
- MotionBlur
- Blur
- RandomBrightnessContrast
- ColorJitter
- RandomGamma
- RandomFog
- MedianBlur
Here is an example image, showing how it looks after applying the above augmentations randomly.
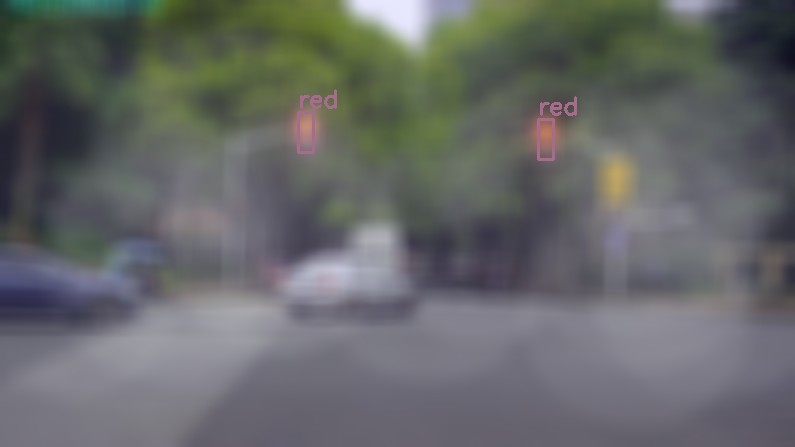
As you can see, the image becomes pretty difficult to recognize now. But hopefully, this will allow the model to learn more complex features and prevent overfitting as well.
To run the training with augmentations we just need one additional flag in the training command.
python train.py --model fasterrcnn_mobilenetv3_large_fpn --epochs 100 --img-size 800 --config data_configs/s2tld.yaml --no-mosaic --use-train-aug --project-name fasterrcnn_mobilenetv3_large_fpn_imgaug_100e
In the above command, we have passed the --use-train-aug boolean flag which will indicate the script to use the augmentations.
This time, we have the best mAP from epoch 38.
Average Precision  (AP) @[ IoU=0.50:0.95 | area=   all | maxDets=100 ] = 0.34726215088596907
Average Precision  (AP) @[ IoU=0.50      | area=   all | maxDets=100 ] = 0.7727445804634654
Average Precision  (AP) @[ IoU=0.75      | area=   all | maxDets=100 ] = 0.2836388662606284
Average Precision  (AP) @[ IoU=0.50:0.95 | area= small | maxDets=100 ] = 0.345429290069328
Average Precision  (AP) @[ IoU=0.50:0.95 | area=medium | maxDets=100 ] = 0.5002653360574153
Average Precision  (AP) @[ IoU=0.50:0.95 | area= large | maxDets=100 ] = -1.0
Average Recall     (AR) @[ IoU=0.50:0.95 | area=   all | maxDets=  1 ] = 0.3442162977867203
Average Recall     (AR) @[ IoU=0.50:0.95 | area=   all | maxDets= 10 ] = 0.421401774282056
Average Recall     (AR) @[ IoU=0.50:0.95 | area=   all | maxDets=100 ] = 0.421401774282056
Average Recall     (AR) @[ IoU=0.50:0.95 | area= small | maxDets=100 ] = 0.41820500482670936
Average Recall     (AR) @[ IoU=0.50:0.95 | area=medium | maxDets=100 ] = 0.5595238095238095
Average Recall     (AR) @[ IoU=0.50:0.95 | area= large | maxDets=100 ] = -1.0
The model was able to reach an mAP of 34.72 is which slightly higher than the last time.
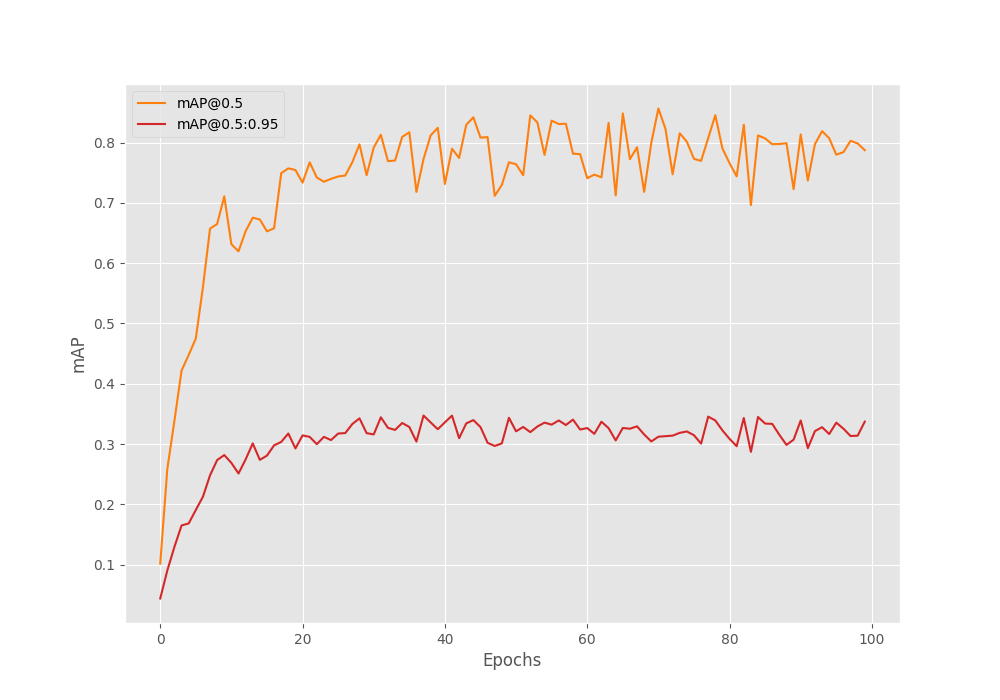
Due to the augmentations, the mAP line does not seem to go down as much in the last few epochs as it did without applying any augmentations.
Evaluating the Best Model
The training experiment with augmentations gave us the best model with 34.72 mAP. We can also use the eval.py script to check the AP (Average Precision) of each class. Here is the command.
python eval.py --model fasterrcnn_mobilenetv3_large_fpn --weights outputs/training/fasterrcnn_mobilenetv3_large_fpn_imgaug_100e/best_model.pth --config data_configs/s2tld.yaml --verbose
The --verbose flag lets the script know that we want to print the precision of every class on the terminal.
AP / AR per class
-------------------------------------------------------------------------
|    | Class                | AP                  | AR                  |
-------------------------------------------------------------------------
|1   | red                  | 0.401               | 0.460               |
|2   | yellow               | 0.277               | 0.314               |
|3   | green                | 0.347               | 0.419               |
|4   | off                  | -1.000              | -1.000              |
|5   | wait_on              | 0.360               | 0.490               |
-------------------------------------------------------------------------
|Avg                        | 0.346               | 0.421               |
There are no ground truths for the off class in the validation set. And the model does not detect any as well. So, it is -1 in the above table.
Inference Using the Models Trained on the Traffic Light Detection Dataset
In this section, we will run inference using the best trained models. All inference videos have been sourced from YouTube and are present in the input/inference_videos directory.
To run the inference on your own videos, you just need to change the --input path.
First, we will run inference on GPU, then on CPU.
The following command runs inference on GPU on one of the videos.
python inference_video.py --weights outputs/training/fasterrcnn_mobilenetv3_large_fpn_imgaug_100e/best_model.pth --input ../input/inference_videos/video_1.mp4 --show-image --img-size 800
During inference also we are using images of 800 resolution so that it matches the training settings.
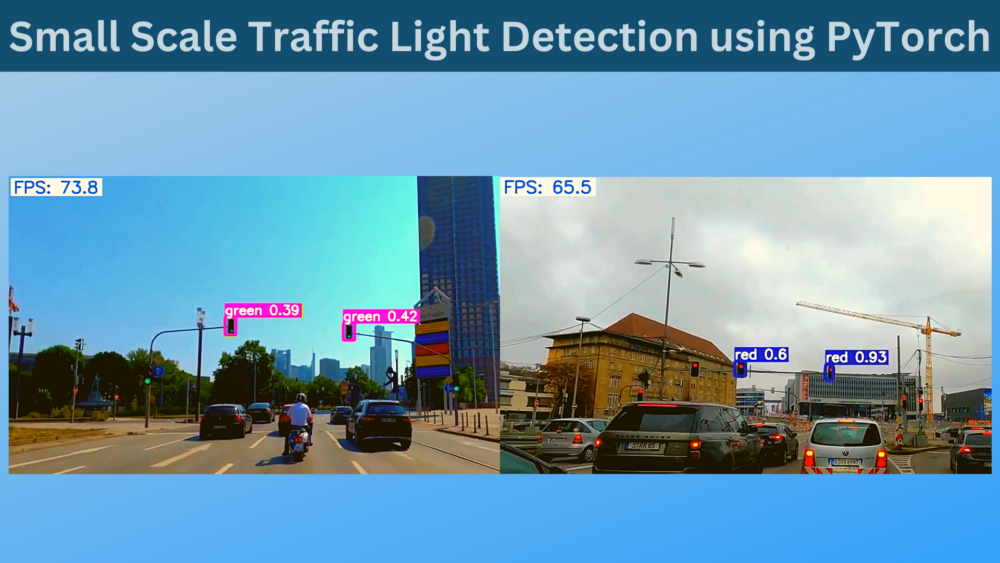
Following is the result that we get.
The results are good but not perfect. Even though the mode is able to detect red lights perfectly, it is confusing the green traffic lights as yellow in some cases.
Also, note that the FPS that we are getting is pretty good for a Faster RCNN model. An average of 70 FPS is not bad considering it is a two-stage detector.
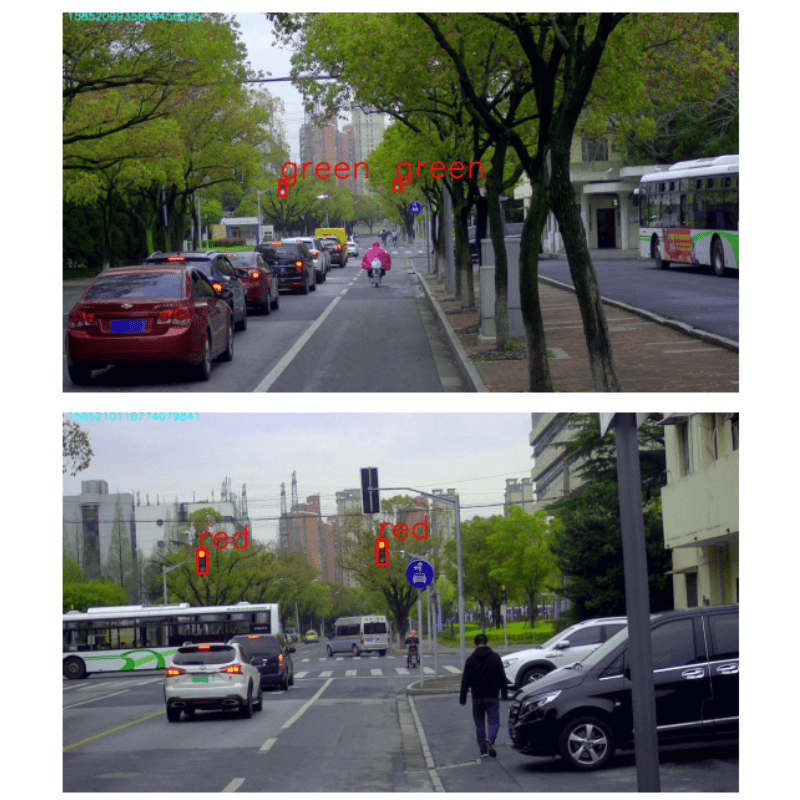
Taking a look at another example will clarify more things.
In the above example, there are few false positives but the traffic light detections look pretty good. It is able to detect changes in traffic lights (from red to green) instantly also.
Finally, let’s check the FPS when running on the CPU. We need to pass the --device as cpu in the inference command.
python inference_video.py --weights outputs/training/fasterrcnn_mobilenetv3_large_fpn_imgaug_100e/best_model.pth --input ../input/inference_videos/video_1.mp4 --show-image --img-size 800 --device cpu
Here, the detections don’t change, just the FPS. We are getting slightly above 5 FPS. This is not too high but not bad also considering it is a two-stage detector. Reducing the image size will increase the FPS but may affect the detection quality.
Summary and Conclusion
In this article, we tackled the problem of traffic light detection on a small scale dataset. The results were not perfect and obviously such problems need even more data. In future articles, we will tackle more such problems using even larger datasets to obtain better results. I hope that this article was useful to you.
If you have any doubts, thoughts, or suggestions, please leave them in the comment section. I will surely address them.
You can contact me using the Contact section. You can also find me on LinkedIn, and X.

Excellent tutorial, I’ve read many of your blogs, please more tutorials on fasterrcnn or there may be different models like yolo.
Sure. I will be posting many more.
can you post and focus more on self driving car and their applications like lane detection and the newest models to use for this
Sure Mohamad. I will focus more self driving applications.
Hi! I am trying to use this model to train the custom dataset (GTSRB). I encountered an error. I followed the csv to xml u used in the past module. Do you happen to know what is wrong with my code? Thank you!
File “C:\Users\helen\OneDrive\Desktop\Traffic light\fasterrcnn-pytorch-training-pipeline-main\datasets.py”, line 107, in load_image_and_labels
labels.append(self.classes.index(member.find(‘name’).text))
ValueError: ’10’ is not in list
So, there is a label called ’10’ in one of the XML files. However, the CLASSES attribute in the YAML file does not contain a label called 10.
Understood, thank you! Is it possible that I change the list of CLASSES to dictionary that contains the labels and names of traffic signs?
If you are using the same dataset script, then it only expects it like a list as shown in the post. It will not work with a dictionary.
okay thanks for the clarification!