
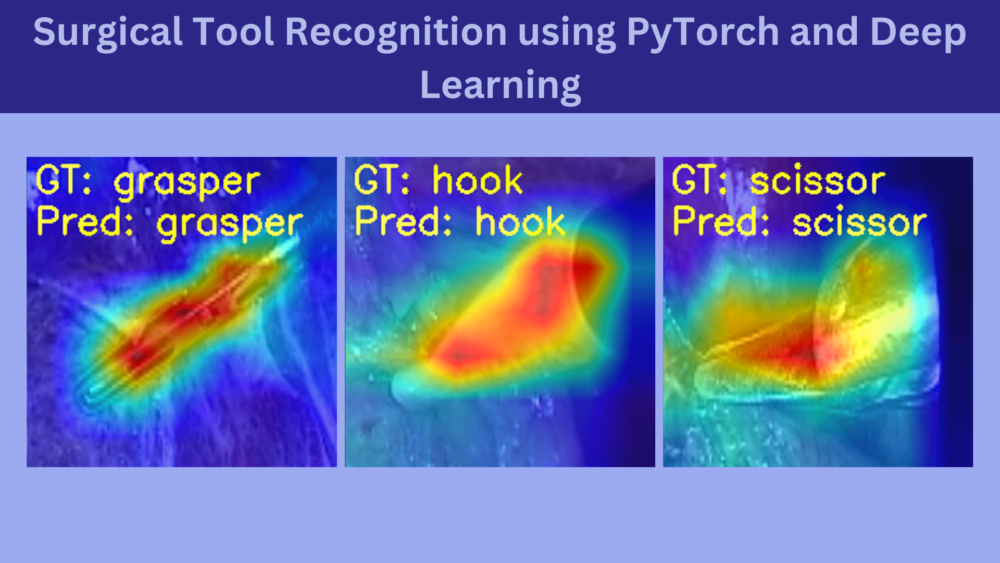
Deep learning and computer vision have a lot of applications in the field of medical imaging. In fact, many deep learning-based approaches are currently being used in medical imaging. These can range from medical image recognition to disease detection, and segmentation of diseased areas. But that’s not all. We can also use deep learning on surgical images. As such, recognizing surgical tools is a big part of such an approach. In this article, we will carry out surgical tool recognition using PyTorch and deep learning.
The above image will give you some perspective into what we are going to do in this article. In simple words, we are going to recognize different types of surgical tools that are used during surgery. We will discuss all the details later when exploring the dataset.
For now, let’s keep in mind that this article is entirely for educational purposes and exploring the world of medical imaging from a deep learning perspective. So, if you find anything wrong or inaccurate, please feel free to point that out in the comment section.
Here are the topics that we will cover in this article:
- We will start with a discussion of the dataset. This includes the source of the dataset, the types of images in the dataset, the number of samples, and classes.
- Then we will discuss the training strategy and the deep learning model to be used for training. As this project contains quite a lot of code, we will cover very limited coding related things. Instead, we will focus on the training strategy and the results.
- Next, we will train the model and test it on the available test dataset.
- Finally, we will check out the class activation maps of the predictions.
The Surgical Tool Recognition Dataset
We will use the Cholec-Tinytools dataset from Kaggle for surgical tool recognition in this article. There is a lot of background to cover around this dataset, but we will cover the basics of it.
The dataset contains the tooltip images of four different surgical equipment. These images have been sourced from 80 laparoscopic cholecystectomy videos. It is a part of a very large dataset called Cholec80 which you can find on the CAMMA website.
But we are not going to use this huge dataset. Instead, we will use the chloec-tinytools dataset from Kaggle. It is a very simple and small dataset to start prototyping with surgical tools and applying deep learning and computer vision approaches.
One big difference apart from the dataset size is that the original datasets on the CAMMA website come with several types of annotations. We can use such annotations and apply deep learning models and approaches for:
- Surgical tools classification
- Surgical phase recognization
- Surgeon skill classification
But we are going to use a toned-down dataset for image classification only.
Please go ahead and download the dataset from Kaggle. After extracting it, you should have a structure similar to the following:
cholec-tinytools/
├── LICENSE
├── README.txt
├── test
│   ├── clipper
│   ├── grasper
│   ├── hook
│   └── scissor
├── train
│   ├── clipper
│   ├── grasper
│   ├── hook
│   └── scissor
└── validation
    ├── clipper
    ├── grasper
    ├── hook
    └── scissor
The images are inside the cholec-tinytools directory. We have three splits for the surgical tool recognition dataset, train, test, and validation.
Exploring the Cholec-Tinytools Surgical Recognition Dataset
As we can see from the above directory structure, there are 4 classes in the dataset:
- Clipper
- Grasper
- Hook
- Scissor
There are 1200 images in the training set, 200 images in the validation set, and 599 images in the test set. Obviously, this is not a huge dataset but there are enough samples to start experimenting.
Here are a few examples from the dataset along with their annotations.
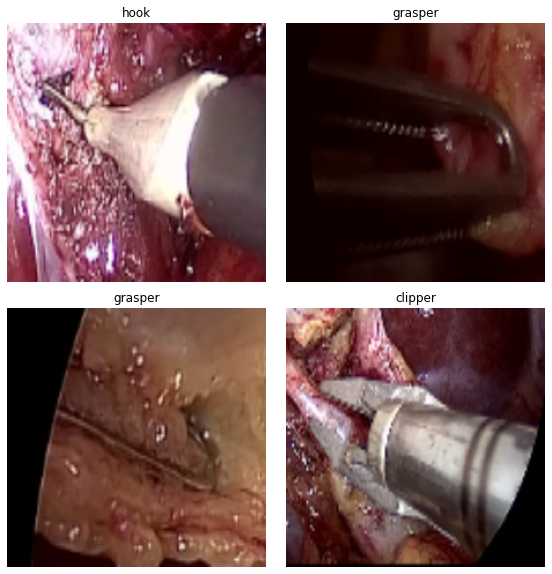
The images contain snapshots from the surgical procedures and the images contain the surgical equipment’s tooltips as well. The deep learning model that we are going to build, should be able to recognize the surgical tool from such images.
From a real-world scenario only recognizing the surgical tool may not be enough. We need surgical tool detection and segmentation also to create an application that’s worthwhile. But recognition is the first step and this will also give us more insights into where a deep learning model may fail.
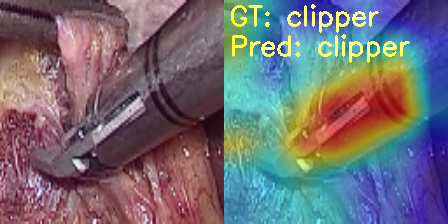
Also, as we will visualize the class activation maps on the test after, we will know where the model is focusing on when recognizing a certain surgical tool.
The Project Directory Structure
Before moving into the training experiments, let’s take a look at the project directory structure.
├── input
│   └── cholec-tinytools
├── outputs
│   ├── cam_results
│   ├── test_results
│   ├── accuracy.png
│   ├── best_model.pth
│   ├── loss.png
│   └── model.pth
└── src
    ├── cam.py
    ├── datasets.py
    ├── model.py
    ├── test.py
    ├── train.py
    └── utils.py
- The
inputdirectory contains thecholec-tinytoolsdataset which contains the data splits as we saw above. - We have all the training, testing, and class activation map outputs in the
outputsdirectory. - The
srcdirectory contains 5 Python files. Although we will not discuss the code in detail, we will explore the necessary parts of the any script when need be.
This is all the information that we need regarding the dataset. In the next section, we can move on to the training experiments.
The zip file that comes with the dataset provides the best trained model and the training scripts. If you want to train your own deep learning model, you just need to download the dataset and structure it accordingly.
The PyTorch Version
The code provided in this article has been developed with TORCH 1.12.0 and TORCHVISION 0.13.0. As we are using the latest API to load the pretrained weights, you will need version 1.12.0 and above.
You can install/upgrade PyTorch from the official website.
Surgical Tool Recognition using Deep Learning and MobileNet
Let’s start with the training experiments and explore the technical necessities from here onward.
Download Code
The Deep Learning Model
We will use the MobileNetV3 Small model for surgical tool recognition. The MobileNet models in general are very efficient in terms of speed, even the SSD models with MobileNet backbones.
Moreover, from experiments, I found that we don’t even need the large MobileNetV3 model. The MobileNetV3 Small gives very good results and the training iterations are much faster on the surgical tool recognition dataset.
For that reason, we will use this model. As PyTorch already provides the pretrained MobileNetV3 Small model, we just need to load it and change the classification head. Here is how we can do it.
from torchvision import models

import torch.nn as nn

def build_model(fine_tune=True, num_classes=10):
    model = models.mobilenet_v3_small(weights='DEFAULT')
    if fine_tune:
        print('[INFO]: Fine-tuning all layers...')
        for params in model.parameters():
            params.requires_grad = True
    if not fine_tune:
        print('[INFO]: Freezing hidden layers...')
        for params in model.parameters():
            params.requires_grad = False
    # model.fc = nn.Linear(in_features=2048, out_features=num_classes, bias=True)
    model.classifier[3] = nn.Linear(
        in_features=1024, out_features=num_classes, bias=True
    )
    return model
The build_model function takes in parameters for fine tuning the hidden layers and the number of classes.
Just to keep in mind, we will be fine tuning all the layers to get the best results.
Also, in terms of modification, we will just change the final Linear layer as per the number of classes in the dataset.
Dataset Preparation
The datasets.py contains all the code for preparing the datasets and data loaders.
We resize all the images to 224×224 resolution. By default, all the images in the dataset are128x128 in size. Also, we use 4 parallel workers for the dataset preprocessing.
We apply different augmentations to the training dataset to avoid overfitting. Here are all the augmentations that we apply.
- RandomHorizontalFlip
- RandomRotation
- RandomAdjustSharpness
For a model like MobileNetV3 Small, these are enough augmentations to train for 40 epochs without overfitting.
The following figure shows what the images look like after applying the augmentations.
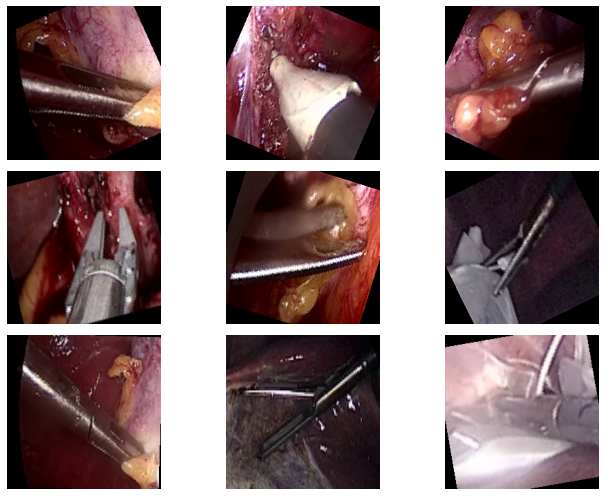
It is clear that applying the augmentations to the images makes them look different which will help the model learn more features.
Helper Functions and the Training Script
The utils.py contains a few helper functions and classes. These include the class to save the best model. Whenever the current epoch’s validation loss will be the lowest, then the weights after that epoch will be saved.
It also contains the code for saving the accuracy and loss graphs.
Coming to the training script, that is train.py. This is the driver script that initiates the training process. It has a few command line argument flags that let us control some training parameters. Let’s discuss these parameters first.
--epochs: This flag lets us set the number of epochs that we want to train for.--learning-rate: To control the learning rate of the optimizer. Its default value is 0.001.--batch-size: The batch size for the data loader, which is 32 by default.--fine-tune: It is a boolean flag. If we pass this argument then all the layers of the MobileNetV3 Small model will be trained.--save-name: This accepts a string name which is used to save the model weights. If we pass the value asnew, the model weight file name will benew.pth.
Other than this, the train.py file also contains the training and validation functions.
Training the MobileNetV3 Small Model on the Surgical Tool Recognition Dataset
We have everything set up. We can start the training now.
All the Python files are inside the src directory. Also, we will execute all the commands in the terminal within the src directory. To start the training, you can execute the following command in the terminal.
python train.py --epochs 40 --fine-tune
We are training the MobileNetV3 Small model on the Surgical Tool Recognition dataset for 40 epochs. This may seem too large, but for the MobileNetV3 Small it is not, as we will later see. Also, we are passing the --fine-tune flag which tells the training script to train all the layers of the model.
Even if you train on a mid-range GPU, it should not take long. Here are the truncated outputs from the terminal.
python train.py --epochs 40 --fine-tune
[INFO]: Number of training images: 1200
[INFO]: Number of validation images: 200
[INFO]: Classes: ['clipper', 'grasper', 'hook', 'scissor']
Computation device: cuda
Learning rate: 0.001
Epochs to train for: 40

[INFO]: Fine-tuning all layers...
MobileNetV3(
  (features): Sequential(
    (0): Conv2dNormActivation(
      (0): Conv2d(3, 16, kernel_size=(3, 3), stride=(2, 2), padding=(1, 1), bias=False)
      (1): BatchNorm2d(16, eps=0.001, momentum=0.01, affine=True, track_running_stats=True)
      (2): Hardswish()
    )
.
.
.
  (avgpool): AdaptiveAvgPool2d(output_size=1)
  (classifier): Sequential(
    (0): Linear(in_features=576, out_features=1024, bias=True)
    (1): Hardswish()
    (2): Dropout(p=0.2, inplace=True)
    (3): Linear(in_features=1024, out_features=4, bias=True)
  )
)
1,521,956 total parameters.
1,521,956 training parameters.
Adjusting learning rate of group 0 to 1.0000e-03.
[INFO]: Epoch 1 of 40
Training
100%|█████████████████████████████████████████████████████████████████████████████████████████████████████████████████████████████████████████████████████████| 38/38 [00:04<00:00,  9.25it/s]
Validation
100%|███████████████████████████████████████████████████████████████████████████████████████████████████████████████████████████████████████████████████████████| 7/7 [00:00<00:00, 22.78it/s]
Training loss: 1.215, training acc: 54.000
Validation loss: 1.079, validation acc: 70.500

Best validation loss: 1.078602569443839

Saving best model for epoch: 1
.
.
.
[INFO]: Epoch 40 of 40
Training
100%|█████████████████████████████████████████████████████████████████████████████████████████████████████████████████████████████████████████████████████████| 38/38 [00:02<00:00, 13.43it/s]
Validation
100%|███████████████████████████████████████████████████████████████████████████████████████████████████████████████████████████████████████████████████████████| 7/7 [00:00<00:00, 27.12it/s]
Training loss: 0.026, training acc: 99.417
Validation loss: 0.169, validation acc: 94.500

Best validation loss: 0.16853357345930167

Saving best model for epoch: 40

--------------------------------------------------
TRAINING COMPLETE
As we can see from the above output block, with 4 classes, the MobileNetV3 Small Model contains only 1.5 million parameters.
Yet, we are getting the best results even in the last epoch. This tells us that the model has not been overfitted yet. It may still be able to learn without overfitting.
Further, it is worthwhile to note that on the last epoch, the validation accuracy is 94.5% which is quite impressive for such a small model.
Right now, we can take a look at the accuracy and loss graphs which will tell us even more about the training procedure.
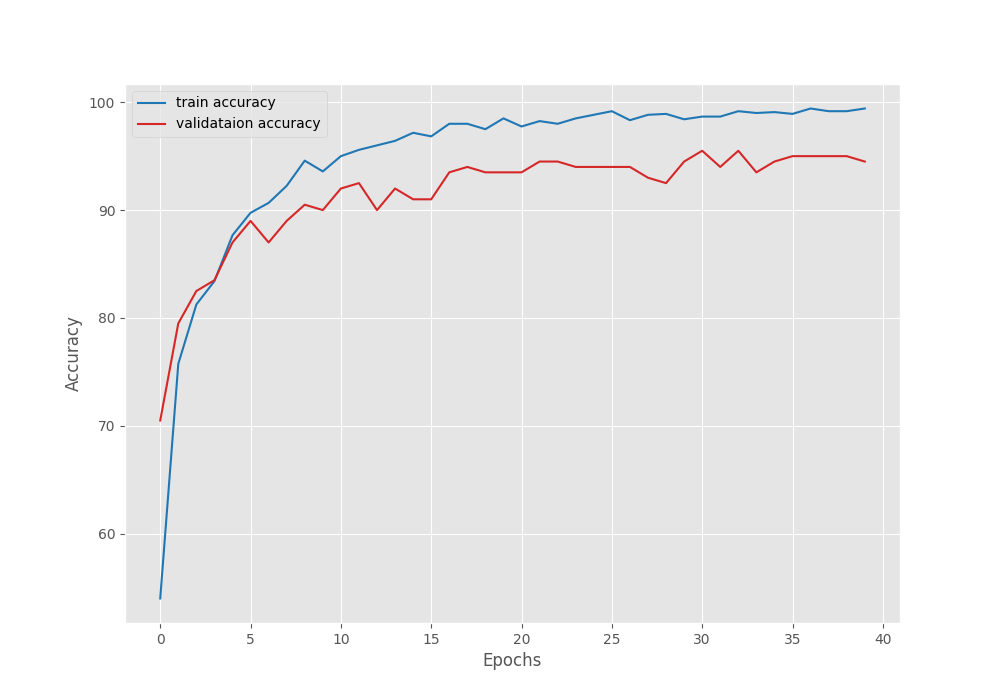
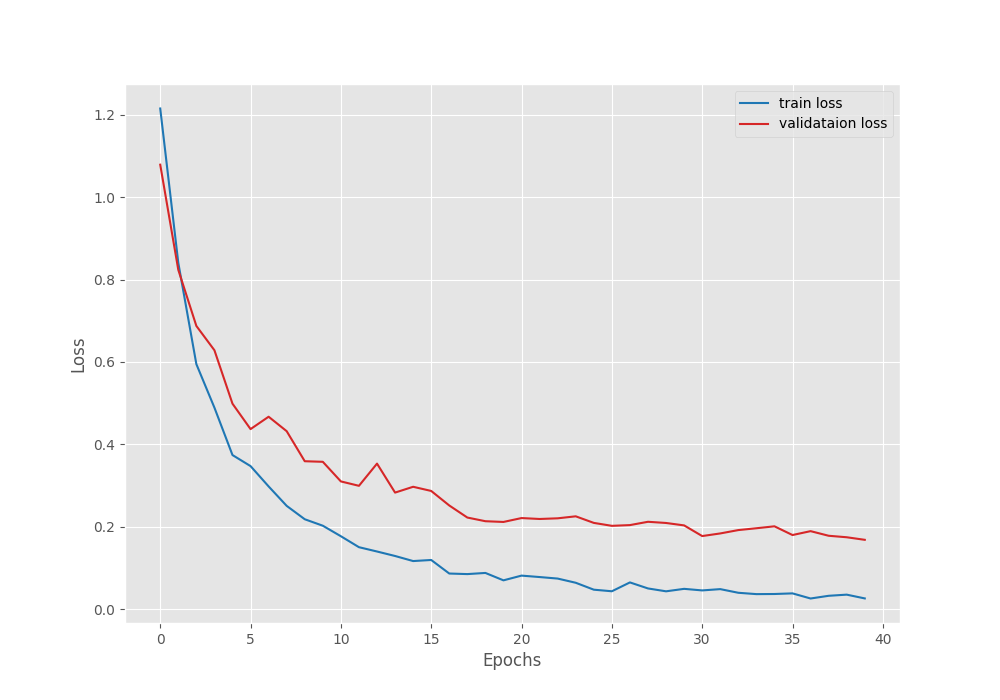
The accuracy plots look pretty good. The training accuracy seems to be still improving. It tells us that if the learning rate scheduler kicks in and reduces the learning rate, the validation accuracy and loss may further improve.
Testing the Trained MobileNetV3 Small Model on the Test Set
We have the test.py script which uses the best trained model to evaluate the accuracy on the test set.
The dataset already has a test split, we can easily test how the model performs on unseen surgical tools when doing image recognition.
Following is the command to run the test.
python test.py
Here are the outputs.
[INFO]: Freezing hidden layers...
Testing model
100%|███████████████████████████████████████████████████████████████████████████████████████████████████████████████████████████████████████████████████████| 599/599 [00:06<00:00, 96.43it/s]
Test accuracy: 95.326%
The model achieves 95.32% accuracy on the Surgical Tool Recognition test set. This is slightly higher than the best validation accuracy.
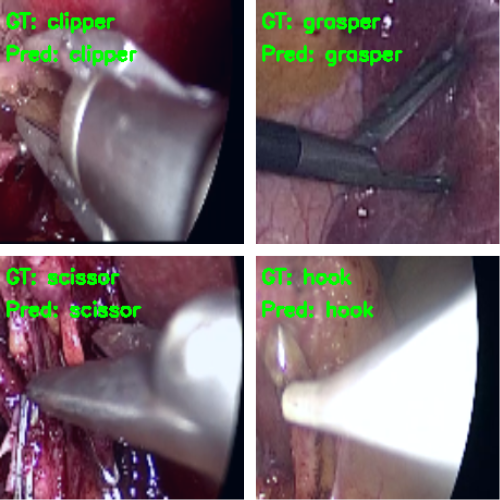
Following are some of the images where the model made correct predictions.
And here are some wrong predictions.
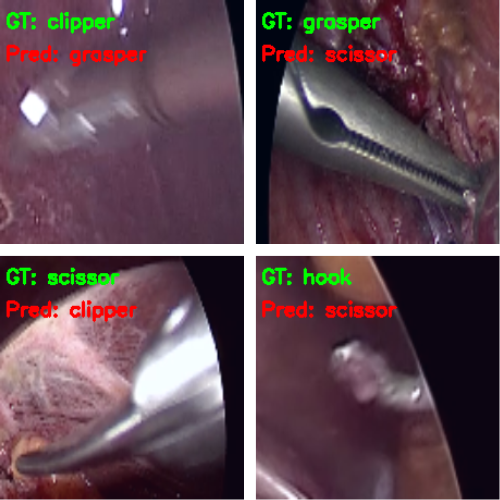
It is a bit difficult to explain why the model made certain wrong predictions. Most probably, taking a look at the class activation maps will clear up our confusion.
Class Activation Maps (CAM) for the Surgical Tool Recognition Test Set
The cam.py script contains the code to visualize the class activation maps on the test set. It is almost the same as the test.py script but adds the class activation maps on the predictions.
We can run the script using the following command.
python cam.py
Now, let’s take a look at the same four images.
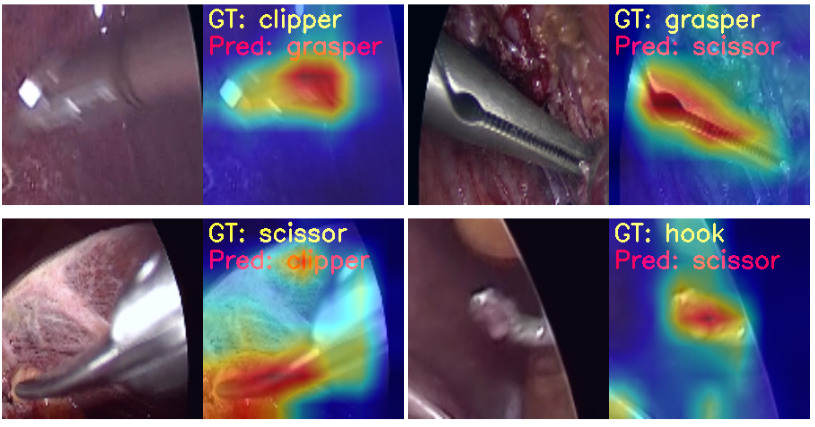
In the first and second images, the model predicts the clipper as a grasper and the grasper as a scissor. Surely, all three have some similarities, and therefore, when the images are not that clear, it is wrongly predicting the tool. For the same reason, it may also be predicting the scissor as a clipper. What’s more interesting is that while making all these predictions, the model is directly focusing on the area around the tool.
But the model is also predicting the hook as a scissor while focusing on the bent part of the hook. If you observe, the scissors have a slight bent to their tooltips. This may be one of the reasons for the wrong predictions.
Summary and Conclusion
We covered the recognition of surgical tools in this article on a small dataset and using the MobileNetV3 Small model. We did not get state-of-the-art results and certainly did not become surgical experts. But we got to know a good deal about how even small models can perform pretty well given a proper dataset and decent training pipeline. We also saw where the models may fail while doing predictions. I hope that this article was useful to you.
If you have any doubts, thoughts, or suggestions, please leave them in the comment section. I will surely address them.
You can contact me using the Contact section. You can also find me on LinkedIn, and X.

Thank you for the wonderful tutorial. Do something about yolov8 onject segmentation.
Thank you Raj. I am planning on YOLOv8 too.