
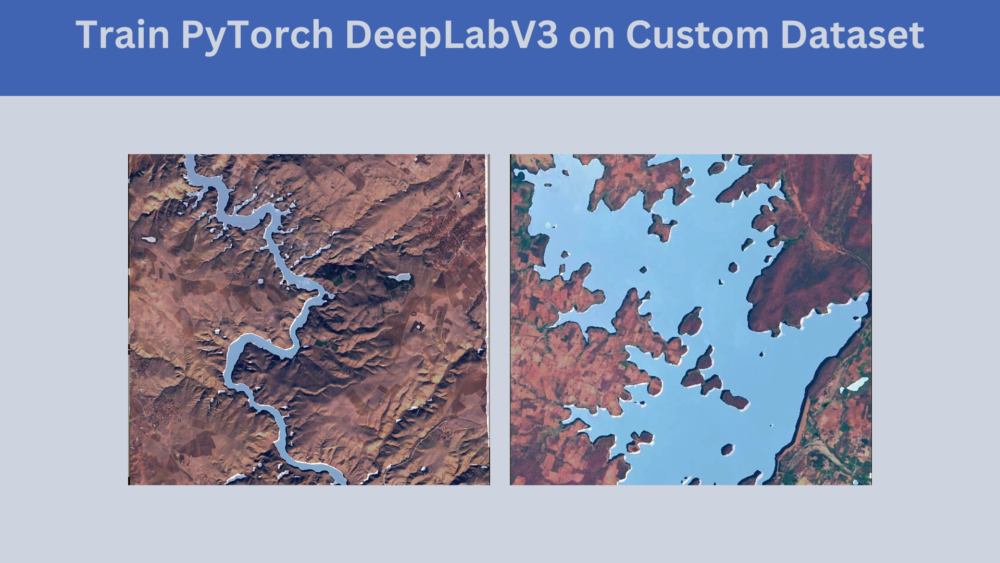
Semantic segmentation can add immense value when coupled with deep learning. Semantic segmentation has several applications in the field of medical imaging, environmental imaging, and satellite imagery. Tapping into any of these areas and carrying out a project can provide a lot of knowledge. We will start with a single-class semantic segmentation in this article. We will train the PyTorch DeepLabV3 model on a custom dataset. This dataset consists of satellite images of water bodies.
There are two aspects to the satellite image of water bodies that we will use here. It is related to both, satellite as well as environmental imaging. And carrying out this project will give us an idea of how difficult or easy certain parts of the project are.
Here are the points that we will cover in this article to train the PyTorch DeepLabV3 model on a custom dataset:
- We will start with a discussion of the dataset. This will include the number of images, the types of images, and how difficult the dataset can be.
- Next, we will discuss the deep learning model, that is, the PyTorch DeepLabV3 model.
- Then we will discuss the data preparation strategy to train the PyTorch DeepLabV3 model on the satellite water bodies dataset.
- After training, we will also run inference for semantic segmentation on the validation images.
By the end of this article, you will have an overall idea of fine tuning a semantic segmentation model using PyTorch on a custom dataset. Not only that, but we will also take a look at how real-world datasets can be sometimes messy and how to deal with such issues.
The Satellite Water Bodies Segmentation Dataset
To train the PyTorch DeepLabV3 model, we will use a dataset containing images of water bodies within satellite imagery.
The original dataset is available on Kaggle.
But we will use a different version of the dataset with a train and validation split. This version of the water bodies segmentation data has 2683 training and 158 validation images. Each image has a mask associated with it. So, we have 2683 training masks, and 158 validation masks.
There are a few caveats and details that we need to be aware of before using this dataset.
Satellite Water Bodies Segmentation Dataset Details
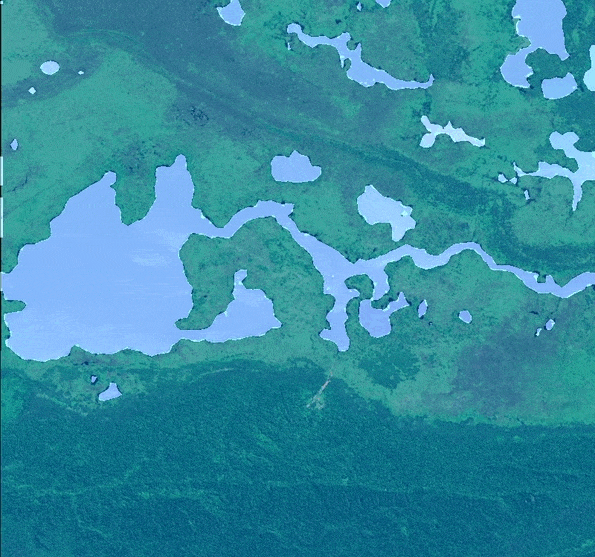
The dataset contains images of water bodies from satellite image and their masks. The masks are black-and-white images. In these, the white pixels represent the water bodies, and the black pixels represent something other than water. Effectively, this segmentation dataset has a background class and an object class to segment.
Here are a few examples.

According to the original dataset’s author, NWDI (Normalized Water Difference Index) is used to obtain the masks of water. This method is also used to detect vegetation in satellite images. But a greater threshold can be used to detect water bodies.
And because the images are generated using a thresholding method, there are a few issues with the dataset. We can deal with a few and not with some others. Let’s take a look at each of these issues.
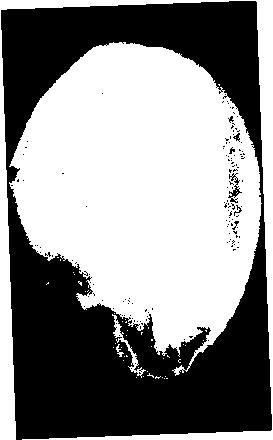
Not All Pixel Values are 255 in Value
As we know, pure white pixels have a value of 255. In semantic segmentation and training deep learning models, each pixel class should be properly segmented in the dataset. But in this dataset, the hues of white pixels vary. This means that there are gray pixels as well indicating values such as 190, 200, 225, and so on.
Here is a zoomed-in image of such a segmentation mask showing not pure white but somewhat gray pixels.
Note: It may not be very clear on the website here because of compression.
As we can see, there are a few gray pixels on the mask. These do not necessarily indicate water. This means that while encoding the pixels into the background and water bodies we will find more than 2 pixel values. This will obviously lead to more than 2 classes which we do not want. As we will see in the dataset preparation section later, we will use simple thresholding to overcome this issue.
Not All White Pixels are Water Bodies
Another issue is that not all the white pixels are water bodies. There are instances in the dataset that shows buildings and other parts as water bodies.
In the above image, we can see that a few pixels have been segmented as water which are actually buildings or just land. This might be the limitation of the thresholding approach which has been used to generate the masks. This is surely going to affect the learning of the deep learning model to some extent. But if the pixels are completely white (255), there is nothing much that we can do about it.
White Pixels on the Border of the Images
There are a few images where the borders have white pixels.
And as is the case, in this dataset white pixels indicate water. This will also affect the learning of the model. But again, if the border pixel value is 255, we cannot rectify the issue.
The above points out some of the issues that we may find with real-world datasets. They may not be clean always. As we will see later, we can deal with some of the issues and cannot with some others.
For now, please go ahead and download the dataset from here.
Project Directory Structure
Before we train the PyTorch DeepLabV3 model on the custom segmentation dataset, let’s take a look at the directory structure.
├── input
│   ├── Water_Bodies_Dataset_Split
│   │   ├── train_images
│   │   ├── train_masks
│   │   ├── valid_images
│   │   └── valid_masks
│   └── Water_Bodies_Dataset_Split.zip
├── outputs
│   ├── valid_preds
│   │   ├── e0_b8.jpg
│   │   ...
│   └── best_model.pth
└── src
    ├── config.py
    ├── datasets.py
    ├── engine.py
    ├── inference_image.py
    ├── metrics.py
    ├── model.py
    ├── train.py
    └── utils.py
- The
inputdirectory contains theWater_Bodies_Dataset_Splitdataset after downloading and extracting it. The images and masks are present in their respective folders. - The outputs directory will contain results from the training and inference. This includes the trained models, the inference prediction results, and also results from the validation loop while training the model.
- We have 8 Python files in the
srcdirectory. Although we will not be able to go into the details of each code file (that would be too long and verbose), we will surely explore some of the important aspects of the code and training pipeline.
The downloadable zip file provides the source code for this article. If you want to directly run inference and not train the model, please download the trained weights from Kaggle.
PyTorch Version
This code in this project uses TORCH 1.12.0 and TORCHVISION 0.13.0. Higher versions will also work.
Train PyTorch DeepLabV3 on the Custom Waterbody Segmentation Dataset
From here onward, we will completely focus on the technical parts of the article. We will go through the entire process in the following order:
- Preparing a simple configuration file.
- Preparing the PyTorch DeepLabV3 model to train on the waterbody segmentation dataset.
- Taking a look at the important parts of the dataset preparation.
- A short discussion on the utility scripts and training & validation functions.
- Training the model.
After training the model, we will also run inference on the validation images and take a deeper look at the results.
Download Code
The Configuration File
To train the PyTorch DeepLabV3 model, we can keep a few variables in a single script that will be accessible to all other files. We will call this configuration file config.py and here are its contents.
ALL_CLASSES = ['background', 'waterbody']

LABEL_COLORS_LIST = [
    (0, 0, 0), # Background.
    (255, 255, 255), # Waterbody.
]
This file contains only two lists. The ALL_CLASSES list stores all the class names. We have two classes in this dataset. One is the background, and the other is the waterbody. Now, for each class, we need to mention the color coding in the original mask images in the LABEL_COLORS_LIST. The background class is encoded in black color ((0, 0, 0)) and the waterbody class in white ((255, 255, 255)).
The PyTorch DeepLabV3 Model
We will use the pretrained PyTorch DeepLabV3 model and fine tune it on the waterbody segmentation dataset. We can use either the DeepPLabV3 model with the ResNet50 backbone or the ResNet101 backbone. For example, here is the code for model.py preparing the DeepLabV3 with ResNet50 backbone.
import torch.nn as nn

from torchvision.models.segmentation import deeplabv3_resnet50

def prepare_model(num_classes=2):
    model = deeplabv3_resnet50(weights='DEFAULT')
    model.classifier[4] = nn.Conv2d(256, num_classes, 1)
    model.aux_classifier[4] = nn.Conv2d(256, num_classes, 1)
    return model
In the above code block, we have weights='DEFAULT' which automatically uses the best pretrained weights. Other than that we also need to number of classes (num_classes) for the classification and auxiliary classification layer. We do that on lines 7 and 8.
In case you want to train the PyTorch DeepLabV3 model with ResNet101 backbone, just one line changes, and others remain the same.
import torch.nn as nn

from torchvision.models.segmentation import deeplabv3_resnet101

def prepare_model(num_classes=2):
    model = deeplabv3_resnet101(weights='DEFAULT')
    model.classifier[4] = nn.Conv2d(256, num_classes, 1)
    model.aux_classifier[4] = nn.Conv2d(256, num_classes, 1)
    return model
We will fine tune the entire model while training.
Preparing the Waterbody Segmentation Dataset
There are a few important aspects of dataset preparation that we need to look at while preparing the dataset. They are:
- The augmentation. This is important to reduce overfitting.
- Making the pixel values greater than 200 to 255 and others 0.
Let’s dive a bit deeper into them.
The Image Augmentations
Although we will normalize both the training set and validation set in the same manner, we will apply the augmentations to the training set only.
Also, it is important to keep in mind that we need to apply the same augmentation techniques to the images and the corresponding masks as well. Albumentations provides pretty easy techniques to apply the same augmentation to the images and masks. So, we will be using that. For the augmentations we choose:
- HorizontalFlip with a probability of 0.5
- RandomBrightnessContrast with a probability of 0.2
This is what the images and masks look like after applying the augmentations.
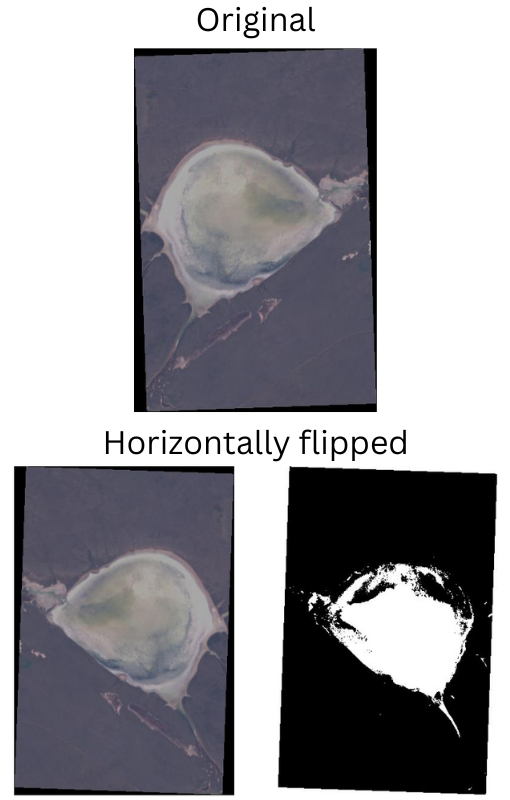
Other than that, we also resize all the images to 224×224 resolution.
Adjusting the Pixel Values
As we discussed earlier, not all the pixel values are entirely black and white. Some pixels are between 0 and 255. This will cause issues while encoding the pixel values into class labels. For this reason, we need to add the following lines into the __getitem__ method of the SegmentationDataset class.
# Make any pixel value above 200 as 255 for waterbody.
im = mask >= 200
mask[im] = 255
mask[np.logical_not(im)] = 0
Any pixel which has a value greater than or equal to 200 will be converted to 255 and other will be converted to 0. For obvious reasons, this is not a perfect approach. The final mask in a few images will still encode a few of the pixels as waterbody even if they are not. But for now, this is the best that we can do to carry on with the training.
The fix that we apply here is very specific to this dataset. Mostly, we should not need something like this if the dataset is properly prepared.
In case you want to take a look at the entire code, please download the zip file and extract it into your working directory.
The Utility Script and Helper Functions
The utils.py file contains many helper functions and classes. These are used for both training and inference. A few of them which are used during training are:
set_class_valuesfunction to assign a class number to each class label. For our dataset, this function will assign 0 tobackgroundand 1 towaterbody.get_label_maskfunction to encode pixel values into class labels.- Then we have the
SaveBestModelclass for saving the model to a disk whenever the loss reduces. - We also have the
save_plotsfunction for saving the accuracy and loss graphs.
Other than these, there are a few other helper functions that are used during inference.
The Training Script and the Training and Validation Functions
The engine.py file contains the training and validation functions. We keep these functions in a separate file as they are quite long.
Other than that, the metrics.py file contains the pix_acc function which returns the number of correctly classified pixels.
Now, coming to the driver script, that is, train.py. We will execute this script from the command line to start the training. It has a few command line arguments as well. They are:
--epochs: To specify the number of epochs to train for.--lr: The learning rate for the optimizer.--batch: Batch size of the data loader.
We are all set to start the training.
Training the PyTorch DeepLabv3 ResNet50 Model
To start the training, you can execute the following command in the terminal within the src directory.
python train.py --epochs 30 --batch 16
We are training for 30 epochs with a batch size of 16. Here are some of the truncated outputs.
41,994,308 total parameters.
41,994,308 training parameters.
EPOCH: 1
Training
Loss: 0.3888 | PixAcc: 77.62: |                    | 168/? [01:14<00:00,  2.26it/s]
Validating
Loss: 0.1374 | PixAcc: 90.79: |                    | 10/? [00:03<00:00,  3.12it/s]

Best validation loss: 0.23766808807849885

Saving best model for epoch: 1

Train Epoch Loss: 0.3841, Train Epoch PixAcc: 72.8681
Valid Epoch Loss: 0.2377, Valid Epoch PixAcc: 81.9685
--------------------------------------------------
.
.
.
EPOCH: 29
Training
Loss: 0.1585 | PixAcc: 88.05: |                    | 168/? [01:10<00:00,  2.38it/s]
Validating
Loss: 0.0823 | PixAcc: 95.60: |                    | 10/? [00:03<00:00,  3.17it/s]

Best validation loss: 0.17843103408813477

Saving best model for epoch: 29

Train Epoch Loss: 0.1586, Train Epoch PixAcc: 87.6265
Valid Epoch Loss: 0.1784, Valid Epoch PixAcc: 87.1912
--------------------------------------------------
EPOCH: 30
Training
Loss: 0.1329 | PixAcc: 88.33: |                    | 168/? [01:11<00:00,  2.36it/s]
Validating
Loss: 0.0831 | PixAcc: 95.48: |                    | 10/? [00:03<00:00,  3.19it/s]

Best validation loss: 0.17434130385518073

Saving best model for epoch: 30

Train Epoch Loss: 0.1455, Train Epoch PixAcc: 88.6037
Valid Epoch Loss: 0.1743, Valid Epoch PixAcc: 87.2596
--------------------------------------------------
TRAINING COMPLETE
We have the best model on the last epoch with a validation accuracy of 87.25%.
Let’s take a look at the accuracy and loss plots.
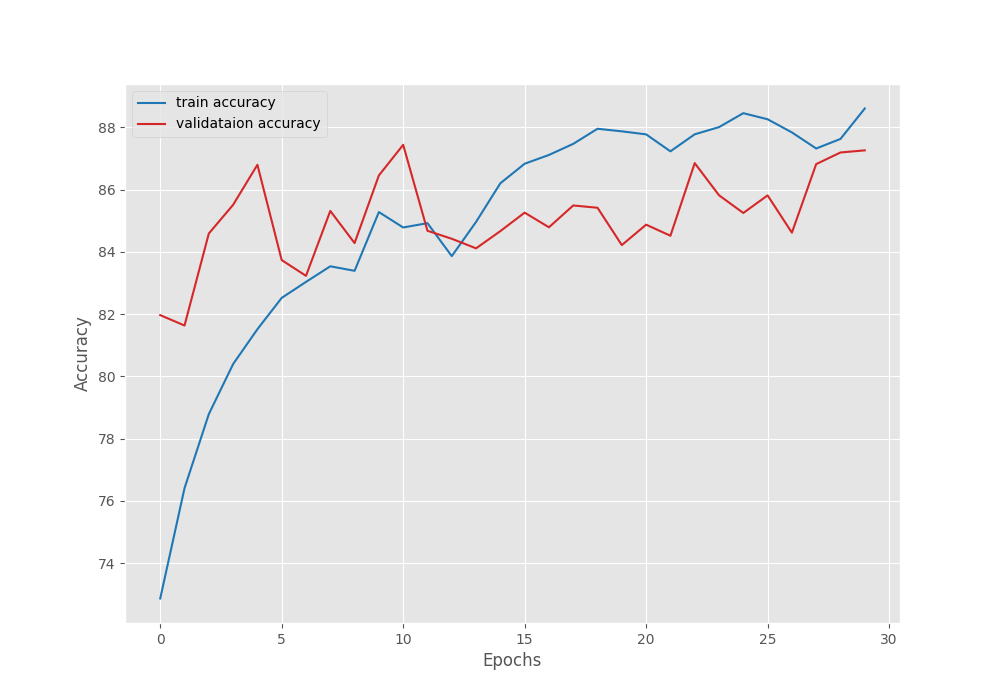
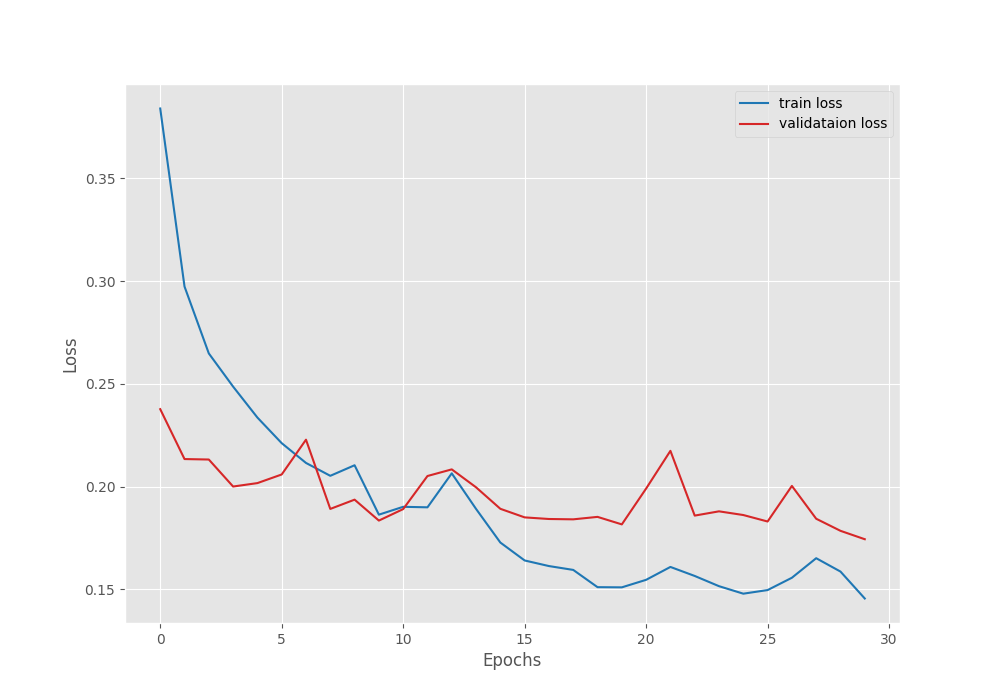
Even though with a lot of fluctuation, the loss and accuracy were both improving till the end of training. Most probably with a bit of learning rate scheduling we can train for even longer.
The DeepLabV3 ResNet101 Results
Although we will be using the DeepLabV3 ResNet50 models for inference, in case you are interested, here are the results for the DeepLabV3 with ResNet101 backbone. The following block shows the results from the best epoch while training.
EPOCH: 28
Training
Loss: 0.1326 | PixAcc: 89.36: |                    | 168/? [01:33<00:00,  1.79it/s]
Validating
Loss: 0.0795 | PixAcc: 95.31: |                    | 10/? [00:03<00:00,  2.82it/s]

Best validation loss: 0.17537788152694703

Saving best model for epoch: 28

Train Epoch Loss: 0.1477, Train Epoch PixAcc: 88.4566
Valid Epoch Loss: 0.1754, Valid Epoch PixAcc: 87.0370
The DeepLabV3 with ResNet101 backbone reached the least loss on epoch 28. Here, its validation accuracy is less compared to the DeepLabV3 ResNet50 model. It has also been trained for 30 epochs with a batch size of 16. Interestingly, the accuracy values after this epoch improved for 2 epochs while the loss deteriorated. This showed clear overfitting.
You can download both model weights from here on Kaggle.
Waterbody Segmentation Inference using the Trained DeepLabV3 ResNet50 Model
Let’s get down to inference now. We will use the best weights of the DeepLabV3 ResNet50 model.
The inference.py file contains all the code for running inference on images.
We will run inference on the validation images.
python inference_image.py --input ../input/Water_Bodies_Dataset_Split/valid_images/
We use the --input flag to provide the path to the validation image directory. Then the script will run inference on all the images in the directory.
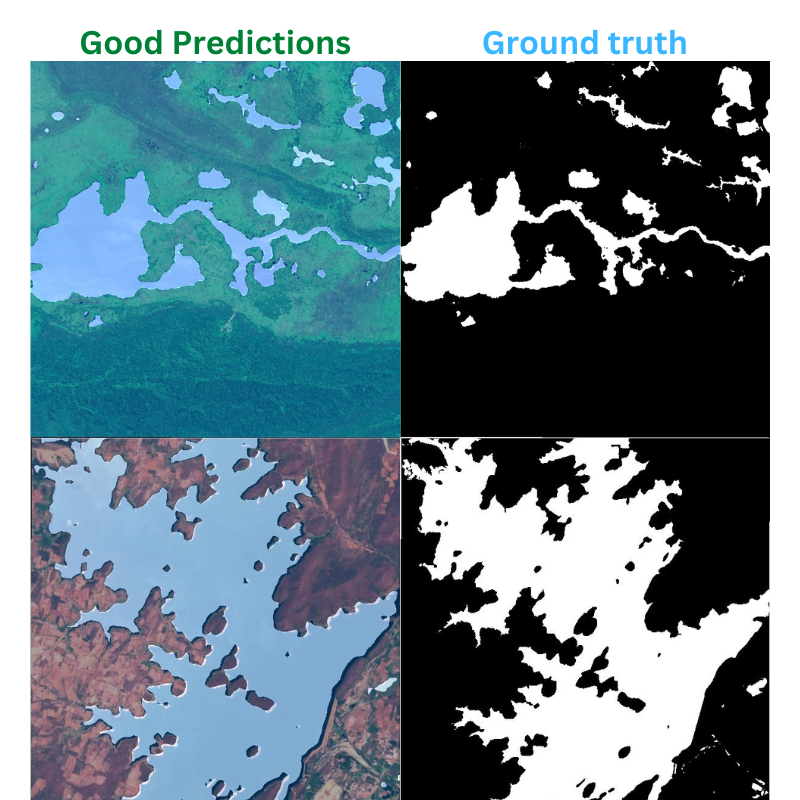
Here are a few outputs and their ground truth comparison which came out to be pretty close.
And here are a few bad results.

As we can see, the model can still improve.
Here are a few ideas that can be tried in the next iteration of training.
- Training with a higher image resolution. May be 512×512.
- Longer training with more augmentations and a learning rate scheduler.
Summary and Conclusion
In this article, we learned how to train a PyTorch DeepLabV3 model on a custom semantic segmentation dataset. While doing so we also got to know how datasets in deep learning are not always perfect and how to deal with them. After training and getting the results we also discussed what to do for the next iteration of training.
Such projects with satellite imagery can be very useful if we are able to scale them. It is true for image segmentation in medical imaging as well. In future articles, we will deal with more useful and complicated datasets to create even more advanced projects. I hope that you learned something new from this article.
If you have any doubts, thoughts, or suggestions, please leave them in the comment section. I will surely address them.
You can contact me using the Contact section. You can also find me on LinkedIn, and X.

Hi! Thank you for sharing this. I trained with your dataset and it worked fine, I did some modifications and so on. Then I trained with a custom dataset, during training it seemed to be right, the pixel accuracy was high and the loss was low. Once training finished I made inferences, the issue here is that it didn’t work, I only got a black image, the segmentation mask wasn’t there. So I suppose that the high accuracy was due to classifying the pixels as background. What could I do here? In your dataset the inference was nice, but with mine was not.
How many classes does your dataset have?
I have the data visualization code to take care of two classes only, background and one object class. In case you have more classes, you need to modify these two in config.py
ALL_CLASSES = [‘background’, ‘waterbody’]
LABEL_COLORS_LIST = [
(0, 0, 0), # Background.
(255, 255, 255), # Waterbody.
]
Also, remember that I am modifying the pixel values in datasets.py to remove some border pixels. That may be causing issues. You may need to comment these lines in datasets.py:
im = mask >= 200
mask[im] = 255
mask[np.logical_not(im)] = 0
Thanks for anwesring. I have two classes too. i tried to increase my dataset by data augmentation but it did not work.
In that case, please try commenting out these lines from the datasets.py script.
im = mask >= 200
mask[im] = 255
mask[np.logical_not(im)] = 0
Hi! Thank you, not it is working well. But still I have another question that I cannot figure it out by myself: I plot a graph of the model and I see two outputs, one from FCNHead and the other from DeepLabHead, so… Which one is the output of the model, or is a concatenation between those two outputs? In the graph I cannot see a mixture of those outputs.
Hi! I trained with your dataset and tried to run inference_image.py with valid_images. But I got all images as inference result, even ones that not related with water body. Could you please help as I’m newbie and I can’t figure out what the problem is
Hello Narmin. I have replied to you by email. Please check.
Hello Angel G, creating a new thread here. The output from the DeepLab head is used for prediction during evaluation and loss during training.
Oh, thank you. And the FCNHead output what is used for? And once we have the model trained and we make an inference, which output is used? Only the output from the DeepLab head?
Hello Sovit,
Thank you for your post. I used the code to train on my custom data and it seems pretty well. I had one question please:
When I use inference_image where is the cutoff threshold of confidence is defined? Can I change it?
Thanks in advances
Hello Sanima.
In semantic segmentation, we do not provide a threshold. Each pixel will be assigned a class depending on the number of classes. If you have two classes (background and one object class), then each pixel will be assigned either the 0 for the background class or 1 for the object class.
I hope this helps.
Hello Mr.Sovit.
your article is very informative.
what will be license for this cord?
And can I publish the model create from this code?
thanks in advance
Hello Danny. Thank you.
All my blog posts are open source. A simple credit and link back to the article is enough if you want to use the code. Thanks.
Dear Mr.sovit.
Thanks a lot!
Hi,
Thanks for the simple instructions to run deeplab framework.
I have a question regarding dataset preparation.
Before splitting train and validation, how did you create those mask images?
Just annotation doesn’t give mask. Right? I am looking for a process to make such dataset so that I can train in different dataset with more classes.
Thanks
Hello. Actually, I did not create the dataset. Creating segmentation masks is a time-consuming task in general. As mentioned in the article, before splitting, the dataset was already available here => https://www.kaggle.com/datasets/franciscoescobar/satellite-images-of-water-bodies
You can use tools like label studio (https://github.com/HumanSignal/label-studio) to create semantic segmentation masks.
Thanks for the reply.
I did convert my mask to binary as required for the training by using openCV.
I have one more issue regarding your code link?
Is it still working?
I got nnothing while clicking the link?
If you have done training with tf deeplabV3 with multiple classes, could you share the link ? if it is okay?
Thank you
Oh. I think you may have adblocker or DuckDuckGo enabled. When entering the email and clicking the download button, please disable them. They interfere with the download API.
Hello, I can’t access the link
Download*
Hello Marcos. There were some issues with the download API. Its fixed now. Please make sure to disable any adblockers or DuckDuckGo if you have them enabled.
Apologies for the trouble.
Hello Mr. Rath. Thank you for the article. It was helpful. I have a question. I am running your code using greyscale images and when I run inference_image.py, I get the following error message: output with shape [1, 256, 256] doesn’t match the broadcast shape [3, 256, 256]. I think this is because I am using greyscale images instead of RGB images. How should I change the code to make it work for greyscale images? Thank you for the help.
Hello Andrew. Can you please try this on your image:
image = cv2.cvtColor(image, cv2.COLOR_GRAY2RGB)
Hello Mr. Rath. Yes, that solved the problem. Thank you for the help.
Glad that it helped.
Hi, I can’t download the files, I entered my email, clicked the link and nothing happened!
Hello Fran. I have sent an email to you with the link. I hope you received it. Sometimes ad blockers or DuckDuckGo cause issues with the download API. Please try disabling them and clicking the download button. Hope that will solve the issue next time.
Thanks.
Hello and nice tutorial!
I’m trying to train on google machine, but it works extremely slowly. Looks like it just runs with CPU. Do you know, how to run training with GPU?
Have a nice day,
Lukaaash
Hello. Can you please confirm that you have installed PyTorch with CUDA support? I think that might one of the reasons.
Hello, yeah, I figured it out. I didn’t correctly create docker, missed the cuda support, like you wrote. Thanks anyway.
Glad that it worked.