
Frameworks like PyTorch and TensorFlow have made the lives of many deep learning and machine learning engineers easier. They provide really easy and intuitive codebase to quickly solve a deep learning problem using their tools. In addition to that, they also provide many pre-trained deep learning models on which we can test our hardware capability by inferencing on different images and videos. As such, in this tutorial, we will carry out Semantic Segmentation using PyTorch DeepLabV3 ResNet50 model.
Not only this, but we will cover two more pre-trained semantic segmentation PyTorch models next week also.
- (This week): Semantic Segmentation using PyTorch DeepLabV3 ResNet50.
- (Next week): Semantic Segmentation using pre-trained PyTorch DeepLabV3 and Lite R-ASPP with MobileNetV3 backbone.
By covering all these pre-trained semantic segmentation models, we will be able to compare their segmentation capability (performance) and speed while carrying out inference on videos as well.
So, what will we cover in this tutorial?
- We will start by getting to know about DeepLabV3 segmentation network in brief.
- About the PyTorch DeepLabV3 ResNet50 model.
- Then we will move over to cover the directory structure for the code of this tutorial. Along with that, we will also discuss the PyTorch version required.
- Moving over to the coding part, we will carry out semantic segmentation using PyTorch DeepLabV3 ResNet50 on both, images and videos.
A Brief About DeepLabV3
DeepLab was introduced by Chen et al. in the paper Rethinking Atrous Convolution for Semantic Image Segmentation in 2017.
After the initial publication of the paper, it was also revised 3 times. Currently, the implementation in PyTorch is called DeepLabV3 which is one of the state-of-the-art semantic segmentation models in deep learning.
We will discuss three concepts in brief about the DeepLab semantic segmentation architecture. They are:
- Encoder-Decoder.
- Atrous Convolution.
- Spatial Pyramid pooling.
Encoder-Decoder
The DeepLab semantic segmentation model has an encoder-decoder architecture.
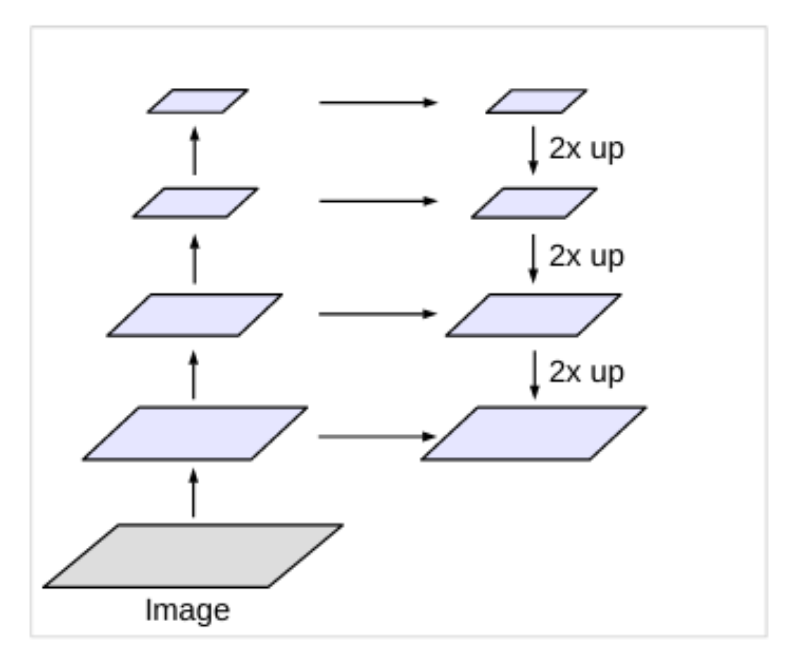
- The encoder is responsible for obtaining the feature maps from the input images.
- The decoder helps in gradually recovering the object details and spatial dimensions. Essentially, the decoder uses upsampling to get back the details from the low-dimensional feature maps.
Atrous Convolution
We can find the words Atrous Convolution in the name of the paper also. But what does it actually mean?
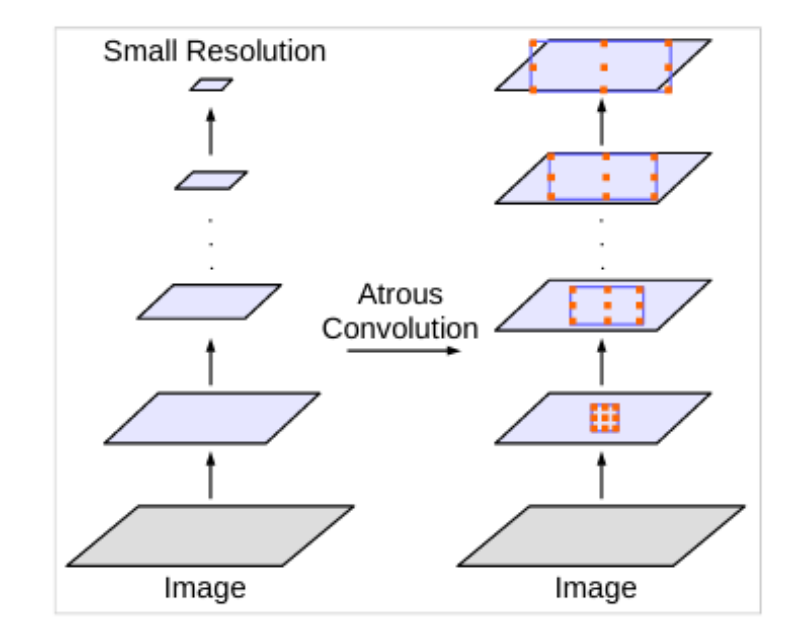
Deep Convolutional Neural Networks are really good at the task of semantic segmentation. But they use repeated convolutions and max-pooling. This results in very low resolution spatial maps which are then recovered using deconvolution.
But we can also use dilated or atrous convolutions where we can define an atrous rate (r). Atrous convolutions result in kernels that have space/holes (zeros) in-between them. This enlarges the size of the kernels and we can capture a larger area. The best part is that this step does not lead to an increase in parameters. So, the computation time stays the same.
The rate r defines the space between the kernel values. A rate of 1 means that no atrous convolution is applied. And from the paper, we can easily find that, DeepLab uses rates like 2, 4, 8, and 16.

Figure 4 shows the atrous convolutions for varying levels of r.
Spatial Pyramid Pooling (SPP)
In deep learning and computer vision, all the objects in an image will not be of the same size. Some objects will be small and some will be large. In such cases, to deal with objects with varying scales, DeepLab uses Spatial Pyramid Pooling. Spatial Pyramid Pooling uses pooling layers at different scales to deal with images and objects at varying scales.
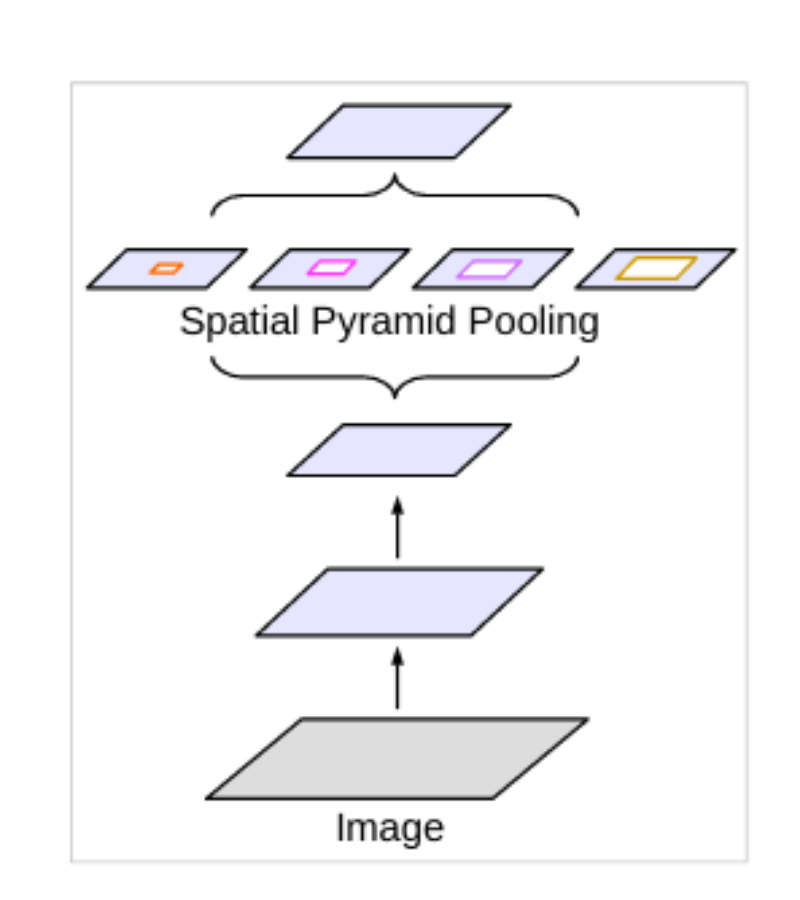
Now, DeepLab uses the concept of atrous convolution with SPP which the authors call Atrous Spatial Pyramid Pooling (ASPP). In short, the authors apply four parallel atrous convolutions at different atrous rates to a feature map. This allows resampling the feature maps at different scales to classify regions of an arbitrary scale.
We will not go into much more detail about the architecture or the paper here. Going through the complete DeepLab paper will need its own tutorial/article which we will most probably cover in one of the future posts. Still, if you are very intrigued by what we discussed, then surely go through the paper once. I am sure you will learn a lot.
Note: Please note that we will be using the DeepLabV3 model with a ResNet50 backbone in this tutorial.
About the PyTorch DeepLabV3 ResNet50 Model
The PyTorch DeepLabV3 ResNet50 model has been trained on the MS COCO dataset. But instead of training on all the 80 classes, the segmentation model has been trained on the 20 classes corresponding to the PASCAL VOC dataset. The following are the categories.
['__background__', 'aeroplane', 'bicycle', 'bird', 'boat', 'bottle', 'bus',
 'car', 'cat', 'chair', 'cow', 'diningtable', 'dog', 'horse', 'motorbike',
 'person', 'pottedplant', 'sheep', 'sofa', 'train', 'tvmonitor']
And as the name suggests, the encoder backbone is a ResNet50 model.
Also, if you wish to know more about the input and output data format of the model, then please one of my previous tutorials. In that tutorial, we discuss semantic segmentation using FCN ResNet50 model, and it has the same input and output formats as DeepLabV3 in PyTorch.
Directory Structure and PyTorch Version
We will follow the below directory structure in this tutorial.
├── input
│   ├── image_1.jpg
│   ├── image_2.jpg
│   └── video_1.mp4
├── label_color_map.py
├── outputs
├── segmentation_utils.py
├── segment_image.py
└── segment_video.py
- First, we have an
inputfolder that contains all the test input data. We will use these images and videos to carry our image segmentation using PyTorch DeepLabV3 ResNet50. - Secondly, we have an
outputsfolder which will contain all the resulting segmented images and videos after we run them through the model. - Then, we have four Python scripts, the details of which we will get to know while writing the code.
You can download the source code and the test data for this tutorial by clicking on the following button. If you wish, then you can also use your own images and videos.
PyTorch Version
Coming to the PyTorch version. The code in this tutorial uses PyTorch 1.8.0. To ensure that everything runs fine, you may update your PyTorch version as well. Either PyTorch 1.8.0 or any newer version when you are reading this should work just fine.
In addition, you will also need the OpenCV computer vision library. We will need this for dealing with images and videos. Any OpenCV 4.5.x version should work without any issues.
This ends all the preliminary set up that we need. We are all set to start coding now.
Semantic Segmentation using PyTorch DeepLabV3 ResNet50
From this section onward, we will start the coding part of this tutorial.
First, we will apply semantic segmentation to images using DeepLabV3 ResNet50 with PyTorch. Then we will move to videos as well.
We have four Python files in which we will write the code and we will tackle each of them in their respective subsections.
Creating a Different Color Map for Each Class
The DeepLabV3 ResNet50 model gives the outputs in PASCAL VOC class format. This means that there are 21 classes in total including the background. So, if we want to visualize the segmentation map of each class properly, then providing different color maps to the pixels of different classes makes sense.
This is exactly what we will do in this section. We will create a simple list that will help us create the same color map for the pixels that belong to the same class. Let us write the code, then it will be even easier to understand.
The following code will go into the label_color_map.py Python file.
label_color_map = [
               (0, 0, 0),  # background
               (128, 0, 0), # aeroplane
               (0, 128, 0), # bicycle
               (128, 128, 0), # bird
               (0, 0, 128), # boat
               (128, 0, 128), # bottle
               (0, 128, 128), # bus
               (128, 128, 128), # car
               (64, 0, 0), # cat
               (192, 0, 0), # chair
               (64, 128, 0), # cow
               (192, 128, 0), # dining table
               (64, 0, 128), # dog
               (192, 0, 128), # horse
               (64, 128, 128), # motorbike
               (192, 128, 128), # person
               (0, 64, 0), # potted plant
               (128, 64, 0), # sheep
               (0, 192, 0), # sofa
               (128, 192, 0), # train
               (0, 64, 128) # tv/monitor
]
In the above code block we have a label_color_map list which contains 21 tuples (including the background class). These tuples define the RGB (Red, Green, Blue color values for different classes. As they are in RGB format, we will be converting them to BGR format because we will use OpenCV for overlaying the color maps on top of the original images.
This is all we need for this Python file. We just need to define the list containing the color values for different classes in tuples.
Utility Functions for Semantic Segmentation
Now we will write some helper/utility codes for our semantic segmentation using DeepLabV3 ResNet50 purpose. These codes and functions will helps us easily visualize and overlay the color maps in the manner that we want.
We will write these codes in the segmentation_utils.py file.
The following are the imports that we will need for writing the utility functions.
import torchvision.transforms as transforms
import cv2
import numpy as np
import torch

from label_color_map import label_color_map as label_map
- We need the
torchvision.transformsmodule as we will be defining the image transforms here. - Also, we are importing our own
label_maplist from thelabel_color_mapmodule.
For the image transforms, we just need to convert our images to tensors and normalize them according to the ImageNet stats.
# define the torchvision image transforms
transform = transforms.Compose([
    transforms.ToTensor(),
    transforms.Normalize(mean=[0.485, 0.456, 0.406],
                         std=[0.229, 0.224, 0.225])
])
After going through the above code, all our images will have pixel values within the range [0, 1]. This is what the DeepLabV3 ResNet50 model expects as well.
Next, we will define a few utility functions.
Function to Get the Segmentation Labels (the output)
The DeepLabV3 model outputs the segmentation labels after the image forward passes through it.
Let us write a simple function that will forward propagate the image tensor through the model and return us with the outputs.
def get_segment_labels(image, model, device):
    # transform the image to tensor and load into computation device
    image = transform(image).to(device)
    image = image.unsqueeze(0) # add a batch dimension
    outputs = model(image)
    return outputs
The get_segment_labels() functions accepts the image, model, and computation device as parameters.
- At line 15, we transform the image using the transforms defined above.
- Then we add an extra batch dimension to make it four dimensional.
- At line 17, we forward propagate the image tensor through the model to get the outputs and finally return the outputs.
Function to Draw Segmentation Map According the Outputs
After we get the outputs, we will need to draw the segmentation map according to the label of each pixel.
This function will actually draw the color labels on a completely black mask according to the outputs that we will get.
Let us write the code first, then it will be even easier to understand.
def draw_segmentation_map(outputs):
    labels = torch.argmax(outputs.squeeze(), dim=0).detach().cpu().numpy()

    # create Numpy arrays containing zeros
    # later to be used to fill them with respective red, green, and blue pixels
    red_map = np.zeros_like(labels).astype(np.uint8)
    green_map = np.zeros_like(labels).astype(np.uint8)
    blue_map = np.zeros_like(labels).astype(np.uint8)

    for label_num in range(0, len(label_map)):
        index = labels == label_num
        red_map[index] = np.array(label_map)[label_num, 0]
        green_map[index] = np.array(label_map)[label_num, 1]
        blue_map[index] = np.array(label_map)[label_num, 2]

    segmentation_map = np.stack([red_map, green_map, blue_map], axis=2)
    return segmentation_map
The draw_segmentation_map() function accepts the values of the out key from the output dictionary as the parameters.
- At line 20, we are getting the index position of all the output tensors in the dictionary. After this step, the
labelswill look like the following.
[[0 0 0 ... 0 0 0]
 [0 0 0 ... 0 0 0]
 [0 0 0 ... 0 0 0]
 ...
 [0 0 0 ... 0 0 0]
 [0 0 0 ... 0 0 0]
 [0 0 0 ... 0 0 0]]
Basically, now, labels will have a minimum value of 0 and a maximum value of 20 according to the classes that were present in the image.
- From lines 24 to 26, we create three NumPy arrays containing zeros only which have dimensions similar to the
labelsthat we obtained above. - Then from line 28, we have a
forloop iterating through the total number of labels there are in thelabel_map. If any of the current label fromlabel_mapmatches thelabels, then we storeTruein that position inindex. ElseFalseis stored. Then whichever index positions containTrueare filled with the corresponding R, G, and B value from the tuple of the current label number. - Finally, we stack all the color maps (line 34), and return the segmented map.
To get an even better idea, this is what a final segmentation_map looks like after stacking all the RGB NumPy arrays.
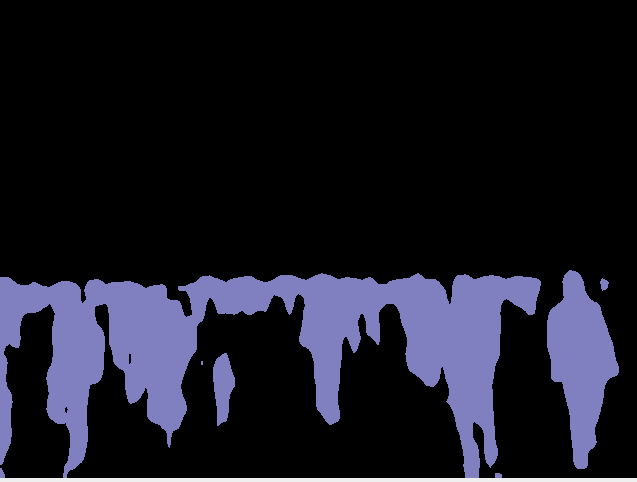
This image contains only persons but I hope that this gives a much better idea of the output that we are getting here.
Function to Overlay the Segmentation Map on Top of the Original Image
To visualize the outputs properly, we will overlay the segmentation map that we obtained from the draw_segmentation_map() on top of the original RGB image.
The following function does that for us.
def image_overlay(image, segmented_image):
    alpha = 1 # transparency for the original image
    beta = 0.8 # transparency for the segmentation map
    gamma = 0 # scalar added to each sum

    segmented_image = cv2.cvtColor(segmented_image, cv2.COLOR_RGB2BGR)
    image = np.array(image)
    image = cv2.cvtColor(image, cv2.COLOR_RGB2BGR)
    cv2.addWeighted(image, alpha, segmented_image, beta, gamma, image)
    return image
- We have three variables
alpha,beta, andgamma.alphadefines the weight of the first array. For us, this is going to be the original image and we will use the complete weight (fully opaque) of the image. For the segmentation map, we will make it slightly transparent, and define abetavalue of 0.8. Andgammais the scalar that is added to each sum which we keep as 0. - At line 44, we use the
addWeighted()function from OpenCV to apply a slightly transparent segmentation map on top of the original image. We will get to see the output while executing the code.
This completes all the utility code and functions that we need for semantic segmentation.
Semantic Segmentation in Images using PyTorch DeepLabV3 ResNet50
As we have completed all the utility codes, we can now begin to apply semantic segmentation to images.
The code that we will write here will go into the segment_image.py script. Most of the work is already done by completing the utility functions. We just need to call and execute the functions.
Let us start with the imports.
import torchvision
import torch
import argparse
import segmentation_utils
import cv2

from PIL import Image
Along with all the standard library and modules, we are also importing our own segmentation_utils module.
Construct the Argument Parser, Define the Computation Device, and Initialize the Model
The following block of code constructs the argument parser to parse the command line arguments.
# construct the argument parser
parser = argparse.ArgumentParser()
parser.add_argument('-i', '--input', help='path to input image')
args = vars(parser.parse_args())
We just need one --input flag here which will provide the path to the input image on which we want to apply semantic segmentation.
Next, we will define the computation device and initialize the DeepLabV3 model as well.
# set computation device
device = torch.device('cuda' if torch.cuda.is_available() else 'cpu')

# download or load the model from disk
model = torchvision.models.segmentation.deeplabv3_resnet50(pretrained=True)
# model to eval() model and load onto computation devicce
model.eval().to(device)
For semantic segmentation on images, GPU is not mandatory, a decent CPU will handle the computation pretty easily. But a CUDA enabled GPU will really help when we will move over to semantic segmentation in videos.
We are also loading the DeepLabV3 ResNet50 model along with the pre-trained weights at line 16. Then we are switching the model into eval() mode and loading it onto the computation device.
Read the Image, Forward Pass Through the Model, and Visualize the Results
The following are the few final steps to apply semantic segmentation to an image:
- We will read the image using the PIL
Imagemodule which will load the image in RGB format by default. - Then we will forward pass the image through the model by calling the
get_segment_labels()function and get the output dictionary. - Draw the segmentation map according to the output by calling the
draw_segmentation_map(). - Overlay the segmentation map on top of the original RGB image.
- Finally, visualize and save the resulting image to disk.
# read the image
image = Image.open(args['input'])
# do forward pass and get the output dictionary
outputs = segmentation_utils.get_segment_labels(image, model, device)
# get the data from the `out` key
outputs = outputs['out']
segmented_image = segmentation_utils.draw_segmentation_map(outputs)

final_image = segmentation_utils.image_overlay(image, segmented_image)
save_name = f"{args['input'].split('/')[-1].split('.')[0]}"
# show the segmented image and save to disk
cv2.imshow('Segmented image', final_image)
cv2.waitKey(0)
cv2.imwrite(f"outputs/{save_name}.jpg", final_image)
The above block of code does everything that we discussed in the previous points.
The next step is to execute the code and visualize the outputs.
Execute segment_image.py to Apply Semantic Segmentation to Images
Now we are ready to execute the segment_image.py script and apply semantic segmentation to images.
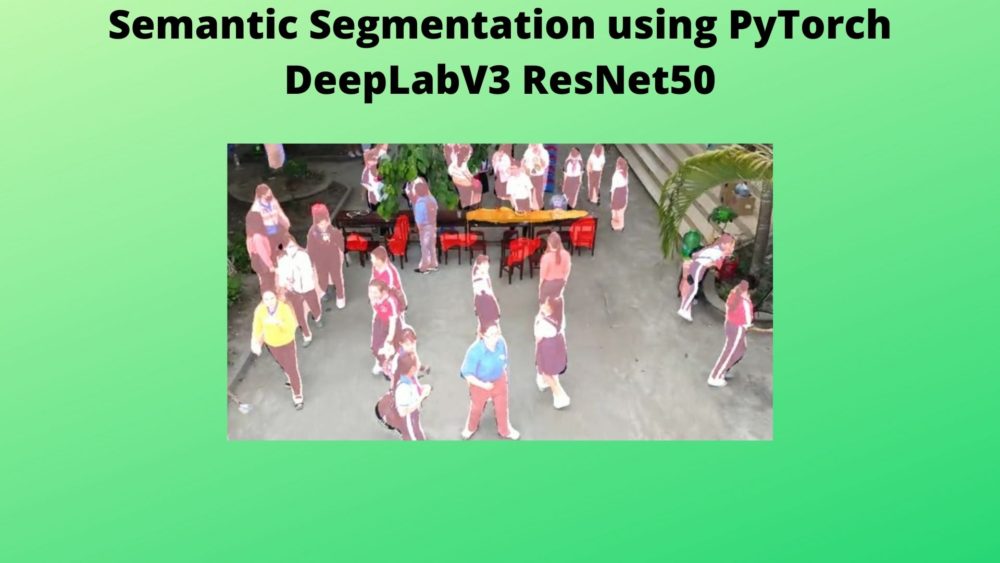
We have two two images. Let us start with the first image. While being within the project directory, execute the following in the command line/terminal.
python segment_image.py --input input/image_1.jpg
You should get to see the following output.
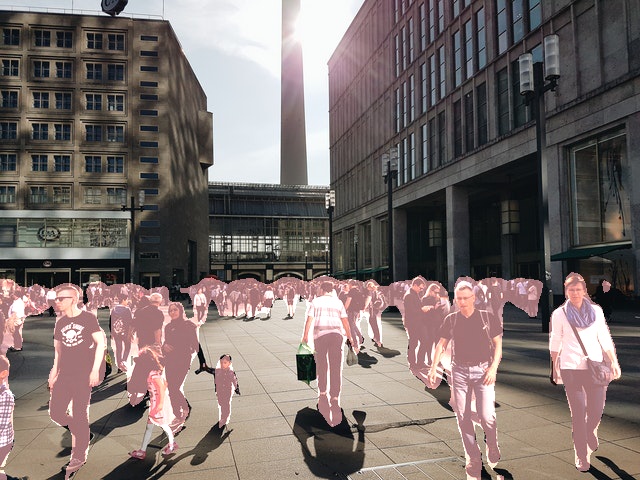
This image consists mostly of persons and we can see that the DeepLabV3 model is doing a pretty good job of segmenting them. In fact, it is segmenting all of the humans. But at the back, it is not able to segment all the persons individually. Still, it is detecting them as humans and all are segmented using the same colored pixels only.
Let us take a look at another image example.
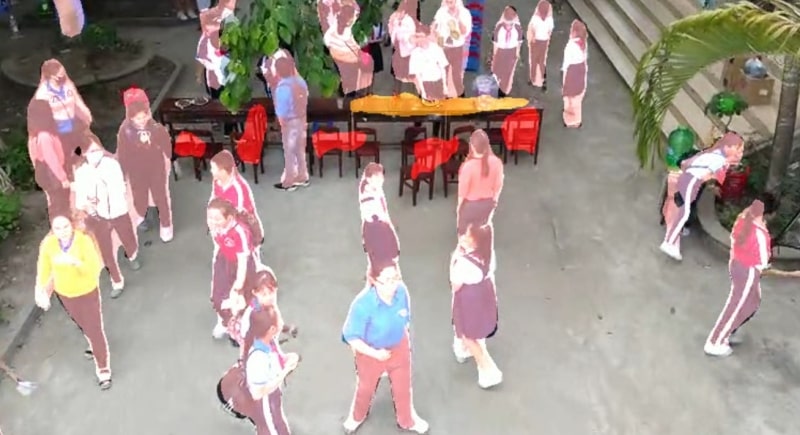
python segment_image.py --input input/image_2.jpg
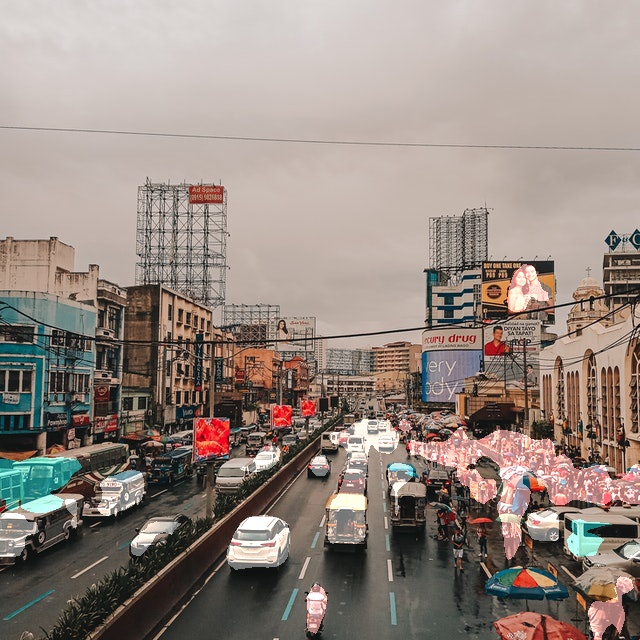
In this case, the results are somewhat mixed. The DeepLabV3 model is able to segment the vehicles but not too well. Similarly, almost whole of the right side is filled with segmentation for persons, but obviously, all do not belong to the person class.
From the above two results, we can infer that the model is mostly failing when there is a large group of a single class together. In those cases, the DeepLabV3 model is segmenting everything as a group.
Semantic Segmentation in Videos using PyTorch DeepLabV3 ResNet50
Now, we will move on to segmenting objects in videos. Most of the things are going to stay the same. We just treat each single frame of the video as an image and apply the appropriate segmentation utility steps.
All of this code will go into the segment_video.py Python script.
The code till loading the of the DeepLabV3 model is going to be the same as in the case of images. So, let us write that code first.
import torchvision
import cv2
import torch
import argparse
import time
import segmentation_utils

# construct the argument parser
parser = argparse.ArgumentParser()
parser.add_argument('-i', '--input', help='path to input video')
args = vars(parser.parse_args())

# set the computation device
device = torch.device('cuda' if torch.cuda.is_available() else 'cpu')

# download or load the model from disk
model = torchvision.models.segmentation.deeplabv3_resnet50(pretrained=True)
# load the model onto the computation device
model = model.eval().to(device)
In this case, we will provide the path to a video file instead of an image in the command line arguments.
The next few steps are:
- Reading the video file.
- Capturing the video frames’ width and height.
- Preparing the
VideoWriter()object to save the resulting video with semantic segmentation applied to it.
cap = cv2.VideoCapture(args['input'])
if (cap.isOpened() == False):
    print('Error while trying to read video. Please check path again')

# get the frame width and height
frame_width = int(cap.get(3))
frame_height = int(cap.get(4))

save_name = f"{args['input'].split('/')[-1].split('.')[0]}"
# define codec and create VideoWriter object
out = cv2.VideoWriter(f"outputs/{save_name}.mp4",
                      cv2.VideoWriter_fourcc(*'mp4v'), 30,
                      (frame_width, frame_height))

frame_count = 0 # to count total frames
total_fps = 0 # to get the final frames per second
Along with all the points mentioned above, we are also initializing two variables, frame_count and total_fps. They will help us keep track of the total FPS (Frames Per Second) and the total number of frames until the end of the video.
Reading the Video Frames and Applying Semantic Segmentation
We will loop through all the frames present in the video and apply all the steps to each frame just as we did in the case of images.
The following block of code contains the complete while loop of reading through the video frames and applying semantic segmentation to each frame.
# read until end of video
while(cap.isOpened()):
    # capture each frame of the video
    ret, frame = cap.read()
    if ret:
        rgb_frame = cv2.cvtColor(frame, cv2.COLOR_BGR2RGB)
        # get the start time
        start_time = time.time()
        with torch.no_grad():
            # get predictions for the current frame
            outputs = segmentation_utils.get_segment_labels(rgb_frame, model, device)

        # obtain the segmentation map
        segmented_image = segmentation_utils.draw_segmentation_map(outputs['out'])
        # get the final image with segmentation map overlayed on original iimage
        final_image = segmentation_utils.image_overlay(rgb_frame, segmented_image)

        # get the end time
        end_time = time.time()
        # get the current fps
        fps = 1 / (end_time - start_time)
        # add current fps to total fps
        total_fps += fps
        # increment frame count
        frame_count += 1
        # put the FPS text on the current frame
        cv2.putText(final_image, f"{fps:.3f} FPS", (20, 35),
                    cv2.FONT_HERSHEY_SIMPLEX, 1, (0, 255, 0), 2)
        # press `q` to exit
        cv2.imshow('image', final_image)
        out.write(final_image)
        if cv2.waitKey(1) & 0xFF == ord('q'):
            break
    else:
        break
- At line 46, we are forward propagating the current frame through the DeepLabV3 model by calling the
get_segment_labels()function. We are providing all the mandatory arguments as well. - Line 49, provides us with the initial color segmentation map on top of a black background.
- And line 51 provides the final output with the segmentation map overlayed on the RGB image.
- All the following steps are post-processing steps like calculating the current FPS, adding to total FPS, incrementing frame count, writing the FPS text on the current frame, and saving the frame to disk.
The final part is releasing the VideoCapture() object and destroying all the OpenCV windows. Along with that, we will also print the average FPS on the terminal.
# release VideoCapture()
cap.release()
# close all frames and video windows
cv2.destroyAllWindows()
# calculate and print the average FPS
avg_fps = total_fps / frame_count
print(f"Average FPS: {avg_fps:.3f}")
This completes our code for semantic segmentation using PyTorch DeepLabV3 ResNet50 on videos as well.
Execute segment_video.py Script
Now we can execute the segment_video.py script and see how it performs for semantic segmentation on videos.
python segment_video.py --input input/video_1.mp4
On a GTX 1060 GPU, the average FPS was 3.047. Not much obviously. But let us take a look at the resulting video.
The results are really interesting. The DeepLabV3 model is finding the most success in segmenting humans. Still, it is labeling some of the bikes on the left as persons. But for most of the bikes, it is labeling them correctly with the cyan color. And if you take a look at the right, then the model is also able to segment (label) the potted plants almost correctly as well. Of course, it is missing on some of the parts of the plants. And it is also able to correctly label the chairs with read color.
This is it for all the technical details of semantic segmentation using DeepLabV3 ResNet50 model.
Summary and Conclusion
In this tutorial, we covered semantic segmentation using the DeepLabV3 ResNet50 model using the PyTorch Deep Learning framework. We started with applying semantic segmentation to images and then moved on to videos as well. I hope that this tutorial was helpful to you.
If you have any doubts, thoughts, or suggestions, then please leave them in the comment section. I will surely address them.
You can contact me using the Contact section. You can also find me on LinkedIn, and X.

Really great blog post.
Thank you. Glad that you liked it.
Thanks, this is a very clear tutorial. It would be nice to have a metric shown to say how good the prediction was to the ground truth, even a mIoU SCORE. Maybe adding a ground truth HTML file that the VOC set includes and then comparing it to the model.
Hello Emile, I am happy that you find the tutorial helpful. I get your point. A comparison point would be nice. But the issue here is that we do not have access to the ground truth segmentations. The reason being these are random images and videos from the internet.
Although your question gave me an idea. Maybe I should include a post on how to actually train an image segmentation model along with all the metrics and everything. I hope this answers your question.
Thanks for the fast response, that will super helpful.
Hi, how to segment only person and save to another video?
Hi. For that, you will need an if block checking for the person label only before applying the segmentation map. And I think that the code is already saving the resulting video to disk.
This is an excellent article. I was wondering if I am able to transform the framework here to map a 64x64x3 images into a 64×64 image where the label for each pixel will be 0,1,2,3,…..10(each number representing a different color)
Hello Jason. As far as I know, the PyTorch segmentation models accept RGB images by default. So, I am unsure how 64×64 (grayscale) images will behave. But you can surely give it a try.
Thank you. Very friendly and easy your paper.
Glad that you found it useful.
Can we get class confidence or prob. of each class like Object Detection model?
Hello. Getting the accuracy of each class is possible during training but not during inference as we do not have the ground truth labels.