
In this tutorial, we will get hands-on experience with semantic segmentation in deep learning using the PyTorch FCN ResNet50 models. If you are completely new to image segmentation in deep learning, then I recommend going through my previous article. In that article, you will have a good idea about deep learning based image segmentation techniques. You will get to know about different image segmentation architectures, evaluation metrics, and real-life use cases as well.

What will you learn in this tutorial?
- How to use PyTorch pretrained semantic segmentation models?
- Deep learning semantic segmentation on images
- Deep learning semantic segmentation on videos.
Some important points before moving further.
- Will we train our own deep learning based semantic segmentation model in this tutorial?
- No, we will not train our own semantic segmentation model. Instead, we will use PyTorch models which have been pretrained on the COCO dataset. We will surely cover training our models in future articles.
- Which model will we be using?
- We will use the FCN ResNet50 model in this tutorial. To know more about FCN (Fully Convolutional Networks), you can read this paper.
- Do you need a GPU to follow this tutorial?
- If you have a GPU, it’s well and good. If not, you can follow all the same. We will be covering semantic segmentation on both images and videos. You will not face any problems with segmenting images on a CPU. For the videos, it is good to have a GPU. You may get very low frames per second with a CPU. But that will not stop you from running the program and analyzing the output.
About the PyTorch FCN ResNet50 Model
PyTorch provides pre-trained models for semantic segmentation which makes our task much easier. In fact, PyTorch provides four different semantic segmentation models. They are, FCN ResNet50, FCN ResNet101, DeepLabV3 ResNet50, and DeepLabV3 ResNet101. You may take a look at all the models here.
Out of all the models, we will be using the FCN ResNet50 model. This is good for a starting point. And moreover, as the backbone is ResNet50, we can run this on videos too. Although, we may not get very high frames per second (FPS).
All of the above models have been trained on the COCO 2017 dataset. But keep in mind that they are not trained on all the COCO classes (almost 80). Instead, they are trained on the 20 classes available in the Pascal VOC dataset. This is something that we have to keep in mind for the color mapping part. The following are the categories they are trained on.
['__background__', 'aeroplane', 'bicycle', 'bird', 'boat', 'bottle', 'bus',
 'car', 'cat', 'chair', 'cow', 'diningtable', 'dog', 'horse', 'motorbike',
 'person', 'pottedplant', 'sheep', 'sofa', 'train', 'tvmonitor']
While segmenting the objects in the images, each of these classes will have a different color mask. We will get to see later on which categories will have which color mask and how to do it.
Input Format for Pretrained FCN ResNet50
As we are using pre-trained models for evaluation in this tutorial, therefore, we will not be using any specific dataset. Instead, we will use standalone images and videos for segmentation. Keeping this in mind, we need to take care of a few things.
First of all, the models are already trained on the COCO dataset. So, whatever images we give as input, we have to normalize them using mean = [0.485, 0.456, 0.406] and std = [0.229, 0.224, 0.225]. If you are a regular deep learning practitioner, then you must know this. Whenever we use a pre-trained model just for evaluation, then we have to use the mean and standard deviation on the dataset that it has been trained on.
Secondly, adding a batch dimension. When we give a single image as input to the FCN ResNet50 model, then it has to be in the format of [batch_size x channels x height x width]. For a single image, we need to add the batch dimension manually before feeding it to the neural network.
Output Format from FCN ResNet50
Before getting into the coding part, let’s take a look at the format of the output that we get from PyTorch FCN ResNet50.
Note: This section does not contain the complete code. This is just to give the readers an idea of the output format. We will get into the complete code in the following sections.
Suppose that we give the following image as input to the model.
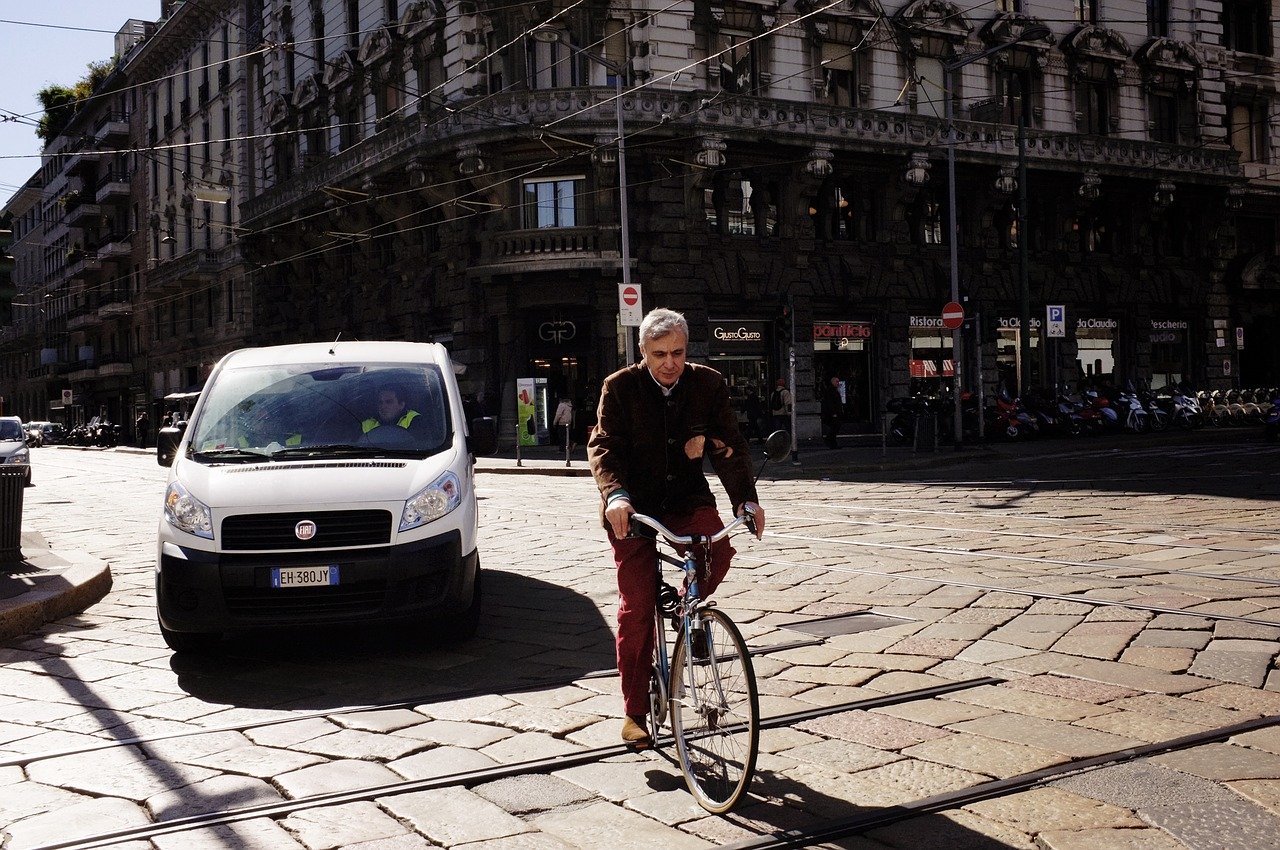
You can see its output in figure 1 at the beginning of this tutorial. Let’s call it as image. And now, let’s take a look at the following lines of code for reference.
outputs = model(image)
print(type(outputs))
print(outputs['out'].shape)
print(outputs)
We save the outputs in outputs. After printing this, we get the following.
torch.Size([1, 21, 850, 1280])
OrderedDict([('out', tensor([[[[11.1675, 11.1675, 11.1675,  ...,  9.8225,  9.8225,  9.8225],
          [11.1675, 11.1675, 11.1675,  ...,  9.8225,  9.8225,  9.8225],
          [11.1675, 11.1675, 11.1675,  ...,  9.8225,  9.8225,  9.8225],
          ...,
          [ 6.0362,  6.0362,  6.0362,  ...,  9.5510,  9.5510,  9.5510],
          [ 6.0362,  6.0362,  6.0362,  ...,  9.5510,  9.5510,  9.5510],
          [ 6.0362,  6.0362,  6.0362,  ...,  9.5510,  9.5510,  9.5510]],

         [[ 0.5891,  0.5891,  0.5891,  ..., -2.3955, -2.3955, -2.3955],
          [ 0.5891,  0.5891,  0.5891,  ..., -2.3955, -2.3955, -2.3955],
          [ 0.5891,  0.5891,  0.5891,  ..., -2.3955, -2.3955, -2.3955],
          ...,
          [ 0.3087,  0.3087,  0.3087,  ...,  0.4327,  0.4327,  0.4327],
          [ 0.3087,  0.3087,  0.3087,  ...,  0.4327,  0.4327,  0.4327],
          [ 0.3087,  0.3087,  0.3087,  ...,  0.4327,  0.4327,  0.4327]],

         [[-0.8241, -0.8241, -0.8241,  ..., -1.9793, -1.9793, -1.9793],
          [-0.8241, -0.8241, -0.8241,  ..., -1.9793, -1.9793, -1.9793],
          [-0.8241, -0.8241, -0.8241,  ..., -1.9793, -1.9793, -1.9793],
          ...,
          [ 0.1900,  0.1900,  0.1900,  ..., -1.3187, -1.3187, -1.3187],
          [ 0.1900,  0.1900,  0.1900,  ..., -1.3187, -1.3187, -1.3187],
          [ 0.1900,  0.1900,  0.1900,  ..., -1.3187, -1.3187, -1.3187]],

         ...,
So, the output is an Ordered Dictionary and the out key contains all the output tensors. Also, printing the shape of outputs['out'] gives us torch.Size([1, 21, 850, 1280]). This means that the batch contains output for one image. The 21 shows that the model gives output for the 21 classes on which it has been trained. And the final two numbers are the height and width.
Now take a close look at the output tensors. You will see that many of the tensors have the same output number. This is because all the pixels of a single object in the image are classified or labeled using the same number. So if the one pixel of a person is 11.1675, then all the pixels making up the person should be labeled as 11.1675.
I hope that you get an idea of the output format here. We will get into more details further on.
Project Directory and the Input Files
We will use the following directory structure in this tutorial.
│   label_color_map.py
│   segment.py
│   segmentation_utils.py
│   segment_vid.py
│
├───input
│       street1.jpg
...
│
├───outputs
- There are four python scripts the details of which we will discuss when we will write the code for them.
- We have an
inputfolder which will contain all the input images and videos that we will use. - Finally, the
outputsfolder will contain the outputs from the FCN ResNet50 segmentation network.
You can use any image and video of your choice. Still, if you want to use the same images and videos as this tutorial, you can download them here.
If you download the zip file, then extract it in your project directory and you are all set. This zip file contains three images and a short video clip. If you want, you can add more images and videos for the input data.
Installing the Latest Version of PyTorch
Before moving further, make sure that you install the latest version of PyTorch (PyTorch 1.6 at the time of writing this). This is because the pre-trained weights for FCN ResNet50 are available starting from PyTorch 1.6 only and not the previous versions. This is one of the important points here.
Image Segmentation using PyTorch FCN ResNet50
Starting from this section, we will write the code for semantic segmentation using the FCN ResNet50 network. Whenever we will start to write code in a new python file, I will be telling the file name as well.
For now, let’s start by creating a label color map.
Creating a Label Color Map List
By now, we know that each pixel belonging to the same class will be labeled using the same number. Also, each of these similarly labeled pixels should have the same color in the final segmented image.
Now, this is something that the deep learning model will not handle for us. It will only give us the tensor values with the labeled pixels. We will have to map each of these labeled classes into one color mask. For example, let an image contains three persons and two cars. Then the three persons will have the same color mask (say red) and the two cars will have the same color mask (say blue).
For this, we create a color mapper. Now, we don’t want the color map to be different with each run. Therefore, we are going to explicitly assign a color mask tuple to each of the labels. So, let’s do that. This code will go into the label_color_map.py file.
label_color_map = [
               (0, 0, 0),  # background
               (128, 0, 0), # aeroplane
               (0, 128, 0), # bicycle
               (128, 128, 0), # bird
               (0, 0, 128), # boat
               (128, 0, 128), # bottle
               (0, 128, 128), # bus
               (128, 128, 128), # car
               (64, 0, 0), # cat
               (192, 0, 0), # chair
               (64, 128, 0), # cow
               (192, 128, 0), # dining table
               (64, 0, 128), # dog
               (192, 0, 128), # horse
               (64, 128, 128), # motorbike
               (192, 128, 128), # person
               (0, 64, 0), # potted plant
               (128, 64, 0), # sheep
               (0, 192, 0), # sofa
               (128, 192, 0), # train
               (0, 64, 128) # tv/monitor
]
In the above code block, we are assigning a different color map tuple (RGB format) to each class. Generally, the background class is given the black color and we have done it as well. The comments show the class for each color. This is just a list of tuples and this is all we need for this python file.
Image Segmentation Utilities
In this part, we will write some image segmentation utilities and functions that will make our work easier. These are the codes that we can reuse a number of times. Therefore, it makes more sense to keep them in a separate python script. All the code in this section will go into the segmentation_utils.py file.
Let’s start with importing the libraries and modules that we need.
import torchvision.transforms as transforms
import cv2
import numpy as np
import numpy
import torch

from label_color_map import label_color_map as label_map
Notice that we are importing the label_color_map list from the label_color_map.py file.
Define the Image Trasnsforms
Now, we will define the image transforms. Remember that we have to normalize the images using mean = [0.485, 0.456, 0.406] and std = [0.229, 0.224, 0.225].
# define the torchvision image transforms
transform = transforms.Compose([
    transforms.ToTensor(),
    transforms.Normalize(mean=[0.485, 0.456, 0.406],
                         std=[0.229, 0.224, 0.225])
])
So, first, we are converting all the images to tensors and then normalize them.
Next up, we will define three helper functions. They are get_segment_labels(), draw_segmentation_map(), and image_overlay().
The get_segment_labels() Function
The get_segment_labels() function will give the model an image as input. Then the model will do a forward pass through the image and provide us with the Ordered Dictionary output as we have seen above.
def get_segment_labels(image, model, device):
    # transform the image to tensor and load into computation device
    image = transform(image).to(device)
    image = image.unsqueeze(0) # add a batch dimension
    outputs = model(image)

    # uncomment the following lines for more info
    # print(type(outputs))
    # print(outputs['out'].shape)
    # print(outputs)

    return outputs
This function takes three input parameters. They are the image, the segmentation model, and the computation device.
- On lines 3 and 4. we apply the image transformations and add a batch dimension.
- Line 5 gives us the output dictionary after the model does a forward pass through the image.
- I have commented on lines 8, 9, and 10. You can uncomment them to see the actual output tensor that we are getting.
- Finally, we return the
outputsdictionary.
Also, do remember that the actual output tensor is in the out key of the outputs dictionary.
The draw_segmentation_map() Function
The draw_segmentation_map() function will apply the color masks as per the tensor values in the output dictionary that we get in the get_segment_labels() function.
def draw_segmentation_map(outputs):
    labels = torch.argmax(outputs.squeeze(), dim=0).detach().cpu().numpy()

    red_map = np.zeros_like(labels).astype(np.uint8)
    green_map = np.zeros_like(labels).astype(np.uint8)
    blue_map = np.zeros_like(labels).astype(np.uint8)

    for label_num in range(0, len(label_map)):
        index = labels == label_num
        red_map[index] = np.array(label_map)[label_num, 0]
        green_map[index] = np.array(label_map)[label_num, 1]
        blue_map[index] = np.array(label_map)[label_num, 2]

    segmented_image = np.stack([red_map, green_map, blue_map], axis=2)
    return segmented_image
This function takes the outputs as the input parameter.
- On line 2, we apply
squeeze()to theoutputsafter converting them to a NumPy array and loading the tensors to the CPU. Then we get the index positions using the torch.argmax() function. If you have any doubts on this line, then print the outputs before and after this line of code. You will get to see the difference and understand what is happening as well. - Then we create three NumPy arrays for red, green, and blue color maps and fill them with zeros. The dimension is similar to the dimension of
labelsthat we get at line 2. - Starting from line 8, we have a
forloop. We iterate 21 times through thisforloop, that is, the total number of labels we are considering. With each iteration, we are considering anindexvariable. Using thisindexvariable we are applying the red, green, and blue color masks to the NumPy arrays that we created at lines 4, 5, and 6. - Then we stack the sequence of the color mask along a new axis which gives us the final segmented color mask image.
- Finally, we return this segmented mask. Do take a good look at this function if you do not get it the first time.
The image_overlay() Function
Using the image_overlay() function we apply the segmented color masks on top of the original image. This will help us interpret the output much better. Visualizing such image overlay output is better than just visualizing the segmented color masks. This way, we can actually interpret how well the deep learning model is segmenting the images.
def image_overlay(image, segmented_image):
    alpha = 0.6 # how much transparency to apply
    beta = 1 - alpha # alpha + beta should equal 1
    gamma = 0 # scalar added to each sum

    image = np.array(image)
    image = cv2.cvtColor(image, cv2.COLOR_RGB2BGR)
    segmented_image = cv2.cvtColor(segmented_image, cv2.COLOR_RGB2BGR)
    cv2.addWeighted(segmented_image, alpha, image, beta, gamma, image)
    return image
We use the OpenCV addWeighted() function to apply the segmented_image mask on top of the original input image. There are three arguments to consider here.
- The
alphaargument controls the transparency of an image. We apply analphavalue of 0.6 to the segmented mask. - The
betaargument is the weight applied to the originalimage. Basically, we can safely setbetato1 - alpha. - Finally, the
gammaargument is the scalar that is added to each sum. We can set it to 0.
This marks the end of all the helper functions that we need. In fact, these are the functions that make most of the logical part of deep learning image segmentation.
Next, we will write the code for segmenting images and frames in videos. Those codes are going to be really easy as we will be calling the above helper functions that will do the bulk of the work for us.
Applying Deep Learning Image Segmentation to Images
In this section, we will write the code to apply deep learning image segmentation to images. All the code in this section will go into the segment.py file.
As always, let’s start with the imports.
import torchvision
import numpy
import torch
import argparse
import segmentation_utils
import cv2

from PIL import Image
We are importing the segmentation_utils that we will later use in this code.
Construct the Argument Parser, Initialize the Model, and Device
Let’s construct the argument parser first.
# construct the argument parser
parser = argparse.ArgumentParser()
parser.add_argument('-i', '--input', help='path to input image/video')
args = vars(parser.parse_args())
This just takes one argument while executing the script. That is the path to the image that we want to apply image segmentation on.
Now, let’s initialize the model and the computation device.
# download or load the model from disk
model = torchvision.models.segmentation.fcn_resnet50(pretrained=True)

# set computation device
device = torch.device('cuda' if torch.cuda.is_available() else 'cpu')

# model to eval() model and load onto computation devicce
model.eval().to(device)
If you are executing the code at line 2 for the first time, the model will be downloaded into your system. Else, it will be just loaded from the disk.
Also, for applying segmentation to images, it is not necessary to have a GPU. Although it will be much faster on a GPU.
We are also getting the model into eval() mode and loading it into the computation device.
Read the Image and Do the Forward Pass
We are all set to read the image and apply segmentation to the image.
# read the image
image = Image.open(args['input'])
# do forward pass and get the output dictionary
outputs = segmentation_utils.get_segment_labels(image, model, device)
# get the data from the `out` key
outputs = outputs['out']
segmented_image = segmentation_utils.draw_segmentation_map(outputs)
- After reading the image, we are doing the forward pass at line 4.
- On line 6, we are getting the tensors in the
outkey of the ordered dictionary. - Finally, On line 7 we are applying the color masks for the different classes that are detected in the image.
Overlaying the Image and Saving to Disk
Now we can overlay the segmented mask on top of the original image.
final_image = segmentation_utils.image_overlay(image, segmented_image)
save_name = f"{args['input'].split('/')[-1].split('.')[0]}"
# show the segmented image and save to disk
cv2.imshow('Segmented image', final_image)
cv2.waitKey(0)
cv2.imwrite(f"outputs/{save_name}.jpg", final_image)
Overlaying the segmentation mask on top of the image is just one line of code.
After that, we are creating a save_name variable using which we will save the final result to disk. Finally, we are visualizing the image and save it to disk as well.
This is all the code we need to apply deep learning image segmentation to images. Now, let’s execute segment.py file and see the outputs.
Execute segment.py from Command Line/Terminal
Open up your command line/terminal and cd into the project directory.
Let’s start with the street2.jpg image in the input folder.
python segment.py --input input/street2.jpg
The following is the output.
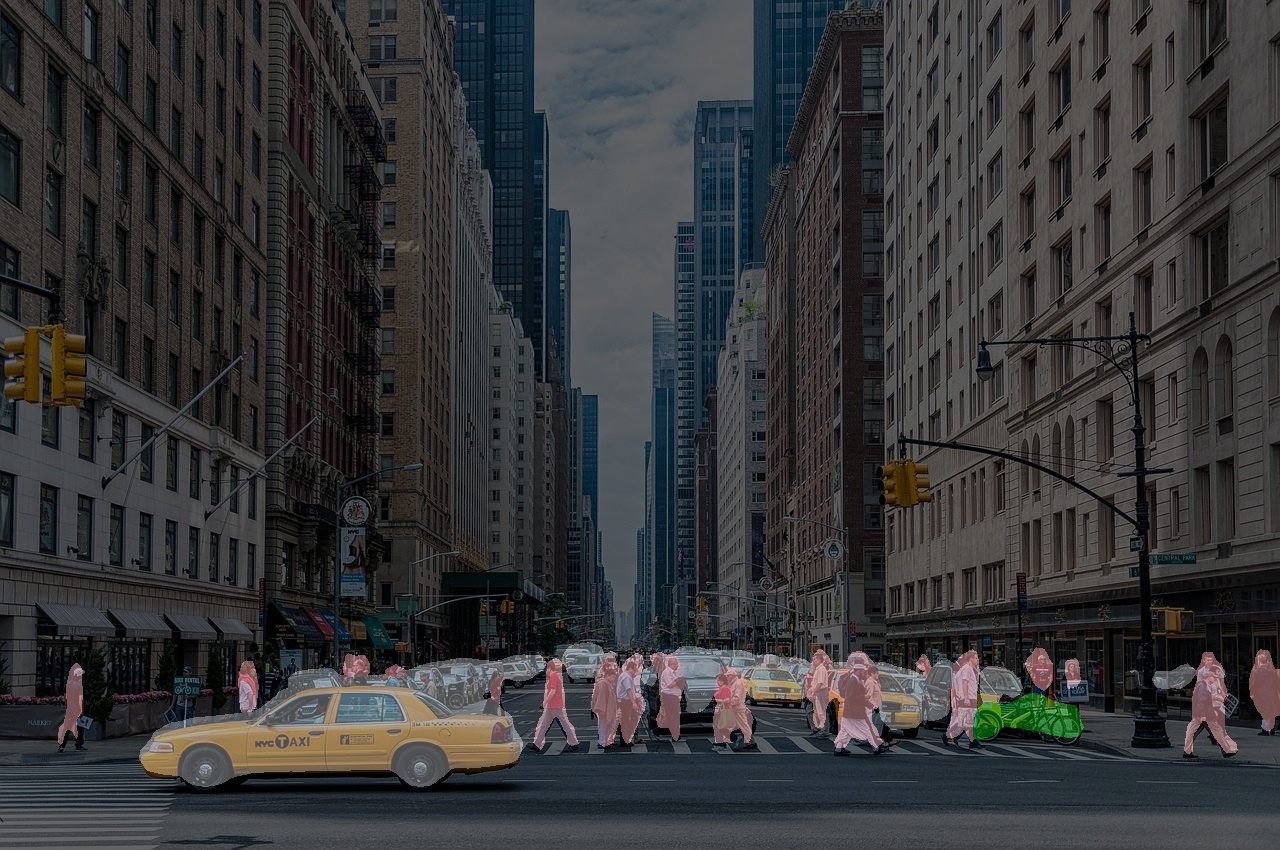
We can see that the FCN ResNet50 segmentation model is working pretty well. All the persons are segmented into a light red color, the cars into white, and bicycles into green color. But the results are not perfect. We can see that the masks for the bicycles are not well aligned. This may be due to the fact they appear very small in the image. Or maybe using a bigger model like FCN ResNet101 will give us better results.
Now, let’s try another image.
python segment.py --input input/street3.jpg
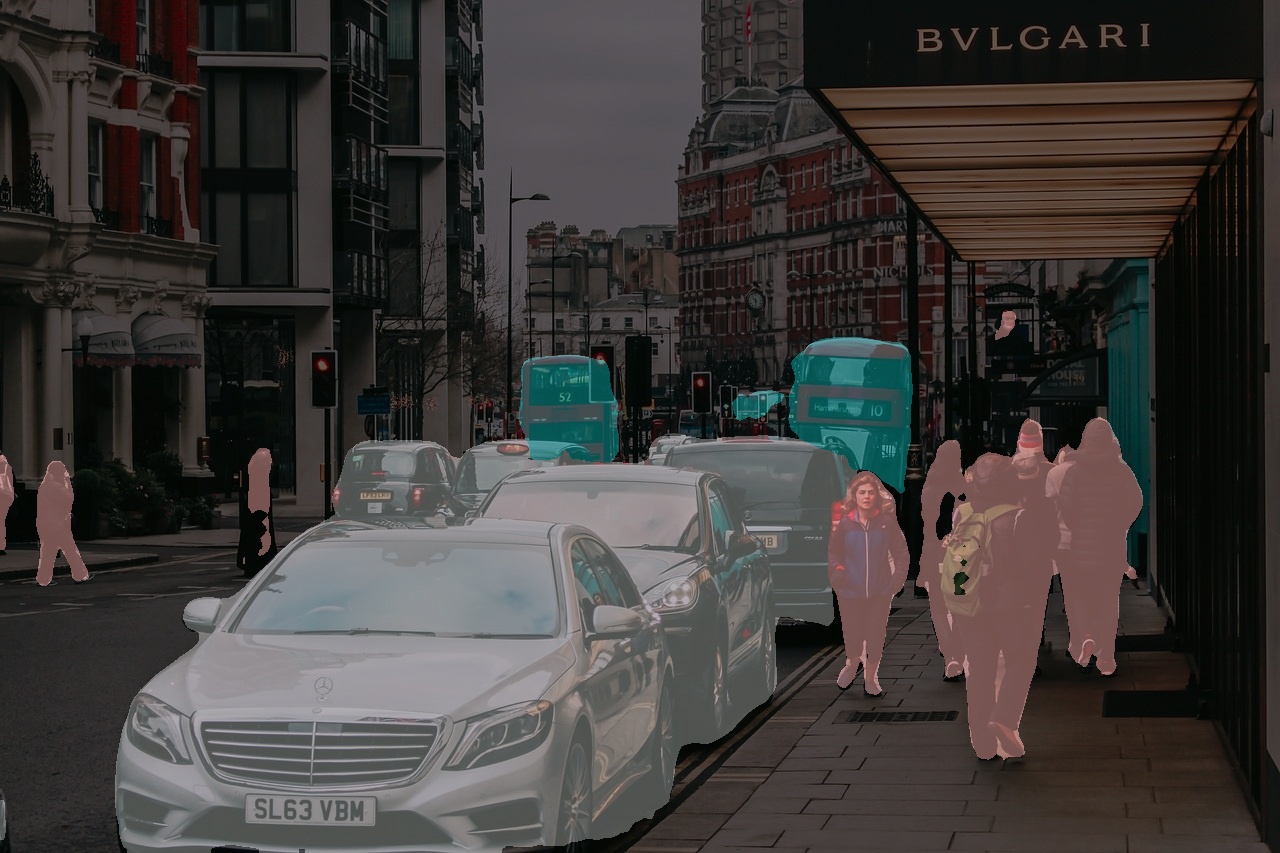
In figure 4, we have instances of buses along with persons and cars. The buses are masked with dark cyan color. But this time also we can see that there is a blob of mask in the background where there is no bus. For some reason, the model is mistaking the traffic light boards as a bus. The most probable reason is that the traffic lights look like the headlights or the brake lights of a bus. This time also, maybe using FCN ResNet101 will help.
Now, we can move on to applying deep learning segmentation to videos.
Applying Deep Learning Segmentation to Videos
Applying segmentation to videos is not much different than images. We know that videos consist of frames. We can easily apply deep learning segmentation to videos if we treat each frame as an image.
The best part is we need not go into many details of the code in this section. This is because we have already covered almost all the steps and what each function does in the previous sections. Still, we will cover some of the important steps.
All the code from here onward will go into the segment_vid.py file.
The following are the imports that we need.
import torchvision
import cv2
import torch
import argparse
import time
import segmentation_utils

from PIL import Image
Next, we have the argument parser for the input video file that we will provide at the time of execution.
# construct the argument parser
parser = argparse.ArgumentParser()
parser.add_argument('-i', '--input', help='path to input video')
args = vars(parser.parse_args())
Initializations
Here, we will initialize all the things that we will need further on. These are the computation device, the FCN ResNet50 model, and the OpenCV VideoCapture object.
# set the computation device
device = torch.device('cuda' if torch.cuda.is_available() else 'cpu')

# download or load the model from disk
model = torchvision.models.segmentation.fcn_resnet50(pretrained=True)
# load the model onto the computation device
model = model.eval().to(device)

cap = cv2.VideoCapture(args['input'])
if (cap.isOpened() == False):
    print('Error while trying to read video. Please check path again')
Next, we have a few lines of code that will make our work a bit easier down the road.
# get the frame width and height
frame_width = int(cap.get(3))
frame_height = int(cap.get(4))

save_name = f"{args['input'].split('/')[-1].split('.')[0]}"
# define codec and create VideoWriter object
out = cv2.VideoWriter(f"outputs/{save_name}.mp4",
                      cv2.VideoWriter_fourcc(*'mp4v'), 30,
                      (frame_width, frame_height))

frame_count = 0 # to count total frames
total_fps = 0 # to get the final frames per second
- On lines 2 and 3, we get the width and height of the video frames. This is important while saving the video file.
- On line 5, we define the name by which we will save the segmented video frames.
- Starting from line 7, we initialize the
VideoWriter()object for saving the video. We also define the codec to save the video. We will save it as a.mp4file. - Finally,
frame_countandtotal_fpswill help us keep track of the total number of frames and total FPS (Frames per Second) while segmenting the video frames.
Applying Deep Learning Image Segmentation to Each Video Frame
Here, we will have a big while loop that will keep running until there are no more frames in the video.
# read until end of video
while(cap.isOpened()):
    # capture each frame of the video
    ret, frame = cap.read()
    if ret == True:
        # get the start time
        start_time = time.time()
        with torch.no_grad():
            # get predictions for the current frame
            outputs = segmentation_utils.get_segment_labels(frame, model, device)

        # draw boxes and show current frame on screen
        segmented_image = segmentation_utils.draw_segmentation_map(outputs['out'])

        final_image = segmentation_utils.image_overlay(frame, segmented_image)

        # get the end time
        end_time = time.time()
        # get the fps
        fps = 1 / (end_time - start_time)
        # add fps to total fps
        total_fps += fps
        # increment frame count
        frame_count += 1

        # press `q` to exit
        wait_time = max(1, int(fps/4))
        cv2.imshow('image', final_image)
        out.write(final_image)
        if cv2.waitKey(wait_time) & 0xFF == ord('q'):
            break
    else:
        break
- We keep on applying deep learning image segmentation to each of the video frames.
- Lines 10 and 13 get the tensor outputs and the segmentation labels respectively. Line 15 gets the final overlayed and segmented output image.
- We also keep track of the time taken to segment each frame, the total FPS, and the total number of frames (lines 18, 20, 22, and 24).
- Finally, we visualize each frame and save the frames at lines 28 and 29. You can press
qto break out of the loop.
Destroying All Video Windows and Calculating Average FPS
This is the final step. We need to release the OpenCV VideoCapture() object and destroy all of its windows. We will also calculate the average FPS.
# release VideoCapture()
cap.release()
# close all frames and video windows
cv2.destroyAllWindows()

# calculate and print the average FPS
avg_fps = total_fps / frame_count
print(f"Average FPS: {avg_fps:.3f}")
This is all we need to apply deep learning image segmentation to videos. We are all set to execute segment_vid.py file.
Execute segment_vid.py from the Command Line/Terminal
Note: It will be a lot better if you have a CUDA enabled NVidia GPU for this section. If you are running the program on a CPU, then you will get less than or close to 1 FPS depending on your CPU. If this is the case, then run the program, ensure that the segmentation code works for a few frames, and then press q to quit. Else, it will take a long time to segment all the frames of the video.
Use the following command to execute.
python segment_vid.py --input input/video1.mp4
The following is the FPS that I get on my GTX 1060.
Average FPS: 7.453
It is somewhat close to 7 FPS. Not too good for sure. But then again, GTX 1060 is not a very powerful GPU for deep learning. You may get more or less FPS depending on the model of your GPU.
Now, let’s take a look at the segmented video that is saved to the disk.
The results are pretty good, Almost all the persons are segmented correctly. There are a few instances where we can see that the persons are being segmented into violet colors. This means that the FCN ResNet50 model is classifying those pixels wrongly.
Take a look at the following image segmentation tutorials. You will surely find them useful.
- Semantic Segmentation using PyTorch DeepLabV3 and Lite R-ASPP with MobileNetV3 Backbone
- Semantic Segmentation using PyTorch DeepLabV3 ResNet50
- Instance Segmentation with PyTorch and Mask R-CNN
Summary and Conclusion
In this article, you got hands-on experience in applying deep learning semantic segmentation on images and videos. You used the FCN ResNet50 semantic segmentation model with the PyTorch deep learning framework. You also saw some flaws in the deep learning model. Hopefully, you will try using the FCN ResNet101 model on the above images and videos and tell your findings in the comment section.
If you have any doubts, suggestions, or thoughts, then please leave them in the comment section. I will surely address them.
You can contact me using the Contact section. You can also find me on LinkedIn, and X.

Can I have all codes for this tutorial
Hello Hai Luu. All the code is already present in this tutorial, please just copy/paste and run them according to the code files. I am sure all will work fine.
hi Sovit, please i have an error ( read image)
fp.seek(0)
AttributeError: ‘NoneType’ object has no attribute ‘seek’
During handling of the above exception, another exception occurred:
image = Image.open((args[‘input’]))
fp = io.BytesIO(fp.read())
AttributeError: ‘NoneType’ object has no attribute ‘read’
Hi Paul. Seems like your input path to image is wrong. Can you please check that again?
Hi Sovit,
First of all, thank you for the article. It is very clear and easy to understand, and helped me a lot with using fcn_resnet50.
However, when I am running the program, I get an error in draw_segmentation_map() saying: ‘collections.OrderedDict’ object has no attribute ‘squeeze’.
I copied and pasted your code, then loaded an image and ran the functions on it in the following way.
img1 = cv2.imread(“inputs/bird_dog_cat.jpg”)
img1_segments = get_segment_labels(img1, model, device)
map1 = draw_segmentation_map(img1_segments)
Do you know what the problem might be here?
Hello Autumn. Can you specify which line is causing this error? Then I think that most probably I will be able to help you.
It is this line in draw_segmentation_map() (Line 2 in the function)
labels = torch.argmax(outputs.squeeze(), dim=0).detach().cpu().numpy()
It happens when I give the function the result from get_segment_labels().
Thanks for the reply.
Hello Autumn, I tried the code but everything ran fine. You are loading the image with OpenCV. Can you try with PIL as in the post here? OpenCV should not cause issues, but still, if you can try once.
Also, would like to know the PyTorch version you are using. And if you can just try the images given with this post once. Whether they are running fine or not. These will help me debug as I am not able to reproduce your error now.
hello, can you please explain how the model is taking a parameter in the line
outputs = model(image)
in get_segment_labels function whereas it is not designed to do so in segmentation_utils.py
Hello Prami. Actually, model(image) is the inherent property of PyTorch to give an input whenever we provide an image tensor as input to the model. It has nothing to do with the segmentation_utils.py function. model(image) will anyhow return an output of format
Hello, can you please explain why a argument parser is needed? And also what is it for? Can I simple use Image.open(‘datapath’) to complete the load of an image? I’ve tried it but it still didn’t work. I just can’t figure out how.
Hello Zachry. Yes, a direct image path will work. If you are using a Jupyter Notebook, be sure to comment out all the argument parser code and then give the direct path. If you still face issues, please paste the error here, so that we can resolve it faster.
How did we figure out which label for what index? How can we know the first one is the background and then airplanes? Anywhere we can find this information?
Hello Sam. The mode outputs class labels for each pixel. So, when we are doing this,
index = labels == label_num
we are checking which predicted label is matching which label number. And according to that, we are assigning color to the pixels.
Hello Sovit
(autoroto) MacBookVFX:PythonScripts liz$ python segment.py –input input/street2.jpg
Traceback (most recent call last):
File “segment.py”, line 22, in
model = torchvision.models.segmentation.fcn_resnet50(pretrained=True)
File “/anaconda3/envs/autoroto/lib/python3.7/site-packages/torchvision/models/segmentation/segmentation.py”, line 70, in fcn_resnet50
return _load_model(‘fcn’, ‘resnet50’, pretrained, progress, num_classes, aux_loss, **kwargs)
File “/anaconda3/envs/autoroto/lib/python3.7/site-packages/torchvision/models/segmentation/segmentation.py”, line 54, in _load_model
raise NotImplementedError(‘pretrained {} is not supported as of now’.format(arch))
NotImplementedError: pretrained fcn_resnet50_coco is not supported as of now
(autoroto) MacBookVFX:PythonScripts liz$ vi segment.py
(autoroto) MacBookVFX:PythonScripts liz$ python segment.py –input input/street2.jpg
Traceback (most recent call last):
File “segment.py”, line 22, in
model = torchvision.models.segmentation.fcn_resnet50(pretrained=True)
File “/anaconda3/envs/autoroto/lib/python3.7/site-packages/torchvision/models/segmentation/segmentation.py”, line 70, in fcn_resnet50
return _load_model(‘fcn’, ‘resnet50’, pretrained, progress, num_classes, aux_loss, **kwargs)
File “/anaconda3/envs/autoroto/lib/python3.7/site-packages/torchvision/models/segmentation/segmentation.py”, line 54, in _load_model
raise NotImplementedError(‘pretrained {} is not supported as of now’.format(arch))
NotImplementedError: pretrained fcn_resnet50_coco is not supported as of now
Hello. May I know which version of PyTorch you are using? As far as I know, PyTorch versions >= 1.8.1 support FCN ResNet50.
Also, can you please ensure that you are loading the model as:
model = torchvision.models.segmentation.fcn_resnet50(pretrained=True)
And not as:
model = torchvision.models.segmentation.fcn_resnet50_coco(pretrained=True)
Please let me know what happens.
Nice tutorial, Sovit.
Thanks for your efforts.
Thank you Alok.