
A few weeks ago I posted a tutorial on Faster RCNN Object Detection with PyTorch. In this article, the readers got to use deep learning and Faster RCNN object detector to detect objects in videos and images. After going through the tutorial, one of the readers asked me if I could do a tutorial detecting potholes in images of roads. He wanted to compare the performance of the RCNN deep learning object detector and the YOLO deep learning object detector. After that, I got down to making the tutorial happen. Although we will not be able to compare two different deep learning object detectors here. We will be carrying out road pothole detection with PyTorch Faster RCNN ResNet50.
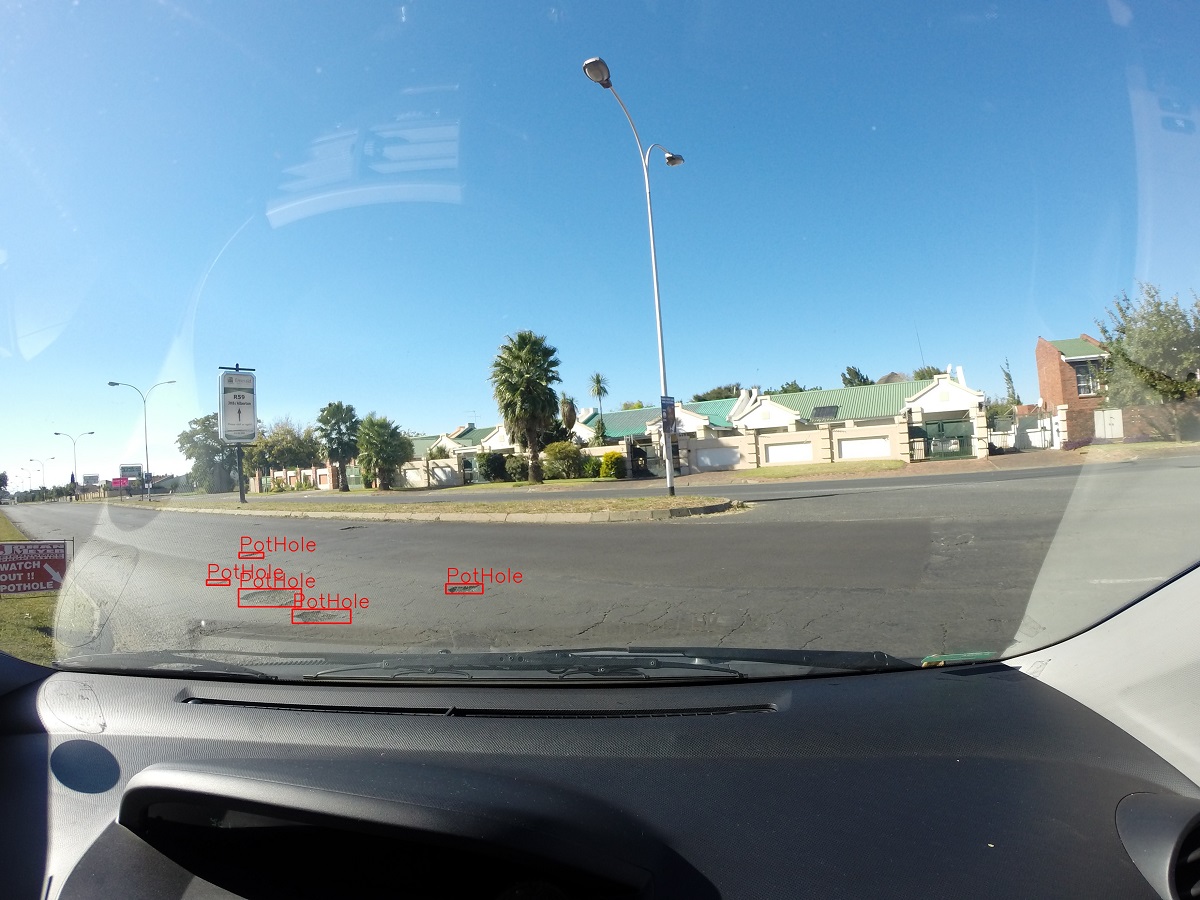
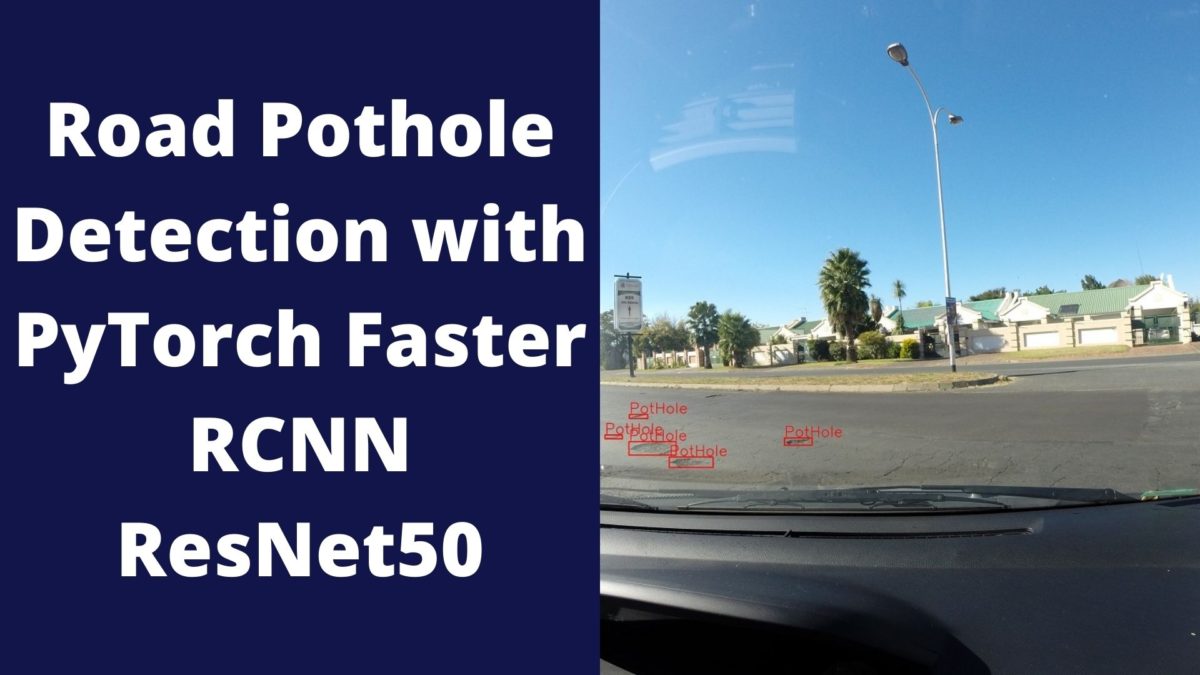
Figure 1 shows an example output after we train a Faster RCNN model and use it to predict on the test data. You can also expect to get similar results after going through this tutorial.
If You are New to Object Detection in Deep Learning…
If you are new to object detection in deep learning, then I recommend that you go through the following articles first.
- Introduction to Deep Learning for Object Detection.
- Evaluation Metrics for Object Detection.
- Faster RCNN Object Detection with PyTorch.
The above articles will give you a pretty good idea of deep learning based object detection. You will get to learn the basic theoretical concepts, the evaluation metrics used for object detection, and also use pre-trained models to get hands-on experience.
What will you learn in this tutorial?
- How to use PyTorch for object detection on a real-world dataset?
- Using PyTorch pre-trained models and fine-tuning it by training it on our own dataset.
- Using the Faster RCNN ResNet50 FPN model for training and detecting potholes in images of roads.
- Finally, detecting potholes in the test images using the trained models.
I hope that you are excited to move along with this tutorial. Let’s start.
The Dataset and the Project Directory
This is perhaps the most important thing in deep learning and machine learning in general. We need a dataset to start anything in deep learning.
We will use the dataset that is provided in this paper. Thanks to S. Nienaber, M.J. Booysen, and R.S. Kroon for making this dataset public. This dataset contains almost 8 GB of image data. You can find the original data in this Google Drive link. But I recommend that you do not download the data from this link. The main reason being, you will have to do a lot of preprocessing yourself and also create the labeled dataframe yourself.
I have downloaded the whole Dataset 1 (Simplex) data and written a python script to generate a CSV file with all the pothole instances and corresponding labels. Then I have uploaded it to Kaggle Dataset and made it public. It will be much easier for you if you download the dataset from this Kaggle Dataset link.
This dataset contains the whole Dataset 1 (Simplex) and a train_df.csv file which contains all the annotated instances of all the potholes in the images.
Download the zip file and extract it while using following the directory structure. Extract it inside the input folder.
The Directory Structure
The code for pothole detection using Faster RCNN is structured in the following manner.
│   config.py
│   dataset.py
│   engine.py
│   model.py
│   test.py
│   train.py
├───checkpoints
├───input
│   │   PotholeDataset.pdf
│   │   train_df.csv
│   └───Dataset 1 (Simplex)
│       └───Dataset 1 (Simplex)
│           ├───Test data
│           └───Train data
│               ├───Negative data
│               └───Positive data
├───test_predictions
- You can see that there are six python scripts. We will get into the details of their content when writing the code for them.
- The
inputfolder contains the dataset after we extract the data that we download from the Kaggle Dataset link.The Dataset 1 (Simplex)also contains two text files that have the annotations of the pothole images. You need not worry about that now. I have already created thetrain_df.csvusing the training annotation text file. TheTrain datacontains the positive and negative pothole images. TheTest datafolder contains images that we will use for testing. - The
checkpointsfolder will contain the trained model. - Finally,
test_predictionswill contain all the output after we use our trained Faster RCNN object detector to detect potholes in the images insideTest data.
Here are a few images from the dataset with potholes in them.
Figure 2 shows a few images from the dataset that contain potholes in them. I recommend that you explore the dataset on your own a bit before moving further.
A Note Before Moving Ahead
I hope that you have set up the directory for the project as per the above section. Now, you will notice that the train_df.csv contains the instances with positive examples only. This means that we are considering only those images for training that contain potholes. We will not be training the model on images that do not have any potholes.
The truth is, while training deep learning object detectors, it almost never hurts to train on positive instances only. This means that we can only show those images to the deep learning object detector that has some labeled instances of the object we want to detect. If an image does not contain an object and we do not train on those images, then performance does not decrease in most cases. This is true for all the benchmarking datasets like Pascal VOC or MS COCO as well. All the images in these datasets contain some instances of the objects. Therefore, we are ignoring the negative classes while training on this pothole image dataset.
Now, we are all set to jump into the coding part of this tutorial.
Install the Required Libraries and Frameworks
- We will use the PyTorch deep learning framework in this tutorial. Be sure to install the latest version of PyTorch before moving ahead.
- For the transformations, we will use the Albumentations library. Install this before moving ahead as well.
pip install albumentations- If you want to know more about the usage of Albumentations, then you may check one of my previous articles here. Image Augmentation using PyTorch and Albumentations.
Pothole Detection using Faster RCNN ResNet50 and PyTorch
Starting from this section onward, we will write the code to detect potholes in roads using deep learning object detection. We will move step-by-step while writing the code for each of the python scripts. I will be telling which python code will go into which script to avoid confusion.
Let’s start with the configuration python script, which is config.py script.
Setting Up the Configuration Python Script
All the code in this section will go into the config.py file. The config.py python script will contain all the training configurations. These include the training and test data path, the number of epochs to train for, the batch size, and some other details as well.
Let’s write the code and then we will get into the details.
ROOT_PATH = 'input/Dataset 1 (Simplex)/Dataset 1 (Simplex)'
TEST_PATH = 'input/Dataset 1 (Simplex)/Dataset 1 (Simplex)/Test data'
PREDICTION_THRES = 0.8
EPOCHS = 5
MIN_SIZE = 800
BATCH_SIZE = 2
DEBUG = False # to visualize the images before training
We also have the MIN_SIZE argument set to 800. This is the size that the Faster RCNN ResNet50 model will resize the input image to. This is a very important argument too. We can get really good results by setting this to a higher resolution like 1024. But that will also increase the training time. For now, we are keeping it to the default size of 800. If you want to know more about the effect of the MIN_SIZE value, then you should surely take a look at this tutorial.
The PREDICTION_THRES is the confidence threshold that we will use while testing on the test data. Any detections below the confidence value of 0.8 will be rejected.
Then we have the DEBUG argument. If this argument is True, then the code will show us a few annotated input images before training. Also, we will be training the model for 5 epochs.
Preparing the Faster RCNN ResNet50 FPN Model for Pothole Detection
Now, we will write the code to load the Faster RCNN ResNet50 FPN model. We will use the pre-trained weights that PyTorch provides. We will just change the head of the model so that the model will classify the images based on our input images. The code here will go into the model.py python file.
The following are the imports that we will need to prepare the deep learning object detector model.
"""
Python script to prepare FasterRCNN model.
"""

import torch
import torchvision

from torchvision.models.detection.faster_rcnn import FastRCNNPredictor
from torchvision.models.detection import  FasterRCNN
from torchvision.models.detection.rpn import AnchorGenerator
import config
Next, let’s write the function to prepare the model.
def model():
    # load the COCO pre-trained model
    # we will keep the image size to the original 800 for faster training,
    # you can increase the `min_size` in `config.py` for better ressults,
    # although it may increase the training time (a trade-off)
    model = torchvision.models.detection.fasterrcnn_resnet50_fpn(pretrained=True,
                                                                 min_size=config.MIN_SIZE)
    # one class is for pot holes, and the other is background
    num_classes = 2
    # get the input features for the classifier
    in_features = model.roi_heads.box_predictor.cls_score.in_features
    # replace pre-trained head with our features head
    # the head layer will classify the images based on our data input features
    model.roi_heads.box_predictor = FastRCNNPredictor(in_features, num_classes)

    return model
The above code block contains a lot of documentation to help you understand the code block better.
- Take a look at lines 6 and 7. We are using
pretrained=Trueand theMIN_SIZEargument from theconfig.pyscript. - Now, you may wonder, why do we have two classes when there is only one class in our dataset, that is “pothole”. Well, one class is “pothole” and the other is the mandatory background class.
- On line 11, we are getting the
in_features. These are the pre-trained features from the MS COCO dataset. - Finally, On line 14, we initialize the
FastRCNNPredictorwith thein_featuresand the number of classes (num_classes).
Preparing the Dataset for Pothole Detection using Faster RCNN
Here, we will prepare the dataset for training. This includes the PotHoleDataset() class and the data loader as well. We will also define the training image transformations here. Again, be sure to install the Albumentations library before moving ahead.
This code will go into the dataset.py file.
Import the following modules and libraries.
"""
Python script to prepare the dataset
"""

import os
import numpy as np
import cv2
import torch
import glob
import albumentations as A
import pandas as pd
import config

from torch.utils.data import Dataset
from albumentations.pytorch.transforms import ToTensorV2
from torch.utils.data import DataLoader
You will notice that we are importing ToTensorV2 from albumentations. This is the Albumentations implementation to convert pixels into tensors.
The Dataset Class
The following is the complete PotHoleDataset() class.
class PotHoleDataset(Dataset):
    def __init__(self, dataframe, image_dir, transforms=None):
        super().__init__()

        self.image_ids = dataframe['image_id'].unique()
        self.df = dataframe
        self.image_dir = image_dir
        self.transforms = transforms

    def __getitem__(self, index: int):

        image_id = self.image_ids[index]
        records = self.df[self.df['image_id'] == image_id]

        image = cv2.imread(f"{self.image_dir}/Train Data/Positive data/{image_id}.JPG", cv2.IMREAD_COLOR)
        image = cv2.cvtColor(image, cv2.COLOR_BGR2RGB).astype(np.float32)
        image /= 255.0

        # convert the boxes into x_min, y_min, x_max, y_max format
        boxes = records[['x', 'y', 'w', 'h']].values
        boxes[:, 2] = boxes[:, 0] + boxes[:, 2]
        boxes[:, 3] = boxes[:, 1] + boxes[:, 3]

        # get the area of the bounding boxes
        area = (boxes[:, 3] - boxes[:, 1]) * (boxes[:, 2] - boxes[:, 0])
        area = torch.as_tensor(area, dtype=torch.float32)

        # we have only one class
        labels = torch.ones((records.shape[0],), dtype=torch.int64)

        # supposing that all instances are not crowd
        iscrowd = torch.zeros((records.shape[0],), dtype=torch.int64)

        target = {}
        target['boxes'] = boxes
        target['labels'] = labels
        target['image_id'] = torch.tensor([index])
        target['area'] = area
        target['iscrowd'] = iscrowd

        # apply the image transforms
        if self.transforms:
            sample = {
                'image': image,
                'bboxes': target['boxes'],
                'labels': labels
            }
            sample = self.transforms(**sample)
            image = sample['image']

            # convert the bounding boxes to PyTorch `FloatTensor`
            target['boxes'] = torch.stack(tuple(map(torch.FloatTensor,
                                                    zip(*sample['bboxes'])))).permute(1, 0)

        return image, target, image_id

    def __len__(self):
        return self.image_ids.shape[0]
We will not go into much details of the above code class. We will take a look just at some of the important lines of code. If you have any doubts, then feel free to ask in the comment section. I will surely answer them.
- We have the bounding boxes in the x_min, y_min, width, and height format. We are converting that to x_min, y_min, x_max, and y_max format from lines 20 to 22.
- At lines 25 and 26, we get the area of the bounding boxes.
- We prepare the
targetdictionary starting from line 34 till line 39. This will act as our training labels. - Then we apply the image transforms starting from line 42 and convert the bounding boxes to
FloatTensorat line 52. - Finally, we return the
image,target, andimage_idat line 55.
If you wish to get into more depth of preparing the data for PyTorch object detection in general, then be sure to take a look at this official GitHub repository. You will find the dataset preparation code inside the coco_utils.py file.
Now, we will define two functions.
The collate_fn() Function
The collate_fn() function helps when we have different number of instances in the images. This will lead to a different number of targets in a single batch as well which will cause problems during training. The collate_fn() function takes a single batch of data and returns it as a tuple.
def collate_fn(batch):
    """
    This function helps when we have different number of object instances
    in the batches in the dataset.
    """
    return tuple(zip(*batch))
Function for Image Transforms
Let’s define a function for the image transforms. We will call it as train_transform().
# function for the image transforms
def train_transform():
    return A.Compose([
        A.Flip(0.5),
        # A.RandomRotate90(0.5),
        # A.MotionBlur(p=0.2),
        # A.MedianBlur(blur_limit=3, p=0.1),
        # A.Blur(blur_limit=3, p=0.1),
        ToTensorV2(p=1.0)
    ], bbox_params={'format': 'pascal_voc', 'label_fields': ['labels']})
We are just flipping the images horizontally with a probability of 0.5 and converting the images to tensor. You will see that there are a lot of commented transforms. Although we can use those, we will not use those in this tutorial. Using them will surely make the model much more robust. Using these transforms will have a slight impact on the training time. Be sure to train using these transforms on your own some time and tell about your findings in the comment section.
Prepare the Training Dataframe
Let’s prepare the training DataFrame now. Take a look at the following code block.
# path to the input root directory
DIR_INPUT = config.ROOT_PATH
# read the annotation CSV file
train_df = pd.read_csv(f"input/train_df.csv")
print(train_df.head())
print(f"Total number of image IDs (objects) in dataframe: {len(train_df)}")

# get all the image paths as list
image_paths = glob.glob(f"{DIR_INPUT}/Train Data/Positive data/*.JPG")
image_names = []
for image_path in image_paths:
    image_names.append(image_path.split(os.path.sep)[-1].split('.')[0])
print(f"Total number of training images in folder: {len(image_names)}")
image_ids = train_df['image_id'].unique()
print(f"Total number of unique train images IDs in dataframe: {len(image_ids)}")

# number of images that we want to train out of all the unique images
train_ids = image_names[:] # use all the images for training
train_df = train_df[train_df['image_id'].isin(train_ids)]
print(f"Number of image IDs (objects) training on: {len(train_df)}")
Sometimes, in a dataset, we may have an image name in the CSV file, but that image may not be present in the image folder. To check for this we just need a single line of code. We are doing that at lines 18 and 19.
The Train Dataset and Train Data Loader
Finally, for the dataset preparation part, we need to initialize the PotHoleDataset() and define the train data loader.
train_dataset = PotHoleDataset(train_df, DIR_INPUT, train_transform())

train_data_loader = DataLoader(
    train_dataset,
    batch_size=config.BATCH_SIZE,
    shuffle=False,
    collate_fn=collate_fn
)
We are using the batch size from config.py file, that is a batch size of 2. If you face OOM (Out of Memory) error while training, then reduce the batch size to 1.
Writing the Training and Some Helper Functions
In this section, we will write the training function and some helper functions along with that. The code in this section will go into the engine.py file.
Importing the modules first.
import cv2
import matplotlib.pyplot as plt
import numpy as np
import torch

from model import model
from dataset import train_data_loader
The two lines of code will initialize the device, the model, and define the optimizer that we will use.
# the computation device
device = torch.device('cuda' if torch.cuda.is_available() else 'cpu')
model = model().to(device)
optimizer = torch.optim.SGD(model.parameters(), lr=0.001, momentum=0.9, weight_decay=0.0005)
We will use the SGD() optimizer with a learning rate of 0.001, a momentum of 0.9, and a weight decay of 0.0005.
The Training Function
There are a few important points that we need to take care of while training the Faster RCNN ResNet50 FPN model. This is true for any of the PyTorch pre-trained deep learning object detectors. When we use these pre-trained models on our own dataset and fine-tune them, then we have to keep a few things in mind. We will go over these points after we write the function.
def train(train_dataloader):
    model.train()
    running_loss = 0
    for i, data in enumerate(train_dataloader):

        optimizer.zero_grad()
        images, targets, images_ids = data[0], data[1], data[2]
        images = list(image.to(device) for image in images)
        targets = [{k: v.to(device) for k, v in t.items()} for t in targets]

        loss_dict = model(images, targets)

        loss = sum(loss for loss in loss_dict.values())
        running_loss += loss.item()

        loss.backward()
        optimizer.step()

        if i % 25 == 0:
            print(f"Iteration #{i} loss: {loss}")

    train_loss = running_loss/len(train_dataloader.dataset)
    return train_loss
Explanation of the Training Function
- Lines 6, 7, and 8 are quite usual where we extract the images and the target labels from the data.
- Did you notice that we did not define any loss function before the training function? This is because, we need to provide the Faster RCNN ResNet50 object detector with both, the images and the target labels as well. Take a look at line 11. We directly get a loss dictionary in this line that saves in
loss_dict. Now, if you printloss_dict, then you will find something similar to this.
# output format of `loss_dict` in training mode
{'loss_classifier': tensor(0.8491, device='cuda:0', grad_fn=),
'loss_box_reg': tensor(0.0608, device='cuda:0', grad_fn=),
'loss_objectness': tensor(4.9780, device='cuda:0', grad_fn=),
'loss_rpn_box_reg': tensor(0.5585, device='cuda:0', grad_fn=)}
- We have a dictionary of different loss values with the keys indicating the type of loss. We have the image classification loss, the bounding box regression loss, the objectness loss, and the region proposal loss for Faster RCNN.
- Keeping this in mind, we add all the loss values at line 13. Then we add the batch loss to the
running_lossto keep track of the epoch-wise loss. - At lines 16 and 17, we backpropagate the gradients and update the model parameters.
- Also, we are printing the loss values every 25 iterations to keep a close track of our progress. This is because training for one epoch takes a long time and we should know whether the loss is actually decreasing or not.
- Finally, we are calculating the epoch-wise loss, that is
train_lossand returning it.
Some Helper Functions
First, let’s define the function to save the trained model.
def save_model():
    torch.save(model.state_dict(), 'checkpoints/fasterrcnn_resnet50_fpn.pth')
The model will save inside the checkpoints folder.
Next, we will define a function called visualize(). This function will only execute if DEBUG=True inside the config.py script. If this function executes, then it will show some of the annotated training images before training begins.
def visualize():
    """
    This function will only execute if `DEBUG` is `True` in
    `config.py`.
    """
    images, targets, image_ids = next(iter(train_data_loader))
    images = list(image for image in images)
    targets = [{k: v for k, v in t.items()} for t in targets]

    for i in range(1):
        boxes = targets[i]['boxes'].cpu().numpy().astype(np.int32)
        sample = images[i].permute(1,2,0).cpu().numpy()
        fig, ax = plt.subplots(1, 1, figsize=(15, 12))

        for box in boxes:
            cv2.rectangle(sample,
                        (box[0], box[1]),
                        (box[2], box[3]),
                        (220, 0, 0), 3)
        ax.set_axis_off()
        plt.imshow(sample)
        plt.show()
The Training Script
The training script is going to be very simple and concise. We have already defined all the functions that we need. We just need to call those functions. The code in this part will go into the train.py file.
First, import the modules and libraries that we need.
import torch
import matplotlib
import matplotlib.pyplot as plt
import time

from model import model
import config
from engine import train, visualize, save_model
from dataset import train_data_loader, train_dataset
Next, visualize the annotated training images, if DEBUG=True in config.py.
if config.DEBUG:
    visualize()
The next few lines of code train the Faster RCNN ResNet50 on our road pothole images.
num_epochs = config.EPOCHS

for epoch in range(num_epochs):
    start = time.time()
    train_loss = train(train_data_loader)
    print(f"Epoch #{epoch} loss: {train_loss}")
    end = time.time()
    print(f"Took {(end - start) / 60} minutes for epoch {epoch}")
We just run a simple for loop and print the loss after each epoch. Also, we print the time that it takes for the completion of one epoch.
Finally, we save the model trained model.
save_model()
We have the training code ready. Now, it is time to execute train.py.
Training Faster RCNN for Pothole Detection
Move to the project directory in your command line or terminal and execute the train.py script.
python train.py
If you have DEBUG=True in the config.py file, then first you will see some of the training images. I am skipping that part here. The following is the truncated output from the training.
mage_id  num_potholes     x     y    w   h
0  G0010033             6  1990  1406   66  14
1  G0010033             6  1464  1442   92  16
2  G0010033             6  1108  1450   54  16
3  G0010033             6   558  1434  102  16
4  G0010033             6   338  1450   72  18
Total number of image IDs (objects) in dataframe: 4592
Total number of training images in folder: 1119
Total number of unique train images IDs in dataframe: 1337
Number of image IDs (objects) training on: 3896
Iteration #0 loss: 8.82939338684082
Iteration #25 loss: 0.40030747652053833
Iteration #50 loss: 0.6408292055130005
Iteration #75 loss: 0.47089526057243347
Iteration #100 loss: 0.1265372484922409
Iteration #125 loss: 0.251159131526947
Iteration #150 loss: 0.237876296043396
Iteration #175 loss: 0.5076833367347717
Iteration #200 loss: 0.458962082862854
Iteration #225 loss: 0.18618100881576538
Iteration #250 loss: 0.1883908063173294
Iteration #275 loss: 0.35126793384552
Iteration #300 loss: 0.17349722981452942
Iteration #325 loss: 0.4572589099407196
Iteration #350 loss: 0.3761522173881531
Iteration #375 loss: 0.3168582320213318
Iteration #400 loss: 0.6698653697967529
Iteration #425 loss: 0.11370620876550674
Iteration #450 loss: 0.09485868364572525
Iteration #475 loss: 0.2052663117647171
Iteration #500 loss: 0.6903306245803833
Iteration #525 loss: 0.1825105845928192
Iteration #550 loss: 0.1253437101840973
Epoch #0 loss: 0.18087337265278847
Took 14.302103877067566 minutes for epoch 0
Iteration #0 loss: 0.8553087711334229
Iteration #25 loss: 0.3376452624797821
...
Epoch #4 loss: 0.12217348455613259
Took 13.162632573102414 minutes for epoch 4
A single epoch takes somewhere around 13 to 14 minutes on a GTX 1060. Yours may take less or more time depending on the GPU that you have. By the end of 5 epochs, we have a loss value of 0.1221. This seems good enough for just 5 epochs. Still, we cannot say much until we test our model on the test images.
Inference for Pothole Detection Faster RCNN ResNet50 and PyTorch
In this section, we will write the code for testing our trained deep learning object detector on the test images.
All of this code will go into the test.py file.
The following are the imports that we need.
import numpy as np
import cv2
import os
import torch

from tqdm import tqdm
import config
from model import model
Let’s set the computation device and load the trained model weights.
# set the computation device
device = torch.device('cuda') if torch.cuda.is_available() else torch.device('cpu')
# load the model and the trained weights
model = model().to(device)
model.load_state_dict(torch.load('checkpoints/fasterrcnn_resnet50_fpn.pth'))
The following lines of code read all the image paths and stores those paths in a list called test_images.
DIR_TEST = config.TEST_PATH
test_images = os.listdir(DIR_TEST)
print(f"Validation instances: {len(test_images)}")
Reading All of the Images and Detecting the Potholes in Them
Here, we will have a single block of code. We will loop over all of the image paths, read the images using OpenCV, and detect the potholes in each of them.
detection_threshold = config.PREDICTION_THRES
model.eval()
with torch.no_grad():
    for i, image in tqdm(enumerate(test_images), total=len(test_images)):

        orig_image = cv2.imread(f"{DIR_TEST}/{test_images[i]}", cv2.IMREAD_COLOR)
        image = cv2.cvtColor(orig_image, cv2.COLOR_BGR2RGB).astype(np.float32)
        # make the pixel range between 0 and 1
        image /= 255.0
        image = np.transpose(image, (2, 0, 1)).astype(np.float)
        image = torch.tensor(image, dtype=torch.float).cuda()
        image = torch.unsqueeze(image, 0)

        cpu_device = torch.device("cpu")

        outputs = model(image)

        outputs = [{k: v.to(cpu_device) for k, v in t.items()} for t in outputs]
        if len(outputs[0]['boxes']) != 0:
            for counter in range(len(outputs[0]['boxes'])):
                boxes = outputs[0]['boxes'].data.numpy()
                scores = outputs[0]['scores'].data.numpy()
                boxes = boxes[scores >= detection_threshold].astype(np.int32)
                draw_boxes = boxes.copy()

            for box in draw_boxes:
                cv2.rectangle(orig_image,
                            (int(box[0]), int(box[1])),
                            (int(box[2]), int(box[3])),
                            (0, 0, 255), 3)
                cv2.putText(orig_image, 'PotHole',
                            (int(box[0]), int(box[1]-5)),
                            cv2.FONT_HERSHEY_SIMPLEX, 2, (0, 0, 255),
                            2, lineType=cv2.LINE_AA)
            cv2.imwrite(f"test_predictions/{test_images[i]}", orig_image,)

print('TEST PREDICTIONS COMPLETE')
Explanation of the Above Code Block
- First of all, we are defining the detection confidence threshold at line 1. At line 2, we are setting the model to
eval()mode which is very important. - Starting from line 4, we loop over all the image paths and read the images for detection.
- We get the
outputsat line 16. - At line 18, we move all the outputs onto the CPU.
- At line 19, we first check whether the
boxeslist is empty or not. We only move forward if the model has predicted the bounding box coordinates. - Then we extract the bounding box coordinates and the confidence scores. At line 23, we get hold of those bounding boxes only which have a higher score than the threshold.
- Starting from line 26, we loop over all the bounding boxes in an image and draw the rectangles using OpenCV. We also write the text ‘PotHole’ using OpenCV
putText()function for easier interpretation.
Execute the test.py File
Now, we are ready to detect potholes in the images. Execute the test.py script from the command line/terminal.
python test.py
You will see the output similar to this.
Validation instances: 628
 1%|▉                                                                 | 9/628 [00:13<15:59,  1.55s/it]
Detecting on all the images will take some time to run. If you want to detect potholes only in a few images, then quit the program after a few iterations. You will have the detection output images inside the test_predictions folder.
Analyzing the Detection Outputs
Let’s take a look at a few images that the Faster RCNN ResNet50 object detector has detected potholes in. There are more than 600 test images but we will take a look at just a few.
The Successful Detections
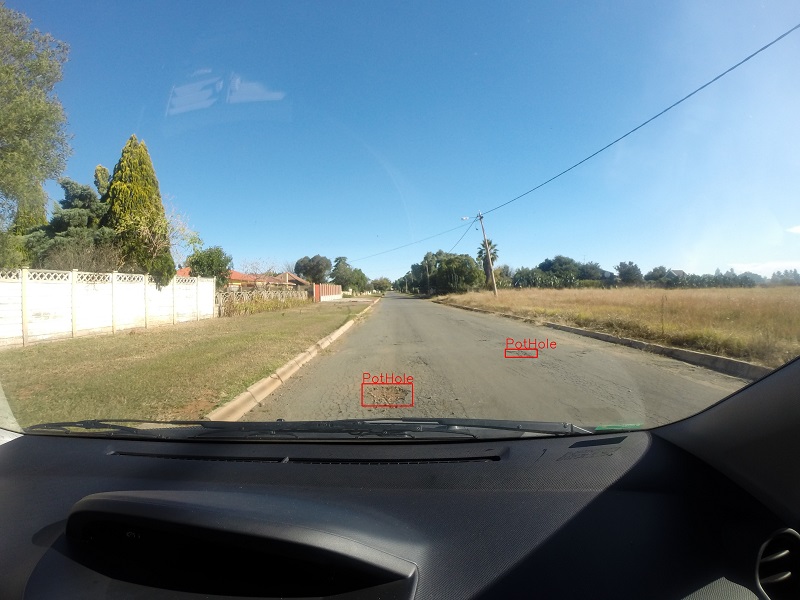
In this image, the Faster RCNN ResNet50 object detector detects the two potholes successfully. It is very clear that there are two potholes on the road which are clearly visible. This would have been easy for the detector.
But what about multiple potholes where the potholes are much smaller? Can the Faster RCNN ResNet50 detector detect those?
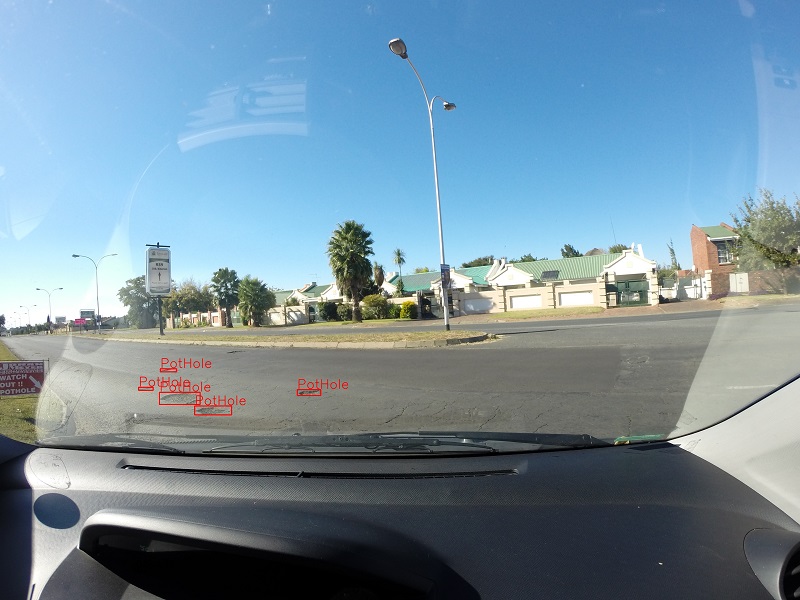
In figure 4, there are five potholes and two of them are small ones as well. Yet the Faster RCNN ResNet50 model is able to detect all of them successfully. Looks like our deep learning object detector has learned well.
Some Failed Detections
Now, let’s take a look at a few of the failed test cases. Take a look at the following image.
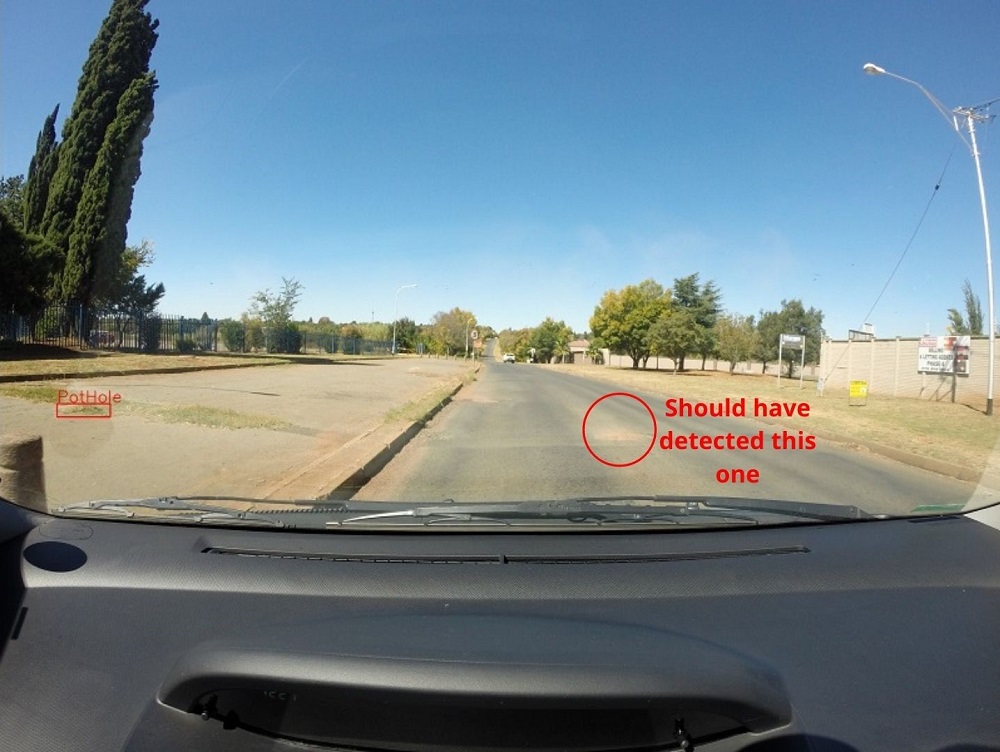
First of all, the Faster RCNN ResNet50 detector detects the pothole wrongly. It is detecting a patch of grass on the sidewalk as a pothole. And secondly, it is totally unable to detect the actual pothole in the middle of the road. I have marked it in the red circle with the text alongside it.
There are probably two main reasons for this failure. First, of all, the pothole in this road image is somewhat different. It looks like sand but if you zoom in, you will come to know that it is actually a pothole. This may have made it difficult for the Faster RCNN ResNet50 object detector to detect this pothole. Then again, we have trained the model for only 5 epochs. I am pretty sure that with more training it will able to detect this pothole successfully as well.
Do try more training on your own and tell about your results in the comment section. It will even help the others.
We will bring this tutorial to an end here.
Summary and Conclusion
In this article, you learned how to train the Faster RCNN ResNet50 FPN for pothole detection. We covered the basics that make up the groundwork of such a system. There are many more things to experiment with.
- We can try training for more epochs to get even better results.
- We can try using different backbones like Faster RCNN ResNet101 for pothole detection.
- Using Mask RCNN for both segmentation and detection of the potholes will also make it an even better project.
- There is also scope for making it a real-time system where we can detect potholes in videos. Although that would require some more work. I hope that you try this one too.
Do try to experiment with the above options. This will surely help you in your learning. I hope that I was successful to give you the groundwork to move further.
If you have any doubts, thoughts, or suggestions, then please leave them in the comment section. I will surely address them.
You can contact me using the Contact section. You can also find me on LinkedIn, and X.

Thanks sovit. But it is actually a pain to upload 8GB data on to colab?? Suggest a easier way. Thank you.
Hello Gaurav. Yes, I know that this tutorial uses a large dataset. And I think that you are using Google Colab instead of your local machine for the training part. Updating to Colab is really slow, I know about that. Actually, there are other ways to use Kaggle datasets directly in Colab. Explaining the process here is not a good idea as it needs some explanation. Most probably, I may write a tutorial on how to use Kaggle datasets with Colab in the near future. Moreover, I am in the process of making Colab notebooks for all my coding tutorials. It is going to take some time as there are more than 100 tutorials. So, please wait for some time. In the meantime, I will try my best to write a tutorial to use Kaggle datasets with Colab. I hope this helps.
Hi,Great tutorial to experiment and learn. any guidance on how to use on a dataset with multiple class objects ?
Hello Raj. I am really happy that you find the tutorial helpful. And if you want to use Faster RCNN to detect multiple objects in images and videos, then this tutorial will help you => https://debuggercafe.com/faster-rcnn-object-detection-with-pytorch/
We do not train the network in that tutorial but we detect multiple classes class objects in images and video. I hope this helps.
Following error is observed:
train_loss = train(train_data_loader, train_dataset)
The train function only takes a single arguement.
File “/home/deeplearner/Pothole_Detection/engine.py”, line 24, in
targets = [{k: v.to(device) for k, v in t.items()} for t in targets]
AttributeError: ‘str’ object has no attribute ‘items’
Kindly help sir.
Hi Gaurav, thank you for reaching out. Indeed there was an error. `train()` function takes only one argument, and I had passed two earlier. It is corrected now. I also corrected a few path names. I don’t know how the names got changed since I always run my codes before posting them. Still, please copy and paste all the code again. Sorry for the trouble. And if you find any more errors, then please be patient and notify me. I will repost all the code snippets after checking them again. Again, thanks for reaching out and for your patience.
Hello this article is too good, I have got a problem my model was trained on colab while predicting the data it is returning original images instead of predicted images.
No image were predicted with boxes and labels
help me to solve this
Hello Sai Reddy. Thank you for reaching out. I understand your situation. But without seeing the actual code, I cannot do anything. Is there any way you can share that colab notebook link? If possible mail the link as using the comment section will make it accessible to others as well.
Thanks sovit. This is very helpfull for me.
「Reading All of the Images and Detecting the Potholes in Them」
I don’t understand why need line 10?
——————
image = cv2.cvtColor(orig_image, cv2.COLOR_BGR2RGB).astype(np.float32)
# make the pixel range between 0 and 1
image /= 255.0
image = np.transpose(image, (2, 0, 1)).astype(np.float) <—this line
——————
Hello jijun. I am really happy that you found the post useful. We know that images are [height x width x channels], right. But by default, PyTorch takes input as [channels x height x width]. So, that line does the conversion. I hope this helps.
Thanks Sovit. How I do find the accuracy of the model?
We do not usually find accuracy in object detection, rather we find Mean Average Precision (mAP), precision, and recall. I have not calculated those in this article. But I will soon write new articles showcasing those as well.
How do I calculate mAP ? Can you give me links to some tutorials or videos on calculating mAP?
One of the codebases that I often use for calculating mAP whenever I am doing custom object detection training is this one => https://github.com/Cartucho/mAP
This has a good explanation on how to arrange and use the code. The code is also easily modifiable.
Thanks
Hey great guide!
I want to train a model with two more classes, how should I got about making changes to your code?
As of now, I think only the num_classes = 2 inside the model() function. But you may check the dataset class once as well to ensure that.
Thank you for the Tutorial!
Shouldn’t it be train(train_data_loader) instead of train(train_dataloader) in engine.py to import train_data_loader from dataset.py?
Hi Alex. Actually the import train_data_loader is not used in engine.py. Instead we call the train function from train.py by passing the data loader as the argument. My mistake that I have not removed the import line from engine.py.
Hi, good project! 2 questions
1.- Do you have the code of this post in a github repository?
2.- I dont have GPU, do you have the model saved?
Hello Oscar. As of now, I don’t have a repository for this. Right now I am creating a simple pipeline for Faster RCNN training that has a repository. You may check it out here => https://github.com/sovit-123/fastercnn-pytorch-training-pipeline
The accompanying post will be published soon as well.
As for the trained model, I will provide a link to it soon in this post.
Hi, thanks for the great tutorial. It really helped me a lot!
I want to use a RetinaNet instead of Faster R-CNN. Are there any major differences I have to think of?
Hi Anne. Glad that you found the tutorial helpful.
One of the first major differences is that Faster R-CNN is a two stage detector, while RetinaNet is a single stage detector. So, most probably, just changing the detector module for this code will not work. But there is an even better way to use RetinaNet.
I recommend that you use Detectron2 library from PyTorch which has a host state-of-the-art detection models. In fact, it is very easy to set it up on Colab as well. So, it might be worth looking into that.
https://github.com/facebookresearch/detectron2
I hope this helps.
Hi Sir
This is an enlightening tutorial. But I am finding difficulties in evaluation metric implementation. Can you share the part of the metric code you did?
Hello Srikanth. Thanks for raising the question. Actually, in this post and project as well, right now, it only has loss calculation. I completely understand that for object detection, we need mAP as an evaluation metric. I am already working on a pipeline and entire project to show and evaluate everything. It might be a few more weeks before I can publish that. In the meantime, if you want a bit more complete pipeline, you can take a look at this post, hope this helps.
https://debuggercafe.com/a-simple-pipeline-to-train-pytorch-faster-rcnn-object-detection-model/
Hi
Can you share the ground truth values of the test data set so that it helps in implementing IoU and other metrics?
If not with ground truth values can you tell how to implement evaluation metrics?
Hello Srikanth. The test data annotations are in the simpleTestFullSizeAllPotholesSortedFullAnnotation.txt file when you download the dataset. In the current form, I have not created a CSV file for the test set. I realize that many people are requesting for AP/mAP metrics and evaluation. I think it’s time that this post needs a REDO. Hopefully, I will use this same dataset and come up with a better post and pipeline in the near future.
Thanks for your patience.
Any update on MAP implementation
Hi Srikanth. The post will be published next week. Although I should mention that we do not implement the mAP from scratch in that post. Rather, we use the official PyTorch COCO evaluation metrics and integrate it into our own code to create a complete Faster RCNN training pipeline. I hope that it will be a very informative post and show how a complete object detection pipeline may be created.
Can you give the link of the post where MAP is included
Hello Srikanth, you can find the mAP code in this post.
https://debuggercafe.com/apple-scab-detection-using-pytorch-faster-rcnn/
can you please share full working and documentation of this project for better understanding of working of this project?
Hello yaswanth. Actually, the blog post contains the entire code. There is no extra code. But unfortunately, I don’t have a GitHub repository for this, so you may need to copy/paste the code from here only.
did you done any video on that how to execute code and all the process.
No, Yashwant. I am not currently creating any videos for my blog posts at the moment.
I want to extend this project with detecting speed breakers too. How can I do? Is there any necessary to change code or could we follow same process by creating mixed datasets of speed humps and potholes.
Creating a mixed dataset is necessary. Moreover, follow the pipeline in this blog post by changing the dataset. It covers the code in a more streamlined manner.
https://debuggercafe.com/fine-tuning-faster-rcnn-resnet50-fpn-v2-using-pytorch/
Hi Sovit, thanks for this great post, would you please help with how to include training the negative images as well? I do get pretty good results but in some cases many negative potholes are detected such as street paints or shadows from the trees. Many thanks!
Hello Adam. I am glad that you liked the post.
If you are looking to train images with no annotations then this repository will help you.
https://github.com/sovit-123/fasterrcnn-pytorch-training-pipeline
I have been developing this Faster RCNN training pipeline project over the past several months. It has many functionalities and you can take a look at them. You just need to have the dataset in XML format annotations with the corresponding images.
Can we save .py names to the code cells in google colab
Yes, Do like this:
%%writefile filename.py
import …
…. the rest of the code
Great job Sovit. I had understood the code in an easy way. I have spent literally whole night in training a model. but its interesting as it is my first deep learning project. Do we need to necessarily train again when we are testing again? Please clarify.
Hello. Thanks for the appreciation. No need to train the model again when testing. You can just save the weights and prepare a separate notebook/script for inference.
Hey I want to give input as a video. how can i do that?
Hi Rakesh. I have not shown in the post how to run inference on a video. But I have other Faster RCNN posts which do that. If you tune your code a bit to load the model trained on the pothole dataset, then these posts will help you run inference on videos:
Please check the inference_video.py section in this post:
https://debuggercafe.com/a-simple-pipeline-to-train-pytorch-faster-rcnn-object-detection-model/
Could you please tell me at where I need to change the code? Iam not getting how and where to change code for videos as input
You need to provide the video file path to the cap.VideoCapture function.
Hey Sovit ! great work. I am running test.py instead of calling python test.py as it is showing some runtime error and it is successfully validating. How should I get results for a particular image or video that could be passed into the model..
Hello Vinod. For running on images and videos, you may load the model checkpoint as shown in this article. Then you can follow instructions in this blog post.
https://debuggercafe.com/a-simple-pipeline-to-train-pytorch-faster-rcnn-object-detection-model/
Please refer to the inference.py and inference_video.py in the above linked article.
How to find accuracy of this algorithm Can you explain?
Hello Vinod. In object detection, we find the mAP of the model (Mean Average Precision). Although it is difficult to explain it here, may the following post will help you.
https://debuggercafe.com/evaluation-metrics-for-object-detection/
hello, apppreciate for the completed source you have prepared. I am just wonder if I try to put it to the drone in real-time imagining. is it possible for that? will it so complicate on networking. Reply if you have tried or know the solution XD. THX
Hello Jackson. Thanks for the appreciation. However, I have not tried putting this model into a drone yet.
hello friend! I currently want to upload my own images into the “positive data”, and I name the added image as ‘1’or ‘G1’or name similar name as the original images.
I also add them to the “train_df” in image_id, and provided x,y,w,h.
But there is extra traceback and shows KeyError: ‘image_id’.
Is there any steps i missed ? all the image_id is already different.
Hello. I think this may be an issue with the image extension. So, the code in this tutorial reads the image, when the image has an extension of `.JPG`. You can find that part of the code in the `PotHoleDataset()` class.
Please ensure that your image also have the same extension. It should work then.
hello, I just uploaded 2 photos ( 1140*548 )I took to the test dir, but I can see the result in “test prediction”. Have I skipped some steps?
Hello. Are you executing the test.py file?
So, did you place the images in `input/Dataset 1 (Simplex)/Dataset 1 (Simplex)/Test data`?
hello! I find the txt file”simpleTestFullSizeAllPotholesSortedFullAnnotation”that suit for elevating mAP. Because I want a csv file include all images labels.
It happened to be close, but there’s problem that the code reading my x,y,w,h as empty. I debugg a long time and I still can’t see why.. would favor of a look
—————-
test.py
import numpy as np
import cv2
import os
import torch
from tqdm import tqdm
import config
from model import model as create_model # Assuming this imports a function to create your model
from mean_average_precision import MetricBuilder
from mAP_funct import get_ground_truth # This should be the correct, implemented version
def main():
# set the computation device
device = torch.device(‘cuda’) if torch.cuda.is_available() else torch.device(‘cpu’)
# load the model and the trained weights
model_instance = create_model().to(device)
model_instance.load_state_dict(torch.load(‘C:/Users/jacks/FYP/checkpoints/fasterrcnn_resnet50_fpn.pth’))
DIR_TEST = config.TEST_PATH
test_images = os.listdir(DIR_TEST)
print(f”Validation instances: {len(test_images)}”)
detection_threshold = config.PREDICTION_THRES
model_instance.eval()
# Initialize mAP metric
metric_fn = MetricBuilder.build_evaluation_metric(“map_2d”, async_mode=True, num_classes=2)
with torch.no_grad():
for i, image in tqdm(enumerate(test_images), total=len(test_images)):
orig_image = cv2.imread(f”{DIR_TEST}/{test_images[i]}”, cv2.IMREAD_COLOR)
image = cv2.cvtColor(orig_image, cv2.COLOR_BGR2RGB).astype(np.float32)
image /= 255.0 # normalize image
image = np.transpose(image, (2, 0, 1)).astype(float)
image = torch.tensor(image, dtype=torch.float).cuda()
image = torch.unsqueeze(image, 0)
cpu_device = torch.device(“cpu”)
outputs = model_instance(image)
outputs = [{k: v.to(cpu_device) for k, v in t.items()} for t in outputs]
boxes = outputs[0][‘boxes’].data.numpy()
scores = outputs[0][‘scores’].data.numpy()
labels = outputs[0][‘labels’].data.numpy()
# Filter out predictions with low scores
indices = scores >= detection_threshold
boxes = boxes[indices]
scores = scores[indices]
labels = labels[indices]
# Convert predictions to the format expected by the mAP calculation
preds = np.hstack((boxes, scores[:, None], labels[:, None]))
print(test_images[i])
# Get the ground truth boxes for the current image
gt_boxes = get_ground_truth(test_images[i])
print(f”Ground truth boxes for image {test_images[i]}: {gt_boxes}”)
gt_boxes = get_ground_truth(test_images[i]) # Make sure this is correctly implemented in mAP_funct.py
# Add results to the metric_fn
metric_fn.add(preds, gt_boxes)
# Draw predicted boxes for visualization
for box in boxes:
cv2.rectangle(orig_image,
(int(box[0]), int(box[1])),
(int(box[2]), int(box[3])),
(0, 0, 255), 3)
cv2.putText(orig_image, ‘PotHole_seen’,
(int(box[0]), int(box[1]-5)),
cv2.FONT_HERSHEY_SIMPLEX, 2, (0, 0, 255),
2, lineType=cv2.LINE_AA)
for gt_box in gt_boxes:
cv2.rectangle(orig_image,
(int(gt_box[0]), int(gt_box[1])),
(int(gt_box[2]), int(gt_box[3])),
(0, 255, 0), 2) # Green color for ground truth boxes
cv2.putText(orig_image, ‘GT’,
(int(gt_box[0]), int(gt_box[1]-5)),
cv2.FONT_HERSHEY_SIMPLEX, 0.9, (0, 255, 0),
2, lineType=cv2.LINE_AA)
cv2.imwrite(f”C:/Users/jacks/FYP/test_predictions/{test_images[i]}”, orig_image,)
# Compute mAP
map_result = metric_fn.value(iou_thresholds=0.5, recall_thresholds=np.arange(0., 1.1, 0.1), mpolicy=’soft’)[‘mAP’]
print(f’mAP: {map_result}’)
print(‘TEST PREDICTIONS AND mAP EVALUATION COMPLETE’)
if __name__ == ‘__main__’:
main()
————————-
mAP_funct.py
import pandas as pd
import numpy as np
# Function to load the ground truth data into a DataFrame
def load_ground_truth_data(csv_path):
return pd.read_csv(csv_path)
# Initialize the DataFrame (can be done in the main block of the script if preferred)
gt_df = load_ground_truth_data(‘C:/Users/jacks/FYP/input/Dataset 1 (Simplex)/grd_truth.csv’)
def get_ground_truth(file_name):
“””
Retrieve ground truth boxes for a given image file name.
Parameters:
– file_name: The file name for the image.
Returns:
– A numpy array of ground truth boxes for the image.
“””
# Filter the DataFrame to get the rows for the given file_name
image_gt_data = gt_df[gt_df[‘file_name’] == file_name]
# Extract coordinates and convert (x, y, w, h) to (xmin, ymin, xmax, ymax)
xmin = image_gt_data[‘x’].values
ymin = image_gt_data[‘y’].values
xmax = xmin + image_gt_data[‘w’].values
ymax = ymin + image_gt_data[‘h’].values
# Assuming that the pothole class label is 1 for all instances since it’s not provided in the CSV
labels = np.ones_like(xmin)
# Stack the coordinates and the labels
gt_boxes = np.stack((xmin, ymin, xmax, ymax, labels), axis=1)
return gt_boxes
————————-
file_name num_po x y w h
G0011476 2 2176 1580 242 44
G0011476 2 1726 1458 106 26
G0011523 3 2250 1472 68 24
G0011523 3 2192 1432 56 18
G0011523 3 1974 1344 70 22
G0011524 3 2474 1592 120 40
G0011524 3 2336 1508 88 24
G0011524 3 1992 1370 90 18
Hello Jackson. So, are you trying to add your own images to the CSV file with the ground truth annotations?
i am using the test images provided, and I use ‘Dataset 1 (Simplex)/simpleTestFullPhotosSortedFullAnnotations’ as my ground truth, so I try to valid the test result and elevate mAP with csv created by ‘simpleTestFullPhotosSortedFullAnnotations’
But i think I need some help on a code can evaluate mAP with a single CSV file
Oh. You are trying to integrate mAP calculation into the test set. So, can you please let me know what issues you are facing? Or are you getting any errors?