
PyTorch recently released an improved version of the Faster RCNN object detection model. They call it the Faster RCNN ResNet50 FPN V2. This model is miles ahead in terms of detection quality compared to its predecessor, the original Faster RCNN ResNet50 FPN. In this blog post, we will discover what makes the new Faster RCNN model better, why it is better, and what kind of detection results we can expect from it.
This post will not dive into the details and workings of Faster RCNN. Instead, we will stick completely to the practical aspects. Those are:
- What makes PyTorch Faster RCNN ResNet50 FPN V2 better?
- How good it really is at detecting objects?
Also, we will not draw any comparison with other state-of-the art object detectors that are out there. We will reserve another post for comparison. Instead, we will do a simple comparison with the previous version of Faster RCNN.
We will cover the following points in this tutorial:
- What was the inspiration for improving the Faster RCNN ResNet50 FPN model?
- What are the improvements?
- How it performs on the COCO benchmark dataset?
- How it performs under various real-world scenarios?
There are many other blog posts on Faster RCNN that you will surely find useful on DebuggerCafe. Do check out a few of them from the following:
- Faster RCNN Object Detection with PyTorch
- Road Pothole Detection with PyTorch Faster RCNN ResNet50
- A Simple Pipeline to Train PyTorch Faster RCNN Object Detection Model
- Using Any Torchvision Pretrained Model as Backbone for PyTorch Faster RCNN
Check out the entire Faster RCNN catalog here.
What Inspired the Development of Faster RCNN ResNet50 FPN V2?
Faster RCNN is not a new model in the world of deep learning and object detection. It has been there since 2015 and it really pushed the benchmark of deep learning based object detectors. Although difficult to get real-time detection even with modern hardware, Faster RCNN can give really good results when trained properly.
Even at that time, when attention-based models were relatively new, Faster RCNN, in a way used ‘attention’ modules.
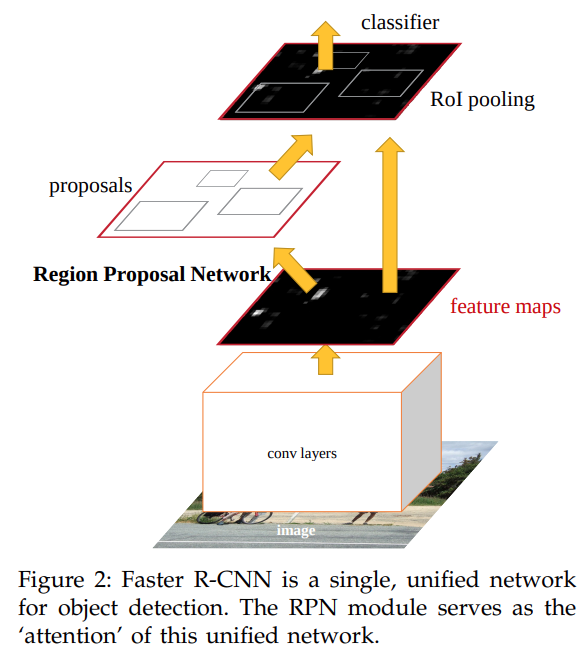
The FPN (Region Proposal Network) module in Faster RCNN is responsible for giving an output of rectangular object proposals. This means that it tells the network where to look. In other words, we can say that it worked the same way as an attention module in Transformer networks (please check section 3 of the Faster RCNN paper for more details).
Coming to the practical side, the PyTorch Faster RCNN ResNet50 FPN (original version) works quite well when used for fine-tuning. But the recent improvements in Vision Transformers led to the improvement of Faster RCNN as well. In fact, the paper Benchmarking Detection Transfer Learning with Vision Transformers is the inspiration for adding new features and retraining the Faster RCNN model.
The paper which mainly aimed towards improving Mask RCNN with Vision Transformers (ViT) backbones also paved the way for improving Faster RCNN.
The authors proposed upgraded modules and other improvements which could also be used for making the ResNet50 backbone, and the overall network better.
What are the Improvements in Faster RCNN ResNet50 FPN V2 Model?
To improve the Faster RCNN ResNet50 (to get the V2 version) model, changes were made to both:
- The ResNet50 backbone
- The object detection modules of Faster RCNN
Pretraining ResNet50 Backbone
Pretraining the ResNet50 backbone is an essential task in improving the performance of the entire object detection model. The ResNet50 (as well as many other classification models) model was trained with a new training recipe. These include, but are not limited to:
- Learning rate optimizations.
- Longer training.
- Augmentation such as TrivialAugment, Random Erasing, MixUp, and CutMix.
- Repeated Augmentation
- EMA
- Weight Decay Tuning
With these new techniques, the ResNet50 Accuracy@1 jumps to 80.858% from the previous 76.130%.
Training the Faster RCNN ResNet50 FPN V2 Model
As mentioned earlier, most of the improvements to train the entire object detection model were taken from the aforementioned paper.
The contributors to these improvements call these improvements as per post-paper optimization. These include:
- FPN with batch normalization.
- Using two convolutional layers in the Region Proposal Network (RPN) instead of one. In other words, using a heavier FPN module.
- Using a heavier box regression head. To be specific, using four convolutional layers with Batch Normalization followed by linear layer. Previously, a two layer MLP head without Batch Normalization was used.
- No Frozen Batch Normalizations were used.
Using the above recipe improves the mAP from the previous 37.0% to 46.7%, a whopping 9.7% increase in mAP.
How Does Faster RCNN ResNet50 FPN V2 Perform on the COCO Benchmark Dataset?
As mentioned above, we get a 9.7% increment in the mAP after using the post-paper optimizations to train the new detection model.
However, they are not the only changes. There are a few more details to observe. The older Faster RCNN model has 41,755,286 parameters. While the new Faster RCNN ResNet50 FPN V2 has 43,712,278 parameters.
This not only leads to a larger size of the model on the disk but also to slower inference. But that’s not all. As the mAP of the new model has improved, we can expect a great jump in the detection quality as well.
For reference, take a look at the following image which shows the object detection results using the older and the newer model.
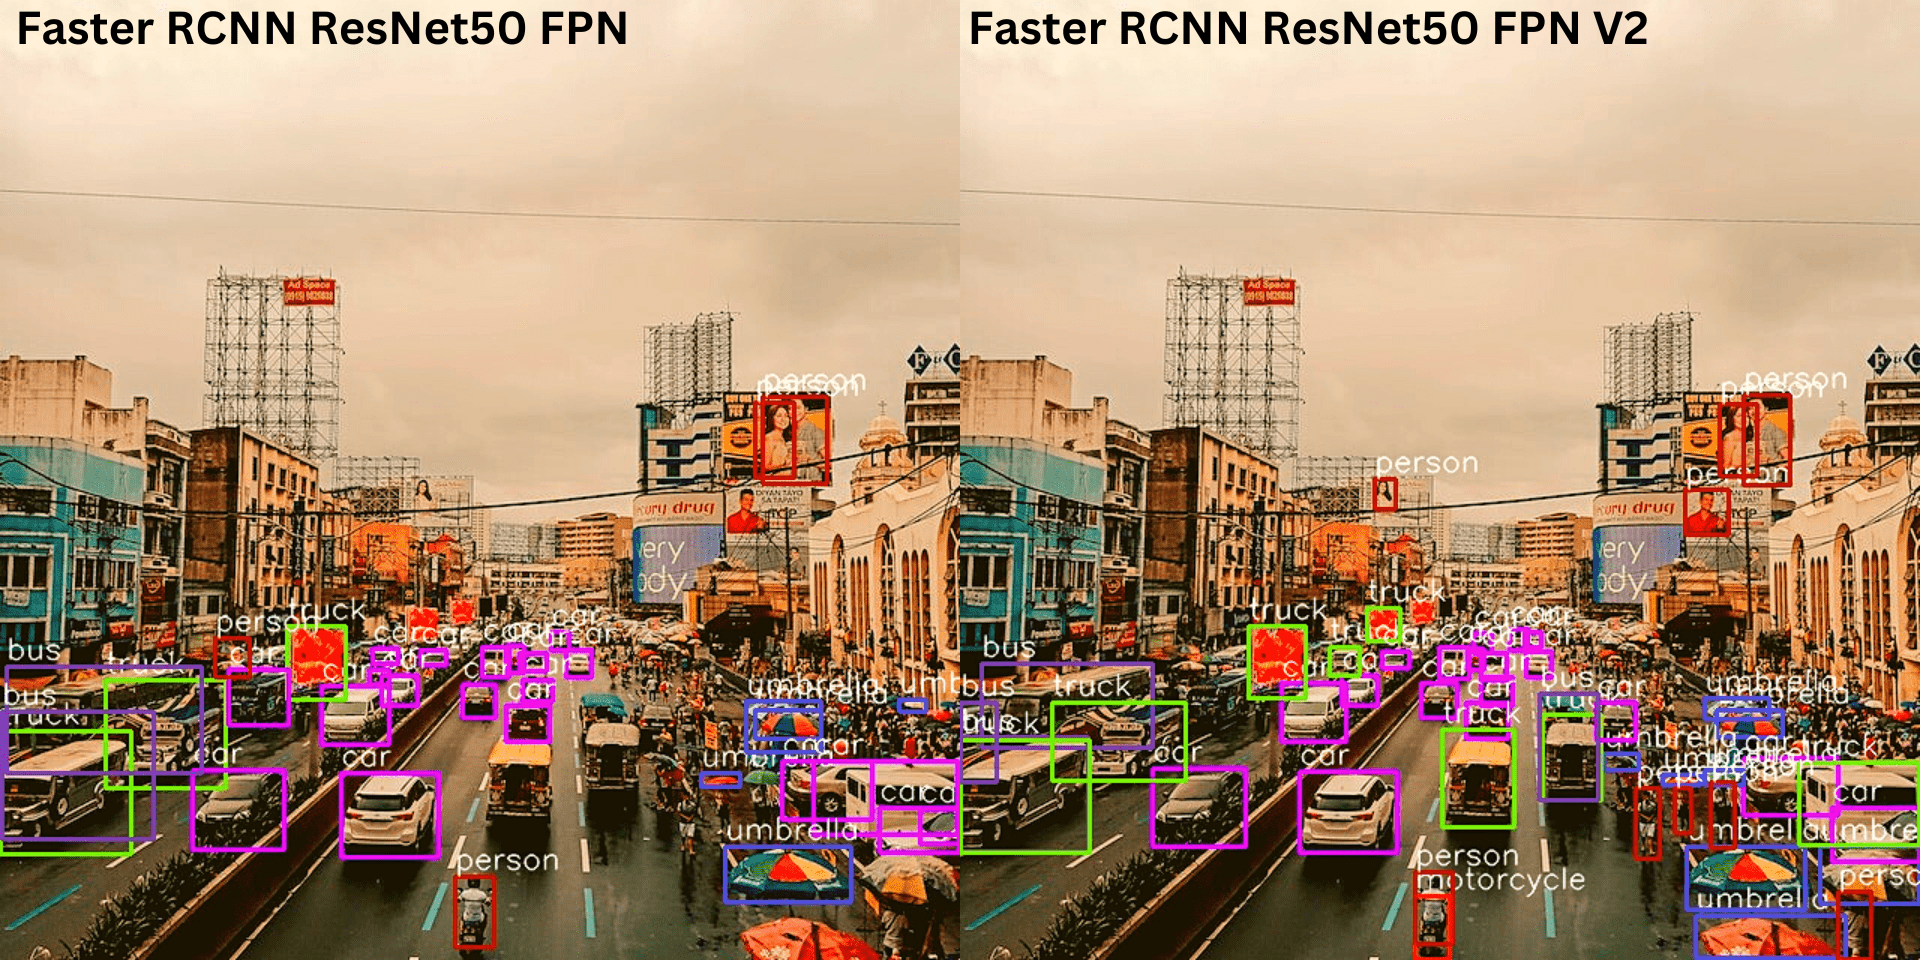
Observe the subtle detections that the new Faster RCNN ResNet50 FPN V2 is able to accomplish that the older model cannot.
PyTorch Version and Requirements
To use the Faster RCNN ResNet50 FPN V2, you will need to install at least PyTorch version 1.12.0. To avoid any errors while executing the code, it is better to install the latest available version from the official PyTorch page.
You will also need to install OpenCV-Python which you can do from here.
Directory Structure
Before we move to the coding section, let’s check out how the files and folders are arranged for this project.
.
├── input
│   ├── image_1.jpg
│   ├── image_2.jpg
│   ├── ...
│   └── video_3.mp4
├── outputs
│   ├── image_1_05.jpg
│   ├── image_2_05.jpg
│   ├── ...
│   └── video_3_05.mp4
├── coco_names.py
├── detect_image.py
├── detect_utils.py
├── detect_video.py
├── model.py
└── README.md
- The
inputdirectory contains all input images and videos that we will run inference on. - The
outputsdirectory contains the detection outputs that we obtain after running inference. - Directly inside the project directory, we have 5 Python files and one
README.mdfile. We will get into the details of the Python files further in the blog post. The README file contains the links to some of the images and videos that you can download yourself and run the inference on.
Downloading the zip file for this post will give you access to all the Python code files. You may run inference on your own images and videos, or download the ones from the links in the README.md file.
Object Detection using Faster RCNN ResNet50 FPN V2
From here onward, we will move toward the practical side of this post. We will run inference on images and videos using the Faster RCNN ResNet50 FPN V2 model.
Download Code
The COCO Dataset Category Names
To annotate the detected objects, we will need the COCO dataset class names. The following code block shows the contents of the coco_names.py file that contains all the class names within the COCO_INSTANCE_CATEGORY_NAMES list.
COCO_INSTANCE_CATEGORY_NAMES = [
    '__background__', 'person', 'bicycle', 'car', 'motorcycle', 'airplane', 'bus',
    'train', 'truck', 'boat', 'traffic light', 'fire hydrant', 'N/A', 'stop sign',
    'parking meter', 'bench', 'bird', 'cat', 'dog', 'horse', 'sheep', 'cow',
    'elephant', 'bear', 'zebra', 'giraffe', 'N/A', 'backpack', 'umbrella', 'N/A', 'N/A',
    'handbag', 'tie', 'suitcase', 'frisbee', 'skis', 'snowboard', 'sports ball',
    'kite', 'baseball bat', 'baseball glove', 'skateboard', 'surfboard', 'tennis racket',
    'bottle', 'N/A', 'wine glass', 'cup', 'fork', 'knife', 'spoon', 'bowl',
    'banana', 'apple', 'sandwich', 'orange', 'broccoli', 'carrot', 'hot dog', 'pizza',
    'donut', 'cake', 'chair', 'couch', 'potted plant', 'bed', 'N/A', 'dining table',
    'N/A', 'N/A', 'toilet', 'N/A', 'tv', 'laptop', 'mouse', 'remote', 'keyboard', 'cell phone',
    'microwave', 'oven', 'toaster', 'sink', 'refrigerator', 'N/A', 'book',
    'clock', 'vase', 'scissors', 'teddy bear', 'hair drier', 'toothbrush'
]
The very first class is the __background__ class. The rest of the list contains 80 object classes and N/A in those indices that we do not need.
Helper Functions for Detection and Annotation
We will write two helper functions, one for detection by doing forward pass through the model and another for annotating the resulting images or frames.
This code will go into the detect_utils.py file.
import torchvision.transforms as transforms
import cv2
import numpy as np
import torch

from coco_names import COCO_INSTANCE_CATEGORY_NAMES as coco_names

np.random.seed(42)

# Create different colors for each class.
COLORS = np.random.uniform(0, 255, size=(len(coco_names), 3))

# Define the torchvision image transforms.
transform = transforms.Compose([
    transforms.ToTensor(),
])

def predict(image, model, device, detection_threshold):
    """
    Predict the output of an image after forward pass through
    the model and return the bounding boxes, class names, and
    class labels.
    """
    # Transform the image to tensor.
    image = transform(image).to(device)
    # Add a batch dimension.
    image = image.unsqueeze(0)
    # Get the predictions on the image.
    with torch.no_grad():
        outputs = model(image)

    # Get score for all the predicted objects.
    pred_scores = outputs[0]['scores'].detach().cpu().numpy()

    # Get all the predicted bounding boxes.
    pred_bboxes = outputs[0]['boxes'].detach().cpu().numpy()
    # Get boxes above the threshold score.
    boxes = pred_bboxes[pred_scores >= detection_threshold].astype(np.int32)
    labels = outputs[0]['labels'][:len(boxes)]
    # Get all the predicited class names.
    pred_classes = [coco_names[i] for i in labels.cpu().numpy()]

    return boxes, pred_classes, labels
After the import statements, we also create a COLORS array for storing tuples of as many colors as the number of classes.
Then we define the transform and the predict function for carrying out the detections.
def draw_boxes(boxes, classes, labels, image):
    """
    Draws the bounding box around a detected object.
    """
    lw = max(round(sum(image.shape) / 2 * 0.003), 2)  # Line width.
    tf = max(lw - 1, 1) # Font thickness.

    for i, box in enumerate(boxes):
        color = COLORS[labels[i]]
        cv2.rectangle(
            img=image,
            pt1=(int(box[0]), int(box[1])),
            pt2=(int(box[2]), int(box[3])),
            color=color[::-1],
            thickness=lw
        )
        cv2.putText(
            img=image,
            text=classes[i],
            org=(int(box[0]), int(box[1]-5)),
            fontFace=cv2.FONT_HERSHEY_SIMPLEX,
            fontScale=lw / 3,
            color=color[::-1],
            thickness=tf,
            lineType=cv2.LINE_AA
        )
    return image
In the above draw_boxes function, we annotate the resulting bounding boxes and the corresponding class names. The text size, scale, and the bounding boxes’ line width are chosen as per the image or frame size.
Creating the Faster RCNN Model
For creating the Faster RCNN ResNet50 FPN V2 model, we need to use the torchvision.models.detection module. We can use the same module to load the older version of the model as well.
We can easily choose which model to load by checking with a simple if-else statememt. Although we are dealing with the newer version of the model here, let’s write the code in such a way that we can load either of the models.
The code for loading the model will go into the model.py file.
import torchvision

def get_model(device='cpu', model_name='v2'):
    # Load the model.
    if model_name == 'v2':
        model = torchvision.models.detection.fasterrcnn_resnet50_fpn_v2(
            weights='DEFAULT'
        )
    elif model_name == 'v1':
        model = torchvision.models.detection.fasterrcnn_resnet50_fpn(
            weights='DEFAULT'
        )
    # Load the model onto the computation device.
    model = model.eval().to(device)
    return model
We check the model_name parameter which can accept the value as either v1 or v2. If it is v2, then we load the FPN V2 model, or else we load the older version of the model.
Object Detection On Images
For the object detection part, we will start with inference on images.
The code for image inference will go into the detect_image.py file.
Starting with the import statements and defining the argument parser.
import torch
import argparse
import cv2
import detect_utils
import numpy as np

from PIL import Image
from model import get_model

# Construct the argument parser.
parser = argparse.ArgumentParser()
parser.add_argument(
    '-i', '--input', default='input/image_1.jpg',
    help='path to input input image'
)
parser.add_argument(
    '-t', '--threshold', default=0.5, type=float,
    help='detection threshold'
)
parser.add_argument(
    '-m', '--model', default='v2',
    help='faster rcnn resnet50 fpn or fpn v2',
    choices=['v1', 'v2']
)
args = vars(parser.parse_args())
Notice that we are importing our custom defined modules, model and detect_utils.
For the command line, we have three flags:
--input: Path to the input image.--threshold: To set the detection threshold below which all detections will be dropped.--model: We can pass eitherv1orv2. Passingv1will load the older Faster RCNN ResNet50 FPN model andv2will load the new one.
The next block contains the entire code to load the model, read the image, do the forward pass, visualize and save the results to disk.
# Define the computation device.
device = torch.device('cuda' if torch.cuda.is_available() else 'cpu')
model = get_model(device, args['model'])

# Read the image.
image = Image.open(args['input']).convert('RGB')
# Create a BGR copy of the image for annotation.
image_bgr = cv2.cvtColor(np.array(image), cv2.COLOR_RGB2BGR)
# Detect outputs.
with torch.no_grad():
    boxes, classes, labels = detect_utils.predict(image, model, device, args['threshold'])
# Draw bounding boxes.
image = detect_utils.draw_boxes(boxes, classes, labels, image_bgr)
save_name = f"{args['input'].split('/')[-1].split('.')[0]}_t{''.join(str(args['threshold']).split('.'))}_{args['model']}"
cv2.imshow('Image', image)
cv2.imwrite(f"outputs/{save_name}.jpg", image)
cv2.waitKey(0)
In the above code block, the save_name string will define the file name with which the resulting image will be saved to disk. To easily differentiate between the results, we append the threshold and model name information to the string.
Executing the detect_image.py for Image Inference
Note: All inference experiments were run on a system with 10 GB RTX 3080 GPU, 32 GB RAM, and 10th generation i7 CPU.
Within the project directory, execute a command similar to the following while giving the path to your image file.
python detect_image.py --input input/image_1.jpg --model v2
We get the following result here.
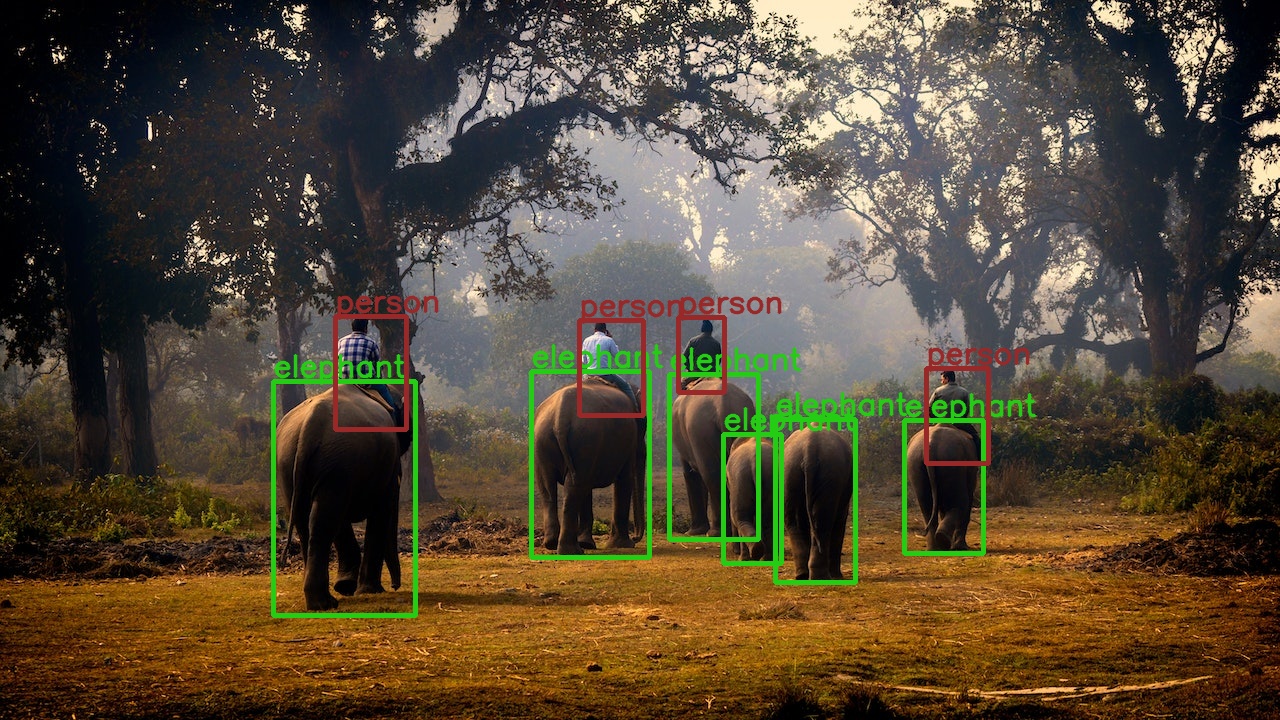
The results look pretty good. All the persons and elephants are detected and the bounding boxes look quite tight around each of them.
Let’s take a look at another example.
python detect_image.py --input input/image_2.jpg --model v2
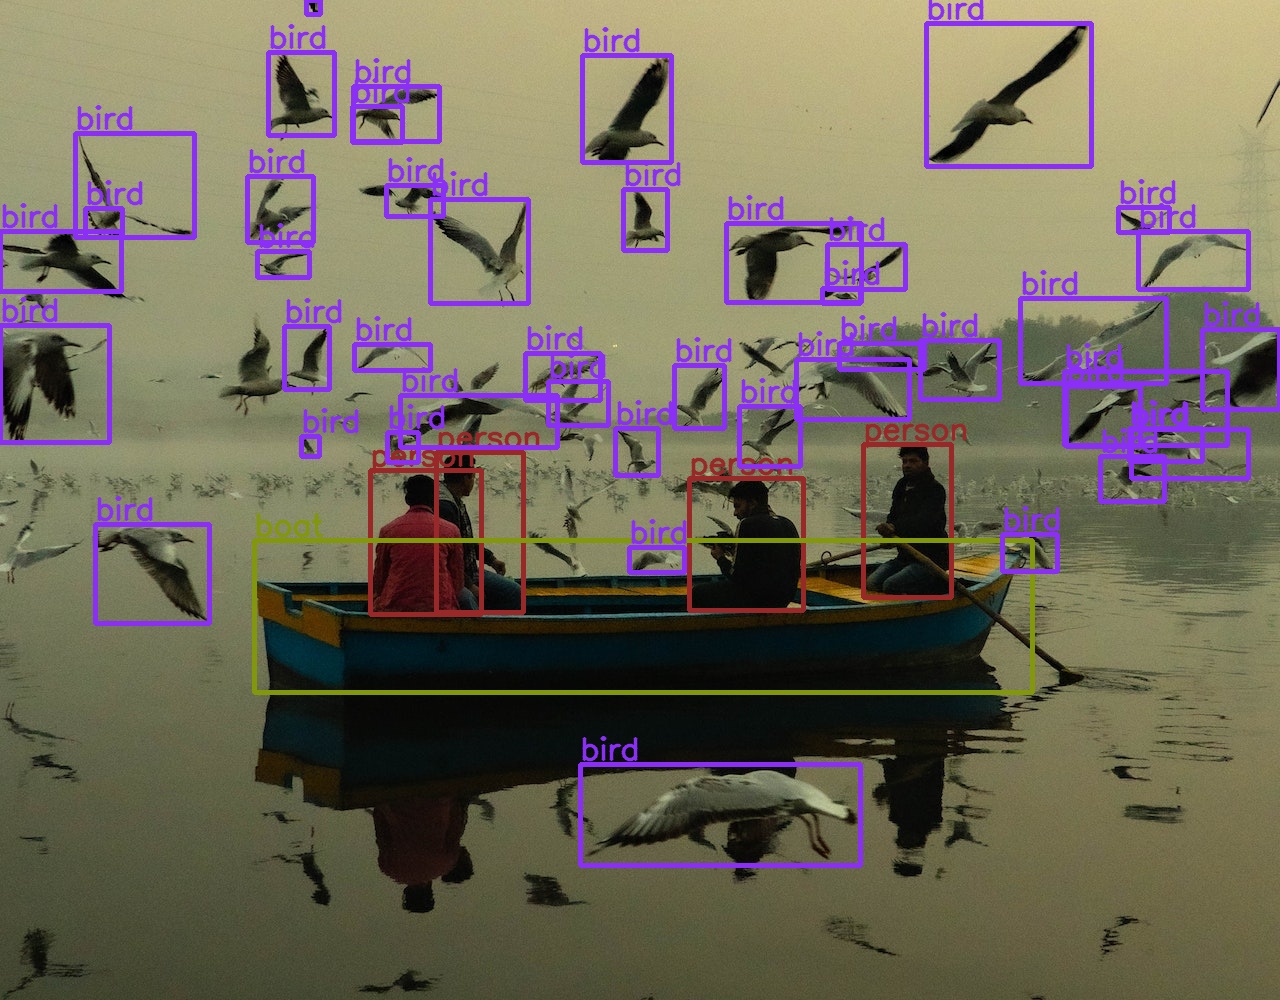
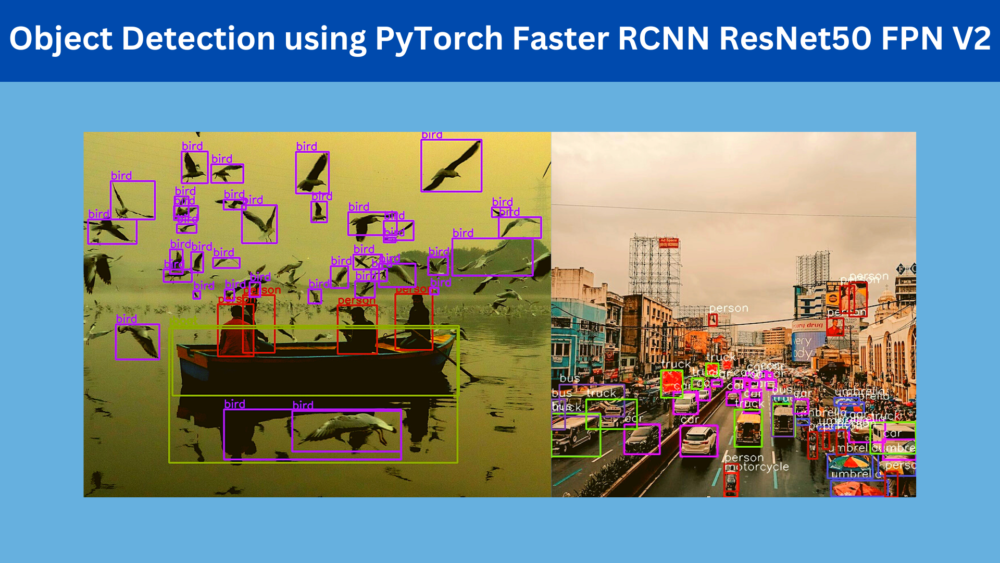
These results are really impressive. Taking a closer look reveals that none of the reflections of the birds are detected which may be a common mistake with many other object detection models. Moreover, the bird at the top of the image with only a small part of the wing visible is detected.
Looks like the Faster RCNN ResNet50 FPN V2 is really living up to its standards.
Object Detection on Videos
Now, let’s check out how the Faster RCNN ResNet50 FPN V2 model performs on videos.
The code for running inference on videos will contain similar parts as was in the case of image inference. There will be a few basic changes like looping over the video frames.
We will write the code for video inference in the detect_video.py file.
The code till the preparation of the argument parser will remain the same as that of image inference.
import cv2
import torch
import argparse
import time
import detect_utils

from model import get_model

# Construct the argument parser.
parser = argparse.ArgumentParser()
parser.add_argument('-i', '--input', default='input/video_1.mp4',
                    help='path to input video')
parser.add_argument('-t', '--threshold', default=0.5, type=float,
                    help='detection threshold')
parser.add_argument(
    '-m', '--model', default='v2',
    help='faster rcnn resnet50 fpn or fpn v2',
    choices=['v1', 'v2']
)
args = vars(parser.parse_args())

# Define the computation device.
device = torch.device('cuda' if torch.cuda.is_available() else 'cpu')
model = get_model(device, args['model'])
In the above code block, we are also defining the computation device and loading the model.
In the next code block, we complete all the preliminaries for setting up the video inference.
cap = cv2.VideoCapture(args['input'])

if (cap.isOpened() == False):
    print('Error while trying to read video. Please check path again')

# Get the frame width and height.
frame_width = int(cap.get(3))
frame_height = int(cap.get(4))

save_name = f"{args['input'].split('/')[-1].split('.')[0]}_t{''.join(str(args['threshold']).split('.'))}_{args['model']}"
# Define codec and create VideoWriter object .
out = cv2.VideoWriter(f"outputs/{save_name}.mp4",
                      cv2.VideoWriter_fourcc(*'mp4v'), 30,
                      (frame_width, frame_height))

frame_count = 0 # To count total frames.
total_fps = 0 # To get the final frames per second.
We read the video file, define the VideoWriter object, and define the variables to keep track of the frame count and total fps while inference.
Next, we will loop over the video frames and carry out the inference.
# Read until end of video.
while(cap.isOpened):
    # Capture each frame of the video.
    ret, frame = cap.read()
    if ret:
        frame_copy = frame.copy()
        frame_copy = cv2.cvtColor(frame_copy, cv2.COLOR_BGR2RGB)
        # Get the start time.
        start_time = time.time()
        with torch.no_grad():
            # Get predictions for the current frame.
            boxes, classes, labels = detect_utils.predict(
                frame, model,
                device, args['threshold']
            )

        # Draw boxes and show current frame on screen.
        image = detect_utils.draw_boxes(boxes, classes, labels, frame)

        # Get the end time.
        end_time = time.time()
        # Get the fps.
        fps = 1 / (end_time - start_time)
        # Add fps to total fps.
        total_fps += fps
        # Increment frame count.
        frame_count += 1
        # Write the FPS on the current frame.
        cv2.putText(
            img=image,
            text=f"{fps:.3f} FPS",
            org=(15, 30),
            fontFace=cv2.FONT_HERSHEY_SIMPLEX,
            fontScale=1,
            color=(0, 255, 0),
            thickness=2,
            lineType=cv2.LINE_AA

        )
        # Convert from BGR to RGB color format.
        cv2.imshow('image', image)
        out.write(image)
        # Press `q` to exit.
        if cv2.waitKey(1) & 0xFF == ord('q'):
            break

    else:
        break

# Release VideoCapture().
cap.release()
# Close all frames and video windows.
cv2.destroyAllWindows()

# Calculate and print the average FPS.
avg_fps = total_fps / frame_count
print(f"Average FPS: {avg_fps:.3f}")
After the forward pass and annotating the current frame with the bounding boxes and class names, we also annotate the frame with the FPS. In the end, we print the average FPS on the terminal.
Executing detect_video.py for Video Inference
Let’s check out a few results. You can run inference on your own videos as well by providing the path to the video file.
python detect_video.py --input input/video_1.mp4 --model v2
The Faster RCNN model is performing really well here. It is able to detect persons and cars really far away. In fact, it is even detecting the two traffic lights separately which is quite impressive.
Here, are some more results.
In the above video, the model is making a few mistakes. First of all, it is detecting the roof of the building to the left as a boat. Secondly, it is detecting the person in the poster as a traffic light. Nonetheless, it is still detecting smaller objects quite well.
Let’s take a look at one final result.
This one is quite challenging. It is a nighttime video in rainy weather. We can see fluctuations in detections for sure, but still nothing majorly wrong. At closer inspection, we can see that the model is able to detect the person inside even in this difficult scene.
Comparison with Faster RCNN ResNet50 FPN Model
The following image shows the comparison between the old and the new Faster RCNN ResNet50 FPN V2 model. It is just to get an idea of how much better the new model is.
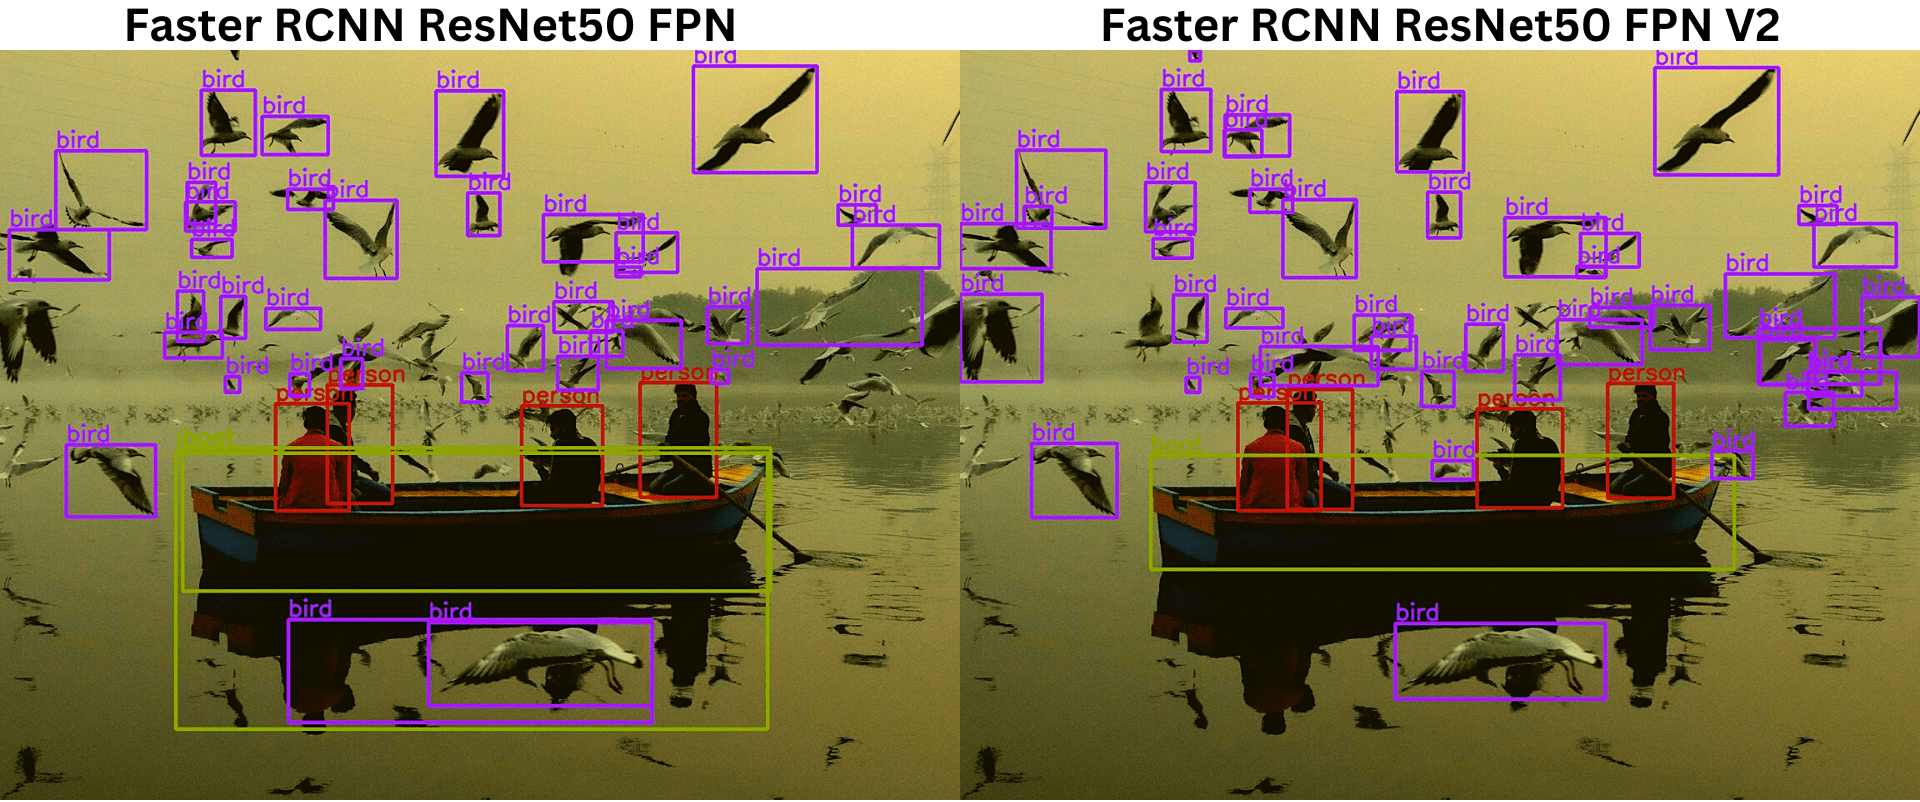
The limitations of the older ResNet model are quite visible here. It is detecting two instances of the boat, wrongly detecting the reflection as a bird, and not detecting as many birds also. This means that the new techniques used to train the Faster RCNN ResNet50 FPN V2 really paid off.
Summary and Conclusion
In this blog post, we covered object detection using the Faster RCNN ResNet50 FPN V2 model. We started with the training techniques used for the model. Then we moved to image inference and finally carried out video inference. I hope that you learned something new from this post.
If you have any doubts, thoughts, or suggestions, then please leave them in the comment section. I will surely address them.
You can contact me using the Contact section. You can also find me on LinkedIn, and X.

is there any algorithm where we can detect both moving and non moving objects?
Hello Katik. For moving object detection, where the camera is fixed and the object of interest is in motion, it is best to use background subtraction. This article will surely help you => https://debuggercafe.com/moving-object-detection-using-frame-differencing-with-opencv/