
In this tutorial, you will learn how to detect moving objects in a video using the frame differencing technique. We will use the OpenCV computer vision library for this. In short, we will learn to carry out moving object detection using frame differencing with OpenCV.
We will be implementing the concepts as described in this amazing paper by Gopal Thapa, Kalpana Sharma, and M.K.Ghose. Their research explains how we can detect different moving objects in a video just using computer vision techniques.
The above video clip shows an example of moving object detection using frame differencing technique. Considering that it is just using computer vision and not any newer deep learning techniques, in my opinion, it is quite impressive.
I hope that you are excited to know more about it.
So, what exactly will you be learning in this tutorial?
- What is moving object detection?
- A short theory on detecting moving objects in videos using computer vision techniques.
- How will we be implementing the concepts for moving object detection?
- Hands-on: Using the OpenCV computer vision library for moving object detection in videos.
- What are the drawbacks of using simple computer vision for moving object detection?
Moving Object Detection using Computer Vision
In recent years, deep learning techniques have contributed hugely to the field of computer vision and object detection. They can employ GPUs for efficient computing which makes it easier for us to use them for large-scale applications.
Still, there are some very simple computer vision techniques that work quite well to date. They may not be used as widely in the industry, but still knowing about them gives a good idea of what we can achieve with very simple techniques. The moving object detection using frame differencing and summing technique is one such method. We will know more about it further on in this article.
Moving Object Detection using Frame Differencing and Summing Technique
As the name suggests, we can detect any moving object in a video using this technique. Basically, the main motive here is to do motion detection in videos.
Moving object detection has a range of use cases ranging from surveillance to security. So, finding a technique that can be easily used in low computation devices is crucial. That is exactly what Thapa et al. have proposed in their paper. I recommend that you go through the paper as it is very readable.
They propose a method using which we can easily detect any moving object in a video. They employ the power of frame differencing and summing technique. Let’s know more about frame differencing and summing technique.
Frame Differencing and Summing Technique in Computer Vision
Frame Differencing and Summing Technique (DST for short) is a very simple yet effective computer vision technique. We can use it to know whether there are any moving objects in a video or not.
We know that a video consists of multiple consecutive frames. And these frames are made up of pixels which consist of colors (red, green, and blue). And these pixels are just values in the range of 0 to 255. 0 is completely black and 255 is white.
So, suppose that we take any two consecutive frames from a video. Now, let’s subtract the current frame from the previous frame. If they contain the same information (RGB color values), then the resulting frame will be completely black. But if the current frame consists of some newer information or pixel values, then we will see some sort of white patches after the subtraction. This tells us that something in the video has moved or changed position. This is a very simple concept. Yet we will use this as the basis for moving object detection in videos.
Let’s know about it in a bit more detail.
Steps for Moving Object Detection using Frame Differencing and Summing
Detecting moving objects using frame differencing and summing involves some simple steps.
The authors have described it quite well in the paper. We will go through the steps briefly in this tutorial.
Let’s observe the block diagram which shows the complete procedure.
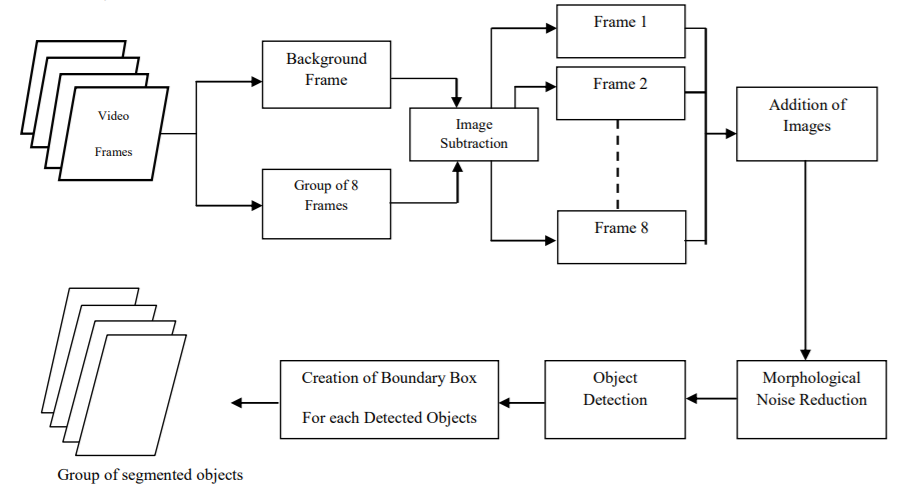
Figure 1 shows all the steps involved as a block diagram. These steps are very clearly explained in the paper as well.
If we can divide this whole process, then it can be described as the combination of two important processes which have their own steps in-turn. They are:
- Moving object detection and segmentation from the video frames.
- Drawing the bounding boxes around the detected moving objects.
In the following sub-sections, we will get to know about the two processes in more detail. We will also learn about the intermediate steps involved.
Moving Object Detection and Segmentation
The moving object detection and segmentation directly use the video frames that we are dealing with. This is also the process where we use frame DST (Differencing and Summing Technique).
Moving further, let’s learn about the steps that we have to go through for moving object detection and segmentation from the video frames.
These are a total of 7 steps. You will also find the steps in the paper. Still, let’s go through them here.
Step 1: Read 8 Consecutive Frames from the Video
First, we have to read 8 consecutive frames from the video. Now, if we take the case of Clip 1 that we saw before, then 8 consecutive frames will look something like this.
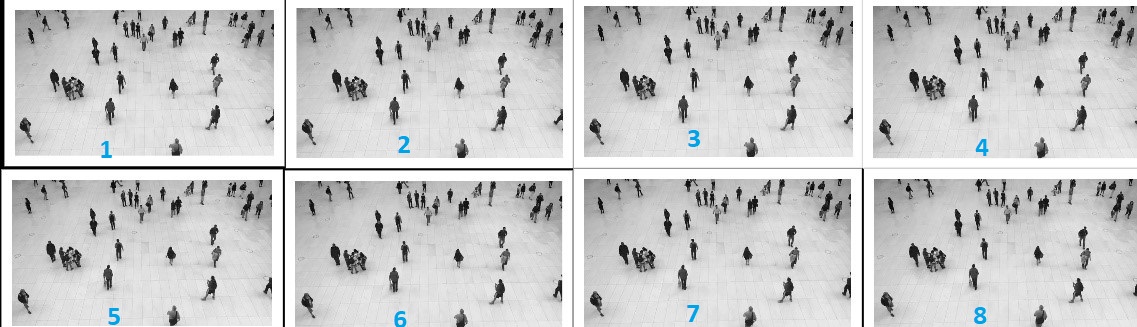
You can see all the 8 frames starting from top left corner. They all look almost the same.
Step 2: Convert the Frames into Grayscale
This is one of the important steps. We have to convert all the 8 frames into grayscale color format which will later help us with noise reduction and dilation. We will get into these details while writing the code.
Step 3: Frame Differencing
After every 8 consecutive frames, take the 8 frames and do frame differencing by subtracting the each of the frames from the background model.
We will have get the background model before this. To get the background model, we will take a the median of certain number of frames.
But how does the frame differencing look like? The following image will give you a good idea.
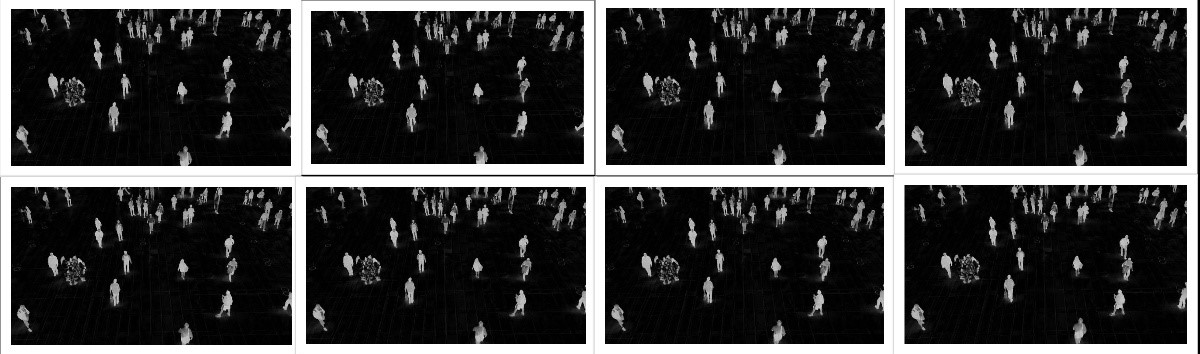
Figure 3 shows the frame differencing with the background model for each of the frames in figure 2. I hope that this makes things clear.
Step 4: Add the 8 Frames
After we get the frames by subtracting from the background model, we just add them.
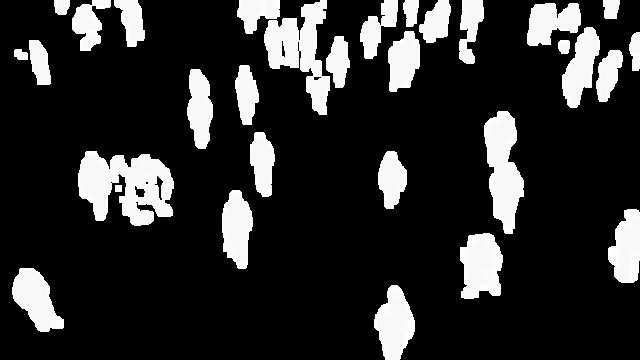
Figure 4 shows the result when we add all the 8 frames from figure 3.
Step 5: Fill the Gaps Inside the Objects
We need to fill the gaps so that the obtained objects look a bit more whole.
Step 6: Convert to Binary
Convert the image obtained in step 5 to a binary image by applying thresholding. Now we have a binary image out of the grayscale image.
Step 7: Remove Noise from the Resulting Image
We can apply a morphological operation to remove any extra noise. Morphological operations like dilations will help us with this.
The above steps actually complete the detection and segmentation of the moving objects in a video. After that , we still have to draw the bounding boxes around the detected objects. That is the one of the important parts of the block diagram as well that we saw above.
So, how to draw the bounding boxes?
Drawing Bounding Boxes Around Detected Objects
As per the paper, the authors have proposed the method of pixel-wise labeling. As we have a binary image in the end, all the values are either 0 or 1. And if a pixel value is 1, then it is surely part of an object. The important thing here is to know the lowest and highest pixel coordinates for each detected object. Using these coordinates we can easily draw the bounding boxes. Section 2.2 in the paper lays out a pretty detailed explanation and steps as well for pixel labeling. You may give that part a read if you want to go in-depth.
But in this tutorial, we will following a different method which is much less time consuming and more automated as well. We will simply draw the contours around the detected and segmented objects. As we have binary images after the first stage, drawing the contours will not be much difficult. After that, we can easily extract the minimum x and y coordinates, and the width and height for each contour. Using them we can draw the bounding boxes around the detected objects.
To give you an idea, this is what drawing the contours will look like.
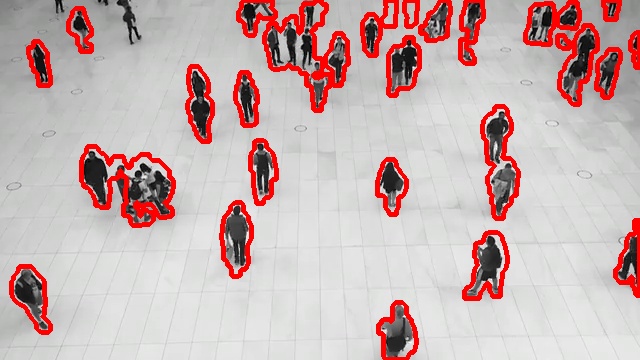
Here, we have drawn the contours around the segmented image and shown the plotting around the original frame. After this step, it is very easy to draw the bounding boxes around the persons.
We will end our theoretical discussion here. If you go through the paper, then you find many additional details as well. But here, we will focus on the coding part next. We will write the code to carry out moving object detection using frame differencing using OpenCV.
The Directory Structure and Input Data
We will follow the below directory structure for this tutorial.
│   detect.py
│   get_background.py
│
├───input
│       video_1.mp4
│       video_2.mp4
│       video_3.mp4
│
├───outputs
Directly inside the project directory, we have two Python files. We will get into the details of these while writing the code. The input folder contains the videos that we will use for moving object detection. And the outputs folder will contain all the output videos with the detected objects that we will write to disk.
Now, coming to the input videos. You can easily download the three videos that we will be using in this tutorial. Just click on the button below.
After downloading the files, just extract them in your project directory and you are good to go. All the videos are taken from Pixabay and are free to use.
As for the OpenCV version, I am using version 4.2.0.32 for this tutorial. I recommend using any of the 4.x versions of OpenCV. This will ensure that you do not run into any code-breaking bugs.
So, let’s start coding our way through for moving object detection using frame differencing.
Writing the Code for Moving Object Detection using Frame Differencing with OpenCV
From here onward, we will get into the coding part of this tutorial. We have two Python code files, get_background.py and detect.py. We will get into the details of each of the code files.
Let’s start with getting the background model.
Code for Getting the Background Model of Video
Here, we will write the code to get the background model of a video. Basically, we will select a few frames from the video file and calculate the median of those frames. This should provide us with the background model which we can use for frame differencing.
All the code in this section will go into the get_background.py Python file.
The following are the two imports that we need.
import numpy as np
import cv2
Moving on, we will write a get_background() function that will accept the video path as a parameter. After calculation, this function will return the background model of the video.
def get_background(file_path):
    cap = cv2.VideoCapture(file_path)
    # we will randomly select 50 frames for the calculating the median
    frame_indices = cap.get(cv2.CAP_PROP_FRAME_COUNT) * np.random.uniform(size=50)

    # we will store the frames in array
    frames = []
    for idx in frame_indices:
        # set the frame id to read that particular frame
        cap.set(cv2.CAP_PROP_POS_FRAMES, idx)
        ret, frame = cap.read()
        frames.append(frame)

    # calculate the median
    median_frame = np.median(frames, axis=0).astype(np.uint8)

    return median_frame
- First, we are reading the video file and selecting 50 frames randomly.
- Starting from line 10, we are setting the frame index position to the indices that we have chosen randomly. We are reading those frames and storing them in
frameslist. - At line 17, we are calculating the median frame (the background model) and returning the resulting frame.
The following image shows the median frame (background model) of the video_1.mp4 from the input files. This is the same video whose images we have been visualizing in the previous sections.
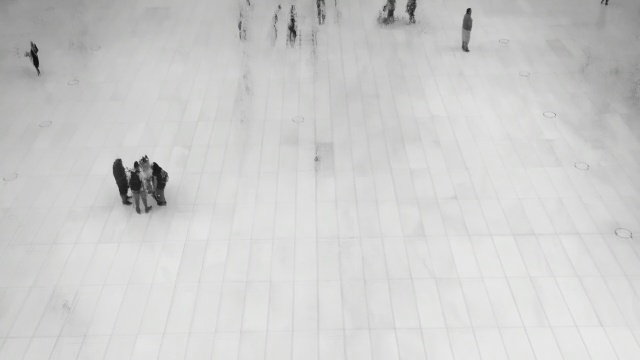
We can see that the median frame returns the background almost perfectly. All the moving objects disappear from the resulting background model. Only the static objects remain. We will use this background model and subtract the current frames at the frame differencing step.
Code for Moving Object Detection using Frame Differencing
Now, we will get into the most important coding part of this tutorial. We will write the code to detect the moving objects using frame differencing.
The code in this section will go into the detect.py Python file. We will get into each and every detail of the code that we will write. This will help us know what exactly is happening.
The following are the imports that we will need for this Python code.
import cv2
import argparse

from get_background import get_background
Along with cv2 and argparse, we are also importing get_background function that we have just written.
Define the Argument Parser
Here, will define the argument parser to parse the command line arguments.
parser = argparse.ArgumentParser()
parser.add_argument('-i', '--input', help='path to the input video',
                    required=True)
parser.add_argument('-c', '--consecutive-frames', default=4, type=int,
                    dest='consecutive_frames', help='path to the input video')
args = vars(parser.parse_args())
There are two flags that we define.
--inputfor the path to the input video file.--consecutive-framesto set the number of consecutive frames that we want to consider for frame differencing and summing. The authors have used 8 consecutive frames in their research. But we can choose any number of frames from 2 to 8. In fact, choosing a lesser number of frames will result in a smoother video. This is because we will skip fewer frames in between the detections.
Read the Video File
Let’s read the video file using OpenCV. Along with that, we will also get the frame width and height for the VideoWriter() object.
cap = cv2.VideoCapture(args['input'])
# get the video frame height and width
frame_width = int(cap.get(3))
frame_height = int(cap.get(4))
save_name = f"outputs/{args['input'].split('/')[-1]}"
# define codec and create VideoWriter object
out = cv2.VideoWriter(
    save_name,
    cv2.VideoWriter_fourcc(*'mp4v'), 10,
    (frame_width, frame_height)
)
At line 7, we are defining the codec for saving the resulting video. We will save the video as an .mp4 file. We are getting the save_name by simply splitting the input path that we will provide as the command line argument.
The following block of code gets the background model (the median frame) by calling the get_background() function.
# get the background model
background = get_background(args['input'])
# convert the background model to grayscale format
background = cv2.cvtColor(background, cv2.COLOR_BGR2GRAY)

frame_count = 0
consecutive_frame = args['consecutive_frames']
We are converting the background model to grayscale color format. This is a very important step. We are also setting frame_count variable to 0 and consecutive_frame variable to the value passed as the command line argument. The frame_count will keep track of the total number of frames in a video. And consecutive_frame defines the number of frames that we want to consider for frame differencing and summing for detecting the objects.
Looping Over the Frames and Detecting Moving Objects
Next, we will use a while loop to loop over the frames in the video for moving object detection using frame differencing. We will first write the code and then get to the explanation part. The following code block contains the complete while block.
while (cap.isOpened()):
    ret, frame = cap.read()
    if ret == True:
        frame_count += 1
        orig_frame = frame.copy()
        # IMPORTANT STEP: convert the frame to grayscale first
        gray = cv2.cvtColor(frame, cv2.COLOR_BGR2GRAY)

        if frame_count % consecutive_frame == 0 or frame_count == 1:
            frame_diff_list = []

        # find the difference between current frame and base frame
        frame_diff = cv2.absdiff(gray, background)
        # thresholding to convert the frame to binary
        ret, thres = cv2.threshold(frame_diff, 50, 255, cv2.THRESH_BINARY)
        # dilate the frame a bit to get some more white area...
        # ... makes the detection of contours a bit easier
        dilate_frame = cv2.dilate(thres, None, iterations=2)
        # append the final result into the `frame_diff_list`
        frame_diff_list.append(dilate_frame)

        # if we have reached `consecutive_frame` number of frames
        if len(frame_diff_list) == consecutive_frame:
            # add all the frames in the `frame_diff_list`
            sum_frames = sum(frame_diff_list)

            # find the contours around the white segmented areas
            contours, hierarchy = cv2.findContours(sum_frames, cv2.RETR_EXTERNAL, cv2.CHAIN_APPROX_SIMPLE)
            # draw the contours, not strictly necessary
            for i, cnt in enumerate(contours):
                cv2.drawContours(frame, contours, i, (0, 0, 255), 3)

            for contour in contours:
                # continue through the loop if contour area is less than 500...
                # ... helps in removing noise detection
                if cv2.contourArea(contour) < 500:
                    continue

                # get the xmin, ymin, width, and height coordinates from the contours
                (x, y, w, h) = cv2.boundingRect(contour)
                # draw the bounding boxes
                cv2.rectangle(orig_frame, (x, y), (x+w, y+h), (0, 255, 0), 2)

            cv2.imshow('Detected Objects', orig_frame)
            out.write(orig_frame)
            if cv2.waitKey(100) & 0xFF == ord('q'):
                break
    else:
        break

cap.release()
cv2.destroyAllWindows()
Let’s go over the code.
- The very first thing, as soon as we encounter a frame, we increment the
frame_countat line 32. Then we keep a copy of the original unchanged frame at line 33 and convert the current frame to grayscale color format at line 35. - Now, we know that we have to consider
consecutive_framenumber of frames for frame differencing and summing. This means that we need to store all theconsecutive_framenumber of frames somewhere. Therefore, at line 38, we initializeframe_diff_list. This happens if we are at the first frame or when we reach the consecutive number of frames that we want to consider. - All the operations of the first phase, that is, object detection and segmentation happen from line 40 to 48. First, we find the difference between the current frame and the background model frame.
- Then we apply thresholding to convert the resulting frame to binary format. If the pixel value is less than 50, we set it to 0, else we set it to 255. So, all the pixels are either 0 or 255 after this operation.
- Then we apply a morphological operation, that is dilating. This expands the white pixel regions to some extent. The number of
iterationsdetermine how much they should be dilated. A very big value will result in just white patches. So, we should use it cautiously. - At line 48, we append the resulting
dilate_frameto theframe_diff_list. - From line 51, we have an
ifblock. This block is executed every time we reachconsecutive_framenumber of frames. First, we add all the frames inside theframe_diff_list. At line 56, we find the contours of all the outlined objects insum_frames. Then we draw the frames as well which is not actually necessary but might come in handy if we consider visualizing the contours. - Starting from line 61, we go over the contours and only move forward to drawing the bounding boxes if the contour area is greater than 500. This is a very easy way to filter out any noise that might have been detected in the previous stages.
- At line 68, we get the minimum x & y coordinates and width & height by using
cv2.boundingRectaround the current contour. And line 70 draws the bounding boxes around the current object. - Then, we show the frame on the screen and save the frame to disk as well.
- Finally, we release the
VideoCapture()object and destroy all OpenCV windows.
This is all the code we need to moving object detection using frame differencing with OpenCV. We are all set to execute the code and see how it performs.
Executing detect.py for Moving Object Detection using Frame Differencing
Open up your terminal/command line and cd into the project directory.
We have three videos inside the input folder. We will start with the first video. Now, keep in mind that the authors used 8 consecutive frames in their research. But we will consider 4 frames. This will keep the frames a bit less choppy. Still, you are all free to try and see how 8 consecutive frames perform as well.
Moving over to the execution part, type the following command.
python detect.py --input input/video_1.mp4 -c 4
You should see the following result.
We can see that the frame differencing and summing is working really well. It is picking up almost every moving person in the frames. There are some cases, where two persons very close to each other are being detected as a single person. Still, that is not very profound here. In fact, the detections are really good for such a simple computer vision teachnique.
Next, we will see a case where the detections are not as good.
python detect.py --input input/video_2.mp4 -c 4
Here, the detections are really bad. Because we have so many persons in close proximity, therefore most of them are being enclosed in a single bounding box. Moreover, because of the lighting and contour detection issues, sometimes the legs and rest of the body are being detected separately. This is one of the cases, where the detection technique does not perform as well.
One final video to show how the technique performs in detecting vehicles on highways.
python detect.py --input input/video_3.mp4 -c 4
While detecting the vehicles, the algorithm is performing much better than the previous case. Although it is still detecting vehicles that are close to each other as one moving object. But for most part, it is working well. It is even able to detect the moving vehicles right at the back when they just appear on the camera.
We have tested all the videos. Now you may go ahead and test on any new videos of your choice as well.
Advantages and Disadvantages
We have now completed detecting moving objects using frame differencing with OpenCV. We saw some advantages and disadvantages. Let’s outline them here.
Advantages
- The first one is low computation power. As we do not use any neural network or deep learning technique, it is not computationally demanding.
- We can even run it on a CPU. Even a moderately powerful CPU will suffice for employing this detection technique for moving objects.
Disadvantages
- First of all, we can only detect moving objects. If our goal is that, then it is all fine. But we will not be able to detect static objects using this technique. This also means that we cannot use this technique on images but only on videos.
- It cannot be actually completely real-time as we have to wait at least for a certain number of frames to get the background model. We also have to get a certain number of frames for differencing and summing and then only we can start detection.
- Using this with static cameras works pretty well. But with moving cameras it will not work at all as the objects will be just everywhere. Therefore, it is best suited for surveillance tasks where the camera is stationary.
- The background model and the moving objects should be pretty distinguishable. The lighting should also be good. Else, we may face issues like double detections for a single object, like in video 2.
- And objects close to each other will be detected as a single object, which is a big issue.
Summary and Conclusion
In this tutorial, you got to learn about moving object detection. You saw how a very simple computer vision technique could also help in detecting moving objects in videos. You also got to know about the specific advantages and disadvantages. I hope that you learned something new.
If you have any doubts, suggestions, or thoughts, then please leave them in the comment section. I will surely address them.
You can contact me using the Contact section. You can also find me on LinkedIn, and X.

Thank you for such amazing tutes. One thing…it just detects moving objects, can we extract these individual objects and enter in to deep learning classification modelling scheme for object classification too.
Thank you for the appreciation. Yes, you can extract the objects as you do have the bounding box coordinates. But this method might not be too efficient as the bounding boxes will not be accurate every time. It will again require filtering after the extraction process. Still, I think it is an interesting idea of collecting data and worth a try as well.
Thank you for this well written tutorial. I’ve been familiar with frame differencing for years and used it in my VideoSpeedTracker: https://github.com/pfr/VideoSpeedTracker. VST worked well enough to track millions of vehicles speeding on residential streets and convince the Virginia, USA legislature to allow municipalities to deploy speed cameras this past year. But that aside your explanation of using a sequence of frames for summing and differencing was new to me. I’ll be trying it out on a different project (tracking model trains for location detection and collision avoidance).
Thank you Paul for the info and linking the project. And all the best on your new project.
Thanks Sovit, this is excellent. Really clear and helpful.
Glad that it helped you.
I want to make some advance improvement over it.
Suppose if there are lots of moving objects, and we want to detect only particular object , then what should I do?
I dont want to track all the objects.
With the current approach, it’s really difficult. For your use case, I think deep learning is the best approach.
Can u explain how it could be done with the Deep learning?
It’s really difficult to explain deep learning based object detection in a comment section. But I have a host of tutorials and you can look at them to get started.
https://debuggercafe.com/category/object-detection/
I hope this helps.
Hi, very good tutorial, but I confused with the term of summing? when is the summation process did? I think there is only getting the median of the frames and no summing process
Hello. This is line of code where we sum the frames.
“`
if len(frame_diff_list) == consecutive_frame:
# add all the frames in the `frame_diff_list`
sum_frames = sum(frame_diff_list)
“`
I hope this helps.
Hi, It is a great tutorial. I am using it for video streaming from a CCTV camera. But I am facing some issues. First of all, the video won’t pop up immediately even though sometimes I can see people moving around. Second, I need to detect the object moving at a significant pace. For example, a person is walking. But code also detects a person’s hand movement while he is sitting in a place. My main goal is to detect the door movement. Could you please help me out with this?
Hi. This seems like a much bigger project which needs dedicated time and much more information as well. I am not sure whether I will be able to help right now with this.
Nice toutorial
it can also work on “Depth image”?
i want to work on Kinect V2 sensor, thank you!!!
Thank you for your appreciation. It should work on depth image as well. If you try it, please let us know in the comment section.
Fantastic tutorial, if any possible apply these features to live-streaming video
Thank you. I have not thought about it yet, but I will try it out.
i want to use the code for commercial project, can i? do you allow?
Hello. I think you sent me an email as well. I have replied, please check.
Hello, thank you very much for great tutorial!
There is sometimes error within get_background function. I’m not sure why, it has to do something with row
np.median(frames, axis=0).astype(np.uint8)
and also with random choosing frames, beacause it fail only occasionally…
The error message is ‘ValueError: The truth value of an array with more than one element is ambiguous. Use a.any() or a.all()’
Any idea what is wrong?
Hello Wojman. I will check the code and update it accordingly. It may be because of some update in the OpenCV API as I wrote the post a long time ago. In the meantime, can you please let me know your OpenCV version>
Hello Sovit,
Great tutorial!
How did you display the image of ‘median_frame’ from Figure 6?
Figure 6. The background model after calculating the median of 50 randomly chosen frames from the video file.
Thanks!
Hello Brian. Thanks for the appreciation.
As the caption says, it is the median for 50 random frames from the video.
The code is present in the get_background() function under the Code for Getting the Background Model of Video heading.
We get the 50 frames, append them to a list and apply np.median to it.
I hope this helps.
In my opinion, you should read this article. This guide will teach you how to use the frame-by-frame difference to find the locations of moving objects in a movie. We’ll be making use of the OpenCV library while doing this. Using only computer vision techniques, their study describes how to identify a variety of moving objects in a movie. In my opinion, this is one of the greatest blogs that thoroughly covers the topic. Great to find Spypro.com.au which has same kind of wonderful tips, if possible then visit.