
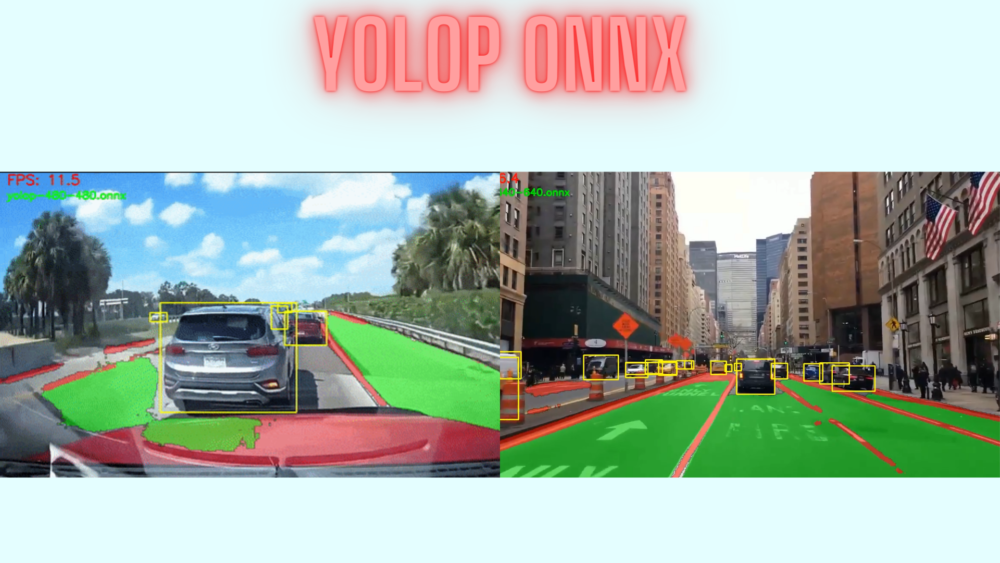
In this tutorial, we will run several inference experiments using the YOLOP ONNX models.
The last two blog posts covered the YOLOP models at different levels. In the first post, we covered the YOLOP paper. We got to know how a real-time panoptic driving perception model is built for detection and segmentation. In the second post, we ran several inference experiments using the pretrained YOLOP PyTorch models on CPU and GPU. That also gave us a pretty good idea about the real-time performance and lackings of the model.
But the story does not stop here. The official YOLOP codebase also provides ONNX models. We can use these ONNX models to run inference on several platforms/hardware very easily. Although we will not use any specialized hardware in this post. Still, we will use the YOLOP ONNX models for inference on a desktop CPU. This will provide us with even better insights into the performance of the model.
Note: We will not be diving into the details of ONNX itself here. In future blog posts, we will cover all the details of ONNX, the hardware platforms it supports, its usefulness, and many more. This blog post will mainly focus on using the YOLOP ONNX models for running inference on a desktop CPU.

Topics to Cover In This Post
- How to set up your local system for running YOLOP ONNX models?
- How to use the available ONNX models for inference?
- What are the steps to create your own YOLOP ONNX models and how to use them for inference?
There are two other blog posts on YOLOP that you will surely find useful if you are new to the topic. Check out the following links to know more:
Benefits of Using ONNX for Inference
Although we will not get into the details of the working of ONNX, still, let’s discuss the benefits of using ONNX for inference. These are going to be mostly pointers. And as pointed out above, we will discuss all the details in a separate post on ONNX.
- Interoperability between frameworks: We can train deep learning models in one framework and run inference on another framework easily. For example, we train a model in PyTorch, save its ONNX format, and run inference using TensorFlow.
- Wide range of hardware support: Unlike deep learning models which may or may not be available for particular hardware, ONNX models can run on a wide range of hardware. These include different CPUs, GPUs, and edge hardware.
The following image provides a good overview of the hardware that ONNX supports.
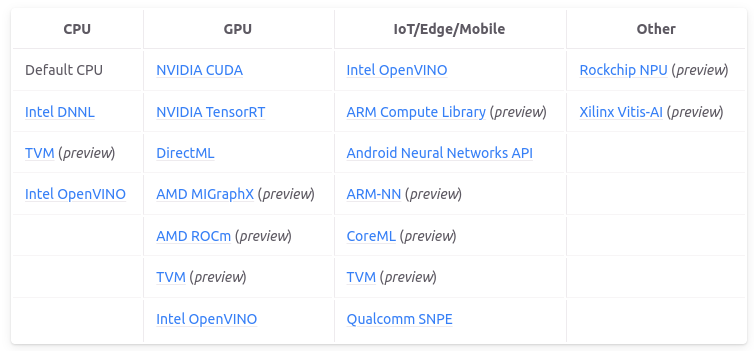
This makes it easier to deploy a deep learning model as we just need to train the model once and convert it into the ONNX format.
To know more about ONNX, please visit the website.
Directory Structure
Let’s check out the directory structure that we have for this project.
├── input
│   └── videos
├── YOLOP
│   ├── inference
│   ├── lib
│   ├── pictures
│   ├── toolkits
│   ├── tools
│   ├── weights
│   ├── export_onnx.py
│   ├── hubconf.py
│   ├── LICENSE
│   ├── onnx_video.py
│   ├── README _CH.md
│   ├── README.md
│   ├── requirements.txt
│   ├── test.jpg
│   └── test_onnx.py
└── README.md
There are two directories:
input: This contains the videos that we will use for inference inside thevideossubdirectory.YOLOP: This is the cloned YOLOP GitHub repository. We create a new file calledonnx_video.pywhich will contain the executable code for using YOLOP ONNX models for inference.- The project directory itself contains a
README.mdwhich holds all the steps to set up the local system for YOLOP ONNX inference. We will follow the steps in this blog post well.
When downloading the zip file for this post, you will get access to the onnx_video.py inference script. You just need to set up the local system and copy the file into the YOLOP directory to start running the code.
Setting Up Local System for YOLOP ONNX Inference
Before moving forward into the inference section, we will need to set up the local system. This is important because of two reasons:
- We want to run the inference using the already provided YOLOP ONNX models.
- Also, we will be exporting our own ONNX models and run inference. This requires additional dependencies with very specific versions which can be hard to install. But we will move forward step by step and make everything smooth.
The cloning of the YOLOP repository and installing the requirements have already been covered in the previous two posts. Still, let’s follow the steps once again here.
All the steps here are based on the Anaconda command line environment.
Open your terminal/command line in the directory of your choice and execute the following commands to complete the setup.
- Create a new conda environment called
yolopand activate it. You may name it differently if you want.
conda create -n yolop python=3.7
conda activate yolop
- Clone the YOLOP repository and make it the current working directory.
git clone https://github.com/hustvl/YOLOP.git
cd YOLOP
- Install PyTorch first and the remaining requirements from the
requirements.txtfile.
conda install pytorch torchvision torchaudio cudatoolkit=11.3 -c pytorch
pip install -r requirements.txt
- Install ONNX Runtime. We need this for running the ONNX models on the CPU.
pip install onnxruntime==1.7.0
- As we will be exporting our own ONNX models as well, we will need ONNX and ONNXSim.
pip install onnx==1.9.0
pip install onnx-simplifier==0.3.6
In the above commands, the versions of ONNX Runtime, ONNX, and ONNXSim are particular for this project. Other versions may or may not work but the above versions will indeed work.
With this, we complete the setting up of the local system for running YOLOP ONNX models and for exporting them as well.
Running Inference using the Provided YOLOP ONNX Models
The weights directory contains three ONNX models that already come with the repository.
They are:
yolop-320-320.onnxyolop-640-640.onnxyolop-1280-1280.onnx
Note: All the experiments shown here were run on a system with an Intel Core i7 10th generation CPU, and 32 GB of RAM.
As the name suggests, they have been exported to carry out inference at different resolutions. In this blog post, we will use the yolop-640-640.onnx and yolop-320-320.onnx models for inference. The yolop-1280-1280.onnx model runs too slow on the CPU. For that reason, we are going to skip running inference using that.
The onnx_video.py already contains the code for running the inference. I have adapted the test_onnx.py script that came with the repository which could run inference on an image. You will get access to the script when downloading the zip file for this post.
Download Code
You may carry out inference on your own videos by changing the video path. The following command has been executed from the YOLOP directory to run inference on a video.
python onnx_video.py --weight yolop-640-640.onnx --source ../input/videos/video_1.mp4
Let’s check out the results of two more videos using the 640×640 model and then analyze the results.
We can see that although we are using the same model and resolution to carry out the inference, still, the difference in the FPS is too much. Sometimes, as big as 3 FPS. It is also difficult to get any more FPS with 640×640 video frames when running on a CPU.
Let’s try out the yolop-320-320.onnx model which resizes all frames to 320×320.
python onnx_video.py --weight yolop-320-320.onnx --source ../input/videos/video_3.mp4
This time we are getting almost 26 FPS but the output is too blurry because of resizing to the original size. Also, because of the low resolution, the outputs are not that good.
How to Create Your Own YOLOP ONNX Models for Inference?
As we saw in the above examples, the resolution of the video and the resolution to which we resize the frames, both affect the FPS.
When we use high-resolution input frames, like 640×640 for the ONNX model, then we get an average of around 6 FPS. And with low-resolution input frames of 320×320, we get an average of around 25 FPS. But the predictions when using low-resolution frames are not that good. Because the model does not get to see very distinct features.
Mostly, we need a middle ground to balance out the predictions, the visualizations, and the FPS. This is where exporting our own ONNX model comes into the picture. Every ONNX model can only process images or frames with which they were exported with.
Luckily for us, we do not have to write a custom script for this. The authors already provide an export_onnx.py script which we can use to export our own model.
We just need a PyTorch pretrained model which is already present in the weights directory.
Please note that we are not going into the details of how ONNX export works. Instead, from a beginner’s point of view, we are just taking the simple steps of using the predefined scripts and available models. In future posts, we will get into the details of the working of ONNX, exporting it, and running it on different hardware.
Here, we will export an ONNX model to process 480×480 frames. This stands just in between 640×640 and 320×320. So, we can expect a good balance between the FPS and output quality.
To export your own YOLOP ONNX model, just execute the following script in the terminal.
python export_onnx.py --height 480 --width 480
It may take a few seconds for the export to complete. After it is done, you should see a new yolop-480-480.onnx model in the weights directory.
Running Inference using Custom YOLOP ONNX Models
Let’s check out the inference results on one of the videos on which we ran inference using 320×320 frames.
We can use a very similar command and just change the weight path.
python onnx_video.py --weight yolop-480-480.onnx --source ../input/videos/video_3.mp4
The following is the output that we get.
With the hardware specified above, we get an average of 11.7 FPS. That’s not bad at all. Even the detections look pretty good.
If you remember, with 320×320 frames, we got a few false positives for the vehicle detections. Also, the road segmentation was not accurate. With the new 480×480 input frames, although there are still a few false positive vehicle detections, the model is now able to detect vehicles far away. And the drivable area segmentation and lane detection look pretty good.
Summary and Conclusion
In this blog post, we used the YOLOP ONNX models to run inference on videos with various input resolutions. Not only that, but we also exported our own ONNX model and ran inference using it. This gave us an idea of the FPS and the quality of prediction when using different input frame resolutions. In future posts, we will dive deeper into ONNX and its working. I hope that you learned something new from this post.
If you have any doubts, thoughts, or suggestions, please leave them in the comment section. I will surely address them.
You can contact me using the Contact section. You can also find me on LinkedIn, and X.

Super…..I akse like this articles
Please continue this series related onnx
Thank you. Will write more on ONNX after a couple of more articles.