
This post is going to be a practical guide to YOLOP for object detection and semantic segmentation.
YOLOP is an end-to-end panoptic vision perception model for autonomous driving. YOLOP stands for You Only Look Once for Panoptic Driving Perception. It has been trained on the BDD100K dataset and can carry out the following three tasks:
- Traffic object detection.
- Drivable area segmentation.
- Lane line detection (segmentation).
It can easily run in more than real-time on a mid-range laptop GPU. This is a nice achievement as it is sometimes difficult for models to carry out both, detection and segmentation.
In the last blog post, we discussed the theory and paper on YOLOP. That gave us some important insights into the:
- The model architecture of the YOLOP model.
- The training experiments.
- And the results.
As of writing this, although YOLOP is not the latest model for driving perception, it is one of the very few open-source models.
In this post, we will take a completely practical approach using the code that has been generously provided by the authors on GitHub. We will carry out inference using YOLOP for traffic object detection and segmentation.
- We will run inference on CPU and GPU.
- For running the inference and testing out the model, we will choose videos with varying lighting and weather conditions. We will get into the details later on.
Let’s start with the exciting part.
Directory Structure
We will be cloning the YOLOP repository later on. Before that, let’s take a look at the final directory structure that we have.
.
├── input
│   └── videos
│       ├── video_1.mp4
│       ├── video_2.mp4
│       ├── video_3.mp4
│       └── video_4.mp4
├── YOLOP
│   ├── inference
│   │   ├── images
│   │   ├── output
│   │   └── videos
│   ├── lib
│   │   ├── config
│   │   ...
│   │   └── __init__.py
│   ├── pictures
│   │   ├── da_onnx.jpg
│   │   ...
│   │   └── yolop.png
│   ├── runs
│   │   └── BddDataset
│   ├── toolkits
│   │   ├── datasetpre
│   │   └── deploy
│   ├── tools
│   │   ├── demo.py
│   │   ├── inference.py
│   │   ├── test.py
│   │   └── train.py
│   ├── weights
│   │   ├── End-to-end.pth
│   │   ├── yolop-1280-1280.onnx
│   │   ├── yolop-320-320.onnx
│   │   └── yolop-640-640.onnx
│   ├── export_onnx.py
│   ├── hubconf.py
│   ├── LICENSE
│   ├── README _CH.md
│   ├── README.md
│   ├── requirements.txt
│   ├── test.jpg
│   └── test_onnx.py
└── README.md
There are two subdirectories in the parent project directory.
- The
inputdirectory holds the videos that we will use for YOLOP object detection and segmentation inference. YOLOPis the cloned repository that already has the inference scripts. Thetools/demo.pyfile holds the original inference script. But we make some additions to it and create a new file for it, that is,tools/inference.pyThis is the one that we will execute for PyTorch GPU and CPU inference.- The
weightsfolder in theYOLOPdirectory contains the pretrained PyTorch and ONNX weights. But we will not be dealing with the ONNX weights or ONNX inference in this post. We will dedicate an entire post for the ONNX inference. - The
README.mdfile in the parent directory holds the instructions for setting up the local system and the inference commands.
You can find all the new files as highlighted lines in the above block.
You will also find the custom inference scripts inside custom_inference_scripts after downloading and extracting the zip file for this post.
Inference using YOLOP for Object Detection and Segmentation
From here on, we will move towards the practical side of the blog post for running detection and segmentation inference using YOLOP.
We will run inference on four different videos which have varied lighting and weather conditions. These include:
- Simple driving video during the day-time.
- A slightly challenging one during the night-time.
- A more difficult scenario with rain during the day-time.
- And the most challenging one is with rain during the night-time.
But before that, we need to set up the local system to run the experiments.
Setting Up YOLOP On Local System
All the instructions here follow the Anaconda (conda) environment setup.
Download Code
Let’s start with creating a conda environment called yolop with Python 3.7 and activating it.
conda create -n yolop python=3.7
conda activate yolop
Now, clone the YOLOP repository.
git clone https://github.com/hustvl/YOLOP.git
Enter the YOLOP directory.
cd YOLOP
Next, we need to install PyTorch. Here, we are installing the latest version of PyTorch with CUDA 11.3 support. At the time of writing, PyTorch 1.12.1 happens to be the latest version.
conda install pytorch torchvision torchaudio cudatoolkit=11.3 -c pytorch
Finally, install the rest of the requirements as per the requirements.txt file.
pip install -r requirements.txt
That’s it. We are all set with all the requirements that we need to run the object detection and segmentation inference using YOLOP.
Running PyTorch GPU Inference using YOLOP for Object Detection and Segmentation
We will start with running the inference using PyTorch on the GPU device.
Note: All the inference experiments shown in this post have been run on a machine 10th generation i7 CPU, 10GB RTX 3080 GPU, and 32 GB of RAM. The FPS may vary according to the hardware that you run the experiments on.
Before running any commands, please make sure that you have copied the inference.py into the cloned YOLOP/tools directory. You will find the script with the downloaded file in this blog post.
Right now, we have all the code in the tools/inference.py script. We just need to execute the script and provide the path to the folder containing the videos. It will run inference on all the videos at once.
Also, for running inference on GPU, we need to provide the --device as 0 while executing the script. This will consider the first GPU as detected by the script.
Open the command line/terminal inside the cloned YOLOP repository and execute the following command. You may use the same execution commands and change the path to the directory containing the videos to run inference on your own videos.
python tools/inference.py --source ../input/videos --device 0
You will get to see that the script runs the inference on the four videos one after the other. All the resulting videos will be saved in the inference/output directory.
Let’s check out all the video outputs that we got and then analyze the results.
Starting with the simple daytime driving video.
Analyzing the YOLOP GPU Inference Results
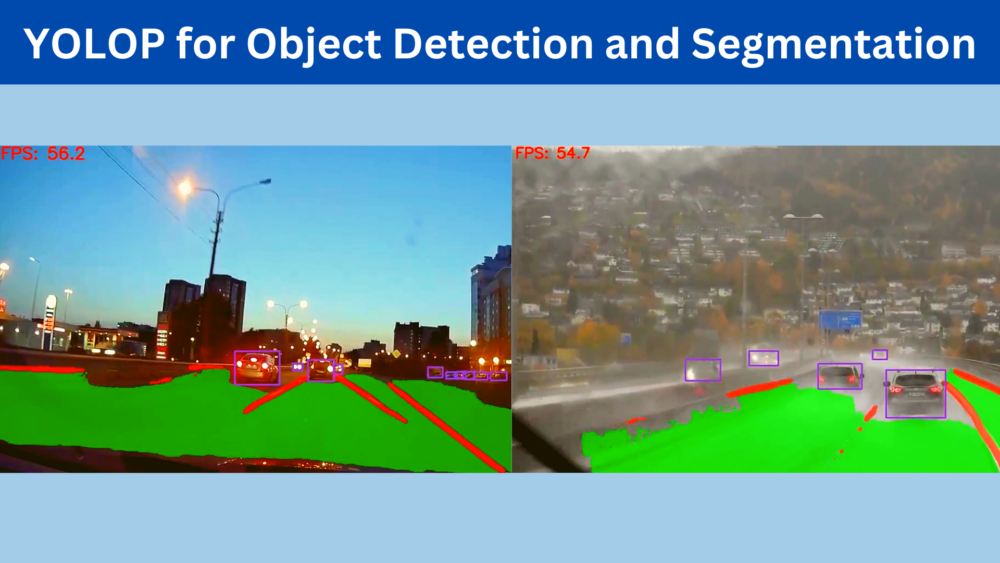
From the above outputs, we can right away consider one positive point. The model is able to run at almost 60 FPS. That too while handling three different deep learning tasks. They are traffic object detection, drivable area segmentation, and lane detection.
In fact, the same videos were tested with a laptop GTX 1060 GPU. And the model was still able to give a throughput of more than 35 FPS which is really nice.
If you have gone through the HybridNets inference post, then you may remember that on a laptop GTX 1060 we were getting only 11-12 FPS. YOLOP is much faster than HybridNets for sure.
But we can also see that the detections and segmentation are not that good, at least compared to HybridNets. For the traffic objects, YOLOP is still making the same mistakes as HybridNets and maybe even some more false positives as well.
On top of that, consider the rainy weather condition, the night-time video, and the night-time rainy video. The detection and segmentation performance gets a bit worse here. The drivable area segmentations are not very well-defined. Also, the lane line detections are bad in the final video.
But considering the speed we are getting with the YOLOP model, maybe the next version of the model will perform much better.
Running PyTorch CPU Inference using YOLOP for Object Detection and Segmentation
To run the inference on the CPU, we just have to change one command line flag value while executing the inference.py script. This time, the --device will be cpu.
The detection and segmentation outputs here are going to be the same as in the GPU inference. The main difference will be in the FPS. Let’s check out one of the outputs.
On an Intel 10th generation desktop i7 CPU, the model is able to run between 11 and 15 FPS. Even on an 8th generation laptop i7 CPU, the model was running at more than 9 FPS. This is really good. As you may remember from the HybridNets post, we were getting only 2-3 FPS on the laptop 8th generation laptop i7 CPU.
Key Takeaways
There are some important observations we can make here.
- In deep learning, the speed vs accuracy trade-off is a big concern. The models which run faster may not be the most accurate. We got first-hand experience here when running the YOLOP model.
- But we should also not forget that deep learning is moving at a faster pace than ever before. Most probably, the next version of YOLOP is going to be much faster and more accurate than all the other models in this field.
- The area of end-to-end driving perception is a very important field in deep learning, computer vision, and autonomous driving. We need models which are fast, accurate and make almost no mistakes according to the safety standards. Hopefully, we will reach there one day with the support of all the researchers and developers who are working hard to make this possible.
In a future blog post, we will check out the YOLOP ONNX models. We will try to run inference using these models on both CPU and GPU.
Summary and Conclusion
In this blog post, we ran inference using the YOLOP model for panoptic driving perception. We ran inference on both CPU and GPU. This led us to discover the trade-off that we often see in deep learning in the speed vs accuracy competition. Hopefully, you learned something new from this post.
If you have any doubts, thoughts, or suggestions, please leave them in the comment section. I will surely address them.
You can contact me using the Contact section. You can also find me on LinkedIn, and X.
If interested, please check out the open source projects on GitHub.
Video Credits
video_1.mp4: https://www.youtube.com/watch?v=7HaJArMDKgIvideo_2.mp4: https://www.youtube.com/watch?v=nfE11L7CxAQ
video_3.mp4: Video by Joshua Miranda: https://www.pexels.com/video/vehicles-traveling-on-expressway-while-raining-5004303/.video_4.mp4: https://www.youtube.com/watch?v=iBqjG7EI3Ts

Fantastic tutorial. One question , this is a good solution for the CCTV and human eye perspective camera images. Can the same be applied to drone images/UAV/Satellite images?
Hello Raj. Thank you.
I think if you can retrain on drone/UAV/satellite images dataset, then it can surely be used.
I love how this is able to be run on videos! I have been unable to find any other tutorials on how to use yolop, and was wondering how I would be able to test it out on an image!
Glad that you found the article useful, Aaron.