
Faster RCNN object detectors came a long time ago. But that does not mean they are obsolete today. In fact, they are still some of the best object detectors out there. In this post, we will put the new Faster RCNN ResNet50 FPN V2 model to test. We will train it on a real-world dataset and test it on unseen data as well.
In a few of the previous posts, we covered the updates made to the Faster RCNN models. Most of the changes were made to the training recipe of the backbone and the detection head. A few important changes were made to the architecture as well. This gave rise to the Faster RCNN ResNet50 FPN V2 model. The new Faster RCNN object detection model achieves more than 9% higher mAP compared to its predecessor.

The pretrained Faster RCNN ResNet50 FPN V2 model surely gives better results than its older version. But what about fine tuning the model on a custom dataset? That’s what we will find out in this blog post. We will train the model on a custom dataset and check out the results.
Let’s check out all the points that we will cover in this post:
- We will fine-tune the Faster RCNN ResNet50 FPN V2 model in this post.
- For training, we will use a PPE detection dataset.
- After training, we will analyze the mAP and loss plots.
- We will also run inference on videos to check how the model performs in real-world scenarios.
Know More About Faster RCNN ResNet50 FPN V2
If you wish to know about the updated Torchvision models and Faster RCNN ResNet50 FPN V2, you should surely check the following posts:
The PPE Detection Dataset
To train the object detection model in this post, we will use the COVID-19 PPE Dataset for Object Detection from Kaggle.
The dataset contains images of medical personnel wearing PPE kits for the COVID-19 pandemic. It consists of 366 training images and 50 test images across 5 classes. Also, it is worthwhile to note that the dataset is structured in the Pascal VOC XML format.
The class names given on the Kaggle page and those in the XML files slightly mismatch. As we will be using the class names from the XML files, let’s take a look at them:
- Mask
- Face_Shield
- Coverall
- Gloves
- Goggles
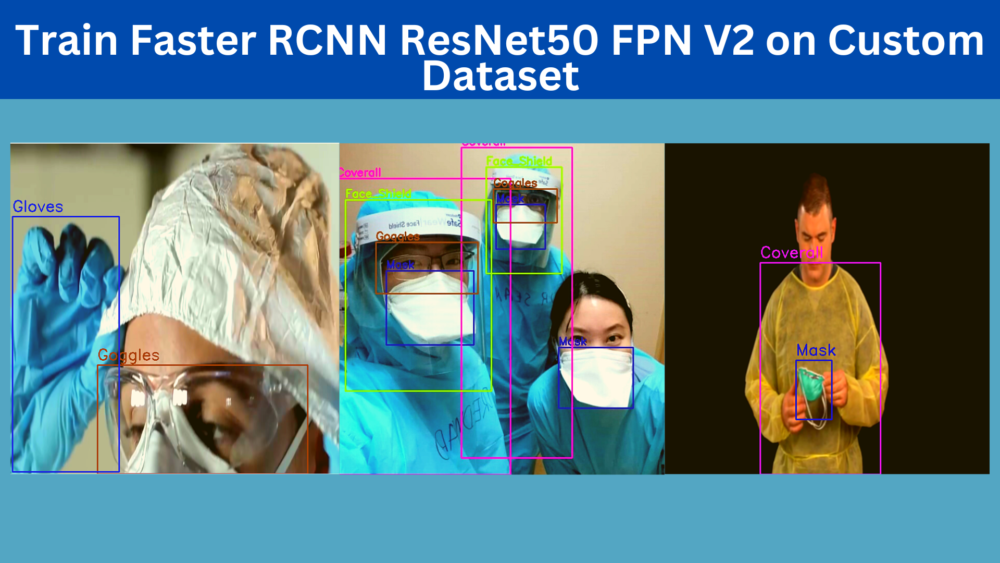
Now, to get a better idea of what each class represents, the following figure shows a few images from the dataset with the annotations.
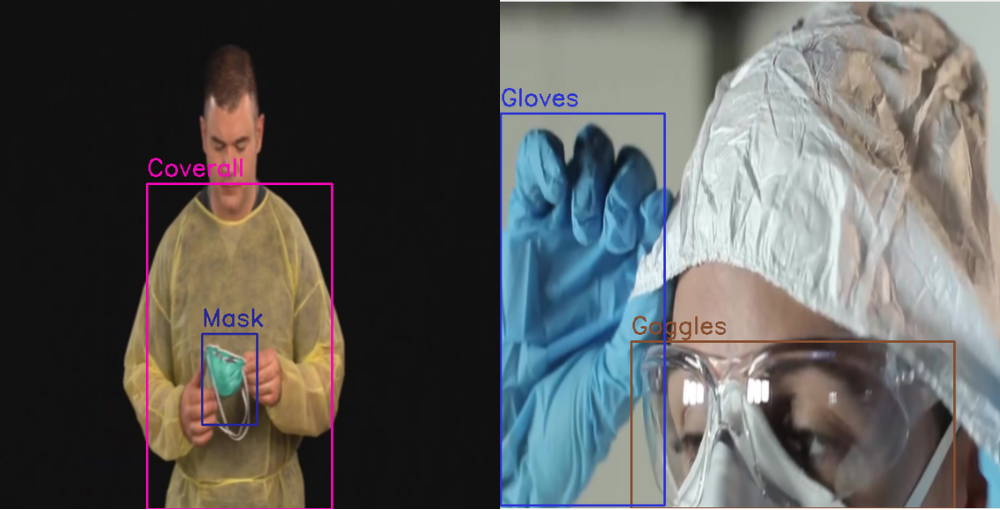
We can see that detecting the Goggles class can be a challenge for the model. Hopefully, the new Faster RCNN ResNet50 FPN V2 model will be able to do that after training.
Before moving ahead, you may download the dataset.
Directory Structure and Codebase
We will be using pretty well-structured code for this project. In fact, it is a modified version of this much larger Faster RCNN project on GitHub. We will be using a simplified version of the project structure in this blog post. The GitHub project contains a lot of advanced things like mosaic augmentation, Weights&Biases logging, TensorBoard logging, resuming training, using COCO pretrained weights, and a few more as well.
For this project, we will have access to the mosaic augmentation, and other advanced augmentation, but we will remove the logging code. This is just to simplify the codebase and concentrate on training the model. Also, the GitHub project contains support for numerous models, while in this blog post, we will tone it down to just two models.
The Project Folder
We will use the following directory structure for this project.
├── data
│   └── ppe
│       ├── dataset
│       │   ├── test
│       │   └── train
│       └── tf_record_files
│           ├── label_map.pbtxt
│           ├── test_labels.csv
│           ├── test.record
│           ├── train_labels.csv
│           └── train.record
├── data_configs
│   └── ppe.yaml
├── models
│   ├── create_fasterrcnn_model.py
│   ├── fasterrcnn_resnet50_fpn.py
│   ├── fasterrcnn_resnet50_fpn_v2.py
│   └── __init__.py
├── outputs
│   └── training
├── torch_utils
│   ├── coco_eval.py
│   ├── coco_utils.py
│   ├── engine.py
│   ├── __init__.py
│   ├── README.md
│   └── utils.py
├── utils
│   ├── annotations.py
│   ├── general.py
│   ├── __init__.py
│   ├── logging.py
│   └── transforms.py
├── datasets.py
├── inference.py
├── inference_video.py
├── __init__.py
├── Outputs.md
├── README.md
├── requirements.txt
└── train.py
- The
datafolder contains the dataset for this project in thedata/ppefolder. Thetrainandtestfolders contain the images along with the XML files. - The
data_configsdirectory contains the dataset information and configuration. We will look at it at a later stage in the post. - We have the script for two models in the
modelsdirectory. One is for the older Faster RCNN ResNet50 FPN and the other is for the FPN V2 one. We can use either one of them during training just by changing one command line flag value. - The
outputsdirectory will hold all the training outputs. - We have a
torch_utilsand autilsdirectory which holds a lot of helper code and training utilities. We will not be diving into the details of these here. But you are free to check them out. - There are two inference scripts as well, one for image inference and one for video inference. Along with that, we have the
datasets.pyfor preparing the dataset and data loaders. Thetrain.pyis the executable script to start the training.
Please note that we will not go into the details of the code files in this post. But you will get access to all the code files in the above structure. You just need to arrange the dataset and you are all set to start the training. You can easily install all the dependencies using the requirements.txt file.
If you intend to run the training on your local system, please ensure that you do so on a GPU.
Also, you will need to install at least PyTorch version 1.12.0 to get access to the Faster RCNN ResNet50 FPN V2 API. The older versions do not support it.
Training Faster RCNN ResNet50 FPN V2 on the PPE Detection Dataset
In this section, we will go through a few code files and the training experiments for PPE object detection.
Although we will not be able to go through all the code files, we will surely go through at least two of them. They are the dataset YAML file (data_configs/ppe.yaml) and the fasterrcnn_resnet50_fpn_v2.py file inside the models directory.
The Dataset YAML File
The dataset YAML file contains information about the images and XML file paths. Along with that, it also contains the class names and the number of classes in the dataset.
Download Code
The following block shows all the content of ppe.yaml inside the data_configs directory.
# Images and labels direcotry should be relative to train.py
TRAIN_DIR_IMAGES: 'data/ppe/dataset/train'
TRAIN_DIR_LABELS: 'data/ppe/dataset/train'
VALID_DIR_IMAGES: 'data/ppe/dataset/test'
VALID_DIR_LABELS: 'data/ppe/dataset/test'

# Class names.
CLASSES: [
    '__background__',
    'Mask', 'Face_Shield', 'Coverall', 'Gloves', 'Goggles'
]

# Number of classes (object classes + 1 for background class in Faster RCNN).
NC: 6

# Whether to save the predictions of the validation set while training.
SAVE_VALID_PREDICTION_IMAGES: True
In the above code block, lines 2 to 5 contain the path to the training & validation images as well as the XML files. As per the dataset structure, the images and the corresponding XML files are present in the same directory.
There are 5 object classes in the dataset. Along with those, we also need to include the __background__ as a class in CLASSES. This brings the total number of classes, that is, NC to 6.
Finally, the SAVE_VALID_PREDICTION_IMAGES attribute ensures that a few images from the validation set along with the predicted annotations are saved to the disk after each epoch. This helps to track the progress of the model visually as well.
The Faster RCNN ResNet50 FPN V2 Model File
All the model code files are present inside the models module. The aim of this project is to make the custom dataset training of Faster RCNN ResNet50 FPN V2 easier. So, let’s check out the content of fasterrcnn_resnet50_fpn_v2.py.
import torchvision

from torchvision.models.detection.faster_rcnn import FastRCNNPredictor

def create_model(num_classes, pretrained=True, coco_model=False):
    # Load Faster RCNN pre-trained model
    model = torchvision.models.detection.fasterrcnn_resnet50_fpn_v2(
        weights=torchvision.models.detection.FasterRCNN_ResNet50_FPN_V2_Weights.DEFAULT
    )
    if coco_model: # Return the COCO pretrained model for COCO classes.
        return model

    # Get the number of input features
    in_features = model.roi_heads.box_predictor.cls_score.in_features
    # define a new head for the detector with required number of classes
    model.roi_heads.box_predictor = FastRCNNPredictor(in_features, num_classes)

    return model

if __name__ == '__main__':
    model = create_model(num_classes=81, pretrained=True, coco_model=True)
    print(model)
    # Total parameters and trainable parameters.
    total_params = sum(p.numel() for p in model.parameters())
    print(f"{total_params:,} total parameters.")
    total_trainable_params = sum(
        p.numel() for p in model.parameters() if p.requires_grad)
    print(f"{total_trainable_params:,} training parameters.")
It’s less than 30 lines of code. Torchvision makes it really easy to load a COCO pretrained model and fine-tune it on any other object detection dataset.
There are a few important points to ensure in the above code block:
- We need to use the
fasterrcnn_resnet50_fpn_v2function fromtorchvision.models.detectionmodule. - The new Faster RCNN model is available starting from PyTorch version 1.12.0. It also contains a new argument to handle the loading of the pretrained weights. Here, we pass the
weigthsargument along with the valueFasterRCNN_ResNet50_FPN_V2_Weights.DEFAULTthat loads the latest pretrained weights. - The rest of the code prepares the entire model for fine tuning on the custom object detection dataset.
There is also the fasterrcnn_resnet50_fpn.py file in the models module. This is the older Faster RCNN model. This is included in case we want to train the model and compare the results.
Train the Faster RCNN Model
The train.py script handles the training of the models in this project. You can go through it to gain a deeper understanding of the workflow.
To start the training, we can use the following command.
python train.py --model fasterrcnn_resnet50_fpn_v2 --config data_configs/ppe.yaml --epochs 50 --project-name fasterrcnn_resnet50_fpn_v2_ppe --use-train-aug --no-mosaic
The following are the command line arguments that we use:
--model: Here, we usefasterrcnn_resnet50_fpn_v2to indicate that we want to train the new Faster RCNN model. To train the older model, you can simply provide the value asfasterrcnn_resnet50_fpn.--config: It takes the path to the dataset configuration file which isdata/ppe.yamlfile in this case.--epochs: We are training the model for 50 epochs.--project-name: Providing a string value to this argument will save the results with that folder name insideoutputs/training. In this case, it is going to beoutputs/training/fasterrcnn_resnet50_fpn_v2_ppe.--use-train-aug: The data loader supports various image augmentations. This argument is a boolean value that ensures that those augmentations are applied.--no-mosaic: Additionally, the data loader also supports mosaic augmentation. But providing this boolean argument will turn it off.
The following are the outputs from the terminal after the final epoch.
Average Precision  (AP) @[ IoU=0.50:0.95 | area=   all | maxDets=100 ] = 0.4657091197451703
Average Precision  (AP) @[ IoU=0.50      | area=   all | maxDets=100 ] = 0.7605803820027989
Average Precision  (AP) @[ IoU=0.75      | area=   all | maxDets=100 ] = 0.5007951131618273
Average Precision  (AP) @[ IoU=0.50:0.95 | area= small | maxDets=100 ] = 0.16899621212121213
Average Precision  (AP) @[ IoU=0.50:0.95 | area=medium | maxDets=100 ] = 0.5239737409561165
Average Precision  (AP) @[ IoU=0.50:0.95 | area= large | maxDets=100 ] = 0.5378966352420922
Average Recall     (AR) @[ IoU=0.50:0.95 | area=   all | maxDets=  1 ] = 0.30762525971018045
Average Recall     (AR) @[ IoU=0.50:0.95 | area=   all | maxDets= 10 ] = 0.5453425772130455
Average Recall     (AR) @[ IoU=0.50:0.95 | area=   all | maxDets=100 ] = 0.5453425772130455
Average Recall     (AR) @[ IoU=0.50:0.95 | area= small | maxDets=100 ] = 0.18468045112781956
Average Recall     (AR) @[ IoU=0.50:0.95 | area=medium | maxDets=100 ] = 0.6493614212929966
Average Recall     (AR) @[ IoU=0.50:0.95 | area= large | maxDets=100 ] = 0.6230463015245624
The [email protected]:0.95 IoU is 46.57% and [email protected] IoU is 76%. But for this run, the best mAP happens to be after epoch 26 which was 47.9 at 0.50:0.95 IoU. The training script saves the last epoch’s model as well as the best model. We will use the best model for inference.
Visualizing the Faster RCNN ResNet50 FPN V2 Training Plots
Let’s take a look at all the plots that were saved to the disk while the training was going on.
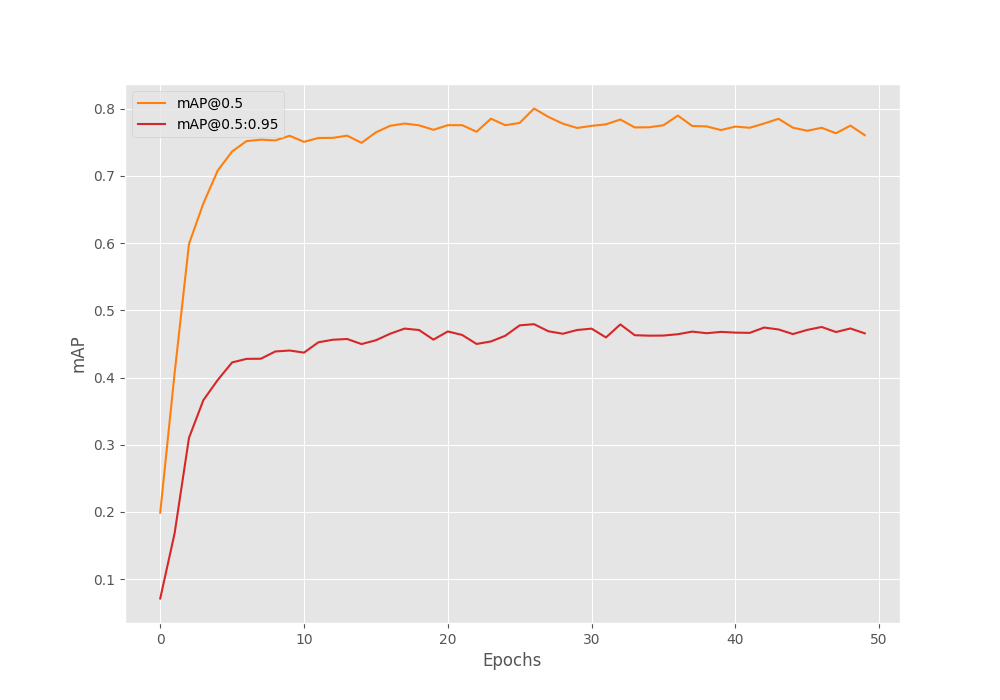
In figure 3 it is pretty clear that the model hit the highest mAP on epoch 26 after which it dropped a bit and remained almost around the same range till the end of the training.
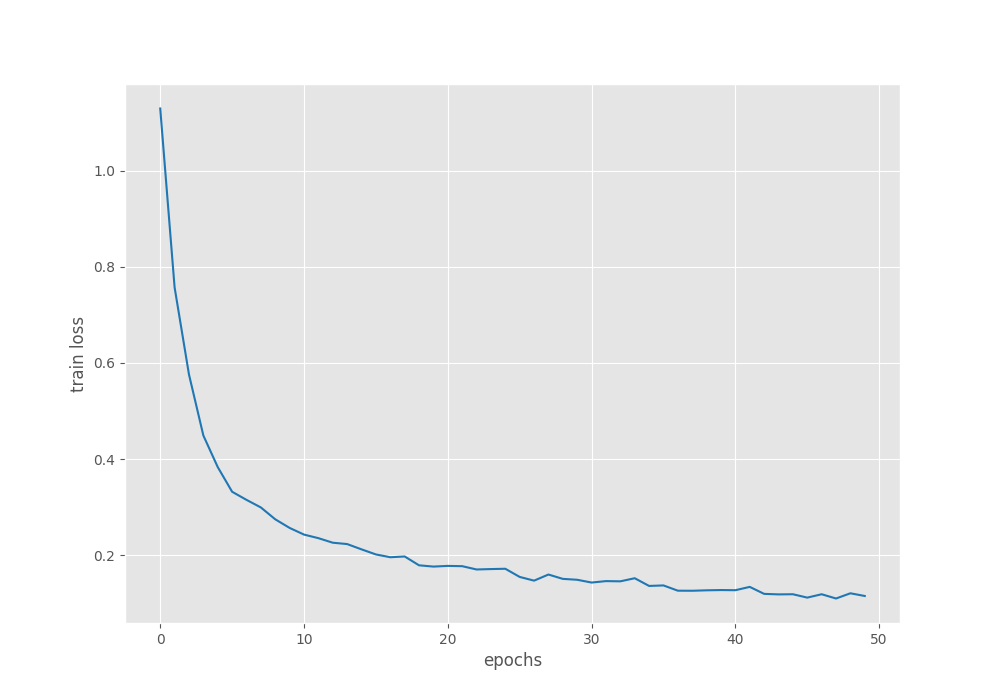
Figure 4 shows the training loss plot which was reducing till the end of the training.
The following are the bounding box regression, classification loss, objectness loss, and RPN box loss which the model outputs during training.
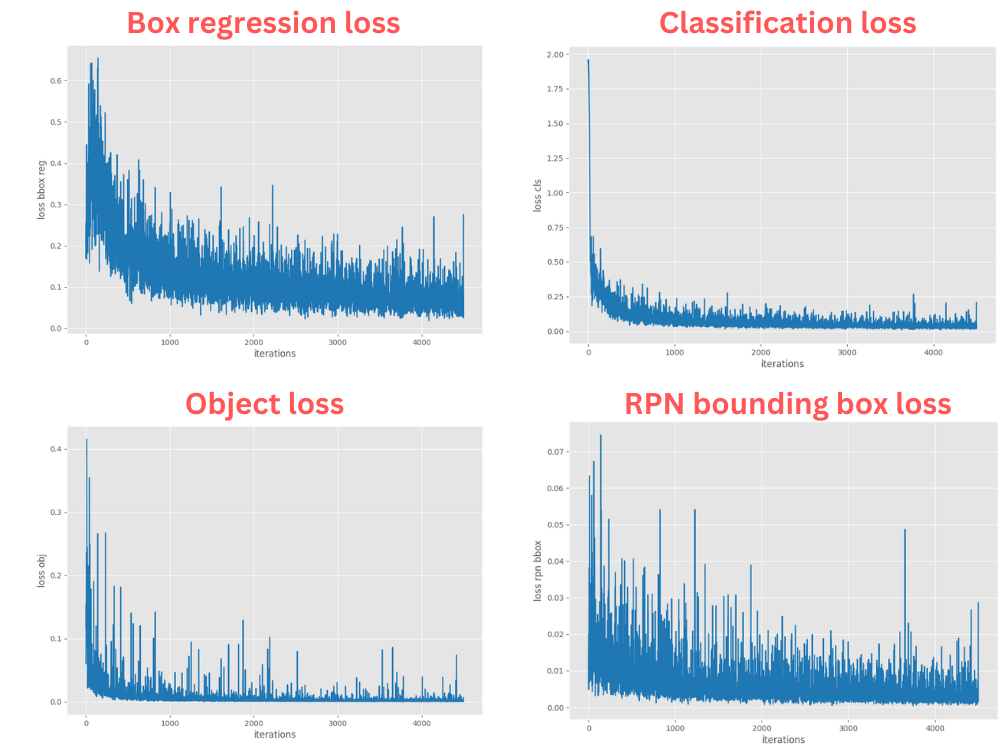
All of them are reducing till the end of training.
Looking at the mAP, we can infer that there is still some room for improvement. But as our focus was to learn to create a pipeline to train the Faster RCNN ResNet50 FPN V2 model here, so, we will focus a bit less on the quality of the results that we get.
Inference on Videos
Let’s run inference using the trained model on some videos. You can use your own videos for inference as well by providing the path to the video.
All inference shown here were run on a machine with 10 GB RTX 3080 GPU, i7 10th generation CPU, and 32 GB of RAM.
We can run inference using the inference_video.py script.
python inference_video.py --weights outputs/training/fasterrcnn_resnet50_fpn_v2_ppe/best_model.pth --input data/inference_data/video_1.mp4 --show-image --threshold 0.9
The following are the command line arguments:
--weights: Path to the weights file. We are using best-trained weights here.--input: Path to the source video. You may give the path to your own videos as well.--show-image: This tells the script that we want to visualize the results on the screen.--threshold: We are using a confidence threshold of 90% for the visualizations.
The following are the results that we get.
The detections look good in most of the frames. But there are some obvious issues. The Mask and Goggles of the woman on the right are not detected in all frames. Also, when they join their hands, the detection for Coverall is ambiguous. Moreover, there is also a false positive detection of the Mask on the hand.
Let’s check out another detection result, but this time with a detection threshold of 80% (0.8).
This is a more challenging scene and the mistakes are very visible here.
In many frames, the microscope is being detected as a Mask. The Coverall of the person on the right is not getting detected in all frames. And the model is detecting the chair as a Mask in some frames as well.
Remember that we had only around 360 images for training. This is not enough for training a state-of-the-art model. Then again, our aim was to set up a pipeline to train the Faster RCNN ResNet50 FPN V2 model here, which we achieved. In future blog posts, we will train this model on larger datasets and also compare it against other state-of-the-art object detection models.
Summary and Conclusion
In this blog post, we set up an entire pipeline for training the PyTorch Faster RCNN ResNet50 FPN V2 object detection model. Although we were not able to achieve the best fine tuning results, we will surely do so in the future. I hope that you learned something new from this tutorial.
If you have any doubts, thoughts, or suggestions, please leave them in the comment section. I will surely address them.
You can contact me using the Contact section. You can also find me on LinkedIn, and X.

Informative post . well written
Thanks
Thank you.
How do I do an inference on static images?
Hello. The code provided with the zip file also contains an inference.py file. Run it just like the video inference script but by providing the path to a specific source image or folder containing images. This should work without issues.
I can’t download the source code :/
Hello Bahadir, sorry to hear that you are having issues. In case you have Adblocker on, or use DuckDuckGo, consider disabling them, refreshing the page, and trying to download again. The link should be sent to your email. Also, please check your promotions tab/spam and add the email to your inbox in that case.
If the problem persists, please let me know, and I will try to figure out something.
Hello Dear, Thank you for sharing your knowledge and insights on this topic.
I was wondering if it would be possible for you to provide a code file or example on how to calculate the mean average precision (mAP) on test data with a Faster R-CNN model. I noticed that you didn’t include this in your blog post and it would be very helpful for me to have a reference to follow.
I understand if you are unable to provide this, but I thought it would be worth asking.
Thank you
Hello Abdul, when you run train.py, it will automatically show the mAP on the validation set after each epoch.
In case you want to check the mAP after training, you can use the eval.py script.
e.g. (using fasterrcnn_resnet_50_fpn)
python eval.py –weights your_weights.pth –config path_to_data_yaml file –model fasterrcnn_resnet_50_fpn
You can check the repository for more details.
https://github.com/sovit-123/fasterrcnn-pytorch-training-pipeline
Thankyou dear
Welcome.
Hi Sovit,
How can resume my training when it’s broken without finishing?
Hello. You can change the training script for this. In the training script after the model has been loaded just your checkpoint weights.
Mostly it would be:
ckpt = torch.load(‘path_to_model_checkpoint’)
model.load_satate_dict(ckpt[‘model_state_dict’])
how to download
Hello. If you are facing issues while downloading, please disable ad blocker or DuckDuckGo if you have them enabled. They tend to cause issues.
Hi Sovit,
In what tools can I run the code?
Hi. You will need to install PyTorch with CUDA to run it locally.
Hi Sovit,
My vscode error message “FileNotFoundError: [Errno 2] No such file or directory: ‘data/ppe/dataset/train\\Demonstration of Donning (Putting On) Personal Protective Equipment (PPE) 078 – Copy – Copy.xml'”, where should i modify its path?
Hello. If you are using one of your datasets with a different path, you should modify the path in the ppe.yaml file.
But after I changed it to an absolute path, the same error occurred. I think there are other errors here, for example, there are two \ in the path connection.
Please use double quotes (” “) to enclose the path and separate the directories with / slash.
how to save the Best Validation Map generated after each epoch in train.log
Hello Rupsha. Do you mean the text that appears on the terminal that BEST VALIDATION mAP has been reached?
I download the file .zip but it’s empty, but in the drive let me see that have diferrent files
Hello Jhon. I have sent the code link via email.