
We can fine-tune the Torchvision pretrained semantic segmentation models on our own dataset. This has the added benefit of using pretrained weights which leads to faster convergence. As such, we can use these models for multi-class semantic segmentation training which otherwise can be too difficult to solve. In this article, we will train one such Torchvsiion model on a complex dataset. Training the model on this multi-class dataset will show us how we can achieve good results even with a small number of samples.
There are several components to a semantic segmentation training pipeline. Starting from the dataset preparation to visualizing the output, the process can be long. Although, a single article is not enough to cover all the coding details of multi-class semantic segmentation training, we will still discuss the most important parts.
For now, let’s take a look at all the points that we will cover in this article.
- We will start with a discussion of the dataset. We will use a small version of the KITTI dataset.
- In the coding section, we will first discuss the dataset preparation and the directory structure.
- Next, we will discuss the model that we will use. We will fine-tune a pretrained DeepLabV3 ResNet101 model from Torchvision.
- Then, we will move on to the training of the model on the multi-class semantic segmentation dataset.
- After training, we will run inference on all the validation images and compare them to the ground truth results.
- Following that, we will discuss some improvement points as well that can help us achieve better results.
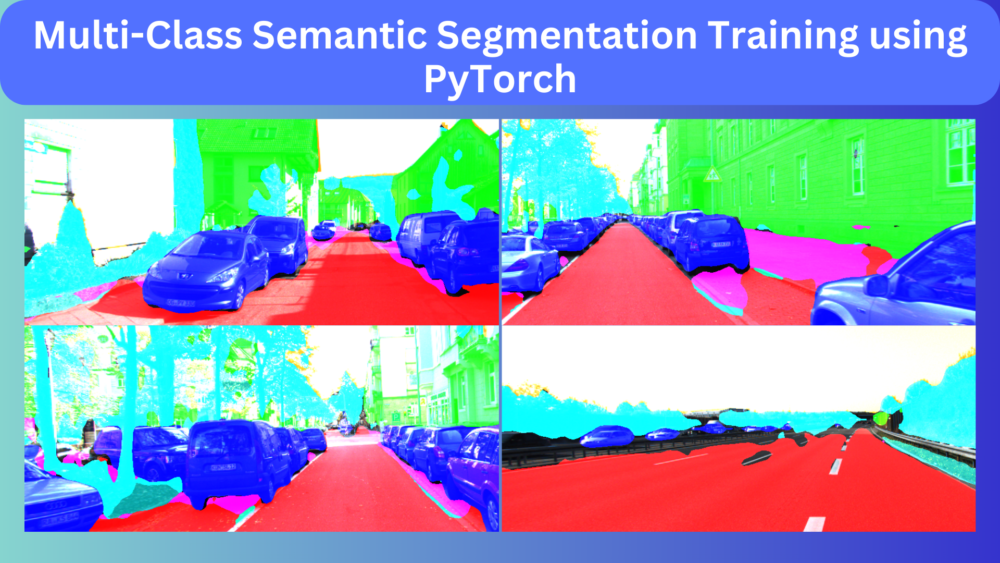
The Small KITTI Multi-Class Semantic Segmentation Training
We will use the smaller version of the KITTI dataset from Kaggle to train the DeepLabV3 ResNet101 model. This dataset contains 203 images in total and comes with text files containing the training and test file names as well. Later we will use these text files to create dataset split directories for the images and labels.
The images and labels are both in PNG format and the README file provides the color annotations as well. All the images have the same resolution of 1241×376.
Here are the classes in the dataset and their respective colors used for segmentation:
- Car: (0, 0, 255)
- Road: (255, 0, 0)
- Mark: (255, 255, 0)
- Building: (0, 255, 0)
- Sidewalk: (255, 0, 255)
- Tree/Bush: (0, 255, 255)
- Pole: (255, 0, 153)
- Sign: (153, 0, 255)
- Person: (0, 153, 255)
- Wall: (153, 255, 0)
- Sky: (255, 153, 0)
- Curb: (0, 255, 153)
- Grass/Dirt: (0, 153, 153)
- Void: (0, 0, 0)
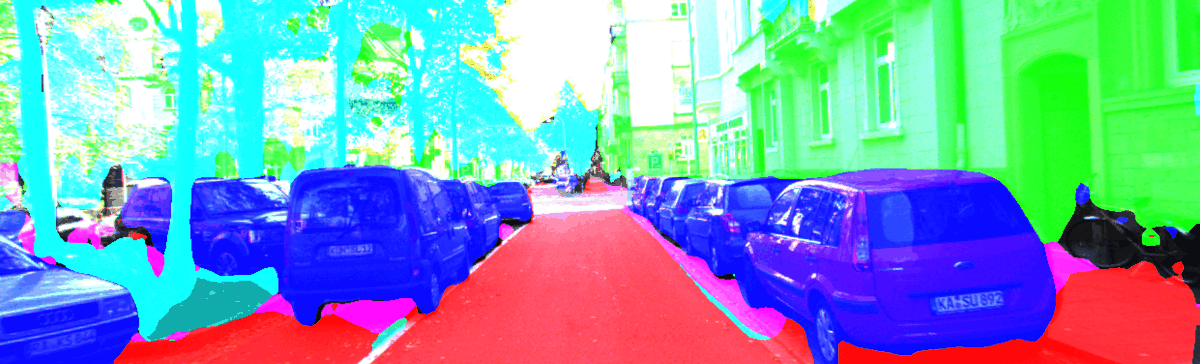
There are 14 classes including the Void class. Following are some examples of the images and their respective segmnetation maps from the dataset.
As we can see, there are multiple objects in a single scene. This looks very complex and can be quite challenging to train a semantic segmentation model.
In case you are planning to train the model yourself, you can download the dataset. After extracting, you will find the following directory structure.
├── README.html
├── README.md
├── calibrations [208 entries exceeds filelimit, not opening dir]
├── images [208 entries exceeds filelimit, not opening dir]
├── kitti-by-ah-and-gf.zip
├── labels [203 entries exceeds filelimit, not opening dir]
├── labels_new [208 entries exceeds filelimit, not opening dir]
├── match_file.txt
├── rwth_kitti_semantics_dataset
│   ├── README.html
│   ├── README.md
│   ├── calibrations [208 entries exceeds filelimit, not opening dir]
│   ├── images [208 entries exceeds filelimit, not opening dir]
│   ├── labels [203 entries exceeds filelimit, not opening dir]
│   ├── labels_new [208 entries exceeds filelimit, not opening dir]
│   ├── match_file.txt
│   └── splits
│       ├── all.txt
│       ├── all_corrected.txt
│       ├── test.txt
│       ├── train.txt
│       └── train_small.txt
└── splits
    ├── all.txt
    ├── all_corrected.txt
    ├── test.txt
    ├── train.txt
    └── train_small.txt
For now, we need to focus on just three directories, splits, images, and labels. The splits directory contains train.txt and test.txt which hold the name of the training and test files. The images and labels contains the PNG images and segmentation maps respectively.
The Entire Project Directory Structure
To get even more clarity, here is the entire directory structure for the project.
├── input
│   ├── README.html
│   ...
│   ├── split_data
│   │   ├── images
│   │   │   ├── train [120 entries exceeds filelimit, not opening dir]
│   │   │   └── val [83 entries exceeds filelimit, not opening dir]
│   │   └── labels
│   │       ├── train [120 entries exceeds filelimit, not opening dir]
│   │       └── val [83 entries exceeds filelimit, not opening dir]
│   └── splits
│       ├── all.txt
│       ├── all_corrected.txt
│       ├── test.txt
│       ├── train.txt
│       └── train_small.txt
├── outputs
│   ├── accuracy.png
│   ├── best_model_iou.pth
│   ├── best_model_loss.pth
│   ├── loss.png
│   ├── miou.png
│   ├── model.pth
│   └── valid_preds [100 entries exceeds filelimit, not opening dir]
└── src
    ├── config.py
    ├── create_data_folders.py
    ├── datasets.py
    ├── engine.py
    ├── inference_image.py
    ├── metrics.py
    ├── model.py
    ├── train.py
    └── utils.py
- The above tree structure shows the truncated
inputdirectory to avoid redundancy. It now shows a newsplit_datadirectory containing the training and validation splits for the images and labels. We will create these data splits in the coding section. - Moving ahead, the
outputsdirectory contains all the outputs from training and inference. - Finally, the
srcdirectory has all the source code that we need for training the DeepLabV3 model on the multi-class semantic segmentation dataset.
All the source code files and trained weights will be available via the code download section. If you wish to train the model, you will need to download the dataset and prepare it according to the above structure.
Multi-Class Semantic Segmentation Training using PyTorch and DeepLabV3 ResNet101
From here on, we will start the technical discussion of the article. We will start with the dataset, move on to the training, and then carry out inference.
Preparing the Training and Validation Split of the KITTI Multi-Class Segmentation Dataset
To train the DeepLabV3 ResNet101 semantic segmentation model, we need a training and validation set. It requires a simple preprocessing script. The code for this is in the create_data_folders.py file.
Download Code
We need to execute the script from the terminal while being within the src directory.
python create_data_folders.py
After this the training and validation split will remain in the input/split_data directory. Right now, we have 120 training samples and 80 validation samples.
The Configuration File
We need to define a configuration file for training and inference. This has some basic yet important job. All the configuration data will go into the config.py file. The following code blocks shows its entire content.
ALL_CLASSES = [
    'car',
    'road',
    'mark',
    'building',
    'sidewalk',
    'tree',
    'pole',
    'sign',
    'person',
    'wall',
    'sky',
    'curb',
    'grass',
    'void'
]

LABEL_COLORS_LIST = [
    (0, 0,255),
    (255, 0, 0),
    (255, 255, 0),
    (0, 255, 0),
    (255, 0, 255),
    (0, 255, 255),
    (255, 0, 153),
    (153, 0, 255),
    (0, 153, 255),
    (153, 255, 0),
    (255, 153, 0),
    (0, 255, 153),
    (0, 153, 153),
    (0, 0, 0)
]

VIS_LABEL_MAP = [
    (0, 0,255),
    (255, 0, 0),
    (255, 255, 0),
    (0, 255, 0),
    (255, 0, 255),
    (0, 255, 255),
    (255, 0, 153),
    (153, 0, 255),
    (0, 153, 255),
    (153, 255, 0),
    (255, 153, 0),
    (0, 255, 153),
    (0, 153, 153),
    (0, 0, 0)
]
First of all, we have a ALL_CLASSES list containing all the class names from the dataset. The dataset preparation script will use this to get the number of classes we need to train from the dataset.
Second, LABEL_COLORS_LIST will be used during training to map the class numbers with the color pixel values. Each tuple of color represents one class from the dataset.
Third, the VIS_LABEL_MAP will be used during inference to map the class number to the color map. We keep this a separate list so that if needed we can assign different colors during inference. However, for now, the color map is the same for both training and inference.
The DeepLabV3 ResNet101 Model
Preparing the DeepLabV3 Resnet101 model is quite straightforward as we are using the pretrained model from Torchvision.
The following code from model.py is all we need to construct the model.
import torch.nn as nn

from torchvision.models.segmentation import deeplabv3_resnet101

def prepare_model(num_classes=2):
    model = deeplabv3_resnet101(weights='DEFAULT')
    model.classifier[4] = nn.Conv2d(256, num_classes, 1)
    model.aux_classifier[4] = nn.Conv2d(256, num_classes, 1)
    return model
We are passing 'DEFAULT' to the weights argument in the above code block. This will load the best pretrained weights from the API. Also, we need to modify the number of classes in the final output layers which include the classifier[4] and, aux_classifie[4].
The Dataset Preparation
The dataset preparation for semantic segmentation training can be a lengthy process. But there are some important points that we need to discuss. One of them is the augmentations. As there are only 120 training samples, we use quite a lot of augmentations which include:
- HorizontalFlip
- RandomBrightnessContrast
- RandomSunFlare
- RandomFog
- Rotate
We use Albumentations to apply augmentations to the images and segmentation maps.
The code for applying the augmentation, preparing the datasets, and data loaders reside in the datasets.py file. This file also takes help from functions present in utils.py to map the segmentation maps to their respective class labels.
The Utility Scripts
The utils.py file contains a lot of helper classes and functions. Among these, some of the important ones are:
set_class_values()function: This function assigns a class number to a specific class. For example,carwill be0,roadwill be1, and so onget_label_mask()function: This function creates the label mask out of the image segmentation mask.SaveBestModelandSaveBestModelIOUclasses: The former saves the best model according to the least validation loss while the later saves the best model according to the best validation mean IoU.
Other than the above, there are a few other functions for plotting graphs and overlaying the segmentation masks on top of the image.
The Training and Validation Functions
The engine.py file contains the training and validation functions for training the semantic segmentation model on the multi-class dataset.
These functions also use the IoUEval class from the metrics.py file which contains the code for calculating the IoU of the predictions over the ground truth masks.
Please go through the above scripts/functions/classes once if you want to dive deeper into the code. We are skipping the explanation of the code files for the sake of brevity.
The Training Script
The training script present in the train.py file is the one that we will execute to start the training. Here are the functions that it carries out in sequence:
- First, it creates an output directory if not already present to store the training graphs and models.
- Second, it initializes the model, optimizer, and the loss function. We are using the SGD optimizer and Cross-Entropy loss function.
- Third, it prepares the training and validation datasets & data loaders.
- Then it starts the training loop. After each epoch, it tries to save the model according to the best validation loss and best validation mean IoU (Intersection Over Union).
Other than the above steps, there are a lot of training hyperparameters that we can control through command line arguments. The following is a complete list of them:
--epochs: The number of epochs that we want to train the model for.--lr: The initial learning rate for the optimizer.--batch: It defines the batch size for the data loaders.--imgsz: The image size to resize the images.--scheduler: This is a boolean argument indicating whether we want to apply a step learning rate scheduler or not.
We can execute the following command to start training the DeepLabV3 ResNet 101 model on the multi-class KITTI semantic segmentation dataset.
python train.py --batch 8 --imgsz 384 --lr 0.05 --epochs 100
We are using a batch size of 8, resizing all the images to 384×384 dimensions, starting with 0.05 learning rate for the SGD optimizer, and training for 100 epochs.
Analyzing the Results
The following block shows the truncated outputs from the terminal.
Namespace(epochs=100, lr=0.05, batch=8, imgsz=384, scheduler=False)
Downloading: "https://download.pytorch.org/models/deeplabv3_resnet101_coco-586e9e4e.pth" to /root/.cache/torch/hub/checkpoints/deeplabv3_resnet101_coco-586e9e4e.pth
100%|████████████████████████████████████████| 233M/233M [00:06<00:00, 36.6MB/s]
DeepLabV3(
  (backbone): IntermediateLayerGetter(
.
.
.
  (aux_classifier): FCNHead(
    (0): Conv2d(1024, 256, kernel_size=(3, 3), stride=(1, 1), padding=(1, 1), bias=False)
    (1): BatchNorm2d(256, eps=1e-05, momentum=0.1, affine=True, track_running_stats=True)
    (2): ReLU()
    (3): Dropout(p=0.1, inplace=False)
    (4): Conv2d(256, 14, kernel_size=(1, 1), stride=(1, 1))
  )
)
60,992,604 total parameters.
60,992,604 training parameters.
Adjusting learning rate of group 0 to 5.0000e-02.
EPOCH: 1
Training
100%|████████████████████| 15/15 [01:12<00:00,  4.83s/it]
Validating
100%|████████████████████| 11/11 [00:15<00:00,  1.37s/it]

Best validation loss: 1.685634352944114

Saving best model for epoch: 1


Best validation IoU: 0.08991178550069252

Saving best model for epoch: 1

Train Epoch Loss: 2.0719, Train Epoch PixAcc: 0.3400, Train Epoch mIOU: 0.046786
Valid Epoch Loss: 1.6856, Valid Epoch PixAcc: 0.4767 Valid Epoch mIOU: 0.089912
--------------------------------------------------
.
.
.
EPOCH: 99
Training
100%|████████████████████| 15/15 [00:46<00:00,  3.10s/it]
Validating
100%|████████████████████| 11/11 [00:12<00:00,  1.16s/it]

Best validation IoU: 0.3256281842827596

Saving best model for epoch: 99

Train Epoch Loss: 0.2529, Train Epoch PixAcc: 0.8597, Train Epoch mIOU: 0.499757
Valid Epoch Loss: 0.7033, Valid Epoch PixAcc: 0.7400 Valid Epoch mIOU: 0.325628
--------------------------------------------------
EPOCH: 100
Training
100%|████████████████████| 15/15 [00:46<00:00,  3.11s/it]
Validating
100%|████████████████████| 11/11 [00:12<00:00,  1.13s/it]
Train Epoch Loss: 0.2548, Train Epoch PixAcc: 0.8594, Train Epoch mIOU: 0.501053
Valid Epoch Loss: 0.7284, Valid Epoch PixAcc: 0.7374 Valid Epoch mIOU: 0.325351
--------------------------------------------------
TRAINING COMPLETE
We get the best model according to the validation mean IoU on epochs 99. In this epoch, we have:
- A validation loss of 0.70
- Validation pixel accuracy of 74%
- And a validation mean IoU of 32.56%
Considering that we had only 120 training samples, these results are more than decent. Now, let’s take a look at the loss, pixel accuracy, and mean IoU plots.
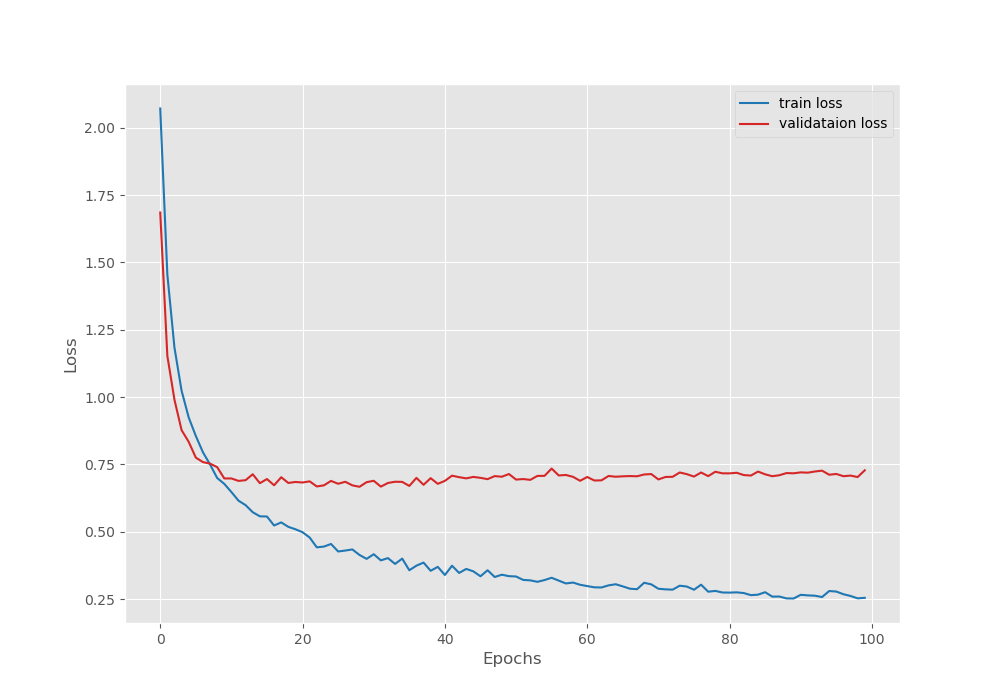
It looks like the validation loss plot was starting to increase a bit after epoch 80. The last model that was saved may be a slightly overfit one.
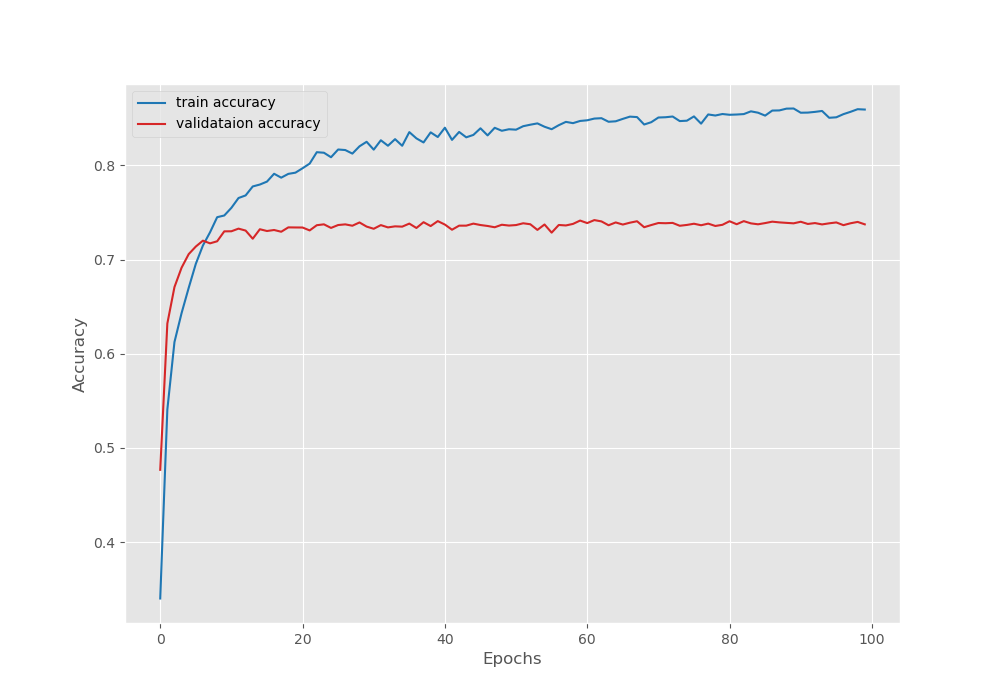
The validation accuracy plot seems to have stopped improving by the end of the training.

It looks like the validation mean IoU is still improving as the training ends. Although the final model according to the best mean IoU may be an overfit one, we will still use that one for running inference on the validation images.
Running Inference using the Trained Model
We can run inference on a directory of images using the inference_image.py script. We just need to provide the path to the directory which contains the images and the path to the model of our choice.
The following is the command to run inference on the validation images using the best model saved according to the mean IoU.
python inference_image.py --input ../input/split_data/images/val/ --model ../outputs/best_model_iou.pth
Note that we are not resizing the images to 384×384. The model can take dynamic input resolutions. However, resizing the images may give slightly better results. Here, as we will be comparing the segmentation masks to their original ones, we avoid the resizing part.
All the results are saved in outputs/inference_results directory.
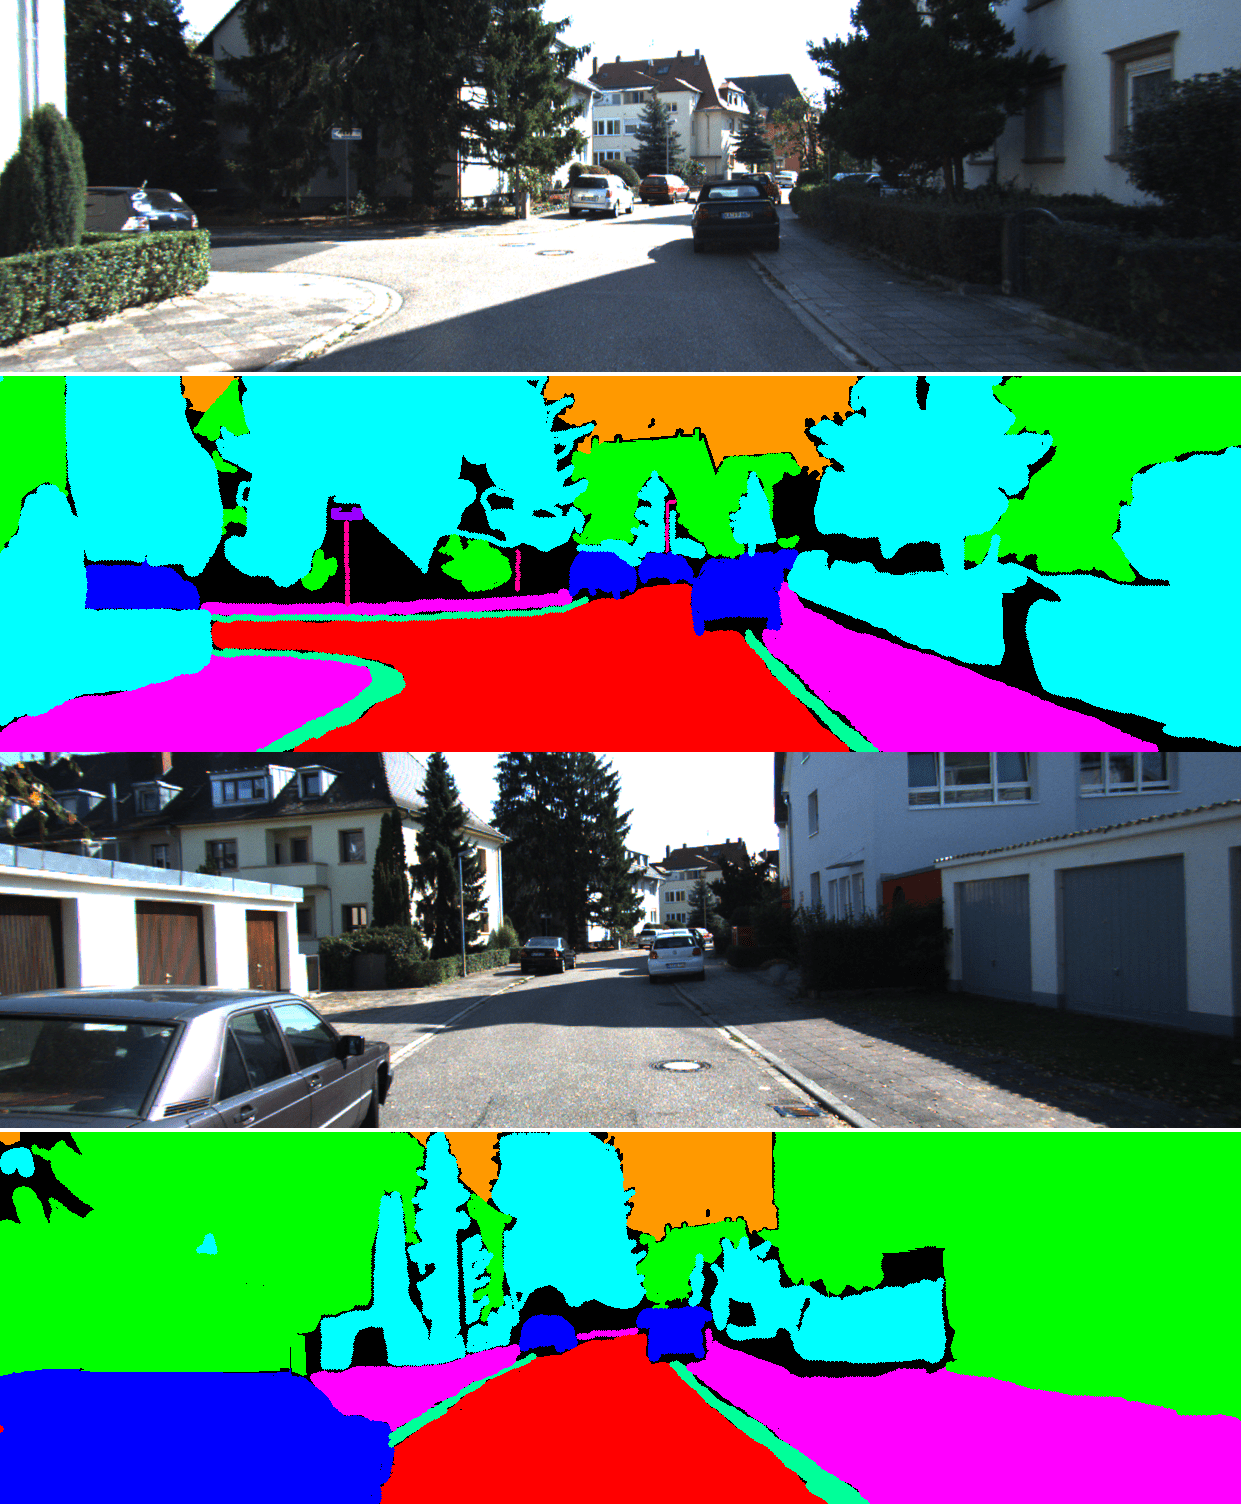
Here are a few examples along with their ground truths.
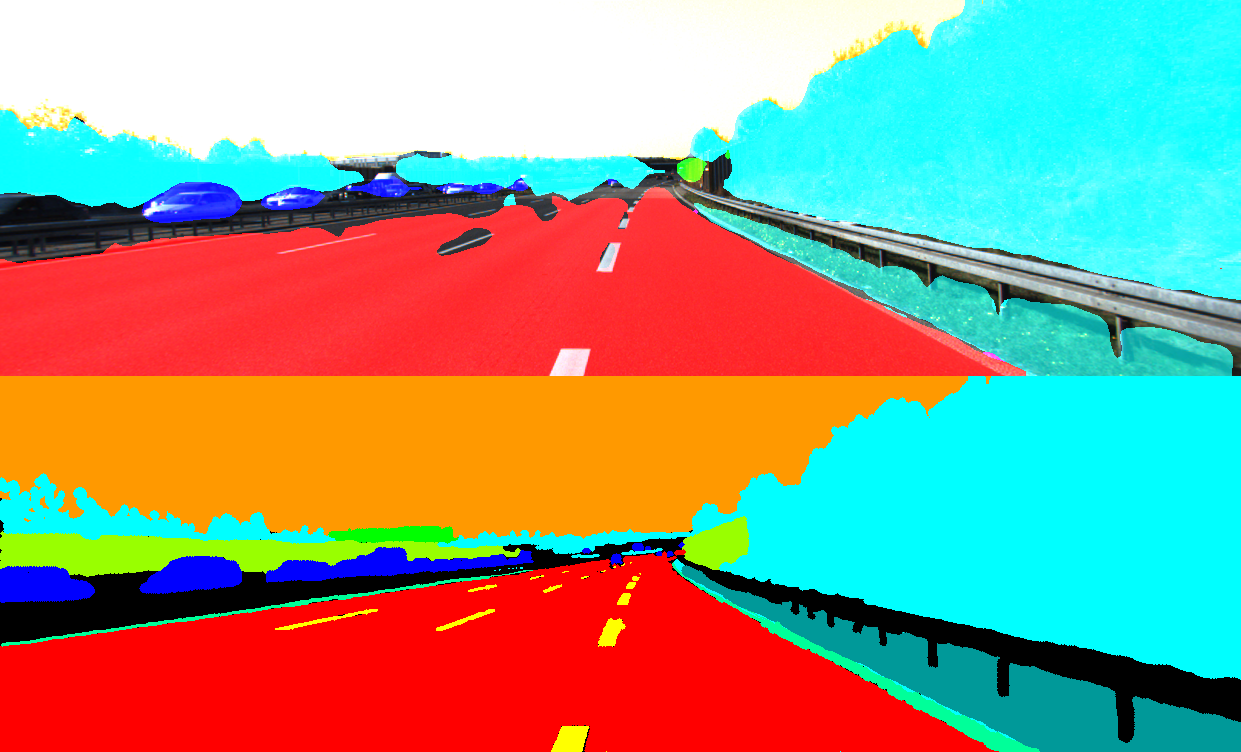
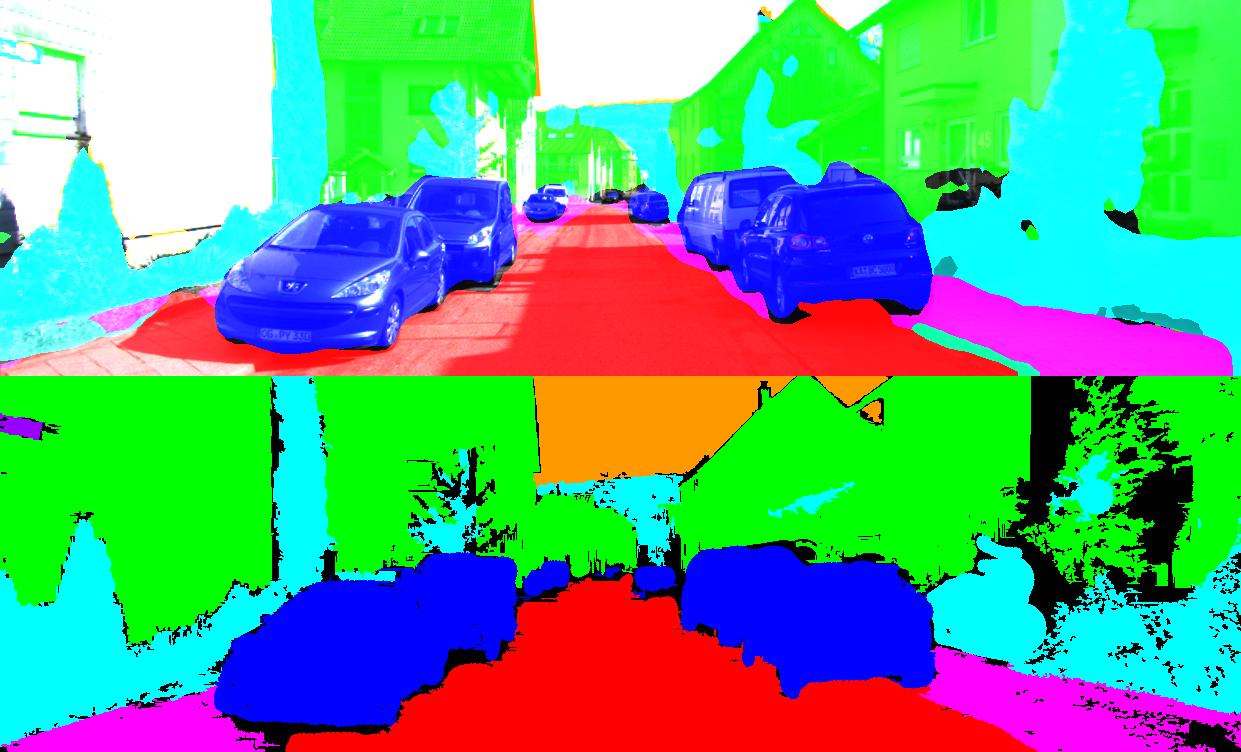
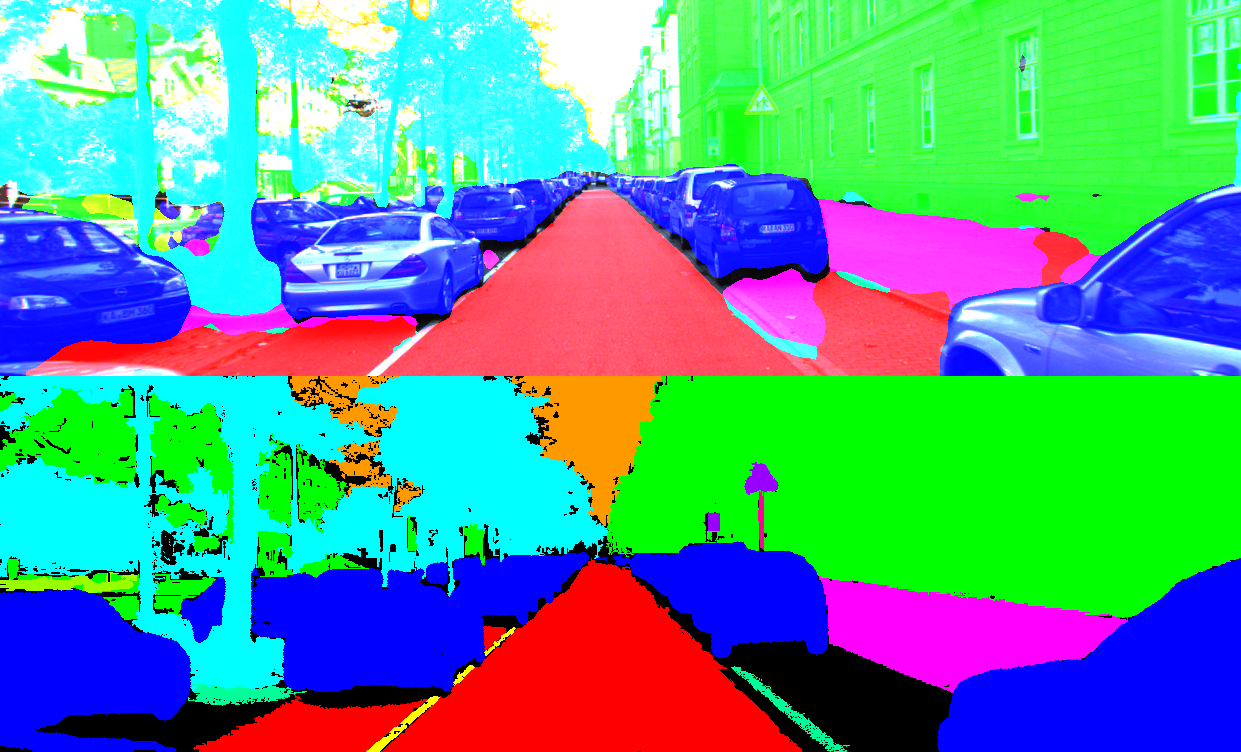
It is very clear that the model is able to segment out the cars, roads, and buildings better compared to the other objects. The model is not able to segment the lane lines and trees very well.
It will be very difficult to achieve better results than this without expanding the training set.
Further Improvements
Here are some points through which we can take this project even further.
- Each image has a width of 1241. We can simply divide each ground truth image and segmentation mask by half according to width. In that case, we will get 240 training samples and each of them will be 620×376 in dimension. Then, we can directly feed the images to the model during training without resizing.
- Using newer transformer based models like SegFormer may also help achieve better results.
We will try to cover the above points in future posts.
Summary and Conclusion
In this article, we carried out multi-class semantic segmentation training using the DeepLabV3 ResNet101 model. Although we had only 120 training samples, still we got very decent results. Thanks to pretraining and fine-tuning. Further, we also, ran inference on the validation data to check the model’s performance after training. After analysis, we discussed how we may improve the accuracy of the model even more. I hope that this article was worth your time.
If you have any doubts, thoughts, or suggestions, please leave them in the comment section. I will surely address them.
You can contact me using the Contact section. You can also find me on LinkedIn, and X.
Further Reading
- Semantic Segmentation using PyTorch FCN ResNet50
- Semantic Segmentation using PyTorch DeepLabV3 and Lite R-ASPP with MobileNetV3 Backbone
- Semantic Segmentation for Flood Recognition using PyTorch

Great and thanks.
Welcome Salid.
Hello, may I ask what GPU you are using? I’m using an RTX 4060 8GB, and when I run with a batch size of 8, it shows “CUDA out of memory.”
Hello, I am using an RTX 3080 with 10 GB VRAM.
Hi, there seems to be an issue with the download code button? I’d love to delve deeper into the implementation. I tried subscribing to the site which didn’t fix the issue. Could you provide a separate link by any chance?
Thank you
Hello Georgi. I have sent you a download link in the email. Please check. Thank you.
Hello! I’ve also had issues with downloading the code for the presented method. I’d be very grateful if you could provide the code. Thank you!
Hello Alex. It seems that having ad blockers or DuckDuckGo enabled causes issues with the download API. Can you please try downloading again after disabling them, if you have any of them enabled.
That did solve the issue! Thank you so much! Great work.
Welcome
Hi, there seems to be an issue with the download code button?Could you provide a separate link by any chance?
Thank you
Hello Mariah. Sometimes, ad blockers or DuckDuckGo block the download API. Can you please disable them if you have them enabled and try again? If that does not work, I will send an alternate link.
Hello, I have tried disabling ad blockers and changed the search engine but still no luck with the download API. Could you send me the link in the email?
Hello Mohammad. Apologies for the issues, I have sent the link via email. I am trying to fix the download code API issues for all articles, thanks for brining this to my notice.