
PyTorch (Torchvision) provides a host of pretrained video classification models. Training and fine-tuning these models can prove to be an invaluable asset in building many real-life applications. However, preparing the right code to start with custom video classification training can be difficult. In this article, we will train the S3D video classification model from PyTorch. Along the way, we will discuss the pitfalls, caveats, and optimization techniques specific to the model.
In the last article, we discussed the code to get started with video classification model. We used the MC3_18 video classification model and trained it on a subset of the UCF50 dataset.
In real life, the datasets will be task specific. For example, training a model for deployment to recognize more than 20 types of exercises. We will tackle such a problem in this article. Further, video classification training can be expensive, both in terms of system RAM needed and the GPU VRAM as well. As these requirements may vary from model to model, we will constrain our optimization techniques to the model at hand, S3D.
We will be covering the following points in this article:
- We will start with a discussion of the dataset that we will use to train the S3D video classification model. The dataset consists of videos belonging to different categories of exercises.
- Then we will move to the coding part of the article. We will mostly focus on the following here:
- The S3D model.
- Preparing the dataset in the correct format.
- The training script.
- And the optimization techniques.
- After the training, we will use the best model to run inference on new videos. This will eventually tell us how the model performs in real-world scenarios.
The Workout Videos Dataset to Train the S3D Video Classification Model
We will use the Workout Video dataset from Kaggle to train the S3D model in this article. This dataset consists of 22 different categories of workouts including some of the popular ones like:
- Bench press
- Pull ups
- Push ups
- and more…
Here are a few clips of the workouts.
If you intend of training the model on your own, please go ahead and download the dataset. After extracting it into workout_recognition directory, you will find the following directory structure.
workout_recognition
├── barbell biceps curl
├── bench press
├── chest fly machine
├── deadlift
...
├── squat
├── t bar row
├── tricep dips
└── tricep Pushdown
Each of the folders contains workout videos belonging to the respective category. As such, there are more than 600 videos in total.
The original dataset contains some very high resolution videos. Processing these clips directly during training will take too much time and is too demanding on the processing part (CPU data preparation). This can also become a bottleneck for the GPU which will be sitting idle till the CPU finishes processing the clip. To mitigate this, later, while going through the dataset preparation, we will resize the videos beforehand. Additionally, we will also create a training and validation split.
Project Directory Structure
Here, we have the entire directory structure for the project. The following contains some directories which we are yet to create.
├── input
│   ├── inference_data
│   │   ├── plank.mp4
│   │   └── push_up.mp4
│   ├── workout_recognition
│   │   ├── barbell biceps curl
│   │   ├── bench press
│   │   ...
│   │   └── tricep Pushdown
│   ├── workout_recognition_resized
│   │   ├── barbell biceps curl
│   │   ├── bench press
│   │   ...
│   │   └── tricep Pushdown
│   ├── workout_recognition_train_valid
│       ├── train
│       └── valid
│
├── outputs
│   ├── inference
│   │   └── push_up.mp4
│   ├── accuracy.png
│   ├── best_model.pth
│   ├── loss.png
│   └── model.pth
└── src
    ├── class_names.py
    ├── datasets.py
    ├── inference_video.py
    ├── model.py
    ├── presets.py
    ├── resize_videos.py
    ├── split_data.py
    ├── train.py
    └── utils.py
- The
inputdirectory contains three subdirectories. The originalworkout_recognitiondirectory. Theworkout_recognition_resizedthat we will create to store the resized videos. And theworkout_recognition_train_validdirectory that further containstrainandvaliddirectories each with their class folders. We will create the later 2 directories in the coding section of this article. - The
outputsdirectory contains the training and inference outputs. - Finally, the
srcdirectory contains all the source code. As you can see, there are 9 Python files in this project. As it is difficult to go through all the code files in detail in a single post, we will only discuss the important parts of the code. Still, all the Python files will be available via the download section.
All the Python files are available to download in this article along with the trained weights and some of the inference dataset. If you wish to run the training experiments, please download the data and execute the scripts further shown to prepare it in the necessary format.
PyTorch Version and Other Dependencies
The code base in this tutorial uses PyTorch version 2.0.1 which is the latest at the time of writing this. It would be best to use this version to avoid any unseen pitfalls.
Further, we need PyAV for the data preparation stage. You can install it using the following command.
pip install av
Another dependency is Albumentations for image transforms that we use in the inference script. You can use the following command to install it while not affecting the current OpenCV installation.
pip install -U albumentations --no-binary qudida,albumentations
There are other minor dependencies that you may encounter as you execute the code that you can install along the way.
Train S3D Video Classification Model on Workout Recognition Dataset
From here on, we will discuss all the important bits of the code to train the S3D video classification model.
- We will start with resizing the original videos into smaller resolutions.
- Then we will move to create the train and validation split of the workout recognition dataset.
- Next, we will discuss the model code in brief and the steps that we take to create the datasets.
- After discussing the important parts of the training script, we will start training the S3D model. During the training process, we will discuss all the hyperparameters that we need to consider in order to train the model in a resource-constraint machine.
Resizing the Workout Recognition Videos
The original size of the workout recognition dataset is more than 5 gigabytes as some of the videos are high-resolution.
We will resize all the videos to a standard resolution and then start the training process. We need this step particularly to reduce the preprocessing time. In video classification, the dimension of the input is [batch_size, num_channels, num_sequences, height, width]. Here, we are dealing with 5 dimensions already. Generally, the processor needs more time to process the data compared to image classification before it goes to the GPU and then the model. On top of that, if we have very high-resolution frames, the processing time increases even more as anyhow we need to resize them. So, it is better to have somewhat low-resolution videos beforehand.
Download Code
The resize_videos.py script contains code to resize the videos and create a new folder for storing the new data.
We can execute the following command to resize all the videos.
python resize_videos.py
There is a RESIZE_TO variable in the code that controls the dimensions of the width. The height will be resized according to the aspect ratio so that we don’t get distorted frames. Currently, the value of RESIZE_TO is 512.
It will take a few minutes to process all the videos depending on the processor. After the process is complete, we find a new workout_recognition_resized directory inside the input directory.
Creating a Train and Validation Split to Train the S3D Model
The next step is to create the training and validation split. The split_data.py script contains the code for this.
It has a VALID_SPLIT constant that has a value of 0.25 by default. This means that we are using 25% of video clips of each class as validation data and the rest of the clips as training data. You may change it to other values to experiment with the training process.
We can execute the following command to create the dataset split.
python split_data.py
After the processing is complete the train and validation splits will be present in input/workout_recognition_train_valid directory.
Dataset Preparation
We are using a simplified version of the dataset preparation script from Torchvision Video Classification code to prepare the datasets and data loaders. Of course, there are a few changes that we make along the way. We can find the majority of the data preparation code in datasets.py and presets.py.
The presets.py file handles the following aspects of dataset preparation:
- It applies the Kinetics-400 normalization values as that’s what the S3D video classification model has been trained on.
- It also applies a horizontal flip augmentation to the training set with a probability of 0.5.
- After resizing the frames, it applies center cropping to the image. Originally, the Torchvision code has random cropping. But since the person doing the exercise will almost always be at the center of a frame, it makes more sense to apply center cropping to the dataset.
The datasets.py file handles the following:
- The reading of the video frames.
- Creating clips out of the videos.
- Returning the video along with its correct class label.
There are a lot of other details in video classification dataset preparation that is out of the scope of this post. It will take an article in itself to justify the dataset preparation for video classification. However, feel free to dive into the code a bit in case you download the scripts.
Note: The above scripts expect the videos to be in their respective class folders which enables them to extract the class labels correctly. In case the dataset format is different, we need to write custom scripts for that.
The S3D Video Classification Model
We are using the S3D model for training on the dataset as it is the smallest video classification model currently available on Torchvision. With just 8.3 million parameters, it reaches a top-1 accuracy of 68.36%.

It is a completely 3D convolutional model introduced in the paper Rethinking Spatiotemporal Feature Learning. Even the final classification layer is a 3D convolutional layer.
From experiments, I found that it is very hard to fine-tune the S3D model on small datasets. By small, we can think each class not containing more than 60 videos. But we will later check how to fine-tune the model properly by leveraging all the hyperparameters at our disposal.
Here are some probable reasons why training the S3D video classification model may be difficult:
- The Torchvision model used a clip length of 64 and batch size of 12 to pretrain the model on the Kinetics-400 dataset. This requires a considerable amount of system RAM, a very good processor, and a very high GPU VRAM as well.
- Further, it was trained on 64 V100 GPUS with parallel processing.
Obviously, using these hyperparameters will yield the best results while fine-tuning. But most users will not have such a system.
While training, we will employ a few techniques that will allow us to train the model on a single GPU.
The model.py file contains the code for the model preparation. It is just a few lines of code as we are using the one from Torchvision.
from torchvision import models

import torch.nn as nn

def build_model(fine_tune=True, num_classes=10):
    model = models.video.s3d(weights='DEFAULT')
    if fine_tune:
        print('[INFO]: Fine-tuning all layers...')
        for params in model.parameters():
            params.requires_grad = True
    if not fine_tune:
        print('[INFO]: Freezing hidden layers...')
        for params in model.parameters():
            params.requires_grad = False
    model.classifier[1] = nn.Conv3d(1024, num_classes, kernel_size=(1, 1, 1), stride=(1, 1, 1))
    return model

if __name__ == '__main__':
    model = build_model()
    print(model)
    # Total parameters and trainable parameters.
    total_params = sum(p.numel() for p in model.parameters())
    print(f"{total_params:,} total parameters.")
    total_trainable_params = sum(
        p.numel() for p in model.parameters() if p.requires_grad)
    print(f"{total_trainable_params:,} training parameters.")
In the above code block, we are changing the out_channels of the final Conv3d layer to the number of classes in our dataset. We can also control whether to fine-tune the entire model or train just the classification head using the fine_tune parameter.
The Training Script
The training script contains a lot of command line arguments that help control the dataset preparation, training, and optimization hyperparameters.
Here are some of the important ones:
--fine-tune: It is a boolean argument controlling whether to fine-tune the entire model or just train the final classification layer.--clip-len: It defines the number of frames to consider from each clip from a video. The dataset preparation code extracts multiple clips from a single video. It has a default value of 16.--clips-per-video: This is the number of clips to extract from each video. It has a default value of 5.--frame-rate: It defines the frame rate of the extracted clips. We can safely leave it at its default value, which is 15.--imgsz: The size to resize the frames to.--crop-size: The crop size after the resizing happens.--scheduler: Whether to apply a learning rate scheduler or not. If we pass this, then a Step Learning Rate Scheduler will be applied after 25 epochs to reduce the learning rate by a factor of 10.
The script uses the Adam optimizer to train the model.
Please go through the previous post where we discussed training the MC3_18 model and also the training script in a bit more detail.
Note: All the training and inference experiments were carried out on a machine with 10 GB RTX 3080 GPU, 10th generation i7 CPU, and 32 GB of RAM.
To start the training, we can execute the following command:
python -W ignore train.py --epochs 50 --batch-size 16 -lr 0.0001 --clip-len 16 --frame-rate 15 --clips-per-video 5 --imgsz 256 256 --crop-size 224 224 --fine-tune --scheduler
We apply the -W ignore to prevent some PyTorch video reader warnings from popping up. Here are some of the important hyperparameters decisions that we make here.
- We are training the model for 50 epochs.
- The batch size is 16 and the initial learning rate is 0.0001.
- As we are using a shorter clip length, so we will have to train longer. For that reason, we are training for 50 epochs and applying a learning rate scheduler after 25 epochs.
- Also, we are passing the
--fine-tuneargument to train all the parameters of the model.
Analyzing the S3D Model’s Training Performance
Let’s take a look at the truncated outputs from the terminal to get a better idea of how the S3D video classification model performed.
.
.
.
  (avgpool): AvgPool3d(kernel_size=(2, 7, 7), stride=1, padding=0)
  (classifier): Sequential(
    (0): Dropout(p=0.2, inplace=False)
    (1): Conv3d(1024, 22, kernel_size=(1, 1, 1), stride=(1, 1, 1))
  )
)
7,932,598 total parameters.
7,932,598 training parameters.
Adjusting learning rate of group 0 to 1.0000e-04.
[INFO]: Epoch 1 of 50
Training
100%|████████████████████| 146/146 [00:44<00:00,  3.25it/s]
Validation
100%|████████████████████| 52/52 [00:17<00:00,  3.01it/s]
Training loss: 1.534, training acc: 65.107
Validation loss: 1.058, validation acc: 71.220

Best validation loss: 1.0579806729040753

Saving best model for epoch: 1

Adjusting learning rate of group 0 to 1.0000e-04.
--------------------------------------------------
.
.
.
[INFO]: Epoch 44 of 50
Training
100%|████████████████████| 146/146 [00:43<00:00,  3.38it/s]
Validation
100%|████████████████████| 52/52 [00:15<00:00,  3.25it/s]
Training loss: 0.002, training acc: 100.000
Validation loss: 0.229, validation acc: 92.805

Best validation loss: 0.22899901952777887

Saving best model for epoch: 44

Adjusting learning rate of group 0 to 1.0000e-05.
--------------------------------------------------
.
.
.
[INFO]: Epoch 50 of 50
Training
100%|████████████████████| 146/146 [00:42<00:00,  3.41it/s]
Validation
100%|████████████████████| 52/52 [00:15<00:00,  3.31it/s]
Training loss: 0.002, training acc: 100.000
Validation loss: 0.258, validation acc: 92.073
Adjusting learning rate of group 0 to 1.0000e-05.
--------------------------------------------------
TRAINING COMPLETE
The model reached the best validation loss of 1.05 on epoch 25. It did not improve after that. This is where we have the highest validation accuracy of 92.8% as well.
The following are the accuracy and loss graphs after we train the S3D video classification model.
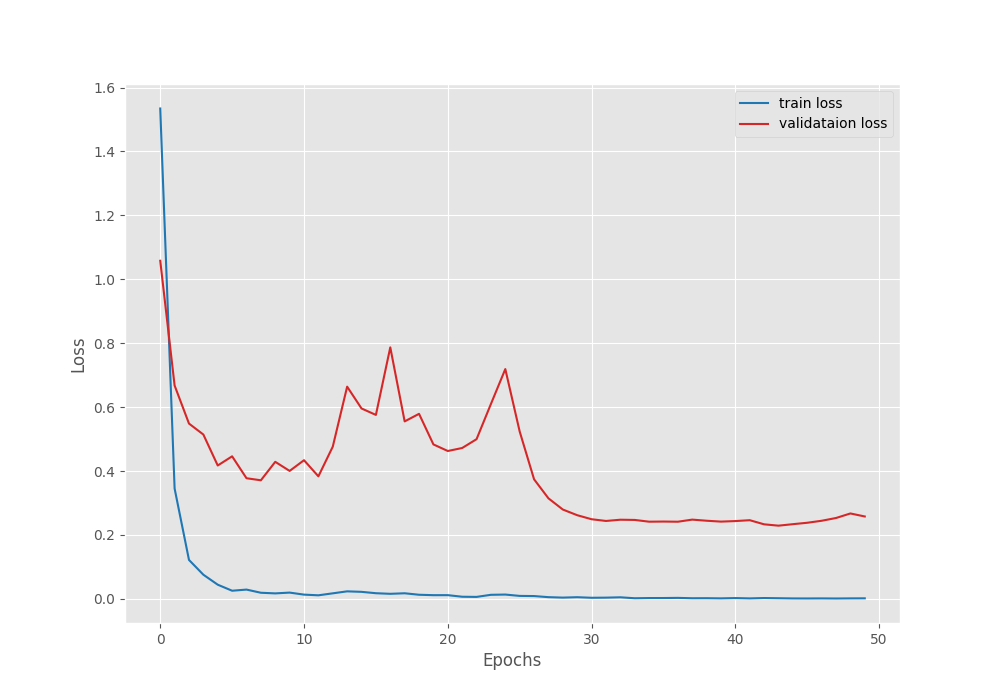
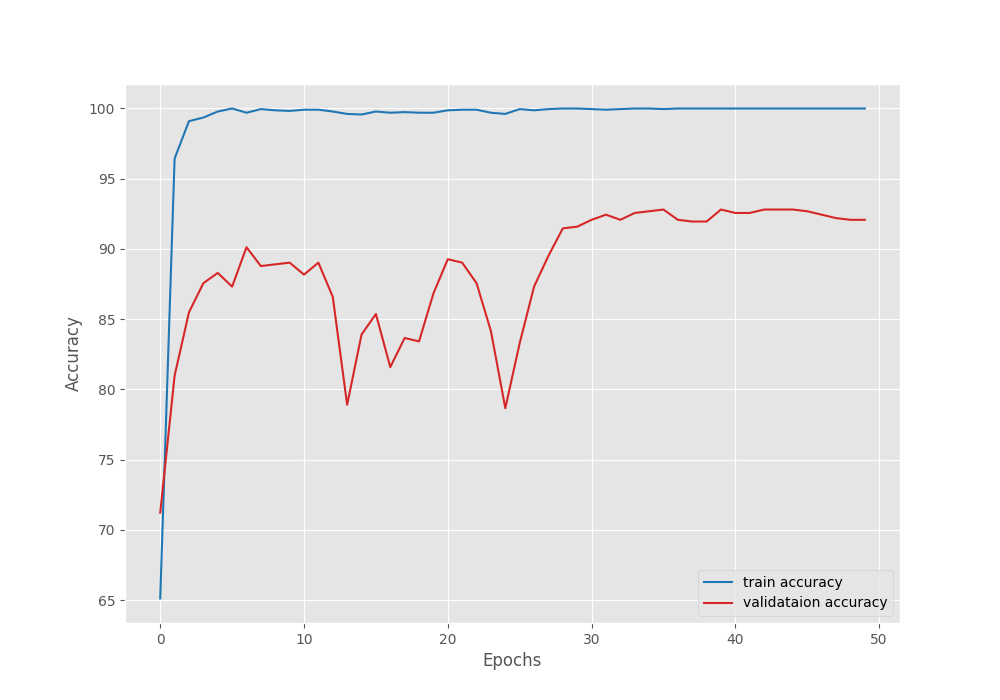
It is very clear that the learning rate scheduler surely helped the model after 25 epochs to increase the validation accuracy and decrease the validation loss.
Running Inference using the Trained S3D Video Classification Model
The inference_video.py script contains the code to run inference on videos. Also, there are a few videos in the input/inference_data directory that we can use to run inference experiments.
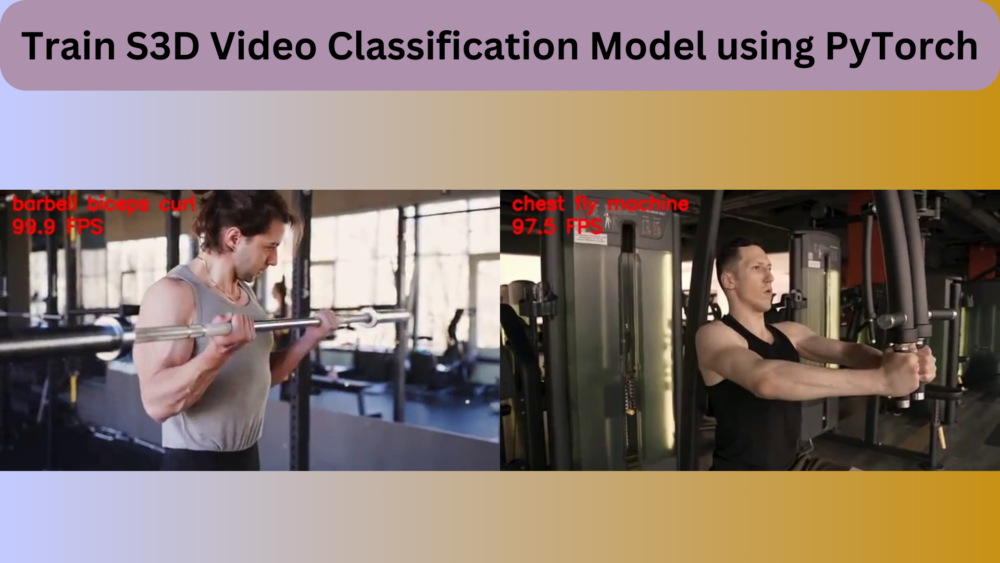
The following is the command to run inference on a Chest Fly Machine exercise video.
python inference_video.py --input ../input/inference_data/chest_fly_machine.mp4 --imgsz 256 256 --crop-size 224 224
We keep the same image resize and cropping size as was in the case of training.
Let’s take a look at the video output once.
We can see that the results are perfect here. There is not a single wrong prediction on any frame.
Now, here is another result of the Barbell Bicep Curl exercise.
python inference_video.py --input ../input/inference_data/barbell_biceps_curl.mp4 --imgsz 256 256 --crop-size 224 224
In this case, the model is predicting the frames wrongly where it cannot see the barbell. This shows how much dependent the model actually is on the equipment to predict the correct exercise.
Finally, one more result where the model performs considerably worse.
python inference_video.py --input ../input/inference_data/push_ups.mp4 --imgsz 256 256 --crop-size 224 224
In the above result, the model is predicting the exercise as plank in some of the frames which we can ignore as they can look similar in some frames. But it also detects some frames as leg-extension and hip thrust which shows that the model needs more training.
Summary and Conclusion
In this article, we trained the S3D video classification model on a workout recognition dataset. After training, we ran inference experiments and analyzed where the model is lacking. Obviously, more training data and even better hyperparameter tuning will help us achieve higher accuracy. If you carry out further experiments, then please leave your findings in the comment section. That will surely help others. I hope that this article was worth your time.
If you have any doubts, thoughts, or suggestions, please leave them in the comment section. I will surely address them.
You can contact me using the Contact section. You can also find me on LinkedIn, and X.
Further Reading
- Human Action Recognition using 2D CNN with PyTorch
- Human Action Recognition in Videos using PyTorch
- Action Recognition in Videos using Deep Learning and PyTorch
References

Thank you for making this tutorial. The link to download the code does not exist. The click does not produce anything
Hello. Can you please try disabling ad blockers or DuckDuckGo when entering the email to download the code? They tend to cause issues with the download block. If the issue persists, please let me know. I will try to provide a direct link.
Many thanks for the tutorial! This has helped me a lot to create a first pipeline for my project.
Hello Christina. Glad that the article helped you.