
Instance segmentation is an exciting topic with a lot of use cases. It combines both object detection and image segmentation to provide a complete solution. Instance segmentation is already making a mark in fields like agriculture and medical imaging. Crop monitoring and tumor segmentation are some of the practical aspects where it is extremely useful. But in deep learning, fine-tuning an instance segmentation model on a custom dataset often proves to be difficult. One of the reasons is the complex training pipeline. Another reason is being able to find good and customizable code to train instance segmentation models on custom datasets. To tackle this, in this article, we will learn how to fine-tune the PyTorch Mask RCNN model on a small custom dataset.
To fine-tune the Mask RCNN model or any other instance segmentation model needs a lot of code. For obvious reasons, we will not be writing all the code ourselves. We will adapt the code from a very reliable source and modify it so that we can fine-tune on any instance segmentation dataset using it.
Before moving further, let’s look at all the points that we will cover in this article:
- We will start with a discussion of the instance segmentation dataset. We will use a very simple microcontroller instance segmentation dataset.
- Then we will move on to the discussion of the important parts of the training code. These include:
- The model that we will use.
- The training script.
- And the training and validation functions.
- Next, we will run the training to fine-tune the Mask RCNN model using PyTorch and analyze the performance metrics.
- Finally, we will run inference on the validation dataset and on some unseen images as well.
The Microcontroller Instance Segmentation Dataset
We will fine-tune the Mask RCNN model on a simple Microcontroller Instance Segmentation dataset. This dataset is originally available on Kaggle. However, we will use a modified version of the dataset. The new version modifies the following compared to the original dataset:
- The annotations were not available in the COCO JSON format in the original dataset. Whereas, the new one contains a JSON file for both, the training and the validation set.
- The original dataset had the category ids (object class numbers) starting from 0. But as we will fine-tune a Torchvision model here, we need the category ids to start from 1. 0 is always reserved for the background class.
- The new dataset uses COCO-compliant directory and annotation file names.
There are 4 classes in the dataset:
- Arduino
- ESP8266
- Heltec
- Raspberry
If you intend to run the training yourself, please download the dataset. After downloading and extracting the dataset, you will find the following directory structure for microcontroller-segmentation.
microcontroller-segmentation
├── annotations
│   ├── instances_train2017.json
│   └── instances_val2017.json
├── labelme2coco.py
├── train2017 [284 entries exceeds filelimit, not opening dir]
└── val2017 [14 entries exceeds filelimit, not opening dir]
- The
annotationsfolder contains the training and validation JSON annotation files. - The
train2017folder contains 142 training images andval2017contains 7 validation images.
Note that we are using the annotation file names and image folder names similar to that of the original COCO dataset. The scripts that we will use for training expect the dataset to be in COCO format as it was meant for training on the COCO dataset. So, it becomes much easier by renaming the file names and folders.
Analyzing the Ground Truth Images
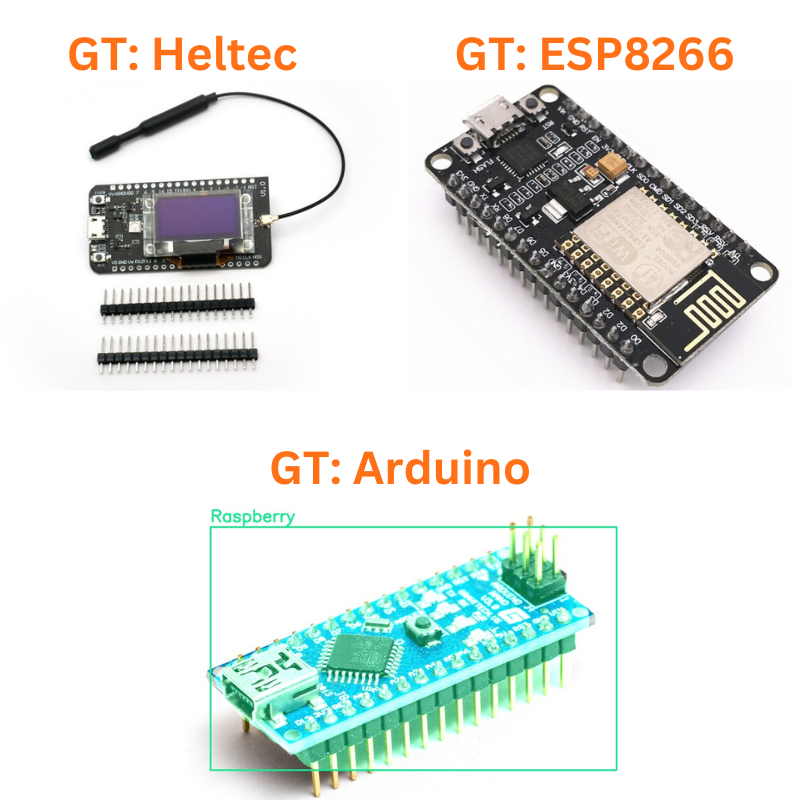
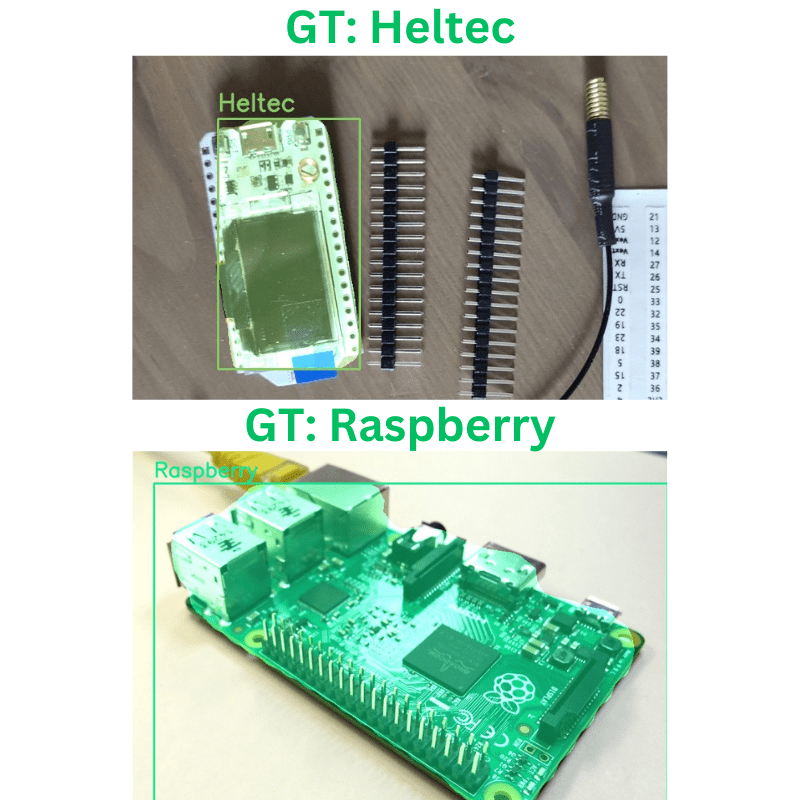
Let’s take a look at some of the ground truth images along with their bounding box and segmentation annotations.
As we can see, each image contains only one object. Although this makes the dataset a bit easier for the model, the model will not see different types of microcontrollers in a single image. Also, each image is taken from a top view. This can affect the Mask RCNN model’s performance during inference where the image may be from a different angle.
Project Directory Structure
Following is the entire tree structure of the project directory.
├── input
│   ├── inference_data
│   ├── microcontroller-segmentation
│   └── microcontroller-segmentation.zip
├── notebooks
│   └── visualize.ipynb
├── outputs
│   ├── inference
│   └── training
├── class_names.py
├── coco_eval.py
├── coco_utils.py
├── engine.py
├── group_by_aspect_ratio.py
├── infer_utils.py
├── inference_image.py
├── inference_video.py
├── presets.py
├── train.py
├── transforms.py
└── utils.py
- The
microcontroller-segmentationdataset is inside theinputdirectory. We have already explored its structure in the previous section. It also contains aninference_datadirectory that contains a few images and videos that we will use after we fine-tune the PyTorch Mask RCNN model. - The
notebooksdirectory contains a visualization notebook that we can use to visualize the ground truth annotations. - Further, the
outputsdirectory contains all the training and inference related outputs. - And directly inside the parent project directory, we have the Python files for training, dataset preparation, and inference.
All last trained checkpoints and inference data will be available via the download section of this article. In case, you intend to run the training as well, please download the dataset from here first.
Dependency and Requirements
This codebase uses PyTorch 2.0.1 for both training and inference. But any version starting from PyTorch 1.13.1 should work well.
Other than that, pycocotools is a hard requirement for both training and evaluation. If you are on Linux based OS, you can install pycocotools by simply executing the following command:
pip install pycocotools
If you are on Windows, please follow the instructions here to install pycocotools.
Fine-Tune PyTorch Mask RCNN on Microcontroller Instance Segmentation Dataset
Let’s dive into the technical parts of the article where we will discuss a bit of the code and then start training the Mask RCNN model.
The training and dataset scripts that we will use have been adapted from the official PyTorch (Torchvision) repository. The scripts were originally meant for pretraining on the COCO dataset. I have made minor changes so that we accommodate any dataset and number of classes. The extra inference scripts are written from scratch as per need.
The codebase is huge and for obvious reasons, we will not be able to discuss all the code here. But we will discuss some essential parts for sure. Please feel free to explore the code after downloading it.
Download Code
The Class Names Python File
We have a very simple Python file containing the class names from the dataset including the background class. Here are the contents of the class_names.py file.
INSTANCE_CATEGORY_NAMES = [
    '__background__',
    'Arduino',
    'ESP8266',
    'Heltec',
    'Raspberry'
]
As we are fine-tuning a PyTorch model, the first class (index 0) is __background__. Starting from index 1 we have the object classes as per the category id in the JSON annotation files.
We will use this class information while preparing the Mask RCNN model for training and inference.
The Mask RCNN Models
As for this article and the scripts that we will use, there are two versions of Mask RCNN models that we can use.
We can either use the Mask RCNN ResNet50 FPN or the Mask RCNN ResNet50 FPN V2 model for fine-tuning on our dataset. We can pass any of the model names along with the weights enum to the train.py script. Things will be clearer once we execute the script and start the training.
The Training and Validation Functions in the Engine File
The engine.py file contains the training and validation functions. These are the train_one_epoch() and evaluate() functions.
The train_one_epoch() function logs different training losses and the final loss. The evaluate() function runs the validation set through pycocotools to give the object detection metrics results. This includes the box and segmentation mask mAP.
Other than the above the train_one_epoch() function handles a few more things. They are:
- It warms up the learning rate to the base learning rate for the first 1000 iterations. This helps prevent big losses, huge weight changes, and sometimes even NaN in the first few iterations.
- If we use AMP (automatic mixed precision), it handles gradient scaling for backward propagation.
- When using multiple GPUs, it reduces the loss across all GPUs as well.
The Training Script
The training script contains a lot of functionalities and argument parsers. We will use the following command line arguments among the ones available:
--data-path: Folder path containing the dataset in COCO format.--model: The exact Torchvision model name.--weights: The enum Mask RCNN weights.--batch-size: Batch size for the data loaders.--lr: The base learning rate after warm up.--output-dir: Output directory to save the checkpoints.--amp: This is a boolean argument indicating whether we want to use Automatic Mixed Precision or not.
We also need to modify the head of the Mask RCNN model before fine-tuning begins according to the number of classes. So, after the model has been loaded, we add the following lines to modify the Mask RCNN box predictor and mask predictor. It has already been modified in the train.py script.
model.roi_heads.box_predictor.cls_score = nn.Linear(in_features=1024, out_features=len(class_names), bias=True)
model.roi_heads.box_predictor.bbox_pred = nn.Linear(in_features=1024, out_features=len(class_names)*4, bias=True)
model.roi_heads.mask_predictor.mask_fcn_logits = nn.Conv2d(256, len(class_names), kernel_size=(1, 1), stride=(1, 1))
Other than that, the training script easily supports multi-GPU training and SyncBatchNorm as well for distributed training. By default, the script uses the SGD optimizer with Nesterov momentum. We also have the option to use the Adam optimizer by passing it through the --opt command line argument.
The training script also applies horizontal flipping data augmentation by default.
That’s all we need to discuss for now regarding the training script. We are all set to start the fine-tuning process.
Executing the Training Script
We can run the following command from the terminal to start the training process.
The following training and inference experiments were run a laptop with 6 GB GTX 1060 GPU, 8th generation i7 CPU, and 16 GB of RAM.
python train.py --data-path input/microcontroller-segmentation/ --model maskrcnn_resnet50_fpn --weights MaskRCNN_ResNet50_FPN_Weights.COCO_V1 --batch-size 4 --epochs 5 --lr 0.005 --output-dir outputs/training/micrcocontroller_segmentation --amp
- The dataset directory path is
microcontroller-segmentation. - We choose the Mask RCNN ResNet50 FPN model (V1). To match this, we need to pass the pretrained weights which is
MaskRCNN_ResNet50_FPN_Weights.COCO_V1in this case. - The batch size is 4 as we only have 6 GB of VRAM available.
- We are training only for 5 epochs as the dataset is quite small and does not need a very long training regime.
- The base learning rate is 0.005.
- We are passing an output directory path as well. So, all the model checkpoints will be saved in the
outputs/training/micrcocontroller_segmentationdirectory. - Finally, we are also passing
--ampto use Automatic Mixed Precision which results in less VRAM usage and slightly faster training.
The training may take a few minutes depending on the hardware.
Analyzing the Training Results
The following image shows the box and mask mAP (IoU=0.50:0.95) results from the last epoch.
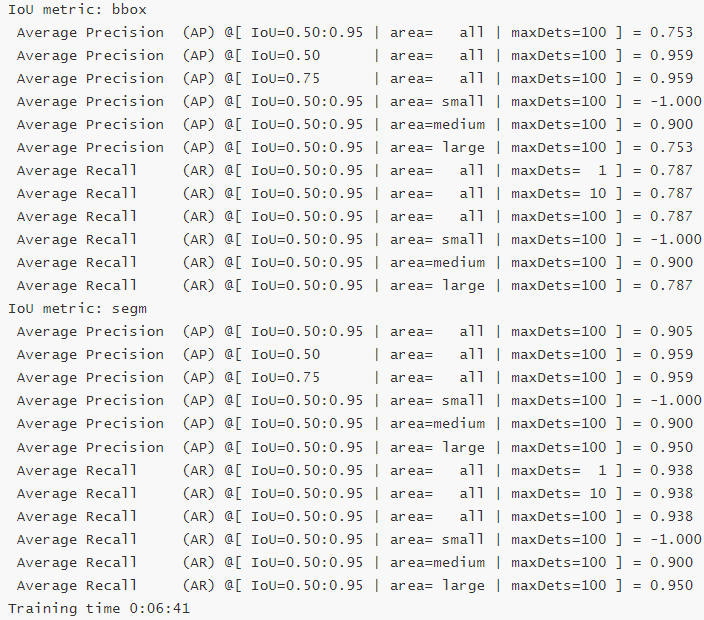
As we can see, the box mAP reaches over 75% and the mask mAP reaches over 90%. Of course, training the model longer will surely result in 100% mask mAP but it may also lead to overfitting. So, we stop the training after 5 epochs. But please feel free to train the model longer.
The resulting directory contains the model checkpoints after each epoch and also one checkpoints.pth file which is always the last epoch’s checkpoint. We will use this checkpoint for inference later.
Inference using the Fine-Tuned Mask RCNN Model
After fine-tuning the Mask RCNN model, we are now ready to carry out inference. We will run two inference experiments. Once on the validation images and again on some new unseen images.
There are three Python files for inference:
inference_image.pyfor running inference on images.inference_video.pyfor running inference on videos.- And
infer_utils.pywhich does the forward pass and overlays the mask on the image.
Although the downloaded code base contains all the scripts, we will carry out only image inference here.
To start the inference process on the validation images, we can execute the following command:
python inference_image.py --weights outputs/training/micrcocontroller_segmentation/checkpoint.pth --input input/microcontroller-segmentation/val2017/
We are passing the path to the --weights and also the path to the --input directory.
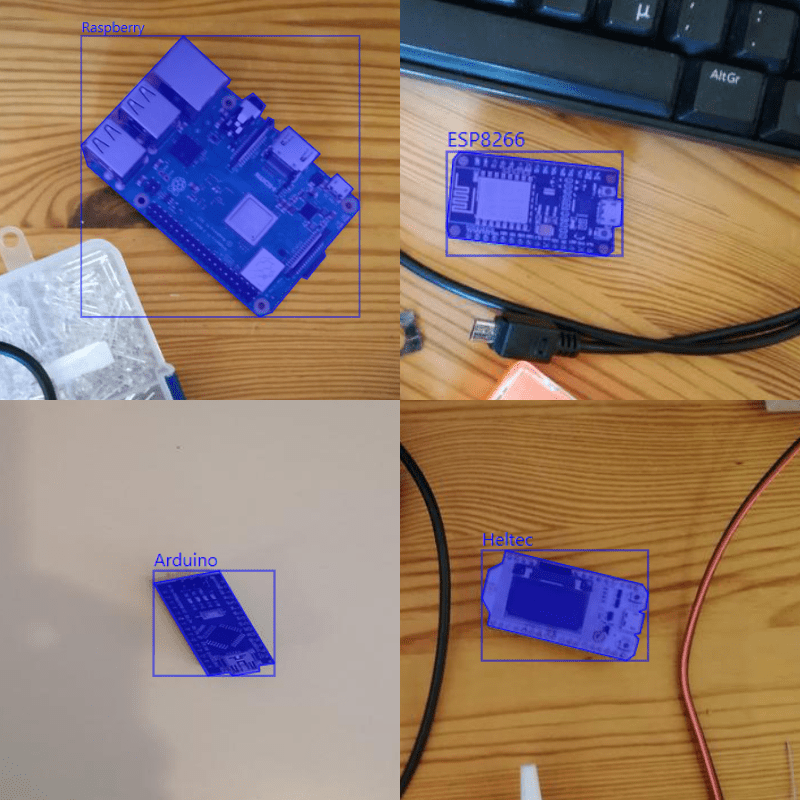
The results are stored in the outputs/inference directory. Here are the visualizations.
Interestingly, the model predicts and segments all the microcontrollers correctly. There are two false predictions though. However, we can easily mitigate this by training for a bit longer.
Now, let’s run inference on some unseen images which are available in input/inference_data directory.
python inference_image.py --weights outputs/training/micrcocontroller_segmentation/checkpoint.pth --input input/inference_data/ --threshold 0.6
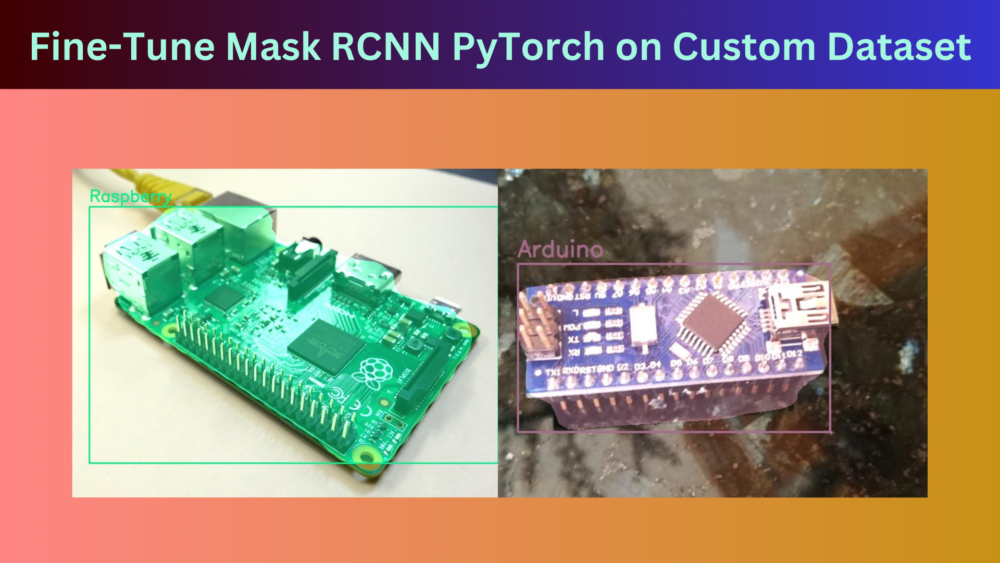
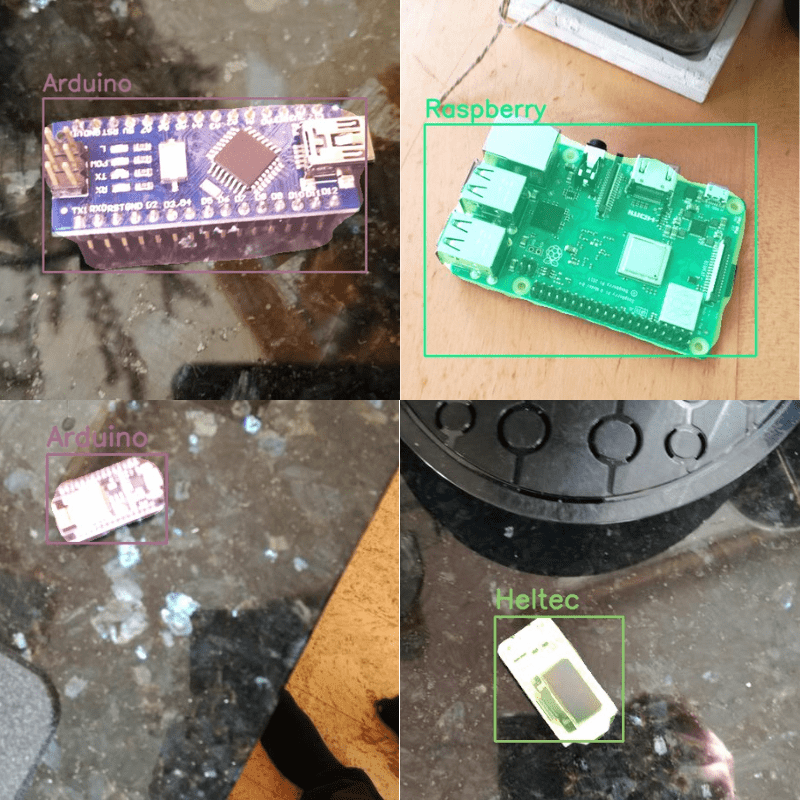
This time we are passing a confidence threshold of 0.6 Here are the results where the heading on top of the images shows the actual microcontroller name.
In the above results, the model misses the prediction for ESP8266 and the Heltec microcontroller. Further, it wrongly predicts, the Arduino as Raspberry Pi.
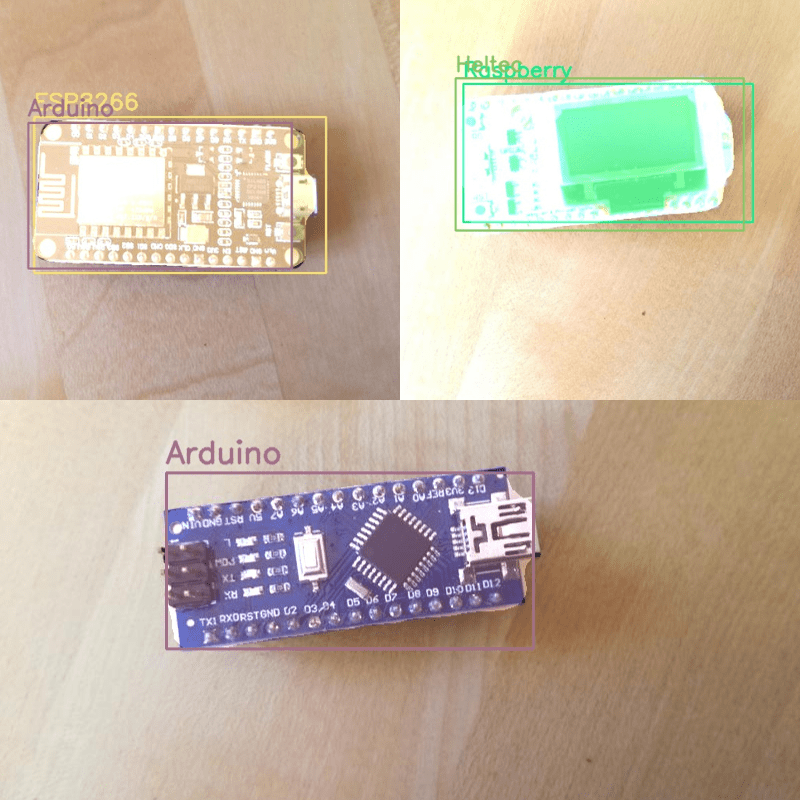
The above figure shows two more instances where the model correctly predicts the classes and has reasonably good masks. But the mask for the Heltec device is not too clean.
Further Improvements to Fine-Tune Mask RCNN
The above scenarios show the limitations of the dataset while carrying inference on real-world data. The model is not able to perform well when the images are not from a top view.
- Collecting more data containing microcontrollers in more diverse environments and even multiple devices in a single image will surely help.
- We can even add data augmentation to mitigate this. We can modify the scripts to add more data augmentation apart from horizontal flipping.
Do let others know in the comment section if you carry out further experiments and obtain interesting results.
Summary and Conclusion
In this article, we went through an introduction to fine-tune the PyTorch Mask RCNN instance segmentation model. We started with a very small and basic dataset to get to know the pipeline. We obtained very interesting results even though the dataset was small. In further articles, we will train on even more complex datasets. While doing so, we will keep on refining the scripts and eventually add more functionalities. I hope that this article was worth your time.
If you have any doubts, thoughts, or suggestions, please leave them in the comment section. I will surely address them.
You can contact me using the Contact section. You can also find me on LinkedIn, and X.
References

Hi, Thanks for the nice tutorial.
I get this error, i am training on windows cpu, how can i resolve it
RuntimeError: Found no NVIDIA driver on your system. Please check that you have an NVIDIA GPU and installed a driver from http://www.nvidia.com/Download/index.aspx
It’s saying that the NVIDIA driver is missing from your system. You need to install the NVIDIA driver for PyTorch to use CUDA. If you have a GPU in your system, you need to choose the driver according to your GPU and install it first from the given link.
Hi, Thanks for the tutorial.
The link for Download the Source Code for this Tutorial does not work!
Hello. Can you please try disabling adblocker or DuckDuckGo while downloading the code if you have them enabled? They cause issues with the download button.
Thank you dear Sovit.
Welcome.
Dear Sovit,
I have prepared a dataset and annotate it with VGG Annotator, so I was wondering how can I use this code with different backbone such as Mobilenet?
It is not very straightforward to swap backbones. But certainly doable.
It’s not a Custom Dataset, it’s more than a usage of pretrained-Coco-dataset with downloading ready-for-usage dataset that Pytorch provides. I did not test. Greetings
Thanks for the feedback. You are right to some degree. I will do better next time.