
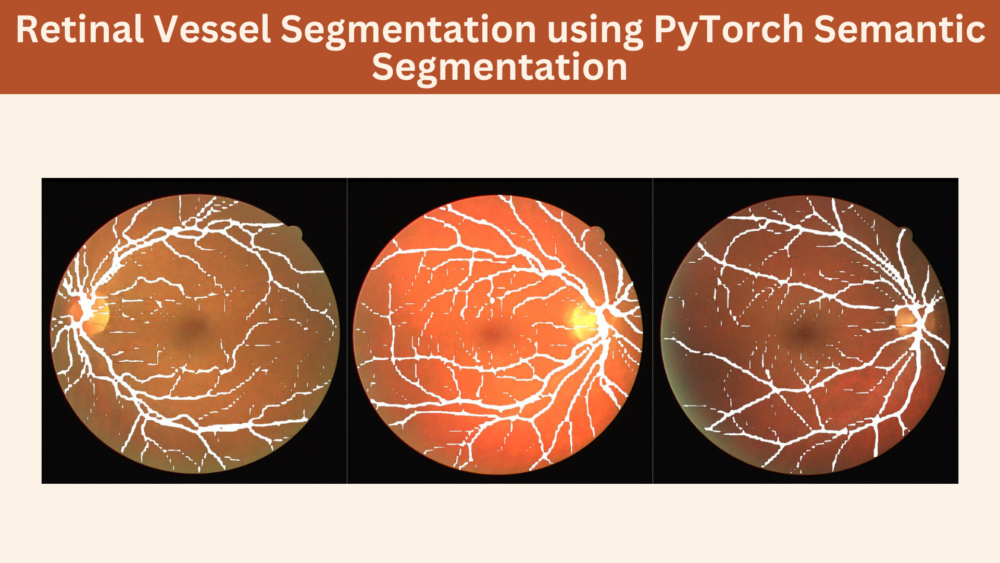
In the last few posts, we covered a lot about image segmentation. We covered semantic segmentation’s environmental and agricultural use cases using PyTorch and DeepLabV3 models. This is the final post in the series where we will cover the medical use case of semantic segmentation. We will use semantic segmentation for Retinal Vessel Segmentation.
Deep learning, in particular, semantic segmentation, has found its niche in medical imaging. From brain tumors to skin lesions, the applications of semantic segmentation in medical imaging are countless. For our journey into semantic segmentation + medical imaging, we will start with a small dataset. That’s not to say that the dataset is simple to solve. It has its intricacies, caveats, and complications. All of which we will cover while discussing the dataset in detail.
Also, in the previous posts, we covered the discussion of the code that was used for segmentation training. We will use almost the same code with only dataset-related changes. With that in mind, we will not discuss the code in this article. Rather we will entirely focus on the experiments and results. It is going to be very interesting and we will learn a lot.
These are the points that we will cover in the article:
- First, we will discuss the DRIVE (Digital Retinal Images for Vessel Extraction) dataset that we will use in the article.
- After that, we will move on to the training experiments. We will carry out the following 4 experiments:
- Training DeepLabV3 ResNet50 model with 512×512 images.
- Training DeepLabV3 ResNet50 with 768×768 images.
- DeepLabV3 ResNet101 training with 512×512 images.
- DeepLabV3 ResNet101 training with 768×768 images.
- After analyzing all the results, we will use the best model for running inference on a held-out test set.
The DRIVE Dataset for Retinal Vessel Segmentation
For the project in this article, we will use the Digital Retinal Images for Vessel Extraction (DRIVE) dataset.
This dataset is part of the biomedical imaging grand challenge that you can find here. It contains images of retinal scans and the segmentation maps of the blood vessels in those scans. Here is an example pair of the ground truth image and mask.
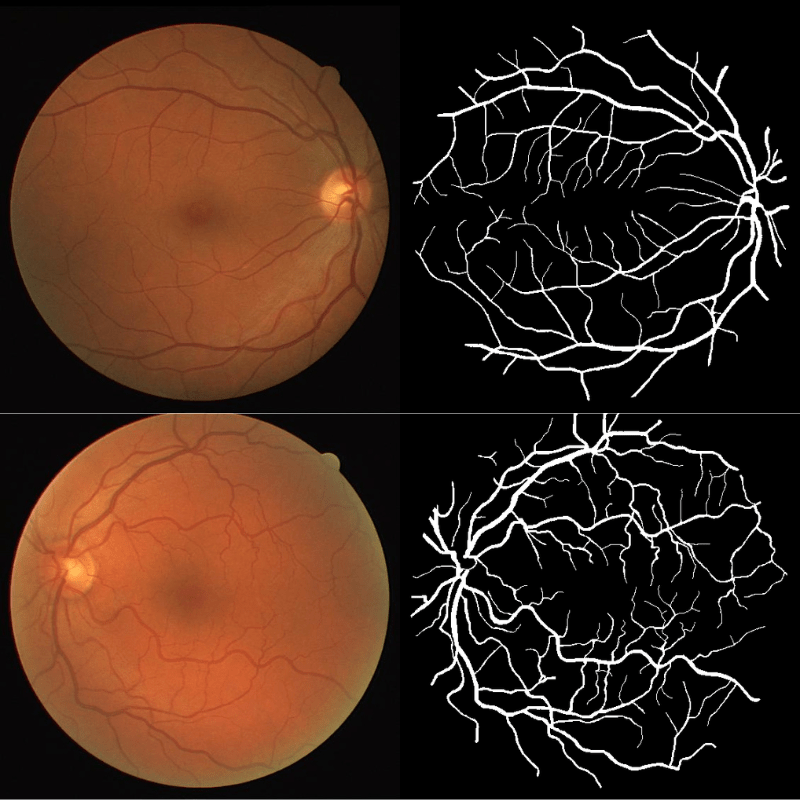
The dataset enables the analysis and creation of comparative studies on the segmentation of blood vessels in retinal images.
Such a dataset can help in the diagnosis and treatment of various diseases. These include diabetes, hypertension, arteriosclerosis, and chorodial neovascularization. But for this to happen, we need to first need the segmentation of the retinal masks. For this, we can train a semantic segmentation based deep learning model.
If you wish to know more about the technical aspects of this dataset, please visit the original site. In the next section, we will discuss the dataset from the perspective of training a deep learning model.
Retinal Vessel Segmentation Dataset
In this article, we will use a format of the dataset that already has a training and validation split. I simply prepared by splitting the dataset randomly and preparing the validation set.
You can find the DRIVE dataset with training/validation split here on Kaggle. We will use this version of the dataset for training and evaluating the model.
After downloading and extracting the dataset, you will find the following structure:
DRIVE_train_val_split
├── test_images
├── train_images
├── train_masks
├── valid_images
└── valid_masks
The original dataset contains 20 images and masks for training and 20 for testing (without masks).
In the new dataset, we have 16 training images & masks, 4 validation images & masks, and 20 images for testing.
This dataset is going to be really challenging for semantic segmentation due to a few reasons.
- First of all, we have only 16 samples for training and 4 for validation. This mostly is not enough to train a good semantic segmentation model for retinal vessel segmentation. Augmentations will help to a certain extent but not much. Because we cannot apply a whole lot of augmentation to these images. We will discuss the reason later.
- The segmentation region, that is, the retinal vessels is very thin. We cannot use low resolution images. We need at least 512×512 images to get decent results. During the analysis of the results, we will see how important image resolution is. Even more so than a larger deep learning model.
As for the dataset that we will use, after training the model on the retinal vessel segmentation dataset, we will also run inference on the test images. This will give us a good idea of how the model performs.
Directory Structure for Retinal Vessel Segmentation Project
Let’s take a look at the entire directory structure for this project.
├── input
│   └── DRIVE_train_val_split
├── outputs
│   ├── valid_preds
│   ├── accuracy.png
│   ├── best_model_iou.pth
│   ├── best_model_loss.pth
│   ├── loss.png
│   ├── miou.png
│   └── model.pth
└── src
    ├── config.py
    ├── create_split.py
    ├── datasets.py
    ├── engine.py
    ├── inference_image.py
    ├── metrics.py
    ├── model.py
    ├── train.py
    └── utils.py
- The
inputdirectory contains the dataset in the structure that we saw in the previous section. - The
outputsdirectory will contain all the training and inference related outputs. These include the trained models, the accuracy & loss graphs, and the inference results also. - Finally, the
srcdirectory contains the Python files that we need to train the DeepLabV3 models on the retinal vessel segmentation dataset.
The Python files are available through the downloadable zip file that come with this article. You just need to download the dataset from Kaggle to train the model. In case you want to run inference only, please download the trained models from here.
PyTorch Version
The code for this article has been developed using PyTorch 1.12.0.
If you run training, you will also need to install Albumentations for image and mask augmentations.
Retinal Vessel Segmentation using PyTorch DeepLabV3 Models
As discussed earlier, we will run 4 different training experiments for this project. Two using DeepLabV3 ResNet50 and two more using DeepLabV3 ResNet101.
We will not be discussing much of the coding details here. Still, we will go over some of the important aspects of dataset preparation and augmentations.
Dataset Preparation and Augmentations
One important part of the dataset preparation is the augmentation. In this project, we just use horizontal flipping and rotating of the images and masks for augmentations. We use the albumentations library for the augmentations.
If you go through the previous posts in this series, you will find that we apply other augmentations as well. But here, the retinal vessels, which we are trying to segment are very thin. So, applying too many blur and contrast augmentations is making it unnecessarily difficult for the model to recognize those areas. For that reason, we just use flipping and rotation augmentations.
To get a better idea of this, the following figures show the difference in results because of applying different augmentations.

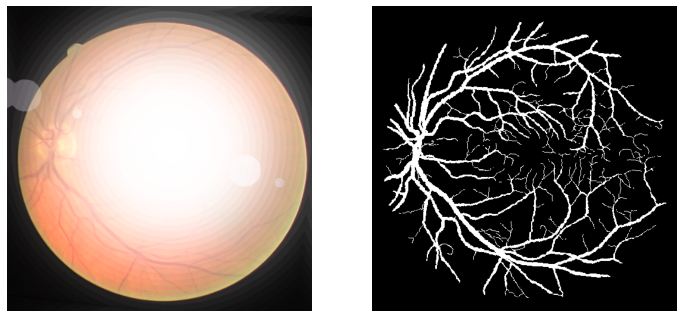
As you can see, in figure 4, the final image does not have clear features of the retinal vessels. It will be very difficult for any semantic segmentation algorithm to recognize and segment them.
As usual, we apply the augmentations to the training samples only. Also, we apply the ImageNet normalization values to both, the training and validation samples. This is because we will be using the ImageNet pretrained weights while fine-tuning the DeepLabV3 models.
Training Experiments and Results for Retinal Vessel Segmentation using DeepLabV3
Let’s dive into the training experiments without any further delay. We will carry out four training experiments, each in its own subsections. Two experiments with DeepLabV3 ResNet50 and two experiments with DeepLabV3 ResNet101.
Download Code
All training and inference experiments were carried out on a machine with 10 GB RTX 3080 GPU, 10th generation i7 CPU, and 32 GB of RAM.
Training DeepLabV3 ResNet50 with 512×512 Resolution
We will start with training the DeepLabV3 ResNet50 with 512×512 resolution. This is the base resolution for this dataset and we will not go below this. It’s very difficult to get good results for this dataset with lower resolution images.
The model.py file contains the code for both, DeepLabV3 ResNet50 and DeepLabV3 ResNet101. To swap between the training experiments, we will just comment out one function and uncomment another (trying to keep things simple here and not introducing unnecessary argument parsers).
To start the training, you can execute the following command in the terminal while keeping src as the current working directory in the terminal.
python train.py --epochs 100 --lr 0.0001 --batch 2 --imgsz 512
We are training the DeepLabV3 ResNet50 for 100 epochs with a batch size of 2 and 512×512 images. The learning rate is 0.0001. All these options are available via the train.py argument parsers. There is also an option to use learning rate scheduler using --scheduler flag but we are not using that here.
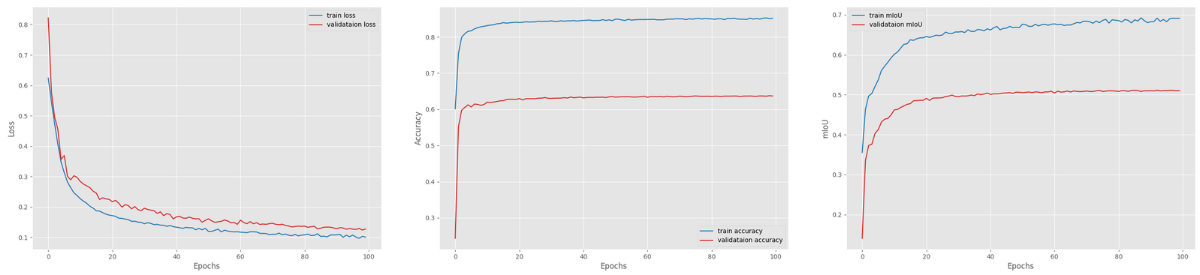
Here are the loss, accuracy, and mIoU graphs from the training.

There are clearly fluctuations in the mean IoU graphs. This may indicate that the learning rate scheduler may have helped. But we only have 4 samples in the validation set. As the training graph is still increasing till the end of training with a slight curve, most probably the learning rate is not the issue.
With the above settings, the DeepLabV3 ResNet50 model was able to achieve the highest mean IoU of 46.93.
Training DeepLabV3 ResNet50 with 768×768 Resolution
Let’s move on to the next experiment. This time we will train the same DeepLabV3 ResNet50 model but with 768×768 resolution.
Note: This training experiment requires quite a lot of VRAM, ~ 8 GB.
To start the training experiment, we can execute the following command.
python train.py --epochs 100 --lr 0.0001 --batch 2 --imgsz 768
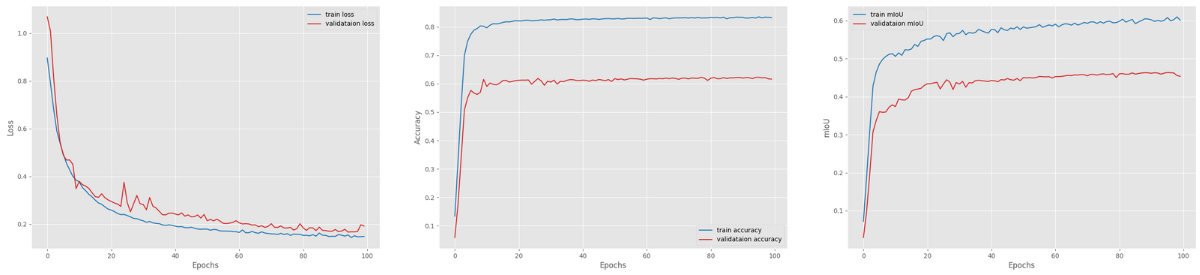
The following are the resulting plots.
The validation loss was decreasing till the end of training. And the validation mean IoU also seems to follow an increasing trend.
In fact, the best validation mIoU was 51.15 on epoch 93. This is a good improvement compared to the previous experiment.
Training DeepLabV3 ResNet101 with 512×512 Resolution
Now, we will use the DeepLabV3 ResNet101 for training on the Retinal Vessel Segmentation dataset.
If you are also training your own models while following the article, please uncomment the function in model.py which loads the deeplabv3_resnet101 model and comment out the previous function.
The training command is going to be the same as the first experiment as the only change we needed was in the model.py file.
python train.py --epochs 100 --lr 0.0001 --batch 2 --imgsz 512
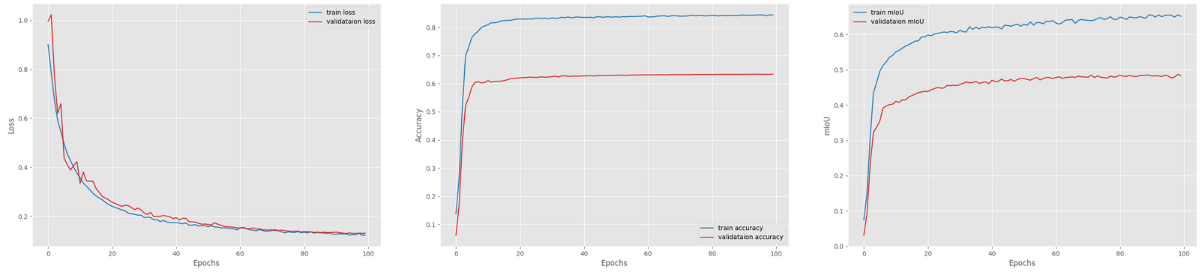
Here are the results.
Now, for this experiment, we would expect that the DeepLabV3 with ResNet101 backbone and 512×512 images would surpass the first training experiment in terms of mean IoU.
But interestingly, the model was able to reach the highest mIoU of 46.35 which is slightly lower than the DeepLabV3 ResNet50 with 512×512 resolution.
This is a big model with a lot of parameters. Such a small dataset and small batch size can easily affect the training flow in a negative manner. Most probably, training slightly longer may surpass the DeepLabV3 ResNet50 results.
Training DeepLabV3 ResNet101 with 640×640 Resolution
We are down to the final training experiment. We will train the DeepLabV3 ResNet101 model with 640×640 resolution.
But why 640×640 and not 768×768? It’s only because of memory constraints. I could only fit 640×640 resolution images into 10 GB RTX 3080. In case you are a GPU-savvy person, it consumed exactly 9.8 GB out of the 10 GB with 2 Chrome tabs open. On a side (and fun) note, I could not carry out the training when 10 Chrome tabs were open. There was not enough VRAM available in that case.
This is the command to start the training.
python train.py --epochs 100 --lr 0.0001 --batch 2 --imgsz 640
We cannot right away say this training experiment would beat the DeepLabV3 ResNet50 one with 768×768 images. We may have a bigger model here, but the image resolution is lower. The following are the loss, accuracy, and mean IoU graphs from the training.
We may have an increasing trend in the mean IoU graph, but it was not able to beat the DeepLabV3 with ResNet50 backbone when the training resolution was 768×768. The model was able to achieve the highest validation mean IoU of 48.69.
But interestingly, the mean IoU is still increasing. So, it may surpass the DeepLabV3 ResNet50 at some point.
Still, the experiments prove that a higher resolution and a moderately sized model are better than having a big model and a somewhat lower resolution especially when the area that we want to segment is very thin or small.
Inference using the Best Model
We will use the DeepLabV3 ResNet50 model that was trained with 768×768 resolution for inference. The training experiments saved two best models. One according to the least loss, and another according to the highest mean IoU. We will use the one with the highest mean IOU.
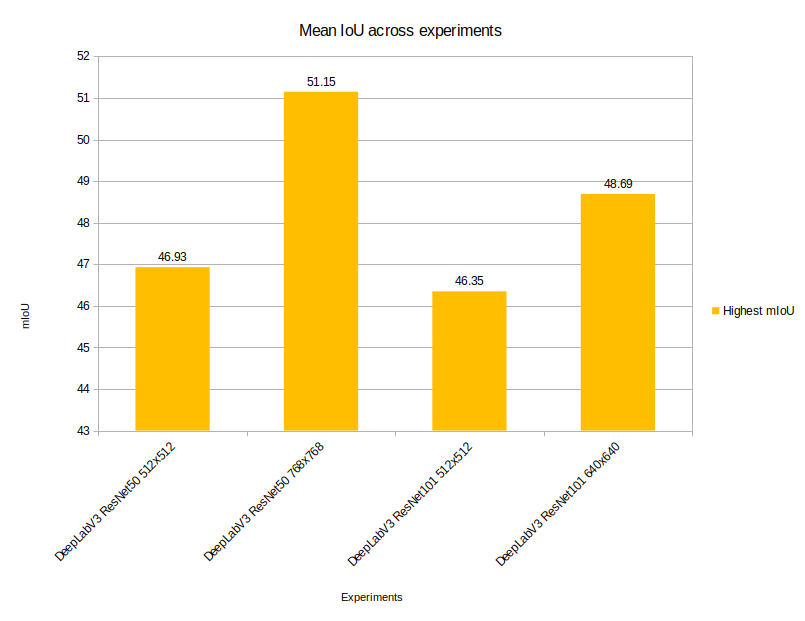
Before running the inference experiment, here is a final graph showing the comparison between the mean IoU between all four training experiments.
We will run the inference on the test images that come with the dataset. We will use the inference_image.py script for this.
python inference_image.py --model ../outputs/best_model_iou.pth --input ../input/DRIVE_train_val_split/test_images/ --imgsz 768
In the above command, we are resizing the images to the same resolution (768×768) as the model was trained with.
We do not have the ground truths for test images. So, we will have to evaluate them visually. Here are some of the results.
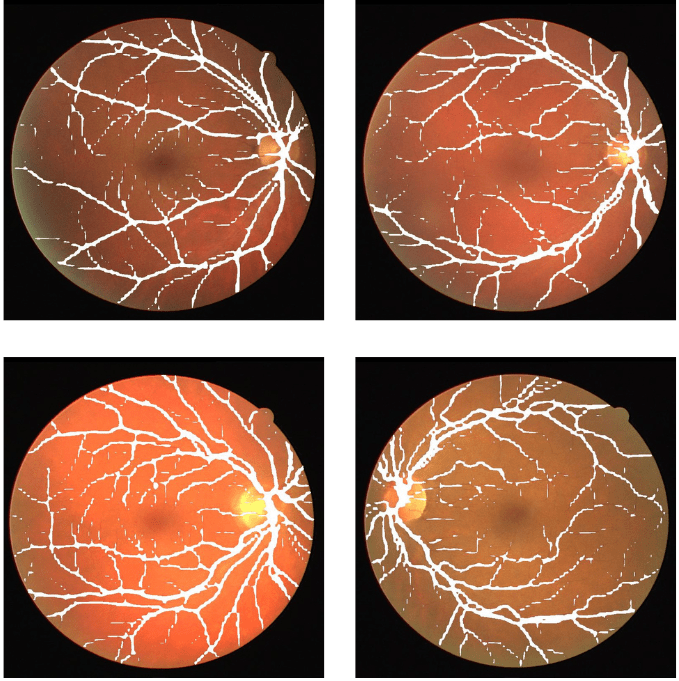
The results are mixed at best here. They are neither very good nor very bad.
In most cases, the model is able to segment the thick retinal vessels. But is missing out in some cases as well. And it is missing out on the segmentation of the thin vessels in most cases. But as we can see, the retinal vessels are barely visible and are very hard to segment. They are very difficult to visualize even for us.
Compared to many others, this dataset is relatively difficult. The segmentation areas are thin and small, and we do not have too many samples also. For what it’s worth, the DeepLabV3 ResNet50 model was able to perform really well.
This also goes on to show the importance of dataset availability to train good models, especially in the field of medical imaging.
Summary and Conclusion
In this article, we tried to solve a particularly difficult problem using semantic segmentation and deep learning. We trained several DeepLabV3 models for Retinal Vessel Segmentation. After the experiments, we found that image resolution plays a big role in getting good results in semantic segmentation. This is even more true when trying to solve medical imaging.
Even with 16 training samples, the DeepLabV3 ResNet50 performed pretty well. We will cover more such experimental deep learning projects in future articles. I hope that this was worth your time.
If you have doubts, thoughts, or suggestions, please leave them in the comment section. I will surely address them.
You can contact me using the Contact section. You can also find me on LinkedIn, and X.
