

Knowing how to write object detection pipelines for fine tuning on custom datasets is a good practice. This helps us deal with various caveats and issues along the way, mostly in terms of the dataset preparation and writing the training/validation loop. Torchvision has quite a few pretrained models in its library. But apart from Faster RCNN models, there are not many resources out there on how to use those models for fine tuning in a custom detection pipeline. For that reason, we will train the SSD300 VGG16 model from Torchvision on a custom dataset in this tutorial.
We will go through the entire pipeline in detail. Starting from the model creation to the inference, we will touch all the bases. After going through this article, you can apply the same techniques to your datasets.
Torchvision has a lot of pretrained models available. These include Faster RCNN, SSD300, RetinaNet, and FCOS models.
To train the SSD300 VGG16 model, we will use the COCO pretrained weights. This will make the training process faster for us. We will get into more detail about the model and dataset in their respective sections. For now, let’s take a look at what we will cover in this article.
- We will start with a discussion of the dataset. We will use a License Plate detection dataset to train the Torchvision SSD300 VGG16 model.
- Then we will write the code to prepare the SSD300 VGG16 model for training on the custom dataset.
- After that, we will have an overview of the dataset preparation and training utilities.
- Next, we will prepare the trainer script and start the training.
- After obtaining the best possible model, we will run inference on images and videos.
The License Plate Detection Dataset to Train the SSD300 VGG16 Model
We will use a License Plate Detection detection dataset from Roboflow.
Note: You need to download Pascal XML version 1 of the dataset which does not contain any extra augmented images.
The dataset contains bounding box annotations of license plates for several vehicles. These include different types of motorbikes and cars.
The class name in XML files is License_Plate. There are a total of 10126 images and 10537 annotations in the dataset. Here is the dataset split.
- 7058 training images.
- 2048 validation images.
- And 1020 test images.
After training and validation, we will run a final evaluation on the test set as well.
Here are some sample images from the dataset along with their ground truth annotations.
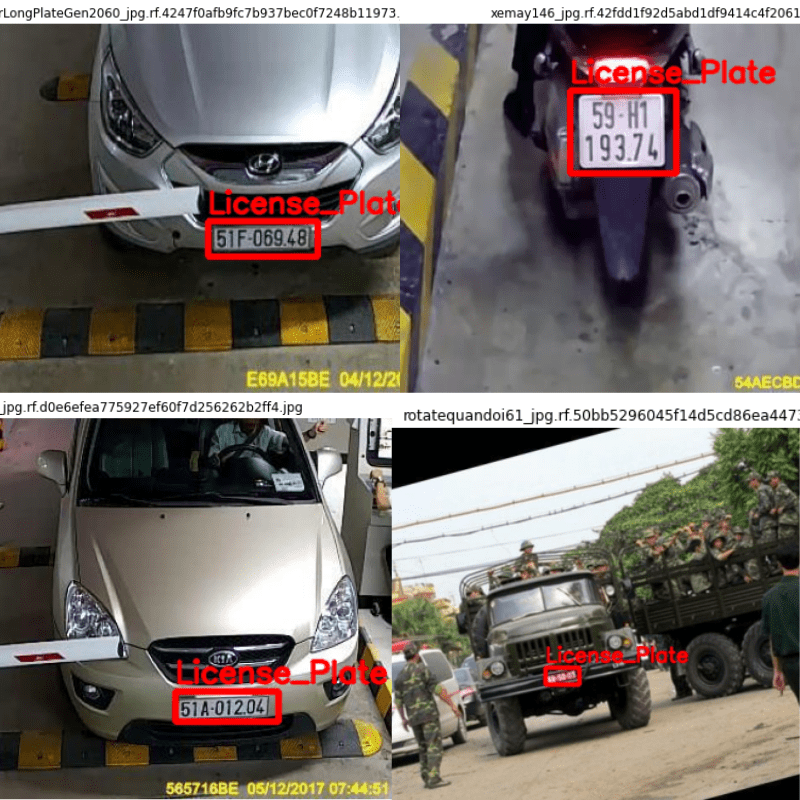
As we can see, there are various scenarios in which the vehicles are located. This will pose a good learning challenge when we train the Torchvision SSD300 VGG16 model.
Also, this will lead the SSD300 VGG16 model to learn important features which will help it during inference and evaluation.
Project Directory Structure
Before we move any further, let’s take a look at the directory structure of the entire project.
.
├── data
│   ├── inference_data
│   │   ├── image_1.jpg
│   │   ├── image_2.jpg
│   │   ├── image_3..jpg
│   │   ├── image_4.jpg
│   │   └── video_1.mp4
│   └── License Plate Recognition.v1-raw-images.voc
│       ├── test [2040 entries exceeds filelimit, not opening dir]
│       ├── train [14116 entries exceeds filelimit, not opening dir]
│       ├── valid [4096 entries exceeds filelimit, not opening dir]
│       ├── README.dataset.txt
│       └── README.roboflow.txt
├── inference_outputs
│   ├── images [36 entries exceeds filelimit, not opening dir]
│   └── video
├── outputs
│   ├── best_model.pth
│   ├── last_model.pth
│   ├── map.png
│   └── train_loss.png
├── config.py
├── custom_utils.py
├── datasets.py
├── eval.py
├── inference.py
├── inference_video.py
├── model.py
└── train.py
- The
datadirectory contains all the dataset related files. These consist of the inference images and videos in theinference_datasubdirectory. In theLicense Plate Recognition.v1-raw-images.vocwe place the entire license dataset directory after extracting it. - The
inference_outputsandoutputsdirectories contain the inference results and training results respectively. - Finally, directly in the parent present directory, we have 8 Python files. We will get into the details of these as we explore the code more in the following sections.
You can download the trained weights, inference data, and source code files through the download button. It already has been structured as per the above format. You just need to download the dataset in case you want to run the training yourself.
PyTorch Version and Other Dependencies
The source code was developed with PyTorch 1.12.0. You will need PyTorch 1.12.0 or higher to run the code locally. Please make sure to install it from the official site.
We also need Albumentations for augmentations. You can install Albumuntations from here.
We will use mAP (Mean Average Precision) as the object detection metric in this project. For that, we need the Torchmetrics library.
That’s all about the project structure and the dependencies. Now we can move on to the coding part of the article.
Train SSD300 VGG16 Model from Torchvision
While going through the code, we will go through the model preparation part in the most detail. As there are 8 code files in total, we will just have an overview of the other code files as per requirement.
The code files are well-documented, so even reading through them should provide enough insights.
Download Code
The Configuration File
Before getting into the training script of the SSD300 VGG16 model, we will define all the configurations.
These configurations are kind of hard-coded but we can change them easily. To keep things simple, we don’t rely much on argument parsers here. We will just define the configurations in the config.py Python file.
Here is the entire content of the file.
import torch

BATCH_SIZE = 16 # Increase / decrease according to GPU memeory.
RESIZE_TO = 640 # Resize the image for training and transforms.
NUM_EPOCHS = 40 # Number of epochs to train for.
NUM_WORKERS = 4 # Number of parallel workers for data loading.

DEVICE = torch.device('cuda') if torch.cuda.is_available() else torch.device('cpu')

# Training images and XML files directory.
TRAIN_DIR = 'data/License Plate Recognition.v1-raw-images.voc/train'
# Validation images and XML files directory.
VALID_DIR = 'data/License Plate Recognition.v1-raw-images.voc/valid'

# Classes: 0 index is reserved for background.
CLASSES = [
    '__background__', 'License_Plate'
]

NUM_CLASSES = len(CLASSES)

# Whether to visualize images after crearing the data loaders.
VISUALIZE_TRANSFORMED_IMAGES = False

# Location to save model and plots.
OUT_DIR = 'outputs'
We define a lot of configurations above. Let’s go over each of them.
BATCH_SIZE: The batch size for data loaders. As we are using an SSD300 model, it uses just over 4 GB of GPU memory even with 16 batch size. You can configure it as per your computing availability.RESIZE_TO: We will resize the images to this shape. As we define 640 above, so all the images will be resized to 640×640 resolution.NUM_EPOCHS: The number of epochs to train for.NUM_WORKERS: The number of parallel workers for loading the data.DEVICE: This automatically assigns the GPU device if it is available.TRAIN_DIR: The directory where all the training images and XML files are present.VALID_DIR: Directory path containing all the valid images and XML files.CLASSES: This part is a bit important. Along with theLicense_Plateclass there is also a default__background__class. All Torchvision models require an additional background class at index 0. The object classes start from index 1.NUM_CLASSES: This automatically assigns the length of theCLASSESas the number of classes present in the dataset.VISUALIZE_TRANSFORMED_IMAGES: If this isTrue, then a transformed image will be shown just before training starts. It is best to make itFalsewhen training on Colab or Kaggle as it usescv2.imshowwhich is not available on those platforms.OUT_DIR: The output directory where the training results will be stored.
Important Note Regarding Image Size
There is one important point to note here. SSD300 primarily means that the model was pretrained with 300×300 resolution images. But here, we will resize images to 640×640 resolution. This is because SSD300 object detection models are not good with small objects. As license plates are small objects, we will use a higher resolution to train the SSD300 VGG16 model for our project.
These are all the configurations that we need.
The SSD300 VGG16 Model
Now, we will move on to prepare the SSD300 VGG16 model that we will train on the license plate detection dataset.
The entire SSD300 VGG16 model preparation code will go into the model.py file. The following block contains all the code that we need to prepare the model.
import torchvision

from torchvision.models.detection.ssd import SSDClassificationHead
from torchvision.models.detection import _utils
from torchvision.models.detection import SSD300_VGG16_Weights

def create_model(num_classes=91, size=300):
    # Load the Torchvision pretrained model.
    model = torchvision.models.detection.ssd300_vgg16(
        weights=SSD300_VGG16_Weights.COCO_V1
    )
    # Retrieve the list of input channels.
    in_channels = _utils.retrieve_out_channels(model.backbone, (size, size))
    # List containing number of anchors based on aspect ratios.
    num_anchors = model.anchor_generator.num_anchors_per_location()
    # The classification head.
    model.head.classification_head = SSDClassificationHead(
        in_channels=in_channels,
        num_anchors=num_anchors,
        num_classes=num_classes,
    )
    # Image size for transforms.
    model.transform.min_size = (size,)
    model.transform.max_size = size
    return model

if __name__ == '__main__':
    model = create_model(2, 640)
    print(model)
Let’s go over the code once to gain a deeper understanding.
In the create_model function, first we load the COCO pretrained SSD300 VGG16 model. We will not be training from scratch as we do not have a huge number of samples. For most use cases, there is no reason why not to start from pretrained weights.
On line 13, we retrieve all the output channels from Conv2d layer of the backbone. This is a list. We will use this to initialize the classification head which in turn will initialize the regression head with the same values for the input channels.
Note that we are providing the input size as per the custom size for the backbone. So, the backbone will receive 640×640 inputs for our use case. This is an important modification for the SSD300 VGG16 model for our use case.
On line 15, we get the number of anchors per location. As there are 6 layers in the classification and regression head of the model, num_anchors will be a list containing the number of anchors per layer.
Line 17 modifies the classification head of the SSD300 VGG16 model as per our requirement. The num_classes should match the number of classes in our dataset. Here, we have two classes including the background class.
The SSD300 VGG16 model uses the GeneralizedRCNNTransform and by default resizes all the images to 300×300 for the SSD300 model. But we want our model to use 640×640 resolution. So, we modify the transforms on lines 23 and 24.
Finally, the function returns the modified model.
The Dataset Preparation Code
To train the SSD300 VGG16 model on this dataset (and various other datasets), it is better to write reusable code.
The datasets.py file contains all the code. It handles a lot of edge cases for a wide range of usage. Although we do not go through the entire code here (it is quite big), here are some of the important things that it handles for us.
- It can handle multiple image file extensions. These include JPG, JPEG, PNG, and PPM.
- It also takes care of the cases in case any bounding box coordinates are bigger than the image height or width. In that case, it trims down the coordinates to the image width or height as per requirement.
- The dataset preparation code to train the SSD300 VGG16 model also handles the images without bounding boxes. We do not discard the images without bounding boxes, instead, we use them as background images. This tends to improve the performance of object detection models.
Apart from that, to prevent overfitting, we are applying quite a lot of augmentations to the images. Here is a complete list of augmentations that we apply to train the SSD300 VGG16 model.
- Blur
- MotionBlur
- MedianBlur
- ToGray
- RandomBrightnessContrast
- ColorJitter
- RandomGamma
We use the Albumentations library to apply the above augmentations.
As we cover more articles on fine tuning Torchvision object detection models on custom datasets, the dataset preparation process will also keep improving as per requirement.
We can also execute the datasets.py file from the project root directory. This will show us images after all the processing and augmentations that we feed into the SSD300 VGG16 model. The following figure shows some of those images after the execution of the script.
python datasets.py
We can see the blur and color augmentations in the above images.
The Utility Scripts
We use a lot of helper functions and classes in our code. It is difficult to go through all of them in detail.
The custom_utils.py file contains all those code. These range from function to save the best model, saving the loss and mAP plots, to the training and validation transforms of the datasets.
I have tried to provide the file with rich documentation. If you are curious, please go through the file once before moving further.
The Script to Train the SSD300 VGG16 Model
Finally, we reach the script that we will use to train the SSD300 VGG16 model on the custom dataset.
The train.py file contains the entire code for this.
There are many details in this script as well. In short, it combines all the components that we discussed earlier and kicks off the training.
It also defines the training and validation functions. One important detail is that, while training, we keep the model in the training (model.train()) mode. Torchvision models output the training loss in this case. So, we can plot the training loss graph.
But in the validation function, we need to keep the model in eval mode (model.eval()). This is important to get the bounding box outputs so that we can calculate the mAP of the model using Torchmetrics. But we do not get the validation loss anymore in this case. For now, this is not a big issue.
Here are some other details before we start the training:
- We use the SGD optimizer for training. From experiments, I found that this was more stable compared to Adam and AdamW. The initial learning rate is 0.0001, with a Nesterov momentum of 0.9. We do not use weight decay for our training.
- We use the StepLR scheduler to reduce the learning rate to 0.00001 after 15 epochs. As we are training for 40 epochs, this makes the training more stable in the final epochs and prevents overfitting.
If you wish to gain some more insights, you may go through the train.py script once before starting the training.
To start the training, we can execute the following command in the terminal from the project root directory.
python train.py
Analyzing the Training Results of SSD300 VGG16 Model
The following block contains the truncated output from the terminal.
Number of training samples: 7058
Number of validation samples: 2048

SSD(
  (backbone): SSDFeatureExtractorVGG(
    (features): Sequential(
      (0): Conv2d(3, 64, kernel_size=(3, 3), stride=(1, 1), padding=(1, 1))
      (1): ReLU(inplace=True)
      (2): Conv2d(64, 64, kernel_size=(3, 3), stride=(1, 1), padding=(1, 1))
      (3): ReLU(inplace=True)
.
.
.
    (regression_head): SSDRegressionHead(
      (module_list): ModuleList(
        (0): Conv2d(512, 16, kernel_size=(3, 3), stride=(1, 1), padding=(1, 1))
        (1): Conv2d(1024, 24, kernel_size=(3, 3), stride=(1, 1), padding=(1, 1))
        (2): Conv2d(512, 24, kernel_size=(3, 3), stride=(1, 1), padding=(1, 1))
        (3): Conv2d(256, 24, kernel_size=(3, 3), stride=(1, 1), padding=(1, 1))
        (4): Conv2d(256, 16, kernel_size=(3, 3), stride=(1, 1), padding=(1, 1))
        (5): Conv2d(256, 16, kernel_size=(3, 3), stride=(1, 1), padding=(1, 1))
      )
    )
  )
  (transform): GeneralizedRCNNTransform(
      Normalize(mean=[0.48235, 0.45882, 0.40784], std=[0.00392156862745098, 0.00392156862745098, 0.00392156862745098])
      Resize(min_size=(640,), max_size=640, mode='bilinear')
  )
)
23,745,908 total parameters.
23,707,188 training parameters.
Adjusting learning rate of group 0 to 1.0000e-04.

EPOCH 1 of 40
Training
Loss: 2.6458: 100%|█████████████████████████████████████████████████████████████████████████████████████████████████████████████████████████████████████████| 441/441 [01:11<00:00,  6.16it/s]
Validating
100%|███████████████████████████████████████████████████████████████████████████████████████████████████████████████████████████████████████████████████████| 128/128 [00:16<00:00,  7.96it/s]
Epoch #1 train loss: 2.922
Epoch #1 mAP: 0.5592052340507507
Took 4.526 minutes for epoch 0

BEST VALIDATION mAP: 0.5592052340507507

SAVING BEST MODEL FOR EPOCH: 1

SAVING PLOTS COMPLETE...
Adjusting learning rate of group 0 to 1.0000e-04.
.
.
.
EPOCH 21 of 40
Training
Loss: 1.1670: 100%|█████████████████████████████████████████████████████████████████████████████████████████████████████████████████████████████████████████| 441/441 [01:09<00:00,  6.31it/s]
Validating
100%|███████████████████████████████████████████████████████████████████████████████████████████████████████████████████████████████████████████████████████| 128/128 [00:15<00:00,  8.49it/s]
Epoch #21 train loss: 0.999
Epoch #21 mAP: 0.6460816264152527
Took 2.962 minutes for epoch 20

BEST VALIDATION mAP: 0.6460816264152527

SAVING BEST MODEL FOR EPOCH: 21

SAVING PLOTS COMPLETE...
Adjusting learning rate of group 0 to 1.0000e-05.
.
.
.
EPOCH 40 of 40
Training
Loss: 1.5361: 100%|█████████████████████████████████████████████████████████████████████████████████████████████████████████████████████████████████████████| 441/441 [01:10<00:00,  6.26it/s]
Validating
100%|███████████████████████████████████████████████████████████████████████████████████████████████████████████████████████████████████████████████████████| 128/128 [00:15<00:00,  8.47it/s]
Epoch #40 train loss: 0.944
Epoch #40 mAP: 0.6419582366943359
Took 2.773 minutes for epoch 39
SAVING PLOTS COMPLETE...
Adjusting learning rate of group 0 to 1.0000e-06.
We get the best model on epoch 21 with an mAP of 64.60. This is not bad at all.
Let’s take a look at the mAP and loss graphs.
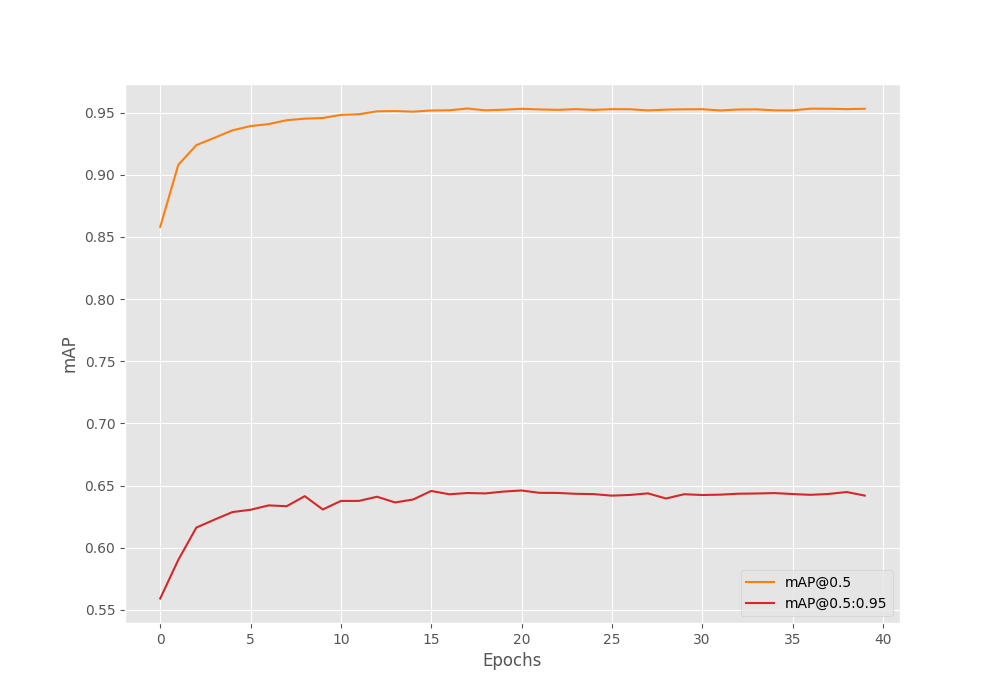
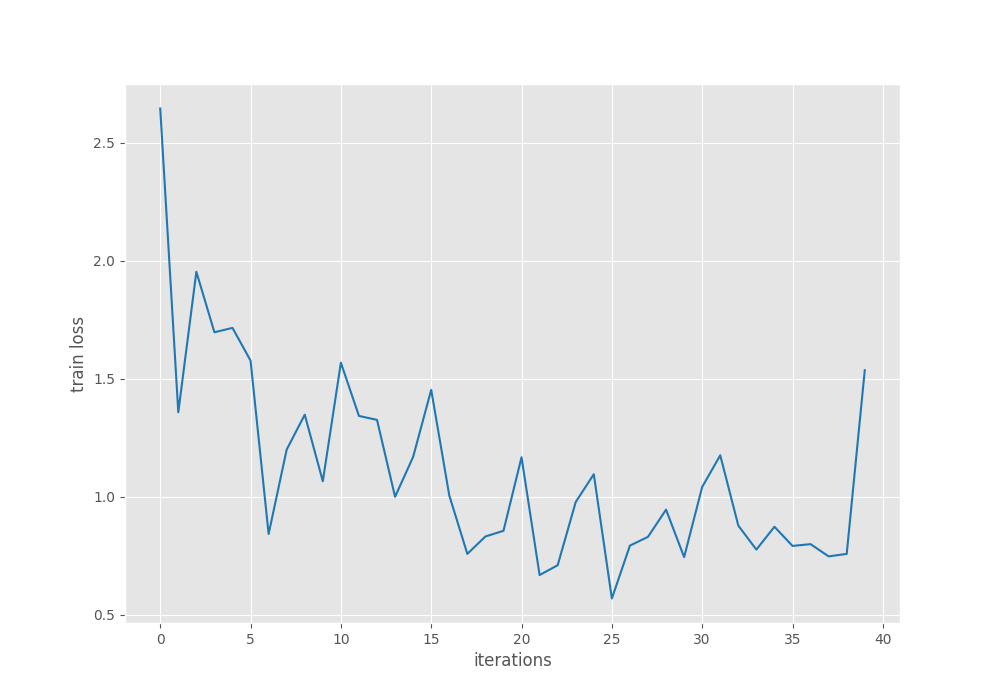
The mAP graph looks very stable without much fluctuation. The learning rate scheduler on epoch 15 surely helped in this.
The loss graph shows some big fluctuations. It is hard to say what will be the remedy for this. But maybe using some more augmentations can help.
For now, we have the best model and are ready to run the evaluation on the test set.
Evaluation using the Best Weights of the SSD300 VGG16 Trained Model
We can use the best weights and the eval.py script to run evaluation on the test set. The evaluation script just contains the same validate function from the training script and a few other custom code to load the model.
You can evaluate the model using the following command.
python eval.py
The following block shows the output.
Validating
100%|█████████████████████████████████████████████████████████████████████████████████████████████████████████████████████████████████████████████████████████| 63/63 [00:08<00:00,  7.56it/s]
mAP_50: 96.956
mAP_50_95: 66.290
The results look good here as well.
The model can achieve an mAP of 66.290 at IoU 0.50:0.95.
Inference on Images and Videos
To run inference on unseen data, we have two scripts:
inference.pyto run inference on images.inference_video.pyfor running inference on videos.
First, we will run inference on some unseen images. For this, we just need to give the directory path to the script.
python inference.py --input data/inference_data/ --imgsz 640
The --input flag accepts the input directory path. As we trained the model on 640×640 images, we use the --imgsz flag to pass the same image shape. Then the script will resize the images internally. The default detection threshold value is 0.25. We can change it using the --threshold flag but we are leaving it as is.
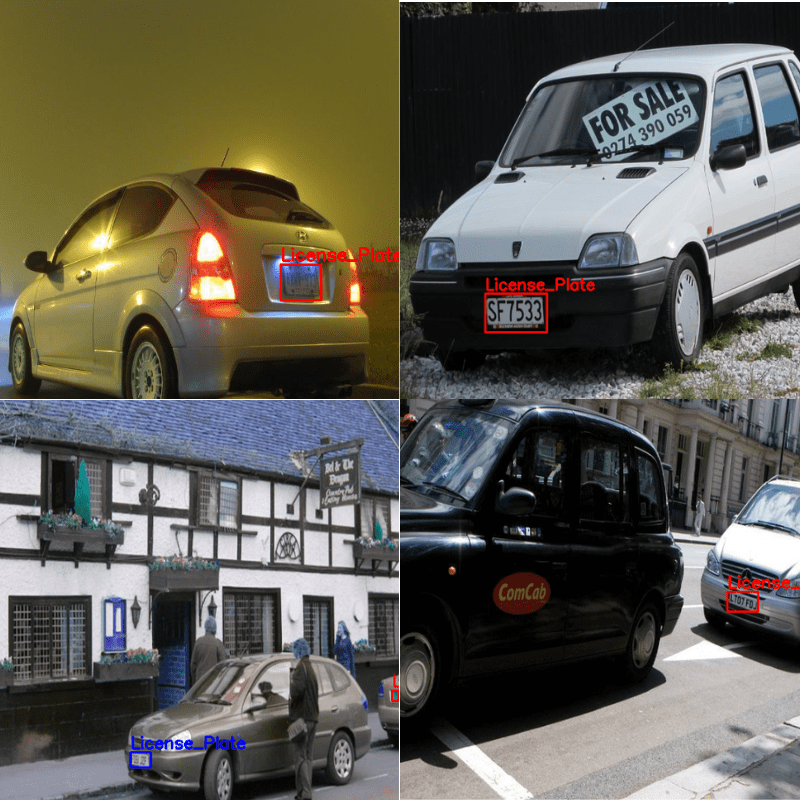
The following figure shows the results from the above command.
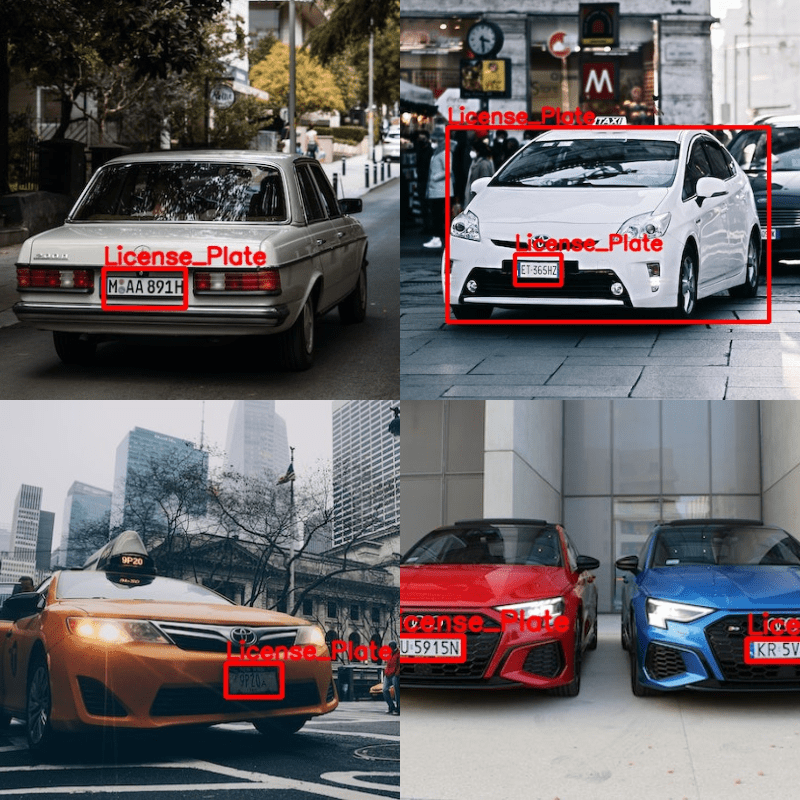
The results are nice. The model can detect the license plates in all cases. But is also has a false positive where it is detecting the white car as a license plate. Mostly, adjusting the threshold value a bit will mitigate this.
Next, we can run inference on a video using the following command.
python inference_video.py --input data/inference_data/video_1.mp4 --imgsz 640
Here also we are resizing all the video frames to 640×640 to get the best performance.
The results are nice but there are a few false positives when the cars are almost at the bottom part of the frame.
On an RTX 3080 GPU, the model was running at 136 FPS. This is good speed considering that we are using the VGG16 backbone to train the SSD300 object detection model.
Further Improvements
There are many other improvements that we can do to improve the detection accuracy. Most of the time when dealing with small and custom objects, we can consider different aspect ratios according to the objects in the dataset.
We may also provide additional anchor box shapes if necessary.
We will dive deeper into these techniques in future articles.
Summary and Conclusion
In this article, we covered how to train a Torchvision SSD300 VGG16 object detection model on a custom dataset. While creating the model, we checked what modifications we need to tune the model for a custom dataset. After training, we also ran an evaluation on the test set and inference on unseen data. I hope that this article was worth your time.
If you have any doubts, thoughts, or suggestions, please leave them in the comment section. I will surely address them.
You can contact me using the Contact section. You can also find me on LinkedIn, and X.

Can i follow this tutorial for custom data with 5 classes or more?
Hello Kingsman. Sure you can. Just change the CLASSES list in config.py with the additional classes. Everything else will be taken care of automatically.
I have a problem when I finish training data, when the data that I have finished training is used for video inference, the screen is full with thousands of bounding boxes. is there any solution?
Can you please try increasing the confidence threshold?
Also, if you are using more than one class, please change the following line of code in both image and video inference scripts.
From
COLORS = [[0, 0, 0], [255, 0, 0]]
to
COLORS = np.random.uniform(0, 255, size=(len(NUM_CLASSES), 3))
This would create a color array for the number of classes you have instead of just one object class.
Thanks, it worked! but i have one more problem, i am using my own dataset and it has been successfully trained. But when I inference the video, the detection is not accurate, many other objects are detected. Is there something wrong?
Can you let me what dataset you are using, how many classes are there, and what is the current mAP that you are getting?
I use the Pascal Voc dataset from roboflow which contains 880 images and there are 5 classes in it. map I got mAP_50:85,132 mAP_50_95: 56,946
That’s not too bad actually. Increasing the confidence threshold should actually work. What thresholds have you tried till now?
Hi,
In the below link
https://debuggercafe.com/custom-backbone-for-pytorch-ssd/
you created a model with differently as compared to this https://debuggercafe.com/train-ssd300-vgg16/
Main differences that I observed was deletion of layer1 …layer 4, no batch norm, no activation function. You used SSD classification head instead of SSD head any specific reason for that? AS per my understanding the default box used in this link are fixed, how can we modify them ? Also how are you applying threshold? If I want to add my own layers in the model instead of existing layers how can I do it?
Hi. It seems that you have a lot of questions. Should we take this forward by email?
[email protected]
Good evening Sovit. I have the same questions _ML_ asked just above. I would be grateful if you could reply here so that I can see the answers too. If you would prefer to answer by email I can of course do that too.
I will answer from DebuggerCafe email to both of you. I hope that works.
Also, Sovit it seems that links to download the source code are no longer working.
Hello Neptune. If you have adblockers or DuckDuckGo enabled, please disable them when entering the email for downloading the code. They tend to cause issues. If you still face issues, let me know. I will send a direct link.
hi Sovit, i am using dataset from url : https://universe.roboflow.com/satellite-images-i8zj5/landscape-object-detection-on-satellite-images-with-ai/dataset/3
The problem is during the training, the mAP is too low and seems not learning really much, which has been improved to 0.05.
I am thinking is this bad result caused by the size of each object need to be detected? as they are not big and obvious as per human eyes…
Thank you for any help.
Hello. It seems like your dataset also contains other types of polygons along with bounding boxes. I hope you have taken care of that in the dataset preparation. Apart from that, the bad detections may be the result of small objects. You can try increasing the image resolution while training and see whether you get any better results.
hi Sovit, I trained the model on my custom dataset and now I’m trying to export the model to onnx format as an intermediate step to deploy it to the oak-d camera at the end, but I encountered a lot of problems doing so
here is the code I used:
import torch
# Load the best model and trained weights.
DEVICE = torch.device(‘cuda’) if torch.cuda.is_available() else torch.device(‘cpu’)
model = create_model(num_classes=2, size=640)
checkpoint = torch.load(‘/content/drive/MyDrive/best_model.pth’, map_location=DEVICE)
model.load_state_dict(checkpoint[‘model_state_dict’])
model.to(DEVICE).eval()
import onnx
example_input = torch.randn(1, 3, 640, 640)
onnx_program = torch.onnx.dynamo_export(model, example_input)
onnx_program.save(“best_model.onnx”)
Hi. I think this post will help you to properly export your PyTorch model to ONNX.
https://debuggercafe.com/export-pytorch-model-to-onnx/
thanks for help, but it seems there is a small issue.
I downloaded the code from the link you provided, replaced the model.py with model.py from this tutorial, replaced best_model.pth with my best_model.pth and run the export.py file with the right arguments but it keeps raising this error
torch.onnx.errors.SymbolicValueError: Unsupported: ONNX export of operator get_pool_ceil_padding, input size not accessible. Please feel free to request support or submit a pull request on PyTorch GitHub: https://github.com/pytorch/pytorch/issues [Caused by the value ‘217 defined in (%217 : Float(1, 256, *, *, strides=[1440000, 5625, 75, 1], requires_grad=1, device=cpu) = onnx::Relu(%input.35), scope: torchvision.models.detection.ssd.SSD::/torchvision.models.detection.ssd.SSDFeatureExtractorVGG::backbone/torch.nn.modules.container.Sequential::features/torch.nn.modules.activation.ReLU::features.15 # /usr/local/lib/python3.10/dist-packages/torch/nn/functional.py:1469:0
)’ (type ‘Tensor’) in the TorchScript graph. The containing node has kind ‘onnx::Relu’.]
It apparently turned out to be a problem with pytorch and tourchvision version
thank you so much for your help, I’m really grateful
Glad that it worked.
Hello, I used your code for the dataset available at: [https://universe.roboflow.com/jan-zmrzly/eduset-one-dataset]. The goal was to detect 3 different objects. Do you have any suggestions on how to improve the results I’m achieving? Currently, the mAP is 0.58, and I cannot classify circles at all. Would it be possible to modify the code to address the multiboxes issue? I’m struggling with it. I saw a similar question in the comments, but I didn’t see a successful resolution. Thanks a lot for your response.
I think increasing the training resolution will help. Currently, the training takes place at (300, 300) resolution. Perhaps you can try with (640, 640). Also, maybe, larger models like Faster RCNN will work better.
Hello, I changed the optimizer to Adam and achieved an mAP around 0.88, which I am satisfied with.
That’s good to hear. I will try to experiment more with this.
Hello, when I click the “Download the Source Code for this Tutorial” button nothing happens. Why could that be?
I solved it. Seems like my AdBlock was blocking the Popup that appeared when you press the button ^^
Yes, adblockers block it. Glad that it was solved.
The visualize_sample function is displaying a dark image with the bounding box. What I have done wrong?
Hi. Are you talking about `VISUALIZE_TRANSFORMED_IMAGES` from config.py.
Can this tutorial applied for any dataset? Because I tried with some other tutorials I referenced from your site including Training RetinaNet or FasterRCNN, but it always return this error during the training and got interrupted:
Value error: x_max is less than or equal to x_min for bbox (tensor(0.5250), tensor(1.), tensor(0.5391), tensor(1.), tensor(1))
It looks like there is an issue with the dataset where the ymin is the same ymax. Please check that once and see if the issue is resolved.
Hello,
Suppose my program needs to train for 100 epochs, but stops at the 60th epoch. Can I continue training next time starting from the 61st epoch?
Thank you!
Yes, you can using the last saved model. But you need to ensure that you load the state dictionary properly after initializing the model.
Which part of the code do I need to modify to resume training from epoch 60?
Hello. You need to modify the train.py script. After initializing the model, you need to load the earlier checkpoint that you trained for 60 epochs. In that case, you will resume training the weights.
Hello,
Hope you are doing well. I want to inspect your code to learn from it but the download link is not working. Can you fix it. Thanks
Regards
My bad, I was using Adblocker.
Glad it was solved.
Hi,
I have trained the model on my own dataset which contains 64 training images and 24 images for validation. Running the datasets.py works well but when training the model on my local machine, it does not train on the first epoch but it does on the second epoch and then stops. Then I get this error “train.py 161
metric_summary = validate(valid_loader, model)
train.py 86 validate
outputs = model(images, targets)
module.py 1532 _wrapped_call_impl
return self._call_impl(*args, **kwargs)
module.py 1541 _call_impl
return forward_call(*args, **kwargs)
ssd.py 404 forward
detections = self.postprocess_detections(head_outputs, anchors, images.image_sizes)
ssd.py 448 postprocess_detections
image_boxes = torch.cat(image_boxes, dim=0)
RuntimeError:
torch.cat(): expected a non-empty list of Tensors”, and I get this warning after the first epoch “UserWarning: Plan failed with a cudnnException: CUDNN_BACKEND_EXECUTION_PLAN_DESCRIPTOR: cudnnFinalize Descriptor Failed cudnn_status: CUDNN_STATUS_NOT_SUPPORTED (Triggered internally at ..\aten\src\ATen\native\cudnn\Conv_v8.cpp:919.)”. I have changed the image size to “300” and I have just one class. Can you please help me?
Hello Afram. It seems that some of the label files do not contain any annotations. Can you please check that?
Hello, sorry, I used your code and when I train I get the mAP of -1.0, I was searching and I can’t find the error, I don’t know if it has happened to you
Hello Enrique. Are you using the same dataset as the article or a different one? Please let me know. It will help me sort out the issue.
Hello, I want to practice training the SSD300 VGG16 model from Torchvision on a custom dataset in Colab, but I can’t find any GitHub links or sources to download it. Could you please help me? Thank you!
Hello, the code is provided under the Download Code section. Please let me know if the link works for you.
Hi Sovit,
Good day. Could you please help me on given error? I’m very new in SSD traning. Appreciate for your help.
EPOCH 1 of 2
Training
0% 0/47 [00:00<?, ?it/s]
Traceback (most recent call last):
File "/content/SSD/20230508_Train_SSD300_VGG16_Model_from_Torchvision_on_Custom_Dataset/train.py", line 159, in
train_loss = train(train_loader, model)
File “/content/SSD/20230508_Train_SSD300_VGG16_Model_from_Torchvision_on_Custom_Dataset/train.py”, line 50, in train
for i, data in enumerate(prog_bar):
File “/usr/local/lib/python3.10/dist-packages/tqdm/std.py”, line 1181, in __iter__
for obj in iterable:
File “/usr/local/lib/python3.10/dist-packages/torch/utils/data/dataloader.py”, line 701, in __next__
data = self._next_data()
File “/usr/local/lib/python3.10/dist-packages/torch/utils/data/dataloader.py”, line 1465, in _next_data
return self._process_data(data)
File “/usr/local/lib/python3.10/dist-packages/torch/utils/data/dataloader.py”, line 1491, in _process_data
data.reraise()
File “/usr/local/lib/python3.10/dist-packages/torch/_utils.py”, line 715, in reraise
raise exception
KeyError: Caught KeyError in DataLoader worker process 0.
I tried to revise NUM_WORKERS = 0 the error change to KeyError: tensor(1).
Note: I run the code on google colab.
Hello Wannisa, can you please try installing albumentations==1.1.0 and let me know if that works?
It working well after installed albumentations==1.1.0.
I have another problem regarding inference.py with error as below
/content/SSD/20230605_Using_Custom_Backbone_for_PyTorch_SSD_for_Object_Detection/inference.py:43: FutureWarning: You are using `torch.load` with `weights_only=False` (the current default value), which uses the default pickle module implicitly. It is possible to construct malicious pickle data which will execute arbitrary code during unpickling (See https://github.com/pytorch/pytorch/blob/main/SECURITY.md#untrusted-models for more details). In a future release, the default value for `weights_only` will be flipped to `True`. This limits the functions that could be executed during unpickling. Arbitrary objects will no longer be allowed to be loaded via this mode unless they are explicitly allowlisted by the user via `torch.serialization.add_safe_globals`. We recommend you start setting `weights_only=True` for any use case where you don’t have full control of the loaded file. Please open an issue on GitHub for any issues related to this experimental feature.
checkpoint = torch.load(‘outputs/best_model.pth’, map_location=DEVICE)
Test instances: 108
(804, 1071, 3)
qt.qpa.xcb: could not connect to display
qt.qpa.plugin: Could not load the Qt platform plugin “xcb” in “/usr/local/lib/python3.10/dist-packages/cv2/qt/plugins” even though it was found.
This application failed to start because no Qt platform plugin could be initialized. Reinstalling the application may fix this problem.
Available platform plugins are: xcb.
I already fix it by use below librarys. Thank you for your help and have a good night.
from PIL import Image, ImageDraw # Import Pillow for image handling
import matplotlib.pyplot as plt # Import Matplotlib for displaying images
I am glad that you solved it Wannisa.
is it just me or does the download link sending everyone to an ecommerce website?
Hello Ashar. Apologies for the issue. I have sent you an email with the download link. Please let me know if you receive it.
This is an issue with the email client that I am using and I am in the process of correcting it. Thanks for letting me know.
Hi Bro, there is no step to use in google colab or only for local laptop , have you made it? can you provide it? i can’t run in my local laptop because of my low laptop specifications, so i need to train in gcolab.
Hi Muhamad. I usually do not create Colab notebooks because creating both runnable scripts and notebooks consume a lot of time. However, I may try this for future articles.
Hi, the source code link is not working for me. Could you please help me? Thank you!
Hello Nusrath. Can you please try disabling ad blockers or Duck Duck Go if you have them enabled? Please remember to refresh the website once when done so. If that does not work, I will surely send via email.
My bad, it worked. Thank you
No problem. Usually, adblockers or Duck Duck Go block the download API.
Hi, great tutorial (I could not find any other for pytorch and SSDs)! However, the download-button does not work for me (adblocker is disabled). Tried in Firefox and Chrome… Is there anything else I could try? Thanks!
Hi Josh. The download link is not working for some of the older posts. I have sent an email with the link. Please check and let me know if you face any issues.