
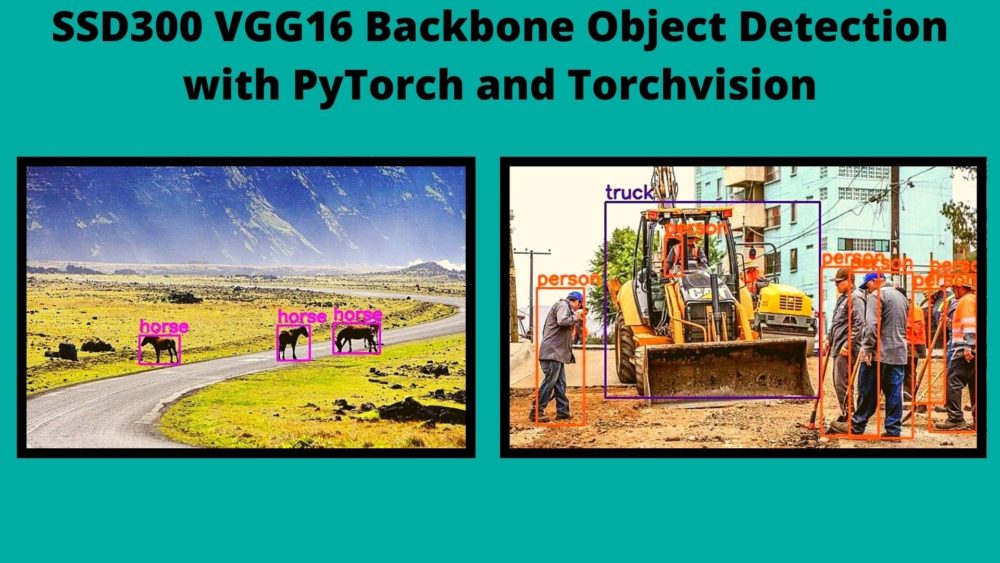
With the release of PyTorch 1.9.0, we also get support for loading the pre-trained SSD300 (Single Short Multibox Detector) model. It is one of the best models out there (among others) for fast object detection. In this post, we will carry out object detection using SSD300 with VGG16 backbone using PyTorch and Torchvision.
In fact, PyTorch now supports two different SSD object detection models:
- SSD300 With the VGG16 backbone (that we will use this week).
- SSDLite320 with the MobileNetV3 backbone (we will explore this next week).
This post will cover the following topics in order:
- Brief about the input and output format of PyTorch SSD models.
- The PyTorch version required to use the new SSD models.
- The directory structure of the mini project.
- Object detection in images and videos using SSD300 with VGG16 backbone.
I hope that you are excited to follow along this post till end. Let’s move forward.
The Input and Output Structure of PyTorch SSD Models
As we will just be doing inference in this post, so, let’s discuss the expected input and output structure for inference only. You can also easily find this information in the official torchvision documentation here.
It is also good to keep in mind that the SSD models have been trained on the MS COCO object detection dataset.
For the input, the model expects a batch of images in Tensor format. If we input only one image, then the size of the Tensor will be [1, C, H, W]. Here, C, H, and W are the number of channels, height, and width of the image respectively.
The model outputs a list of dictionaries which contains the output Tensor values. Specifically, it is of the format List[Dict[Tensor]]. This list contains the following information:
- The bounding
boxesinFloatTensor[N, 4]format whereNis the number of detections. Andx1,y1,x2,y2will be four bounding box coordinates corresponding to the top-left and bottom-right corners of the box. - The
labelsfor each of theNdetections inInt64Tensor[N]format.. - And finally, the
scoresfor each of theNdetections inTensor[N]format.
The following is an example of the output list. This should make things a bit clearer.
[{'boxes': tensor([[442.5059, 238.3201, 507.2607, 280.1403],
        [171.7978, 255.5709, 227.4966, 295.5227],
        [364.5702, 241.9929, 409.5678, 290.7316],
        ...
        [270.7072, 133.8356, 275.2707, 138.8514]], device='cuda:0',
       grad_fn=),
'scores': tensor([0.5262, 0.4450, 0.3461, 0.2393, 0.1884, 0.1600, 0.1473, 0.1453, 0.1361,
        0.1336, 0.1321, 0.1290, 0.1236, 0.1231, 0.1230, 0.1224, 0.1222, 0.1174,
        0.1162, 0.1161, 0.1160, 0.1154, 0.1147, 0.1144, 0.1142, 0.1141, 0.1139,
        ...
        0.0714, 0.0711, 0.0711, 0.0709, 0.0708, 0.0705, 0.0702, 0.0701, 0.0701,
        0.0700, 0.0699], device='cuda:0', grad_fn=),
'labels': tensor([19, 19, 19, 21, 21, 21, 38, 38, 38, 38, 38, 38, 38, 38,  1, 38, 38, 38,
        38, 38, 38, 38, 38, 38, 38, 38, 38,  1, 38, 38, 21, 38, 38, 38,  1, 38,
        38,  1, 38,  1,  1, 38, 38, 38, 38, 38, 38, 38, 38,  1,  1, 38, 38, 19,
        ...
        38, 38, 38, 38, 38, 38, 38, 38,  1, 38, 38, 38,  1,  1,  1, 38, 38, 38,
        19, 38], device='cuda:0')}]
The boxes, scores, and labels keys contain the respective tensor outputs.
Required PyTorch Version
This part is pretty important. You need at least PyTorch version 1.9.0 to load the SSD models from torchvision. If you are reading this when PyTorch already has a version higher than 1.9.0 and you have that installed, then you are good to go.
If you need to install/update PyTorch, then please to the official installation site and choose the configurations according to your requirements.
Directory Structure
The following is the directory structure that we will use for this post.
├── input
│   ├── image_1.jpg
│   ├── image_2.jpg
│   ...
│   └── video_1.mp4
├── outputs
│   ├── image_1.jpg
│   ...
├── coco_names.py
├── detect_image.py
├── detect_utils.py
├── detect_video.py
- The
inputfolder contains the input images and videos that we will use for inferencing on the SSD300 model. - The
outputsfolder will contain the respective image and video outputs after the object detection has happened. - We have four Python (
.py) files. We will get into the details while writing the code.
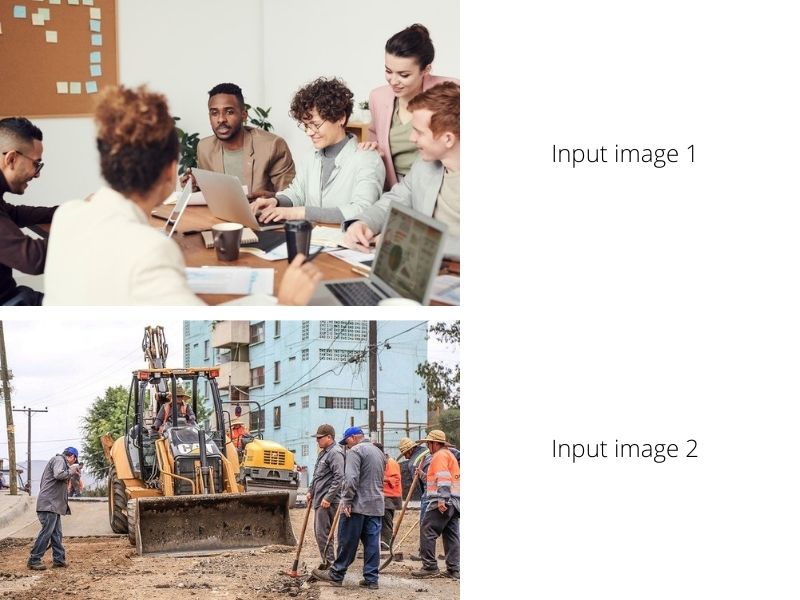
The following figure shows both the input images that we will use in this post.
You can download the source code and input files for this post by clicking on the following button.
Object Detection using SSD300 with VGG16 Backbone
Let’s start with the coding part of this post. We will carry out object detection in images and videos.
The COCO Instance Category Names
We need the instance category names to put the class names on top of the detected objects as labels. For that, we will just create a simple list that contains all the names.
This code will go into the coco_names.py Python file.
COCO_INSTANCE_CATEGORY_NAMES = [
    '__background__', 'person', 'bicycle', 'car', 'motorcycle', 'airplane', 'bus',
    'train', 'truck', 'boat', 'traffic light', 'fire hydrant', 'N/A', 'stop sign',
    'parking meter', 'bench', 'bird', 'cat', 'dog', 'horse', 'sheep', 'cow',
    'elephant', 'bear', 'zebra', 'giraffe', 'N/A', 'backpack', 'umbrella', 'N/A', 'N/A',
    'handbag', 'tie', 'suitcase', 'frisbee', 'skis', 'snowboard', 'sports ball',
    'kite', 'baseball bat', 'baseball glove', 'skateboard', 'surfboard', 'tennis racket',
    'bottle', 'N/A', 'wine glass', 'cup', 'fork', 'knife', 'spoon', 'bowl',
    'banana', 'apple', 'sandwich', 'orange', 'broccoli', 'carrot', 'hot dog', 'pizza',
    'donut', 'cake', 'chair', 'couch', 'potted plant', 'bed', 'N/A', 'dining table',
    'N/A', 'N/A', 'toilet', 'N/A', 'tv', 'laptop', 'mouse', 'remote', 'keyboard', 'cell phone',
    'microwave', 'oven', 'toaster', 'sink', 'refrigerator', 'N/A', 'book',
    'clock', 'vase', 'scissors', 'teddy bear', 'hair drier', 'toothbrush'
]
This is just a simple list that we can import in whichever Python script required.
Utility Functions for Object Detection
For making out the process of object detection a bit easier, we will write a few utility functions and code.
Let’s get into the details straight away. We will write all the utility and helper code in detect_utils.py file.
Let’s start with importing the required modules.
import torchvision.transforms as transforms
import cv2
import numpy as np

from coco_names import COCO_INSTANCE_CATEGORY_NAMES as coco_names
With some of the standard imports, we are importing the COCO instance category names as coco_names. We will use this in one of the functions later on.
Now, take a look at the following code block.
# this will help us create a different color for each class
COLORS = np.random.uniform(0, 255, size=(len(coco_names), 3))

# define the torchvision image transforms
transform = transforms.Compose([
    transforms.ToTensor(),
])
The COLORS is a NumPy array that will generate random tuples of size 3 for each of the classes. This will help us draw the bounding boxes for each detected class with a different color using OpenCV to help them distinguish easily.
Then on line 10 we define the transform to convert the input image to a Tensor.
Helper Function to Predict and Return Outputs
We will write a simple helper function to predict the outputs by forward propagating the image through the neural network. This is will also return the valid bounding boxes based on a threshold value that we will provide while executing the program.
def predict(image, model, device, detection_threshold):
    """
    Predict the output of an image after forward pass through
    the model and return the bounding boxes, class names, and
    class labels.
    """
    # transform the image to tensor
    image = transform(image).to(device)
    # add a batch dimension
    image = image.unsqueeze(0)
    # get the predictions on the image
    outputs = model(image)

    # get all the predicited class names
    pred_classes = [coco_names[i] for i in outputs[0]['labels'].cpu().numpy()]

    # get score for all the predicted objects
    pred_scores = outputs[0]['scores'].detach().cpu().numpy()

    # get all the predicted bounding boxes
    pred_bboxes = outputs[0]['boxes'].detach().cpu().numpy()
    # get boxes above the threshold score
    boxes = pred_bboxes[pred_scores >= detection_threshold].astype(np.int32)

    return boxes, pred_classes, outputs[0]['labels']
Lines 20 and 22, apply the transform and a batch dimension to the image respectively. Line 24 gets the predictions by making a forward of the image through the network.
On line 27, ped_classes stores all the class names from COCO classes according to the label number from outputs. pred_scores stores all the prediction scores. On line 33, pred_bboxes stores all the bounding boxes irrespective of the threshold and output score. Line 35, filters all the bounding boxes according to the threshold we provide and stores them in boxes. It drops any boxes that have a score below the provided confidence threshold.
Then we return the boxes, the pred_classes, and the output label numbers (outputs[0]['labels']).
Helper Function to Draw the Bounding Boxes
This is going to a simple function just to draw the bounding boxes around the detected objects.
def draw_boxes(boxes, classes, labels, image):
    """
    Draws the bounding box around a detected object.
    """
    image = cv2.cvtColor(np.asarray(image), cv2.COLOR_BGR2RGB)
    for i, box in enumerate(boxes):
        color = COLORS[labels[i]]
        cv2.rectangle(
            image,
            (int(box[0]), int(box[1])),
            (int(box[2]), int(box[3])),
            color, 2
        )
        cv2.putText(image, classes[i], (int(box[0]), int(box[1]-5)),
                    cv2.FONT_HERSHEY_SIMPLEX, 0.8, color, 2,
                    lineType=cv2.LINE_AA)
    return image
The draw_boxes() function accepts the bounding boxes, class names, label numbers, and the original image as the input parameters.
For each of the bounding boxes:
- We get a
colortuple according to the label number. - Then we draw the bounding box around the object and put the class name text on top of the bounding box (lines 45 to 53).
- And then simply return the resulting image with all the annotations.
This completes all the utility and helper code we need.
Object Detection in Images using SSD300 and VGG16 Backbone
Here, we are going to write the code to detect objects in images. This is going to be as easy as reading the image and calling the functions from the detect_utils module as most of the things is already handled by the utility functions.
We will write this code in the detect_image.py script.
Let’s start with importing the required modules and libraries and constructing the argument parser.
import torchvision
import torch
import argparse
import cv2
import detect_utils

from PIL import Image

# construct the argument parser
parser = argparse.ArgumentParser()
parser.add_argument('-i', '--input', default='input/image_1.jpg',
                    help='path to input input image')
parser.add_argument('-t', '--threshold', default=0.5, type=float,
                    help='detection threshold')
args = vars(parser.parse_args())
With all the standard library specific modules, we also import our own detect_utils module.
The argument parser defines two flags:
--inputfor the path to the input image.--thresholdto define the detection confidence threshold below which all the detections will be dropped.
Define the Computation Device and Initialize the Model
The following block of code defines the computation device and initializes the SSD300 model with the VGG16 backbone.
# define the computation device
device = torch.device('cuda' if torch.cuda.is_available() else 'cpu')

# load the model
model = torchvision.models.detection.ssd300_vgg16(pretrained=True)
# load the model on to the computation device
model.eval().to(device)
The device will either be the Nvidia GPU, if one is available in the system, or else the CPU.
Then we are loading the pre-trained SSD300 model and switching it to eval() mode.
Read the Image and Predict Objects
Let’s now read the image and carry out object detection.
# read the image
image = Image.open(args['input'])
# detect outputs
boxes, classes, labels = detect_utils.predict(image, model, device, args['threshold'])
# draw bounding boxes
image = detect_utils.draw_boxes(boxes, classes, labels, image)
save_name = f"{args['input'].split('/')[-1].split('.')[0]}_{''.join(str(args['threshold']).split('.'))}"
cv2.imshow('Image', image)
cv2.imwrite(f"outputs/{save_name}.jpg", image)
cv2.waitKey(0)
- Line 26, predicts the objects in the image which returns the bounding box coordinates, class names and label numbers. And line 28 draws the bounding boxes around the objects.
- The
save_nameis the file name with which the resulting image will be saved to disk. It also contains the threshold information at the end. - Finally, we show the image and write the image to disk.
We have completed the code for object detection in images. Let’s execute the code to detect objects.
Execute detect_image.py to Detect Objects in Images
We will try two images from the input folder. Starting with the first image.
Inside the current working directory (where all the scripts are present), open your terminal/command line and execute the following command.
python detect_image.py --input input/image_1.jpg -t 0.5
We are using a confidence threshold value of 0.5

We can see that five persons along with two laptops in the image are detected. But one person and one laptop are not detected. Perhaps because they are only partially visible. Also, the cup is not detected. Now, the SSD300 model is made for faster detection and trading accuracy in return. So, maybe reducing the threshold will help.
python detect_image.py --input input/image_1.jpg -t 0.2

With a threshold of 0.2, the model is now able to detect all the persons and the cup as well. But it is still missing out on the partially occluded laptop.
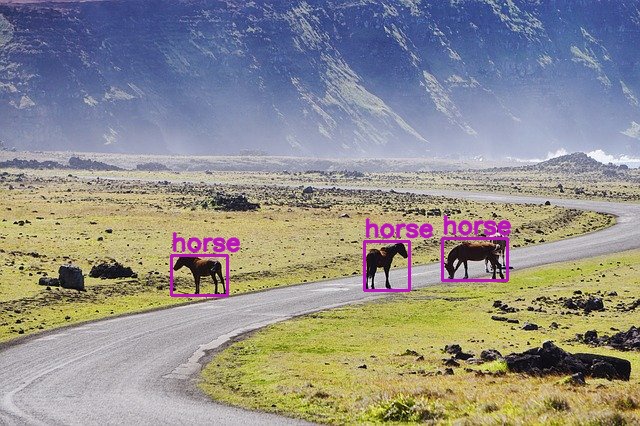
Trying out the second image.
python detect_image.py --input input/image_2.jpg -t 0.5
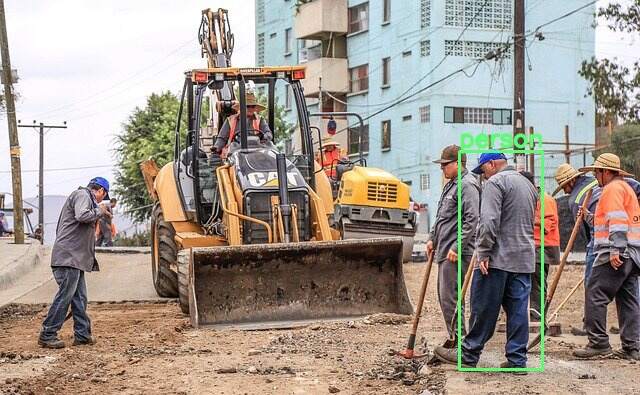
This time only one person was detected. The model is finding it difficult to detect all the persons, maybe because most of them are facing backward.
Let’s try by reducing the threshold to 0.3
python detect_image.py --input input/image_2.jpg -t 0.3
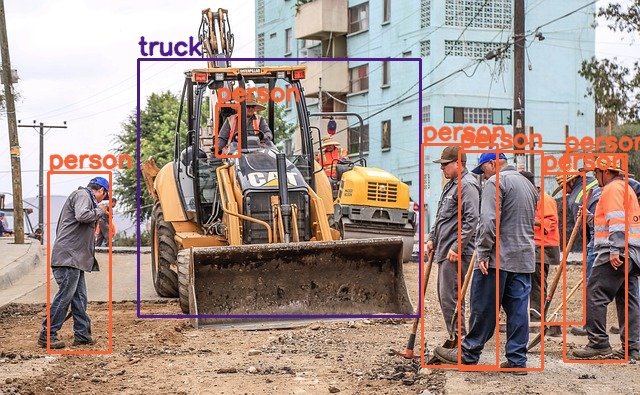
Now, all the persons on the ground are detected but the bounding boxes for the person on the bulldozer are wrong. Also, the bulldozer is detected as a truck. This is acceptable as COCO does not contain a bulldozer class and it looks a lot like a truck.
Object Detection in Videos using SSD300 and VGG16 Backbone
In this section, we will detect objects in videos.
All the code that we will write here will go into the detect_video.py script.
Starting from the import statements, till the initialization of the model, the code will remain the same as was in the previous section.
import torchvision
import cv2
import torch
import argparse
import time
import detect_utils

# construct the argument parser
parser = argparse.ArgumentParser()
parser.add_argument('-i', '--input', default='input/video_1.mp4',
                    help='path to input video')
parser.add_argument('-t', '--threshold', default=0.5, type=float,
                    help='detection threshold')
args = vars(parser.parse_args())

# define the computation device
device = torch.device('cuda' if torch.cuda.is_available() else 'cpu')

# load the model
model = torchvision.models.detection.ssd300_vgg16(pretrained=True)
# load the model onto the computation device
model = model.eval().to(device)
This time, the --input flag will accept the path to a video file instead of an image file.
Reading the Video and Preliminary Set Up
The following code block reads the file and defines a few variables needed for proper execution of the code.
cap = cv2.VideoCapture(args['input'])

if (cap.isOpened() == False):
    print('Error while trying to read video. Please check path again')

# get the frame width and height
frame_width = int(cap.get(3))
frame_height = int(cap.get(4))

save_name = f"{args['input'].split('/')[-1].split('.')[0]}_{''.join(str(args['threshold']).split('.'))}"
# define codec and create VideoWriter object
out = cv2.VideoWriter(f"outputs/{save_name}.mp4",
                      cv2.VideoWriter_fourcc(*'mp4v'), 30,
                      (frame_width, frame_height))

frame_count = 0 # to count total frames
total_fps = 0 # to get the final frames per second
We are capturing the video frames’ width and height at lines 29 and 30. We are using this information while creating the VideoWriter() object at line 34. The save_name variable is a string holding the file name with which the output video will be saved to disk.
The frame_count variable will keep track of the total number of frames looped through. And the total_fps will keep adding the current frame’s FPS (Frames Per Second) to give the total FPS value at the end.
Looping Through the Frames and Detecting the Objects
For detecting the objects, we can simply loop through each of the frames in the video and treat each frame as an image. First, let’s write the code for that.
# read until end of video
while(cap.isOpened()):
    # capture each frame of the video
    ret, frame = cap.read()
    if ret == True:
        # get the start time
        start_time = time.time()
        with torch.no_grad():
            # get predictions for the current frame
            boxes, classes, labels = detect_utils.predict(frame, model, device, args['threshold'])

        # draw boxes and show current frame on screen
        image = detect_utils.draw_boxes(boxes, classes, labels, frame)

        # get the end time
        end_time = time.time()
        # get the fps
        fps = 1 / (end_time - start_time)
        # add fps to total fps
        total_fps += fps
        # increment frame count
        frame_count += 1
        # write the FPS on the current frame
        cv2.putText(image, f"{fps:.3f} FPS", (15, 30), cv2.FONT_HERSHEY_SIMPLEX,
                    1, (0, 255, 0), 2)
        # convert from BGR to RGB color format
        image = cv2.cvtColor(image, cv2.COLOR_BGR2RGB)
        cv2.imshow('image', image)
        out.write(image)
        # press `q` to exit
        if cv2.waitKey(1) & 0xFF == ord('q'):
            break

    else:
        break

# release VideoCapture()
cap.release()
# close all frames and video windows
cv2.destroyAllWindows()

# calculate and print the average FPS
avg_fps = total_fps / frame_count
print(f"Average FPS: {avg_fps:.3f}")
For each valid frame, first, we are predicting the outputs on line 49. Line 52 draws the bounding boxes around each of the detected objects that we want to show. Then we are doing some simple post-processing. This includes calculating the current frame’s FPS, adding to the total_fps, and incrementing the frame_count.
After putting the FPS text on the current frame, we are showing the result on the screen and saving it to disk as well. From line 77, we are releasing the VideoCapture() object, destroying all OpenCV windows and printing the average FPS on the terminal window.
With this, we have completed the code for object detection in videos as well.
Execute detect_video.py to Detect Objects in Videos
There is just one video inside the input folder to test. Let’s try to detect objects in this video with a confidence threshold of 0.3.
python detect_video.py -t 0.3
Average FPS: 22.110
On a machine with GTX 1060 GPU, the SSD300 with VGG16 backbone model is able to run at almost 22 FPS on average. Pretty decent actually. The following video shows the detections.
The detections are really good. The model is able to detect the bicycles, the motorcycles, persons, and the truck. It is even able to detect a person at the far back in a few frames.
I hope that you try this experiment with new images and videos and share your experience in the comments section.
Summary and Conclusion
In this article, we went through using the SSD300 model with VGG16 backbone to detect objects in images and videos. We used the Torchvision module from PyTorch. I hope that you learned something new from this article.
If you have any doubts, thoughts, or suggestions, then please leave them in the comment section. I will surely address them.
You can contact me using the Contact section. You can also find me on LinkedIn, and X.

3 thoughts on “SSD300 VGG16 Backbone Object Detection with PyTorch and Torchvision”