
In this tutorial, we will be using an SSD300 (Single Shot Detector) deep learning object detector along with the PyTorch framework for object detection. In short, we will be carrying out object detection using PyTorch and SSD deep learning model. And the SSD object detector that we will use has a VGG16 backbone.
First of all, why this tutorial?
I get many emails and messages for covering tutorials on object detection and deep learning. Many of the readers also request to write tutorials involving YOLO and SSD deep learning object detectors. But writing such an article will have to be multi-part and will have to be managed properly from one post to the other. Therefore I thought, let’s start a bit small. Let’s use a pre-trained deep learning object detector that is open source and fully fine-tunable on custom dataset. But instead of training, let’s first go through the pre-trained model’s inference capabilities by detecting objects in images and videos.
And that is exactly what we will be doing in this tutorial.
What Will We be Learning in this Article?
In this section, we will go into a bit more detail about all the things that we will learn in this tutorial.
- First of all, we will not train our own SSD deep learning object detector. We will also not go into the theoretical details of the SSD object detector.
- We will an open-source SSD300 with a VGG16 backbone model from GitHub. This model has been trained on the PASCAL VOC dataset.
- The above project is by sgrvinod and it is one of the best open-source implementations of SSD300 that I have seen. I have used it to learn many things and train many of my own models on custom datasets. He has a lot of other projects as well. Be sure to take a look if you are interested.
- Moreover, he has covered the theory of single-shot detection in great detail in the repository. I hope that I will be able to do the same for many object detection models soon so that the readers can learn even in greater depth.
- We will clone that repository onto our systems. Then we will make the necessary changes. And finally, we will write our own scripts to detect objects in images and videos.
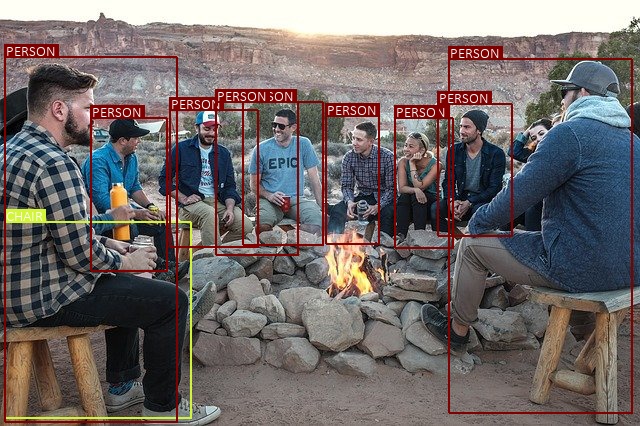
Figure 1 shows an example of how well the SSD300 model from the above repository performs. It is able to detect all the humans in the photo and also one of the chairs. I hope that you are interested to move forward with the tutorial.
And yes, if you find the GitHub repository useful, try to show your support by starring it. With that, let’s get into object detection using PyTorch and SSD300.
Setting Up Our Systems
Let’s begin with setting up our systems to run the code for this deep learning object detection flawlessly.
By now, you must have guessed some of the mandatory library and frameworks that you need. Still, we will go over them once.
The PyTorch Deep Learning Framework
According to the GitHub repository, the model has been coded and trained using PyTorch 0.4. But I tested everything using PyTorch 1.6 and most of the things worked fine. So, all in all, you can just install the latest version of PyTorch from here. Or maybe you can even use any version that you have if it is higher or equal to version 0.4
There are some minor changes we have to make in the code after cloning it. 3 lines of code to be very precise. We will get to that a bit later.
Computer Vision Libraries
There are two important computer vision libraries that we will need. One is OpenCV and the other is PIL (Python Imaging Library). Go ahead and install them if you have not already.
Note: Sometimes I face some issues with the current version of OpenCV Python, that is version 4.4.0.46. I find that version 4.2.0.32 works perfectly fine. So, it is better if you install that version as well. This will ensure a smooth follow-through of the tutorial.
Cloning the SSD300 Repository
Now, we will clone the a-PyTorch-Tutorial-to-Object-Detection repository on to our systems. First of all, make a new folder where you will clone the repository. This will also be your parent folder for this tutorial. Now, clone the repository.
You should see the cloned repository as a-PyTorch-Tutorial-to-Object-Detection. Enter into that directory and we will carry each and every operation in this directory only.
You must be seeing numerous Python files already. But we will not have to go in detail into these. Still, first of all we need to make some changes in the existing code.
Changing a Few Lines in model.py Script
We need to make some minor yet important changes in the model.py script. Open up the script in your file editor / IDE of your choice.
Now, scroll all the way down to line 494. You will find the following line of code there. First, we need to comment out this line of code.
suppress = torch.max(suppress, overlap[box] > max_overlap)
After that, add the following three lines of code below.
condition = overlap[box] > max_overlap
condition = torch.tensor(condition, dtype=torch.uint8).to(device)
suppress = torch.max(suppress, condition)
All in all, starting from line 494, model.py should look something like this.
# COMMENT OUT THE FOLLOWING LINE
# suppress = torch.max(suppress, overlap[box] > max_overlap)
# ADD THE FOLLOWING THREE LINES
condition = overlap[box] > max_overlap
condition = torch.tensor(condition, dtype=torch.uint8).to(device)
suppress = torch.max(suppress, condition)
You might be thinking, what do these lines of code do? Simply speaking, the answer is in the comments above line 494. These lines of code will suppress the boxes whose overlaps with the box are greater then the maximum overlap. That’s it. We have made that changes to avoid some erroneous issues based on the PyTorch version. Now, we can happily move forward with the tutorial.
The Directory Structure
There are already a lot of files and folders inside the cloned repository folder. But before moving ahead into object detection in images and videos, we need to make a few more folders.
Make the following three folders inside the cloned repository.
input: This folder will contain all the input images and videos in which we will detect the objects using the SSD300 deep learning object detector,outputs: Theoutputsfolder will contain the resulting images and videos that we will save after detecting the objects in them.checkpoints: This folder will contain the pre-trained SSD300 VGG16 model that we will download shortly. This model has already been trained on the PASCAL VOC dataset. Thanks again to sgrvinod for providing such a valuable repository.
You final directory structure should look something like the following.
│   create_data_lists.py
│   datasets.py
│   detect.py
│   detect_image.py
│   detect_vid.py
│   eval.py
│   LICENSE
│   model.py
│   README.md
│   train.py
│   utils.py
│
├───checkpoints
│       checkpoint_ssd300.pth.tar
│
├───img
│
├───input
│
├───outputs
I have highlighted all the folders that we need to create. We also need two new Python scripts. One is detect_image.py and the other one is detect_vid.py. For now, just create these two scripts. We will get into the details while writing the code for these.
Download the Pre-Trained Weights
Before moving further, we need the pre-trained weights. You can find the link to download those in the GitHub repository. I am also providing the link here.
After downloading the weights, copy them into the checkpoints folder as per the above directory structure.
The Input Data
You can use any images and videos of your choice for object detection using SSD300. However, if you want to use the same input data as this tutorial, then you can download them from below.
After downloading the input zip file, extract the contents inside the input folder. All these images and videos have been taken from Pixabay.
This is the complete setup that we need for carrying out object detection with SSD300 with the VGG16 backbone. We can now move forward to write our own scripts. These Python scripts will help us to carry out object detection in images and videos using the SSD300 deep learning model.
Object Detection using PyTorch and SSD300 with VGG16 Backbone
Before we start to write our own code, be sure to take a look at the detect.py code file that is already in the repository. It is a very well written code. Using that code file, we can detect objects in images using the trained SSD300 deep learning model.
But we will be writing our scripts for object detection in images and videos. The best part is we can reuse most of the code already present in the detect.py file. We will make some minor yet important changes that will make our work a bit easier. Even if we reuse the code, still, we will go over the code in detail for better understanding.
So, let’s start.
Object Detection using PyTorch and SSD300 in Images
First, we will write the code for detecting objects in images. Then we will move ahead with the video one.
All of the code in this section will go into the detect_image.py file that you have created before.
Let’s start with importing all the required modules and libraries.
from torchvision import transforms
from utils import *
from PIL import Image, ImageDraw, ImageFont

import argparse
import cv2
import numpy as np
The utils script that we import is already present in the repository and contains some really important code. Along with that, we are importing many draw functions from PIL. These will help us to draw the bounding boxes around the detected objects and also put the text for the class above the image.
Construct the Argument Parser and Load the Model Checkpoint
Here, we will construct the argument parser to parse the command line arguments. Along with that we will also set the computation device and load the trained model checkpoint as well.
The following code block builds the argument parser.
parser = argparse.ArgumentParser()
parser.add_argument(
    '-i', '--input', required=True, help='path to input image'
)
parser.add_argument(
    '-t', '--threshold', default=0.45, type=float,
    help='minimum confidence score to consider a prediction'
)
args = vars(parser.parse_args())
We have two flags here.
- Starting from line 9, we have the
--inputflag that takes the path to the input image. - And starting from line 12, we have the
--thresholdflag. This is the minimum confidence threshold below which all the detections will be ignored. We have set it to a default value of 0.45.
Coming to the computation device. It is better to have a GPU for this tutorial. Although for image detection, it won’t matter much, still having a GPU for object detection in videos makes a lot of difference. But as it is an SSD300 model, most probably, you can even run this on a CPU. Do try running the code even if you do not have a GPU.
The next code block sets up the computation device and loads the trained model checkpoint for the SSD300 object detector as well.
# set the computation device
device = torch.device('cuda' if torch.cuda.is_available() else 'cpu')

# Load model checkpoint
checkpoint = 'checkpoints/checkpoint_ssd300.pth.tar'
checkpoint = torch.load(checkpoint)
start_epoch = checkpoint['epoch'] + 1
print('\nLoaded checkpoint from epoch %d.\n' % start_epoch)
model = checkpoint['model']
model = model.to(device)
model.eval()
The trained checkpoint that we load has been trained for 232 epochs. After loading the checkpoint, we are extracting the trained weights at line 25. At line 26, we are moving the model to the computation device and then setting it to evaluation mode.
Define the Image Transforms
Keep in mind that the VGG16 backbone has been trained on the ImageNet dataset. Therefore, we have to provide the mean and standard deviation in consideration of that.
# Transforms
resize = transforms.Resize((300, 300))
to_tensor = transforms.ToTensor()
normalize = transforms.Normalize(mean=[0.485, 0.456, 0.406],
                                 std=[0.229, 0.224, 0.225])
Note that we are also resizing the image to 300×300 dimensions as we will be giving these as inputs to an SSD300 object detector.
The Detection Function
The detection function code that we will be using here has already been written. We will reuse that code and I will try my best to explain everything in detail.
I am including the whole detection function in the next code block. Then we will get into the explanation part.
def detect(original_image, min_score, max_overlap, top_k, suppress=None):
    """
    Detect objects in an image with a trained SSD300, and visualize the results.

    :param original_image: image, a PIL Image
    :param min_score: minimum threshold for a detected box to be considered a match for a certain class
    :param max_overlap: maximum overlap two boxes can have so that the one with the lower score is not suppressed via Non-Maximum Suppression (NMS)
    :param top_k: if there are a lot of resulting detection across all classes, keep only the top 'k'
    :param suppress: classes that you know for sure cannot be in the image or you do not want in the image, a list
    :return: annotated image, a PIL Image
    """

    # Transform
    image = normalize(to_tensor(resize(original_image)))

    # Move to default device
    image = image.to(device)

    # Forward prop.
    predicted_locs, predicted_scores = model(image.unsqueeze(0))

    # Detect objects in SSD output
    det_boxes, det_labels, det_scores = model.detect_objects(predicted_locs, predicted_scores, min_score=min_score,
                                                             max_overlap=max_overlap, top_k=top_k)

    # Move detections to the CPU
    det_boxes = det_boxes[0].to('cpu')

    # Transform to original image dimensions
    original_dims = torch.FloatTensor(
        [original_image.width, original_image.height, original_image.width, original_image.height]).unsqueeze(0)
    det_boxes = det_boxes * original_dims

    # Decode class integer labels
    det_labels = [rev_label_map[l] for l in det_labels[0].to('cpu').tolist()]

    # If no objects found, the detected labels will be set to ['0.'], i.e. ['background'] in SSD300.detect_objects() in model.py
    if det_labels == ['background']:
        # Just return original image
        return original_image

    # Annotate
    annotated_image = original_image
    draw = ImageDraw.Draw(annotated_image)
    font = ImageFont.truetype("./calibril.ttf", 15)

    # Suppress specific classes, if needed
    for i in range(det_boxes.size(0)):
        if suppress is not None:
            if det_labels[i] in suppress:
                continue

        # Boxes
        box_location = det_boxes[i].tolist()
        draw.rectangle(xy=box_location, outline=label_color_map[det_labels[i]])
        draw.rectangle(xy=[l + 1. for l in box_location], outline=label_color_map[
            det_labels[i]])

        # Text
        text_size = font.getsize(det_labels[i].upper())
        text_location = [box_location[0] + 2., box_location[1] - text_size[1]]
        textbox_location = [box_location[0], box_location[1] - text_size[1], box_location[0] + text_size[0] + 4.,
                            box_location[1]]
        draw.rectangle(xy=textbox_location, fill=label_color_map[det_labels[i]])
        draw.text(xy=text_location, text=det_labels[i].upper(), fill='white',
                  font=font)
    del draw

    return annotated_image
Explanation of the Detection Function
The detect() function accepts 4 required parameters.
- The first one is the original image on which the object detection will happen.
- Then we have the
min_scorebelow which all the detections will be ignored. max_overlapis used to indicate whether a bounding box with a lower score will be dropped using NMS (Non-Max Suppression) or not. This case will only arise if two boxes are overlapping.- Then we have the
top_kparameter which defines the number of predictions that we will consider out of all the predictions. - Finally, we have the
suppressparameter that suppresses the classes that we do not want in an image. By default, it isNone.
Starting from line 46, first, we apply all the image transforms. Then we move the image to the computation device. At line 52, we propagate the image through the model and get the predicted locations and predicted scores. Now, we need to keep in mind that the SSD object detector returns 8732 predicted locations by default. Out of those we have to choose our top predictions.
Line 55 calls the detect_objects() function of model. This returns us the proper detected boxes, the labels, and the corresponding scores. All of this happen in accordance to the minimum threshold score, the maximum overlap, and the top predictions that we want.
Lines 62 to 64 convert the normalized bounding box coordinates into the dimensions corresponding to the dimensions of the original input. This is important for proper visualization.
Then line 67 gets all the class names by mapping the output labels to rev_label_map in the utils script. If no objects are detected, then we just return the original image at line 72.
From line 75 to 77, we set up all the drawing and font settings. Lines 80 to 83 suppresses the specific classes if suppress parameter is not empty and the class names are provided.
In the remaining of the code, we draw the bounding boxes around the objects and put the class label text on top of each detection. Finally, we return the image with all the detections at line 101.
That is all we need for the detection function.
Reading the Image and Showing the Results
Now, we just need to write the code to read the image and show the objects in it.
This is going to be a very short code block and easy as well, as we have written most of the code by now.
if __name__ == '__main__':
    img_path = args['input']
    # read as PIL image
    original_image = Image.open(img_path, mode='r')
    # conver to RGB color format
    original_image = original_image.convert('RGB')
    # get the output as PIL image
    pil_image_out = detect(original_image, min_score=args['threshold'], max_overlap=0.5, top_k=200)
    # conver to NumPy array format
    result_np = np.array(pil_image_out, dtype=np.uint8)
    # convert frm RGB to BGR format for OpenCV visualizations
    result_np = cv2.cvtColor(result_np, cv2.COLOR_RGB2BGR)

    # show the image with detected objects on screen
    cv2.imshow('Result', result_np)
    cv2.waitKey(0)

    # save the image to disk
    save_name = args['input'].split('/')[-1]
    cv2.imwrite(f"outputs/{save_name}", result_np)
- First, we are reading the image in PIL image format and converting the image into RGB color format.
- At line 109, we get the output image with all the detections. We call the
detect()function for this. We provide the image, the threshold score, the maximum overlap, and the total number of top predictions we want as arguments. The output image is in PIL image format as well. - Line 111 converts the output image into NumPy array format. And line 113 converts the image into BGR color format for OpenCV functions.
- After that, we just visualize the image on the screen. Finally, we define a
save_imagevariable by editing the input path of the image. We use this name to save the resulting image with all the detections to the disk.
By now, we have completed all the code that we need to detect objects in images using SSD300 object detector with VGG16 backbone. Let’s execute the code and test on a few images.
Execute detect_image.py to Detect Objects in Images
Open your command line/terminal in the working directory. We can start with detecting the objects in image1.jpg in the input folder. Type the following command.
python detect_image.py --input input/image1.jpg
You might see some warnings on your screen. But you can safely ignore those. The following is the output that you should be getting.
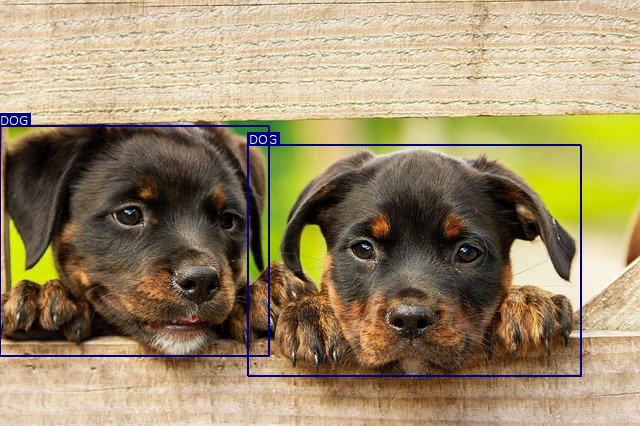
It was an easy one. The SSD300 object detection model is easily able to detect the two dogs.
Let’s throw a bit more challenging one at the deep learning model now.
python detect_image.py --input input/image2.jpg
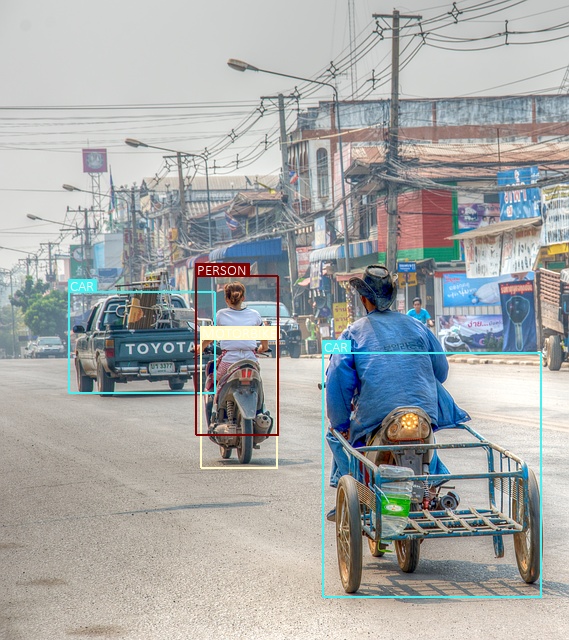
In this one, the SSD300 object detector is not performing that well. It is able to detect the car at the far back and the woman alright. It is also detecting the scooter as motorcycle which is somewhat acceptable. This is because the PASCAL VOC does not contain a scooter class. For the same reason, it is detecting the vehicle of the man as a car, which is obviously not a car. But it is failing to detect the man altogether which is somewhat astonishing. Maybe decreasing the threshold value a bit from the default 0.45 will rectify that. You can try that and see what results you are getting. Most probably, you will also start to get multiple detections for the same object as well.
We will now move on to object detection using SSD300 model on videos.
Object Detection using PyTorch and SSD300 in Videos
From this section onward, we will write the code to detect objects in videos using the SSD300 object detector.
The best part is almost all of the code will remain same. The only thing that we need to add is reading the video input, looping over the frames, and detecting the objects in each frame.
All of this code will go into the detect_vid.py Python file.
Starting from the importing lines till the end of the detect() function, all of the code is the same as the object detection in images. Therefore, I am going to include all of that code in the following code block.
from torchvision import transforms
from utils import *
from PIL import Image, ImageDraw, ImageFont

import argparse
import time
import cv2
import numpy as np

parser = argparse.ArgumentParser()
parser.add_argument(
    '-i', '--input', required=True, help='path to input video'
)
parser.add_argument(
    '-t', '--threshold', default=0.45, type=float,
    help='minimum confidence score to consider a prediction'
)
args = vars(parser.parse_args())

# set the computation device
device = torch.device('cuda' if torch.cuda.is_available() else 'cpu')

# Load model checkpoint
checkpoint = 'checkpoints/checkpoint_ssd300.pth.tar'
checkpoint = torch.load(checkpoint)
start_epoch = checkpoint['epoch'] + 1
print('\nLoaded checkpoint from epoch %d.\n' % start_epoch)
model = checkpoint['model']
model = model.to(device)
model.eval()

# Transforms
resize = transforms.Resize((300, 300))
to_tensor = transforms.ToTensor()
normalize = transforms.Normalize(mean=[0.485, 0.456, 0.406],
                                 std=[0.229, 0.224, 0.225])


def detect(original_image, min_score, max_overlap, top_k, suppress=None):
    """
    Detect objects in an image with a trained SSD300, and visualize the results.

    :param original_image: image, a PIL Image
    :param min_score: minimum threshold for a detected box to be considered a match for a certain class
    :param max_overlap: maximum overlap two boxes can have so that the one with the lower score is not suppressed via Non-Maximum Suppression (NMS)
    :param top_k: if there are a lot of resulting detection across all classes, keep only the top 'k'
    :param suppress: classes that you know for sure cannot be in the image or you do not want in the image, a list
    :return: annotated image, a PIL Image
    """

    # Transform
    image = normalize(to_tensor(resize(original_image)))

    # Move to default device
    image = image.to(device)

    # Forward prop.
    predicted_locs, predicted_scores = model(image.unsqueeze(0))

    # Detect objects in SSD output
    det_boxes, det_labels, det_scores = model.detect_objects(predicted_locs, predicted_scores, min_score=min_score,
                                                             max_overlap=max_overlap, top_k=top_k)

    # Move detections to the CPU
    det_boxes = det_boxes[0].to('cpu')

    # Transform to original image dimensions
    original_dims = torch.FloatTensor(
        [original_image.width, original_image.height, original_image.width, original_image.height]).unsqueeze(0)
    det_boxes = det_boxes * original_dims

    # Decode class integer labels
    det_labels = [rev_label_map[l] for l in det_labels[0].to('cpu').tolist()]

    # If no objects found, the detected labels will be set to ['0.'], i.e. ['background'] in SSD300.detect_objects() in model.py
    if det_labels == ['background']:
        # Just return original image
        return original_image

    # Annotate
    annotated_image = original_image
    draw = ImageDraw.Draw(annotated_image)
    font = ImageFont.truetype("./calibril.ttf", 15)

    # Suppress specific classes, if needed
    for i in range(det_boxes.size(0)):
        if suppress is not None:
            if det_labels[i] in suppress:
                continue

        # Boxes
        box_location = det_boxes[i].tolist()
        draw.rectangle(xy=box_location, outline=label_color_map[det_labels[i]])
        draw.rectangle(xy=[l + 1. for l in box_location], outline=label_color_map[
            det_labels[i]])

        # Text
        text_size = font.getsize(det_labels[i].upper())
        text_location = [box_location[0] + 2., box_location[1] - text_size[1]]
        textbox_location = [box_location[0], box_location[1] - text_size[1], box_location[0] + text_size[0] + 4.,
                            box_location[1]]
        draw.rectangle(xy=textbox_location, fill=label_color_map[det_labels[i]])
        draw.text(xy=text_location, text=det_labels[i].upper(), fill='white',
                  font=font)
    del draw

    return annotated_image
The above code is exactly the same as what we saw for the object detection in images.
Looping Over Video Frames and Detecting Objects in Them
The main concepts lie in looping over the video frames and detecting the objects in each of the frames.
I am writing the whole loop in the following code block for the sake of continuity of code. After the code, we will get into the explanation part.
if __name__ == '__main__':
    cap = cv2.VideoCapture(args['input'])
    if (cap.isOpened() == False):
        print('Error while trying to read video. Please check path again')

    # get the frame width and height
    frame_width = int(cap.get(3))
    frame_height = int(cap.get(4))

    save_name = f"{args['input'].split('/')[-1].split('.')[0]}"
    # define codec and create VideoWriter object
    out = cv2.VideoWriter(f"outputs/{save_name}.mp4",
                        cv2.VideoWriter_fourcc(*'mp4v'), 20,
                        (frame_width, frame_height))

    frame_count = 0 # to count total frames
    total_fps = 0 # to get the final frames per second

    # read until end of video
    while(cap.isOpened()):
        # capture each frame of the video
        ret, frame = cap.read()
        if ret == True:
            frame = cv2.cvtColor(frame, cv2.COLOR_BGR2RGB)
            pil_image_in = Image.fromarray(frame).convert('RGB')

            # get the start time
            start_time = time.time()

            # get the output as PIL image
            pil_image_out = detect(pil_image_in, min_score=args['threshold'], max_overlap=0.5, top_k=200)

            # get the end time
            end_time = time.time()
            # convert to NumPy array format
            result_np = np.array(pil_image_out, dtype=np.uint8)
            # convert frm RGB to BGR format for OpenCV visualizations
            result_np = cv2.cvtColor(result_np, cv2.COLOR_RGB2BGR)

            # get the FPS
            fps = 1 / (end_time - start_time)
            # add FPS to total FPS
            total_fps += fps
            # increment the frame count
            frame_count += 1

            # press `q` to exit
            wait_time = max(1, int(fps/4))

            # write the FPS on current frame
            cv2.putText(
                result_np, f"{fps:.3f} FPS", (5, 30),
                cv2.FONT_HERSHEY_SIMPLEX, 1.0, (0, 0, 255),
                2
            )
            cv2.imshow('Result', result_np)
            out.write(result_np)
            if cv2.waitKey(wait_time) & 0xFF == ord('q'):
                break
        else:
            break

    # release VideoCapture()
    cap.release()
    # close all frames and video windows
    cv2.destroyAllWindows()

    # calculate and print the average FPS
    avg_fps = total_fps / frame_count
    print(f"Average FPS: {avg_fps:.3f}")
Explanation of the Above Code Block
- First, we read the video file using the command line argument with the OpenCV
VideoCapture()function. - Then we get the frames’ width and height at line 114 and 115.
- At line 117, we define
save_nameusing the input path. Using this name, we will save the resulting video to disk. - Then we define the
VideoWriter()object for the codec and the saving format of the video to disk. - Lines 123 and 124 define
frame_countandtotal_fpsto keep track of the total frames and Frames Per Second (FPS) respectively. - Starting from line 127, we have a
whileloop until there are frames remaining in the video. - Line 131 converts the frame to RGB color format and line 132 converts that into PIL image format.
- We get the detections at line 138 by passing the current frame through the SSD300 object detector model.
- At line 143, we convert the resulting image to NumPy array format and then to BGR color format for OpenCV functions.
- Then we calculate the
fpsfor the current frame and add that to thetotal_fps. We also increment theframe_countby 1. - Starting from line 158, we put the FPS as the text on the current video frame.
- Finally, we show the frame on the screen and save it to disk. Just press the
qkey if you want to exit in-between.
After that, from line 171, we first release OpenCV VideoCapture() objects and then destroy all the frame windows. Then we just print the average FPS on the console/terminal.
We are done with the object detection in video code using the SSD300 object detector.
Now, we can execute and see how good and fast the detection is.
Execute detect_vid.py to Detect Objects in Videos
The execution process is similar to what we did for the images. We need to provide the path to the video file while executing detect_vid.py.
We have two videos in the input folder. Let’s start with the first one.
python detect_vid.py --input input/video1.mp4
On a GTX 1060 GPU, I was getting an average of 19 FPS. The FPS will vary depending on the GPU the model is running on.
Now, we can take a look at the results.
The model is performing well. It is able to detect the humans which are near enough for it to detect. It is also able to detect the bicycle in the frames it is present in. But when the people are too far away, the SSD300 object detector is struggling to detect them. Many new deep learning object detectors do not have this issue. Still, it is able to detect the potted plant at the end of the video which is great.
Let’s run one final test on our SSD300 object detector where many more objects are present in a single frame.
python detect_vid.py --input input/video2.mp4
There many objects present in a single frame here. The detections are good but the FPS took a big hit. This time the average FPS has reduced to 14 FPS. The SSD300 model is able to detect many of the cars, buses, motorbikes, and persons in each of the frames. To be fair, for a detection algorithm that first came out in 2015, it is still performing great. Overall, this particular PyTorch SSD300 object detection model is performing pretty well.
Further Experiments
You can take this small tutorial a bit further.
- You may find all the classes that are present in the PASCAL VOC dataset, find some videos in which those objects are present, and try to run the model for detection.
- The model that we used in this tutorial is highly fine-tunable. Maybe you can take this a bit further and do your own custom object detection project using the SSD300 deep learning object detector.
If you try any of the above points, be sure to post them in the comment section. Many other readers will also benefit from that.
Summary and Conclusion
In this tutorial, we learned how to use a pre-trained PyTorch SSD300 for object detection in images and videos. I hope that you learned something new from this tutorial.
If you have any doubts, thoughts, or suggestions, then please leave them in the comment section. I will be happy to address them.
You can contact me using the Contact section. You can also find me on LinkedIn, and X.

That’s a fantastic tutorial.I tried the whole program. Few observations:
If you are on Ubuntu 20 try using opencv-python==4.1.2.30 .
Also if you are using cpu, try using:
checkpoint = torch.load(checkpoint, map_location=torch.device(‘cpu’))
And font gives you an error. Try using:
font = ImageFont.load_default()
The code shall run smoothly.
First of all, thanks for the appreciation Gaurav. And also a big thank you for your support and observations on Ubuntu. I am sure it will help others.
thanks for this tutorial
Welcome ramma.
I want to use the trained VGG16 model and integrate my own photos, what can I do?
I really appreciate your work.
Can you please give an idea how to use a custom dataset instead of PASCAL VOC dataset for object detection using SSD300.
I am happy that you liked the tutorial.
Currently, I do not have any custom training using SSD300. But you may look at training an SSD300 with VGG11 backbone on the PASCAL VOC 2005 data (https://github.com/sovit-123/SSD300-VGG11-on-Pascal-VOC-2005-Data). Also, I have another project using YOLOv3 – Real Time Traffic Light Detection using YOLOv3 (https://github.com/sovit-123/Traffic-Light-Detection-Using-YOLOv3). I hope these help.
Can you please give me an idea how to use transfer learning for SSD300 with mobilenet v2 as a feature extractor using pytorch
If you have trained with other backbone before, then much of the things should stay the same. Still, you may take a look at his GitHub repo if you want to get started a bit faster => https://github.com/ViswanathaReddyGajjala/SSD_MobileNet
Thanks for your reply, but the thing is that I’m trying to use your above mentioned repo with the dataset you used for YOLO v3((https://github.com/sovit-123/Traffic-Light-Detection-Using-YOLOv3). That’s why facing issues and not getting appropriate results. How to train the model and calculate mean average precision. Thanks for your time
Replying to
“`Huma says:
April 19, 2021 at 8:40 pm (Edit)
Thanks for your reply, but the thing is that I’m trying to use your above mentioned repo with the dataset you used for YOLO v3((https://github.com/sovit-123/Traffic-Light-Detection-Using-YOLOv3). That’s why facing issues and not getting appropriate results. How to train the model and calculate mean average precision. Thanks for your time
“`
Replying in a new comment as no more reply back is possible in the above comment. I get your problem now. But I don’t think I can help much without looking at the code. Also, the mean average precision code for SSD in that repo most probably won’t work for YOLOv3.
Hi!
I tried to run your code but encounted an error when loading the checkpoints. I get the following error “KeyError: ‘model'” and “KeyError: ‘epochs'” when running the detect_image.py file. I am certain that the checkpoint file is loaded but there are missing keys in the loaded dict. Do you have any idea why these keys are not existing in the checkpoint file?
Thanks in advance! 🙂
/Pelle
Hello Pelle. Sorry to hear that you are facing issues. Can you please make sure that you are downloading the same model to which I have provided the link in this tutorial? I think you might be using a different model which does not contain those keys.
Thanks for the answer! Now the program runs fine. It was my computer that did not download the file completely…
/Pelle
Glad to hear that.
I want to use the trained VGG16 model and integrate my own photos, what can I do?
Hello Onur, are you looking for only classification or detection also?
If its detection as well, then you have to train the SSD head along with the VGG16 backbone.
I know how to retrain with my own photos without outputting the VGG16 model. But I couldn’t find how to do the same for SSD. Here yes, I want both detection and classification.
Here, VGG16 and SSD are not two different models. The VGG16 is the backbone and the SSD is the detection head. You may take a look at this repository. Maybe it will help you to get started.
https://github.com/sovit-123/pytorch-ssd300
Thanks for this great tutorial. After training and obtained the .tar file, how do we get the MAP? I tried running the eval.py by typing “python eval.py” but it shows error. Any advice?
Hello Vincent. Can you let me know the error that you are facing?
hey, i did all the steps correctly but it still give me this error,Traceback (most recent call last):
File “/content/a-PyTorch-Tutorial-to-Object-Detection/detect_image.py”, line 109, in
pil_image_out = detect(original_image, min_score=args[‘threshold’], max_overlap=0.5, top_k=200)
File “/content/a-PyTorch-Tutorial-to-Object-Detection/detect_image.py”, line 77, in detect
font = ImageFont.truetype(“./calibril.ttf”, 15)
File “/usr/local/lib/python3.10/dist-packages/PIL/ImageFont.py”, line 1008, in truetype
return freetype(font)
File “/usr/local/lib/python3.10/dist-packages/PIL/ImageFont.py”, line 1005, in freetype
return FreeTypeFont(font, size, index, encoding, layout_engine)
File “/usr/local/lib/python3.10/dist-packages/PIL/ImageFont.py”, line 255, in __init__
self.font = core.getfont(
OSError: cannot open resource, i use google colab to run the model, what do you think the problem is?
Hello. This is an older post and the repository mentioned here is not longer maintained. I recommend using the following blog post for SSD object detection inference => https://debuggercafe.com/ssd300-vgg16-backbone-object-detection-with-pytorch-and-torchvision/
I hope this helps.
if some of you using conda and followed all the necessary dependencies like the author mention above and still encounter an error. here are the small thing that needs to be rewrite :
(AttributeError: ‘FreeTypeFont’ object has no attribute ‘getsize’)
# Annotate
annotated_image = original_image
draw = ImageDraw.Draw(annotated_image)
font = ImageFont.load_default()
# Text
text = det_labels[i].upper()
text_bbox = font.getbbox(text)
text_size = (text_bbox[2] – text_bbox[0], text_bbox[3] – text_bbox[1])
text_location = [box_location[0] + 2., box_location[1] – text_size[1]]
textbox_location = [box_location[0], box_location[1] – text_size[1], box_location[0] + text_size[0] + 4., box_location[1]]
draw.rectangle(xy=textbox_location, fill=label_color_map[det_labels[i]])
draw.text(xy=text_location, text=text, fill=’white’, font=font)
del draw
return annotated_image
Thanks for the update. I guess the code has become a bit outdated.