
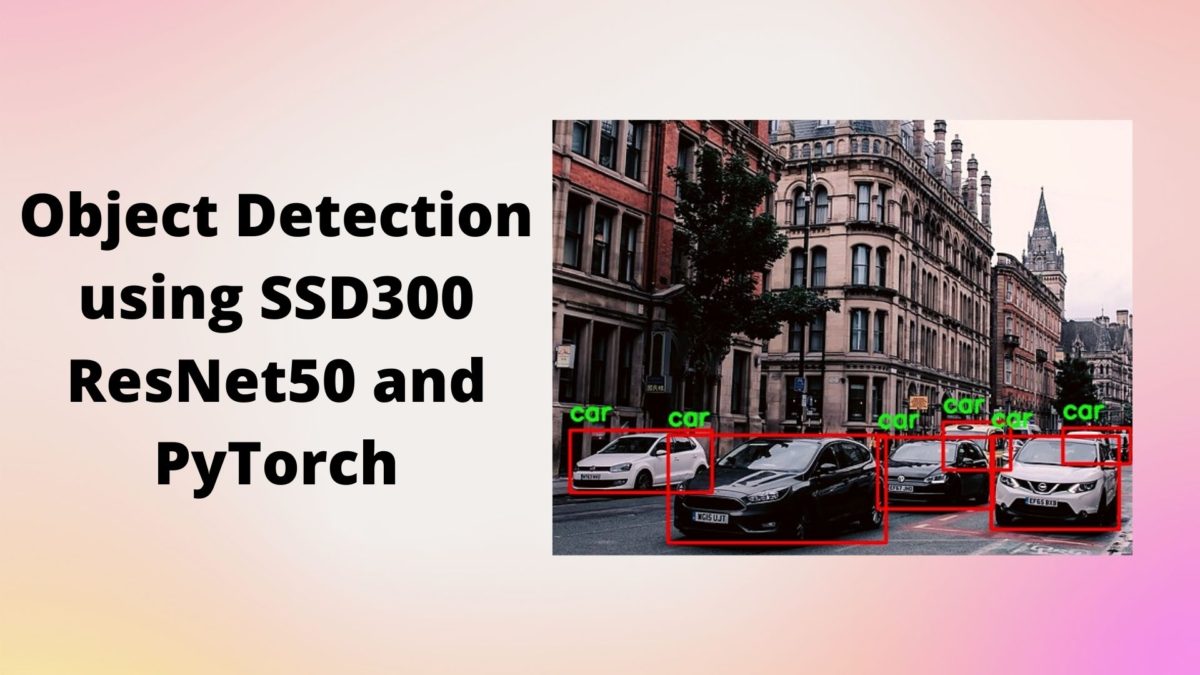
In this week’s tutorial, we will get our hands on object detection using SSD300 ResNet50 and PyTorch. We will use a pre-trained Single Shot Detector with a ResNet50 pre-trained backbone to detect objects in images and videos. We will use the PyTorch deep learning framework for this.
You can even consider this post as an extension of the previous week’s post. In the previous week’s tutorial, we used the same SSD300 model but with the VGG16 backbone. We saw that the detections were really good for such an old backbone deep learning model as VGG16. But in practical deep learning projects, ResNet50 is replacing VGG16 as the neural network backbone of choice. In theory, SSD300 with ResNet50 backbone gives much better predictions than the VGG16 neural network backbone. But we will experience ourselves in this tutorial how true it is.
The SSD300 ResNet50 Model that We Will Use
We will use a pre-trained SSD300 ResNet50 model. This model is available in PyTorch models hub. It has been trained on the COCO vision dataset already. So, it is every bit ready for inference once we load the pre-trained weights into the model. As it has been trained on the COCO dataset, it also gives us the freedom to detect many objects which belong to the 80 classes SSD ResNet50 has been trained to detect.
If you want to explore the detection code a bit, then it also comes with a Colab notebook example. If you wish, you can take a look at it before moving further.
The best part of using the model from PyTorch hub is that it comes with many utilities already which will make our work a bit easier. As most of the benefits are code related, therefore, we will discuss them in detail while writing the code.
So, the following are the most important objectives and learning points from this tutorial.
- We will carry out object detection in images and videos using SSD300 object detector with a ResNet50 neural network backbone.
- For this purpose, we will use the SSD300 model from PyTorch models hub. This SSD300 object detector has been trained on the COCO dataset. We can use it directly for inference for almost 80 classes.
- We will try to compare the detection capabilities of SSD300 ResNet50 with SSD300 VGG16 and observe how much better it performs.
There is one more thing. We will try our best to compare the detection results with the SSD300 VGG16 detection results from last week’s tutorial. For, that we will use some of the same images and videos for detections as we did in the previous tutorial. That will give us a better idea of how well the ResNet50 neural network backbone is performing.
Moving ahead, let’s set up our systems with the libraries that we will need.
Libraries and Frameworks that We Need
Here, we will take a look at some of the specific libraries that we need for this tutorial. And for the other ones, they are really commonplace if you are into deep learning and most probably already have them.
First, comes the PyTorch deep learning framework. For my code executions, I used PyTorch 1.6. As far as I know, you are all set to go even if you have PyTorch 1.4 or a higher version like PyTorch 1.7.
Second, we will need SciPy, at least version 1.5.4. It is safe to update to 1.5.4 as older versions might cause some dependency issues.
Finally, we need the OpenCV computer vision library. If you are on Windows OS, I would recommend going with version 4.2.0.32. As newer versions sometimes cause issues with cv2.imshow() and cv2.imwrite().
This should be enough for us for now. If you find that you are missing anything while running the code, feel free to install them.
Project Directory Structure
Now, let’s setup our project directory for a smooth and easy execution of the code in this tutorial.
│   detection_utils.py
│   ssd_resnet_image.py
│   ssd_resnet_video.py
│
├───input
│       image_1.jpg
│       image_2.jpg
│       ...
│
├───outputs
│       image_1.jpg
│       image_2.jpg
│       ...
- First, we have the
inputfolder which holds input images and videos that we will use for detections. - The
outputsfolder will contain all the output images and videos with all the objects detected in them. This is after we run the images and videos through the SSD300 object detector model. - Finally, there are three Python script files. These are directly present in the parent project directory. We will get into the details of these while writing the code for each of them.
Coming to the input files that we will use. You are free to use any images and videos of your choice. Still, if you want to use the same ones as this tutorial, then you can download the input zip file from below.
All the images and videos are taken from Pixabay and are free to use as well.
As we are all ready with the setup, we can now move forward with the coding part of the tutorial.
Object Detection using SSD300 ResNet50 and PyTorch
From this section onward, we will focus on the coding part of the tutorial. We will write code in three Python files.
There is one Python file, that is detection_utils.py. We will start with writing the code in that one.
Writing the Code for Drawing Bounding Boxes Around Objects
This code will go into the detection_utils.py script.
The code in this file will help us draw the bounding boxes around the objects in an image or a frame when dealing with videos. Keeping this separate from the rest of the code files will make our code cleaner and easier to manage as well.
This is just a single function and I am including that in a single code block.
import cv2

def draw_bboxes(image, results, classes_to_labels):
    for image_idx in range(len(results)):
        image = cv2.cvtColor(image, cv2.COLOR_RGB2BGR)
        # get the original height and width of the image to resize the ...
        # ... bounding boxes to the original size size of the image
        orig_h, orig_w = image.shape[0], image.shape[1]
        # get the bounding boxes, classes, and confidence scores
        bboxes, classes, confidences = results[image_idx]
        for idx in range(len(bboxes)):
            # get the bounding box coordinates in xyxy format
            x1, y1, x2, y2 = bboxes[idx]
            # resize the bounding boxes from the normalized to 300 pixels
            x1, y1 = int(x1*300), int(y1*300)
            x2, y2 = int(x2*300), int(y2*300)
            # resizing again to match the original dimensions of the image
            x1, y1 = int((x1/300)*orig_w), int((y1/300)*orig_h)
            x2, y2 = int((x2/300)*orig_w), int((y2/300)*orig_h)

            # draw the bounding boxes around the objects
            cv2.rectangle(
                image, (x1, y1), (x2, y2), (0, 0, 255), 2, cv2.LINE_AA
            )
            # put the class label text above the bounding box of each object
            cv2.putText(
                image, classes_to_labels[classes[idx]-1], (x1, y1-10),
                cv2.FONT_HERSHEY_SIMPLEX, 0.8, (0, 255, 0), 2
            )

    return image
Explanation of the Above Code Block
Let’s go over the above code block in a bit of detail.
- The
draw_bboxes()accepts three parameters. They areimage,results, andclasses_to_labels.imageis the original input image or the frame before applying any resizing or other augmentations/transforms. Theresultscontain the bounding box coordinates, the labels, and the confidence scores for the detected objects. And theclasses_to_labelscontains the class label names from the COCO dataset. - From line 4, we start a
forloop to loop over all the results. - First, we convert the image from RGB color format to BGR color format for all OpenCV drawing functions. At line 8, we get the original height and width of the image. We need this for the proper resizing of the bounding boxes.
- Line 10 extracts the bounding boxes, the class label, and the confidence score for the current image in the loop.
- Then we start another
forto go over all the detections for the current image. - At line 13, we get the coordinates of the bounding boxes. These are normalized values ranging from [0, 1].
- As we are feeding the image to an SSD300 model, so we need to resize the image to 300×300 pixels. This means we have to resize the bounding box coordinates to 300×300 pixel range from the normalized range. We do this at lines 15 and 16.
- Then we also bring the bounding box coordinates to match the original size of the image for proper visualization. Lines 18 and 19 do that. Now, we can draw the bounding boxes around the original image instead of the resized image.
- The rest of the code includes drawing the bounding box rectangles and putting class label text for the objects. We do this using OpenCV.
- Finally, we return the image with the bounding boxes drawn around all the detected objects.
This is all we need for the detection utilities code.
Object Detection using SSD300 ResNet50 and PyTorch in Images
Now, we will write the code for detecting objects using SSD300 ResNet50 model in images.
All of the code here will go into the ssd_resnet_image.py file. So, open up the file and follow along.
We will start with importing all the modules and libraries that we will need.
import torch
import cv2
import torchvision.transforms as transforms
import argparse

from detection_utils import draw_bboxes
Among all the required libraries, we are also importing the draw_boxes function from detection_utils.
The Argument Parser, Computation Device, and Image Transforms
Here, we will define the argument parser first to parse the command line arguments that we will provide.
parser = argparse.ArgumentParser()
parser.add_argument(
    '-i', '--input', required=True, help='path to the input data'
)
args = vars(parser.parse_args())
We will provide just one command line argument while executing the file. That is, path to the input image.
The next block of code defines the computation device and the PyTorch transforms that we will apply to the image.
# define the computation device
device = torch.device('cuda' if torch.cuda.is_available() else 'cpu')

# define the image transforms
transform = transforms.Compose([
    transforms.ToPILImage(),
    transforms.Resize((300, 300)),
    transforms.ToTensor(),
    transforms.Normalize(mean=[0.485, 0.456, 0.406],
                         std=[0.229, 0.224, 0.225]),
])
It is better to have a GPU for this tutorial, as we will be working with images and videos as well. Particularly, the object detection in videos will benefit a lot from running on a CUDA device.
Now, coming to the transforms at line 16.
- First, we convert the image into PIL image format.
- As we will feed the image to an SSD300 object detector, we need to resize the image to 300×300 pixels. This, we are doing next.
- Then we are applying the
ToTensor()function. This divides the pixel values by 255 and also brings the dimensions to[channels x height x width]format for proper PyTorch input. - Finally, we apply the mean and standard deviation for the ImageNet normalization of the input data. This is because the ResNet50 neural network backbone has been trained on the ImageNet classification data.
Prepare the SSD300 Detector and the Input Data
The next step is to prepare the SSD300 ResNet50 object detector. We will load the model from PyTorch hub. If you run the following code the first time, then the model will get downloaded first. From subsequent runs, the model will be loaded from the torch cache directory.
# initialize and set the model and utilities
ssd_model = torch.hub.load('NVIDIA/DeepLearningExamples:torchhub', 'nvidia_ssd')
ssd_model.to(device)
ssd_model.eval()
utils = torch.hub.load('NVIDIA/DeepLearningExamples:torchhub', 'nvidia_ssd_processing_utils')
- Line 24 loads the SSD300 model from PyTorch hub. It might also download the ResNet50 model on the first run.
- Then we load the model onto the computation device and get it into evaluation mode (lines 25 and 26).
- At line 27, we download some utility scripts. These are provided by NVidia specifically for the SSD300 object detection model. This will the formatting of the detection outputs a lot easier for us. We will see later how.
The next step is to read the image and prepare the input data.
# read the image
image_path = args['input']
image = cv2.imread(image_path)
# keep the original height and width for resizing of bounding boxes
image = cv2.cvtColor(image, cv2.COLOR_BGR2RGB)
# apply the image transforms
transformed_image = transform(image)
# convert to torch tensor
tensor = torch.tensor(transformed_image, dtype=torch.float32)
# add a batch dimension
tensor = tensor.unsqueeze(0).to(device)
- First, we read the image from the input path using OpenCV.
- Then we convert the image to RGB color format from the BGR color format.
- At line 34, we apply the transforms that we have defined above. Line 36, converts the input to torch tensor of
float32type. - At line 38, we add an extra batch dimension to the input which makes the final input of shape
[1 x channels x height x width].
Feed the Input to the Detector and Get the Detections
The final step is to feed our input data to the SSD300 object detector model.
# get the detection results
with torch.no_grad():
    detections = ssd_model(tensor)

# the PyTorch SSD `utils` help get the detection for each input if...
# ... there are more than one image in a batch
# for us there is only one image per batch
results_per_input = utils.decode_results(detections)
# get all the results where detection threshold scores are >= 0.45
# SSD `utils` help us here as well
best_results_per_input = [utils.pick_best(results, 0.45) for results in results_per_input]
# get the COCO object dictionary, again using `utils`
classes_to_labels = utils.get_coco_object_dictionary()

image_result = draw_bboxes(image, best_results_per_input, classes_to_labels)

cv2.imshow('Detections', image_result)
cv2.waitKey(0)

# save the image to disk
save_name = args['input'].split('/')[-1]
cv2.imwrite(f"outputs/{save_name}", image_result)
- Within the
torch.no_grad(), we feed the tensor input to the SSD300 detector (lines 40 and 41). - Then comes the part where we use the utility scripts that we downloaded for the NVidia SSD300 model. At line 46, we use the
decode_results()of theutilsto bring the outputs to the proper format. - Again, at line 49, we use the
pick_best()function ofutils. This takes a confidence threshold as input along with theresults_per_inputthat we got at line 46. This provides us withbest_results_per_inputwhich contains the bounding boxes, the class labels, and the confidence scores for each of the inputs. We are providing the threshold as 0.45 as we did the same for the SSD300 VGG16 model in the previous post. This will help us do a fair comparison later on. - Line 51 downloads the COCO labels into the present directory. After downloading, there will be a text file named
category_names.txtcontaining 80 of the COCO classes. We use this for mapping the class labels to the label names. - At line 53, we use our own
draw_bboxes()function fromdetection_utils. This returns the images with all the detected objects and bounding boxes drawn. - Lines 55 and 56 display the result on the screen.
- Finally, at line 59, we define
save_nameusing the input path. We use this string to save the result to the disk at line 60.
This is all the code we need to detect objects in images using SSD300 ResNet50 object detector.
Executing ssd_resnet_image.py for Object Detection in Images
Now, we are all set to execute the ssd_resnet_image.py script. Open up your command line/terminal and cd parent project directory.
There are several images in the input folder. But we will focus on a single image here. That is going to be the image_2.jpg in this tutorial. This is because in the previous blog post the SSD300 VGG16 model was not able to detect the man near the camera for some reason. Let’s see whether training on the COCO dataset and ResNet50 neural network backbone can help improve the results or not.
python ssd_resnet_image.py --input input/image_2.jpg
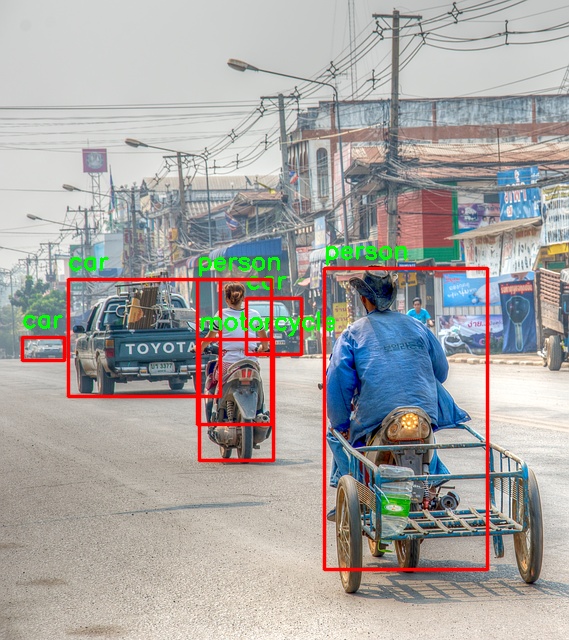
The results are actually better than I expected. First of all, it is able to easily detect the person (with the hat) near the camera. Second, it is also able to detect the car at the far end of the image. On top of that, the SSD300 ResNet50 object detector is also able to detect the car near the woman’s shoulder (near the right) in the image. The SSD300 VGG16 object detector completely missed these detections.
From the above detections, it is clear that the SSD300 ResNet50 object detector is much better than the one with VGG16 backbone.
For the part of the images, we will leave it here. You can try and run inference on some of the other images from the input folder. You may also use your own images if you want.
As per the tutorial, let’s move over to write the code to detect objects in videos.
Object Detection using SSD300 ResNet50 and PyTorch in Videos
The code for object detection in videos using the SSD300 model is going to be a bit easier to follow along. This is because we can reuse much of the code from the image detection section.
The most important thing here is going to be looping over the video frames and detecting objects in each of the frames.
So, let’s start with writing the code.
We will write the video detection code in the ssd_resnet_video.py Python file.
Starting from the imports, till the preparation of the SSD300 model and its utilities are going to be the same as in the image detection. Therefore, I am writing the whole of that code part in the following code block.
import torch
import cv2
import torchvision.transforms as transforms
import argparse
import time

from detection_utils import draw_bboxes

parser = argparse.ArgumentParser()
parser.add_argument(
    '-i', '--input', required=True, help='path to the input data'
)
args = vars(parser.parse_args())

# define the computation device
device = torch.device('cuda' if torch.cuda.is_available() else 'cpu')

# define the image transforms
transform = transforms.Compose([
    transforms.ToPILImage(),
    transforms.Resize((300, 300)),
    transforms.ToTensor(),
    transforms.Normalize(mean=[0.485, 0.456, 0.406],
                         std=[0.229, 0.224, 0.225]),
])

# initialize and set the model and utilities
ssd_model = torch.hub.load('NVIDIA/DeepLearningExamples:torchhub', 'nvidia_ssd')
ssd_model.to(device)
ssd_model.eval()
utils = torch.hub.load('NVIDIA/DeepLearningExamples:torchhub', 'nvidia_ssd_processing_utils')
In the above argument parser, the --path is going to be the path to the input video. The PyTorch transforms are also the same.
Capture the Video and Prepare the VideoWriter Object
Here, we will capture the video using the path that we will provide in the command line while executing the Python file. Along with that, we will also prepare the VideoWriter() object and provide the codec for writing the resulting frames to disk.
# capture the video
cap = cv2.VideoCapture(args['input'])

if (cap.isOpened() == False):
    print('Error while trying to read video. Please check path again')

# get the frame width and height
frame_width = int(cap.get(3))
frame_height = int(cap.get(4))
save_name = f"{args['input'].split('/')[-1].split('.')[0]}"
# define codec and create VideoWriter object
out = cv2.VideoWriter(f"outputs/{save_name}.mp4",
                      cv2.VideoWriter_fourcc(*'mp4v'), 20,
                      (frame_width, frame_height))

frame_count = 0 # to count total frames
total_fps = 0 # to get the final frames per second
At line 41, we define a save_name string and use it to provide the save path for saving the resulting frames for the VideoWriter().
Also, we have frame_count and total_fps variables to count the total number of frames and total FPS (Frames Per Second) as we loop through the video frames.
Looping Over the Video Frames and Detecting Objects in Each Frame
To detect objects in the video, we will loop over all the frames in the video. While doing so, we will be detecting the objects in each of the frames.
The following code block contains the whole loop for the sake continuity.
# read until end of video
while(cap.isOpened()):
    # capture each frame of the video
    ret, frame = cap.read()
    if ret == True:
        frame = cv2.cvtColor(frame, cv2.COLOR_BGR2RGB)
        transformed_frame = transform(frame)
        tensor = torch.tensor(transformed_frame, dtype=torch.float32)
        tensor = tensor.unsqueeze(0).to(device)

        # get the start time
        start_time = time.time()

        # get the detection results
        with torch.no_grad():
            detections = ssd_model(tensor)

        # the PyTorch SSD `utils` help get the detection for each input if...
        # ... there are more than one image in a batch
        # for us there is only one image per batch
        results_per_input = utils.decode_results(detections)
        # get all the results where detection threshold scores are >= 0.45
        # SSD `utils` help us here as well
        best_results_per_input = [utils.pick_best(results, 0.45) for results in results_per_input]
        # get the COCO object dictionary, again using `utils`
        classes_to_labels = utils.get_coco_object_dictionary()

        frame_result = draw_bboxes(frame, best_results_per_input, classes_to_labels)

        # get the end time
        end_time = time.time()
        # get the fps
        fps = 1 / (end_time - start_time)
        # add fps to total fps
        total_fps += fps
        # increment frame count
        frame_count += 1

        # press `q` to exit
        wait_time = max(1, int(fps/4))

        # write the FPS on current frame
        cv2.putText(
            frame_result, f"{fps:.3f} FPS", (5, 30),
            cv2.FONT_HERSHEY_SIMPLEX, 1.0, (0, 0, 255),
            2
        )
        cv2.imshow('image', frame_result)
        out.write(frame_result)
        if cv2.waitKey(wait_time) & 0xFF == ord('q'):
            break

    else:
        break
Let’s go over some of the important bits in the above code block.
- At line 57, we have our input
tensorready. - At line 64, we get the detection results.
- Lines 69 and 72, decode the results into the proper format and discard all the results that have scores below 0.45 respectively.
- Line 74 initialize the COCO labels.
- At line 76, we draw the bounding boxes around the objects that are detected in each frame.
- Then we calculate the
fpsaccording to the startstart_timeandend_time. Line 83, add the current FPS to the total FPS, and line 85 increments the total number of frames. - Finally, we put the FPS text on the resulting frame, show the frame, and save the resulting frame to disk.
As the last step, we just need to destroy all OpenCV frames and print the average FPS on the command line.
# release VideoCapture()
cap.release()
# close all frames and video windows
cv2.destroyAllWindows()

# calculate and print the average FPS
avg_fps = total_fps / frame_count
print(f"Average FPS: {avg_fps:.3f}")
This completes the code for object detection in videos using SSD300 ResNet50 model.
Execute ssd_resnet_video.py for Object Detection in Videos
If you observe, then there are three videos in the input folder that you may have downloaded. Out of that, we will run inference on video_2.mp4 and video_3.mp4. This is because, with the SSD300 VGG16 model in the last tutorial, we used these two videos as well. This will lead to a fair comparison.
We will start with with video_2.mp4.
python ssd_resnet_video.py --input input/video_2.mp4
Let’s see the output in the following clip below.
The outputs may seem similar but they are better actually. One of those cases is around 17-19 seconds into the clip. If you look closely to the left, then you will see that the woman in the black shirt and the child is detected. They were not detected by the SSD300 VGG16 model. Apart from that people who are much farther away are also detected by the SSD300 with the ResNet50 neural network backbone. Moreover, the bench is also detected a few times.
Looks like the SSD300 ResNet50 object detector is actually performing better than the VGG16 backbone.
Further, we can move on to the next video detection.
python ssd_resnet_video.py --input input/video_3.mp4
In this case, the improvements are much more prominent. First, in every frame, we can see that more number of vehicles are detected when compared with the SSD300 VGG16 detector. And second, at the very beginning of the video, the person on the motorbike is also detected (coming from the far left). But these two were never detected by the SSD300 VGG16 model.
Some Observations
From the above outputs, some things are very clear. The SSD300 with ResNet50 neural network as the backbone is obviously performing better than the VGG16 backbone detector. The modern backbone and training on the COCO dataset are helping for sure.
But there is an issue. You must have seen by now that the FPS were quite low, around 2-4 FPS. They should have more for sure. I could not get around to the reason why that happened with a GTX 1060 (GPU on my machine). It might be a versioning issue, but then again nothing can be said for sure.
If any you find any solution to this, then I will highly appreciate it if you can point that out in the comment section. It will help me and also other readers.
Summary and Conclusion
In this tutorial, we learned to use the SSD300 ResNet50 object detector to detect objects in images and videos. We also saw how it is better than some of the models using older neural network backbones. I hope that you learned something new from this tutorial.
If you have any suggestions, thoughts, or doubts, then please leave them in the comment section. I will surely address them.
You can contact me using the Contact section. You can also find me on LinkedIn, and X.

Hi Sovit
Thank you for these useful tutorials, would you kindly write tutorials that shows the performance of the models i.e AP, mAP values etc
And also would you write tutorials on how to create and train our own detectors instead of pre-trained ones?
Hello Twahir. I am happy that you liked it. And of course, I will be posting many articles on object detection pretty soon. Working on those currently.
Hi Sovit,
Thanks for the tutorial.
I’ve installed torch and torchvision for cpu on pycharm and tried to run the code on cpu but I get this error:
raise RuntimeError(‘Attempting to deserialize object on a CUDA ‘
RuntimeError: Attempting to deserialize object on a CUDA device but torch.cuda.is_available() is False. If you are running on a CPU-only machine, please use torch.load with map_location=torch.device(‘cpu’) to map your storages to the CPU.
In the line: torch.hub.load(), I added map_location=torch.device(‘cpu’) but I get the same error.
Do you have any idea?
Hello David. I think PyTorch is installed with CPU support only. Can you please try installing it with CUDA support and let me know.
Sorry but currently I don’t possess a cuda supported gpu so I decided to use cpu instead.
When I call torch.hub.load I can see that two files are downloaded to .cache directory:
nvidia_ssdpyt_amp_200703.pt
resnet50-0676ba61.pth
So I tried to load the model locally from hard disk:
ssd_model = torch.load(‘C:/Users/user/.cache/torch/checkpoints/nvidia_ssdpyt_amp_200703.pt’, map_location=torch.device(‘cpu’))
ssd_model.to(device)
ssd_model.eval()
utils = torch.load(‘C:/Users/user/.cache/torch/hub/checkpoints/resnet50-0676ba61.pth’, map_location=torch.device(‘cpu’))
Now I get this error:
ssd_model.to(device)
^^^^^^^^^^^^
AttributeError: ‘dict’ object has no attribute ‘to’
Do you have any idea how can I load the model correctly?
Instead of that, can you please change the following line in ssd_resnet_image.py
FROM:
device = torch.device(‘cuda’ if torch.cuda.is_available() else ‘cpu’)
TO:
device = ‘cpu’
I’ve tried that but I get this error:
raise RuntimeError(‘Attempting to deserialize object on a CUDA’)
I think when the model is loaded from torch hub it’s loaded for gpu and doesn’t work on cpu. I want to load it from storage for cpu.
Hi David. I will try to experiment more with the code and let you know.