In this tutorial, we are going to learn about multi-label image classification with PyTorch and deep learning. In particular, we will be learning how to classify movie posters into different categories using deep learning. For this, we need to carry out multi-label classification. This is because one movie can belong to more than one category. And we will be using the PyTorch deep learning framework for this.
So, what will you be learning in this tutorial?
First, a very short introduction to multi-label image classification in deep learning.
The problem that we will be tackling, that is movie poster classification.
Building a deep learning model for multi-label classification.
Coding our way through this small project for multi-label image classification with PyTorch and deep learning.
Introduction to Multi-Label Classification in Deep Learning
If you have been into deep learning for some time or you are a deep learning practitioner, then you must have tackled the problem of image classification by now. Commonly, in image classification, we have an image and we classify that into one of the many categories that we have.
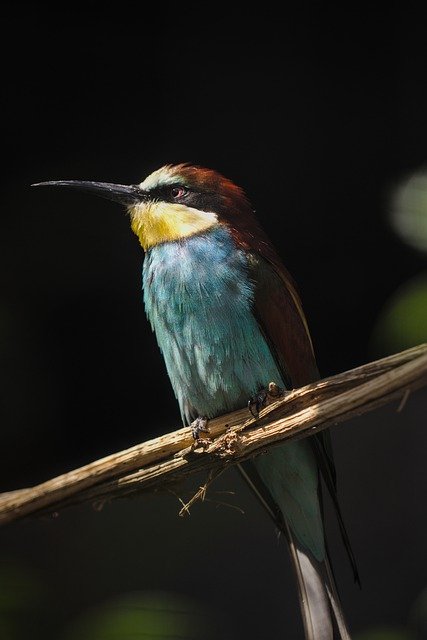
For example, take a look at the following image.
Figure 1. Example image of a bird. Humans as well as a properly trained deep learning model can easily tell that it is a bird.
You can easily tell that the image in figure 1 is of a bird. And if we train a deep learning model on a large enough dataset of bird, it will also be able to classify the image into a bird.
But what if an image or object belongs to more than one category or label or class? Here, multi-label classification comes into the picture. Now do mind that multi-label classification is not just for images but text data as well. But here we will be focusing on images only.
Multi-Label Image Classification in Terms of Movie Poster Genre
Now, let’s come to multi-label image classification in deep learning in terms of the problem that we are trying to solve. That is, classifying movie posters into specific genres.
We know that posters of movies are a big of part of promotion. And they tell a lot about the movie. This can include the type, the style, and even sometimes the feeling associated with the movie. And most of the time, we can also tell the category or genre of the movie by looking at the poster.
Let’s take a look at such a movie poster.
Figure 2. An image of a movie poster from the dataset that we will be using for multi-label image classification with PyTorch and deep learning.
What do you think are the genres that the movie poster in figure 2 belongs to? Taking a simple guess may lead us to horror, or thriller, or even action. Then again, it can be all three at the same time. So, the movie belongs to horror, thriller, and action genres. In most cases, we humans can do this easily. But what about a deep learning model?Can we teach a deep learning neural network to classify movie posters into multiple genres? The answer is a big YES, and we will do that in this tutorial. And I also hope that by now you are excited enough to follow this tutorial till the end.
Libraries and Frameworks that We Will Need
The most important one is obviously the PyTorch deep learning framework. For my code, I have used PyTorch version 1.6. Any older versions should also work fine, still, you can easily update your PyTorch version here. This will ensure that you do not face any unnecessary obstacles on the way.
There are some other computer vision and image processing libraries as well. They are OpenCV and Matplotlib. If you do not have them, please do install them before proceeding.
The Directory Structure
We will follow a simple directory structure for this project. The following is the directory structure that we will use.
The input folder contains our data. These are images of different movie posters. This folder in-turn contains a movie-classifier folder. Inside, we have a train.csv file that has all the movie poster image names and all the classes it belongs to. And the Images folder contains all the movie poster images in .jpg format. We will get into more details of the dataset in a bit.
The outputs folder will contain our trained deep learning model and graphical loss plots after training.
Finally, we have the src folder that contains five Python scripts. We will get into the details of these while writing the code for each of them.
The Movie Poster Images Dataset
One of the most essential parts of any deep learning or machine learning problem, the dataset. There are many movie poster images available online. But most of them are huge and really not suitable for a blog post where everyone can train a model. Fortunately, there is a Movie Posters dataset available on Kaggle which is big enough for training a deep learning model and small enough for a blog post.
This Movie Posters dataset contains around 7800 images ranging from over 25 different genres of movies. First of all, do download the dataset and extract it inside your input folder. Try to achieve the above directory structure so that you don’t need to change any path in your Python scripts.
Now, let’s explore the dataset a bit.
Starting with the train.csv file that we have.
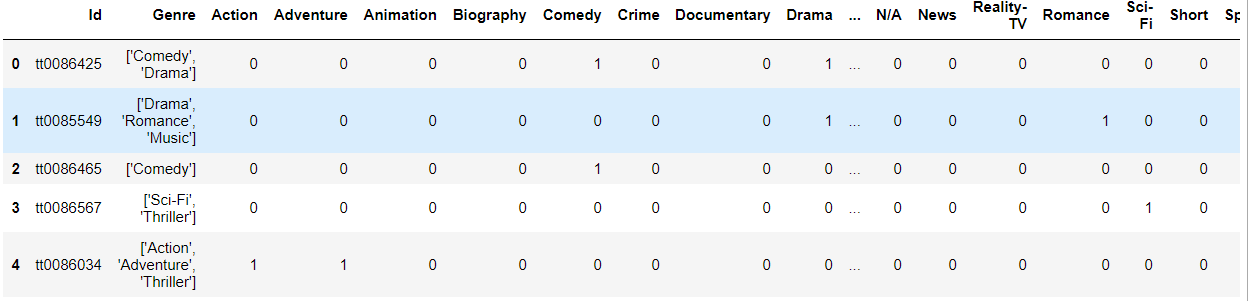
Figure 3. A few rows of data from the CSV file of the dataset that we will use to train our deep learning model.
Figure 3 shows a few rows from the CSV file. The Id column contains all the image file names. And the Genre column contains all the genres that the movie belongs to.
Then we have 25 more columns with the genres as the column names. If a movie poster belongs to a particular genre, then that column value is 1, else it is 0.
Now, let’s take a look at one of the movie posters with the genres it belongs to.
Figure 4. An image from the dataset showing the genres to which the movie belongs. Using these images and labels, we will train a ResNet50 neural network to assign multiple labels by looking at a movie poster.
Figure 4 shows one of the movie posters and its genres on the top. That seems pretty accurate according to the dataset. If you wish, you can explore the dataset a bit more before moving further.
Now, we have a pretty good idea of how the dataset is structured. Hopefully, you are all ready to move ahead.
Multi-Label Image Classification with PyTorch and Deep Learning – Classifying Movie Image Posters
From here onward, we will start code for multi-label image classification with PyTorch and Deep Learning. We will try to build a good deep learning neural network model that can classify movie posters into multiple genres.
Preparing the Movie Poster Dataset
We will start with preparing the dataset. We will divide the the complete dataset into three parts. They are training, validation, and testing.
We will use the training and validation sets during the training process of our deep learning model. For the test set, we will just have a few images there. We will use this test set during inference. The deep learning model is not going to see the test images during training or validation. We will keep that completely separate.
Although, we could have just trained and validated on the whole dataset and used movie posters from the internet. Then again, we do not know whether that movie poster image is in the dataset or not as there more than 7000 images. Therefore, it is best to ensure that we are providing unseen images to the trained deep learning model while testing.
All the code in this section will into the dataset.py script inside the src folder.
The following are the imports that we need for the dataset script.
import torch
import cv2
import numpy as np
import torchvision.transforms as transforms

from torch.utils.data import Dataset
The PyTorch Dataset Class
We will write a dataset class to prepare the training, validation, and test datasets. This is very common when using the PyTorch deep learning framework.
To avoid indentation problems and confusion on the reader’s side, I am including the whole dataset class code inside a single code block. Don’t be alarmed by the huge code block. We will go through everything in detail.
class ImageDataset(Dataset):
    def __init__(self, csv, train, test):
        self.csv = csv
        self.train = train
        self.test = test
        self.all_image_names = self.csv[:]['Id']
        self.all_labels = np.array(self.csv.drop(['Id', 'Genre'], axis=1))
        self.train_ratio = int(0.85 * len(self.csv))
        self.valid_ratio = len(self.csv) - self.train_ratio

        # set the training data images and labels
        if self.train == True:
            print(f"Number of training images: {self.train_ratio}")
            self.image_names = list(self.all_image_names[:self.train_ratio])
            self.labels = list(self.all_labels[:self.train_ratio])

            # define the training transforms
            self.transform = transforms.Compose([
                transforms.ToPILImage(),
                transforms.Resize((400, 400)),
                transforms.RandomHorizontalFlip(p=0.5),
                transforms.RandomRotation(degrees=45),
                transforms.ToTensor(),
            ])

        # set the validation data images and labels
        elif self.train == False and self.test == False:
            print(f"Number of validation images: {self.valid_ratio}")
            self.image_names = list(self.all_image_names[-self.valid_ratio:-10])
            self.labels = list(self.all_labels[-self.valid_ratio:-10])

            # define the validation transforms
            self.transform = transforms.Compose([
                transforms.ToPILImage(),
                transforms.Resize((400, 400)),
                transforms.ToTensor(),
            ])

        # set the test data images and labels, only last 10 images
        # this, we will use in a separate inference script
        elif self.test == True and self.train == False:
            self.image_names = list(self.all_image_names[-10:])
            self.labels = list(self.all_labels[-10:])

             # define the test transforms
            self.transform = transforms.Compose([
                transforms.ToPILImage(),
                transforms.ToTensor(),
            ])

    def __len__(self):
        return len(self.image_names)

    def __getitem__(self, index):
        image = cv2.imread(f"../input/movie-classifier/Multi_Label_dataset/Images/{self.image_names[index]}.jpg")
        # convert the image from BGR to RGB color format
        image = cv2.cvtColor(image, cv2.COLOR_BGR2RGB)
        # apply image transforms
        image = self.transform(image)
        targets = self.labels[index]

        return {
            'image': torch.tensor(image, dtype=torch.float32),
            'label': torch.tensor(targets, dtype=torch.float32)
        }
Let’s Start with the __init__() Function from Line 8
It accepts three parameters, the training CSV file, a train parameter, and a test parameter, both of which are booleans. We will use these two to prepare either the training, validation, or test dataset. First, we initialize all these three variables from lines 9 to 11.
At line 12 and 13, we extract all the image file names and all the labels as well. Now do mind that, for each image, we have 25 labels [0, 0, 1, ..., 1, 0].
Lines 14 and 15 define the training ratio and validation ratio. We will use 85% of the data for training. Out of the remaining 15%, we will use the last 10 images for testing/inference. And the rest is for validation.
Starting from line 18 to 30, we define and prepare our training data. For this, self.train has to be True. We extract 85% of the total images and labels for the training set at lines 20 and 21. For training transforms, we apply image resize, random horizontal flip, and randomly rotating the images.
Coming to the validation images and labels from line 33. If we pass the train and test parameters as False, then the validation dataset is prepared. Except for the last 10 images, the remaining 15% of the data is used for validation. And we just apply the resize image transformation for the validation set.
Finally, we extract the last 10 images and labels set for the test data. We do not apply any image augmentation. we just convert to image into PIL format and then to PyTorch tensors.
Now the __getitem__() Function
This is the easy part actually.
At line 61, we read the image according to the image file name that we get from the self.image_names list.
Then we convert the image to the RGB color format and apply the image transforms and augmentations depending on the split of the data.
Line 66 extracts the labels according to the index position of self.labels list.
Finally, we return the images and labels in a dictionary format. Before returning, we convert them into PyTorch float32 data type as well.
This is all we need to prepare our PyTorch dataset class. I hope that the above code and theory is clear and we can move forward.
Preparing the Deep Learning Model
In this section, we will write the code to prepare our deep learning model.
We will be using a pre-trained ResNet50 deep learning model from the PyTorch models. We keep the intermediate layer weights frozen and only make the final classification head learnable.
This code will go into the models.py Python script.
from torchvision import models as models

import torch.nn as nn

def model(pretrained, requires_grad):
    model = models.resnet50(progress=True, pretrained=pretrained)
    # to freeze the hidden layers
    if requires_grad == False:
        for param in model.parameters():
            param.requires_grad = False
    # to train the hidden layers
    elif requires_grad == True:
        for param in model.parameters():
            param.requires_grad = True
    # make the classification layer learnable
    # we have 25 classes in total
    model.fc = nn.Linear(2048, 25)
    return model
As we a total of 25 classes, therefore, the final classification layer also has 25 output features (line 17). We are freezing the hidden layer weights. After preparing the model according to our wish, we are returning it at line 18.
Writing the Training and Validation Functions
We need to write the training and validation functions to fit our model on the training dataset and validate on the validation set.
We will write two very simple functions, which are going to very similar to any other PyTorch classification functions.
All the code in this section will be in the engine.py Python script inside the src folder. Create the file and follow along.
The Training Function
Let’s start with the training function. We will name it train(). The following code block contains the training function for our deep multi-label classification model.
import torch

from tqdm import tqdm

# training function
def train(model, dataloader, optimizer, criterion, train_data, device):
    print('Training')
    model.train()
    counter = 0
    train_running_loss = 0.0
    for i, data in tqdm(enumerate(dataloader), total=int(len(train_data)/dataloader.batch_size)):
        counter += 1
        data, target = data['image'].to(device), data['label'].to(device)
        optimizer.zero_grad()
        outputs = model(data)
        # apply sigmoid activation to get all the outputs between 0 and 1
        outputs = torch.sigmoid(outputs)
        loss = criterion(outputs, target)
        train_running_loss += loss.item()
        # backpropagation
        loss.backward()
        # update optimizer parameters
        optimizer.step()

    train_loss = train_running_loss / counter
    return train_loss
First, we are importing torch and tqdm which we need for the engine.py script.
The train() function accepts six input parameters. They are the neural network model, the training data loader, the optimizer, the loss function (criterion), the training dataset, and the computation device.
At line 8, we are getting the model training mode.
Line 9 defines a counter variable to keep track of the number of batches per epoch. The train_running_loss at line 10 will keep track of the batch wise loss values which we need to calculate the loss per epoch.
Starting from line 11, it is a pretty standard loop for any PyTorch image classification training.
Take a close look at line 17. We apply the sigmoid activation to the outputs. This will ensure that each of the 25 outputs that we get are in the range of [0, 1].
Then we add the loss for the batch, do the backpropagation, and update the optimizer parameters.
Finally, we calculate the per epoch loss and return it.
The Validation Function
Next up, we will write the validation function. Let’s write the code first and then we will get into the explanation part.
# validation function
def validate(model, dataloader, criterion, val_data, device):
    print('Validating')
    model.eval()
    counter = 0
    val_running_loss = 0.0
    with torch.no_grad():
        for i, data in tqdm(enumerate(dataloader), total=int(len(val_data)/dataloader.batch_size)):
            counter += 1
            data, target = data['image'].to(device), data['label'].to(device)
            outputs = model(data)
            # apply sigmoid activation to get all the outputs between 0 and 1
            outputs = torch.sigmoid(outputs)
            loss = criterion(outputs, target)
            val_running_loss += loss.item()

        val_loss = val_running_loss / counter
        return val_loss
Note that the validate() function does not accept the optimizer as a parameter. This is because we do not need to update the optimizer parameters during validation.
The rest of the function is almost the same as the training function. Except, we are not backpropagating the loss or updating any parameters.
We are applying the sigmoid activation to the outputs here as well.
This completes our training and validation as well. Before we start our training, we just have another script left. Let’s get to that.
Script to Initiate the Model and Start Training
This is the final script we need to start our training and validation. Basically, this is the integration of all the things that we have written. The following are steps that we are going to follow here.
Initialize the model and training parameters.
Prepare the training and validation data loaders.
Start the loop for training and validation.
Save the loss plot and trained deep learning model to disk.
We will write this code inside the train.py script.
The following are the imports that need along the way for this script.
import models
import torch
import torch.nn as nn
import torch.optim as optim
import pandas as pd
import matplotlib.pyplot as plt
import matplotlib

from engine import train, validate
from dataset import ImageDataset
from torch.utils.data import DataLoader

matplotlib.style.use('ggplot')

# initialize the computation device
device = torch.device('cuda' if torch.cuda.is_available() else 'cpu')
Along wit all the required libraries, we are also importing the scripts that we have written.
At line 16, we are initializing the computation device as well. If you are training the model on your own system, then it is better to have a GPU for faster training.
Initialize the Model and Training Parameters
We have our model function ready with us. We just need to call the function. After that, we will define all the learning parameters as well.
#intialize the model
model = models.model(pretrained=True, requires_grad=False).to(device)
# learning parameters
lr = 0.0001
epochs = 20
batch_size = 32
optimizer = optim.Adam(model.parameters(), lr=lr)
criterion = nn.BCELoss()
For the ResNet50 model, we will be using the pre-trained weights. But we will not be updating the weights of the intermediate layers. And that’s why we are passing the argument as requires_grad=False at line 18.
We will be using a lower learning rate than usual. That is, our learning rate will be 0.0001. We are making just the last classification head of the ResNet50 deep learning model learnable. And we don’t want to update the weights too rapidly. This is why we are using a lower learning rate.
We will train and validate the deep learning model for 20 epochs with a batch size of 32.
Our optimizer is going to be the Adam optimizer and the loss function is Binary Cross-Entropy loss.
As the loss function is BCELoss, so, after applying the sigmoid activation to the outputs, all the output values will be between 0 and 1. Now, the real question is, how are we going to make it a multi-label classification?
Well, after we get all the sigmoid outputs, then we can just choose the top three or top two scores. We can use the indices of those scores and map them to the genre of the movies’ list. This is a very straightforward method but it works really well. We will get to this part in more detail when we carry out the inference.
Prepare the Training and Validation Data Loaders
Before we can start the training loop, we need the training and validation data loaders. The following block of code does that for us.
First, we read the training CSV file containing all the image file names and the genres the movie posters belong to.
Then we prepare the train_data and valid_data at lines 28 and 32. For the training data, we need to pass the arguments as train=True and test=False. And for the validation data, both of those arguments need to be False.
After that, we prepare our train_loader and valid_loader.
Start the Training Loop
We will train our ResNet50 deep learning model for 20 epochs. For each epoch, we will store the loss values in two lists. The following is the training loop code block.
# start the training and validation
train_loss = []
valid_loss = []
for epoch in range(epochs):
    print(f"Epoch {epoch+1} of {epochs}")
    train_epoch_loss = train(
        model, train_loader, optimizer, criterion, train_data, device
    )
    valid_epoch_loss = validate(
        model, valid_loader, criterion, valid_data, device
    )
    train_loss.append(train_epoch_loss)
    valid_loss.append(valid_epoch_loss)
    print(f"Train Loss: {train_epoch_loss:.4f}")
    print(f'Val Loss: {valid_epoch_loss:.4f}')
We are appending the training and validation loss values in the train_loss and valid_loss lists respectively.
The final step is to just save our trained deep learning model and the loss plot to disk.
# save the trained model to disk
torch.save({
            'epoch': epochs,
            'model_state_dict': model.state_dict(),
            'optimizer_state_dict': optimizer.state_dict(),
            'loss': criterion,
            }, '../outputs/model.pth')

# plot and save the train and validation line graphs
plt.figure(figsize=(10, 7))
plt.plot(train_loss, color='orange', label='train loss')
plt.plot(valid_loss, color='red', label='validataion loss')
plt.xlabel('Epochs')
plt.ylabel('Loss')
plt.legend()
plt.savefig('../outputs/loss.png')
plt.show()
We are done with all the code that we need to train and validate our model. Now, we just need to run the train.py script.
Run the Training Script for Multi-Label Image Classification with PyTorch and Deep Learning
Open up your command line or terminal and cd into the src folder inside the project directory. From there, just type the following command.
python train.py
You should see output similar to the following on your console.
Number of training images: 6165
Number of validation images: 1089
Epoch 1 of 20
Training
0%| | 0/192 [00:00
According to our dataset split, we have 6165 images for training and 1089 images for validation. Wait for the training to complete. It might take a while depending on your hardware.
By the end of the training, we are having a training loss of 0.2037 ad validation loss of 0.2205. While training, you might see the loss fluctuating. But don’t worry and let the training just finish.
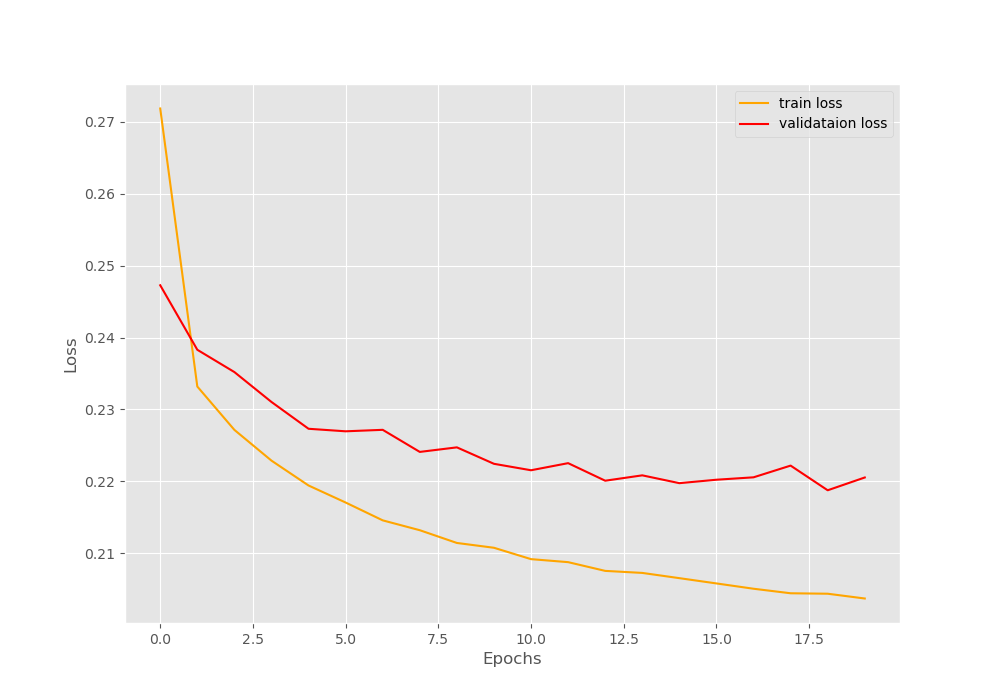
The following is the loss plot that is saved to disk.
Figure 5. The loss plot after training our ResNet50 deep learning model on the movie poster dataset.
We can see that the training loss is reducing pretty much smoothly. The validation loss plot is fluctuating but nothing major to give us any big worries.
The best thing that we can do now is run an inference on the final 10 unseen images and see what the model is actually predicting.
Multi-Label Image Classification using PyTorch and Deep Learning – Testing our Trained Deep Learning Model
We will write a final script that will test our trained model on the left out 10 images. This will give us a good idea of how well our model is performing and how well our model has been trained.
Now, you may be asking, why are we using that last 10 images from the dataset and not some movie posters from the internet? There are actually a few reasons for this.
If we download the movie poster images from the internet, we have to take a guess whether our model is predicting the right genres or not.
But if we use some left out images from the dataset, then we already have the real genres for those posters. We can judge much better how well the model is predicting the multiple genres the movie poster belongs to.
Now, let’s move ahead and code our way through the last part.
We will write this code inside the inference.py script.
The following are the imports that we will need.
import models
import torch
import numpy as np
import pandas as pd
import matplotlib.pyplot as plt

from dataset import ImageDataset
from torch.utils.data import DataLoader
Initialize the Computation Device and Load the Trained Model
We have the trained model with ourselves. We just need to load those trained weights by initializing the model once again.
# initialize the computation device
device = torch.device('cuda' if torch.cuda.is_available() else 'cpu')
#intialize the model
model = models.model(pretrained=False, requires_grad=False).to(device)
# load the model checkpoint
checkpoint = torch.load('../outputs/model.pth')
# load model weights state_dict
model.load_state_dict(checkpoint['model_state_dict'])
model.eval()
We do not need the ResNet50 pre-trained weights. We are loading our own trained weights.
Prepare the Dataset and the Data Loader
Here, we will prepare our test dataset and test data loader.
train_csv = pd.read_csv('../input/movie-classifier/Multi_Label_dataset/train.csv')
genres = train_csv.columns.values[2:]
# prepare the test dataset and dataloader
test_data = ImageDataset(
    train_csv, train=False, test=True
)
test_loader = DataLoader(
    test_data,
    batch_size=1,
    shuffle=False
)
At line 18, we extracting all the column names that contain the movie genre names. This provides us with a list containing all the movie genres.
Take a look at the arguments at line 22. To prepare the test dataset, we are passing train=False and test=True.
Run the Loop to Get the Predictions
We will iterate over the test data loader and get the predictions.
for counter, data in enumerate(test_loader):
    image, target = data['image'].to(device), data['label']
    # get all the index positions where value == 1
    target_indices = [i for i in range(len(target[0])) if target[0][i] == 1]
    # get the predictions by passing the image through the model
    outputs = model(image)
    outputs = torch.sigmoid(outputs)
    outputs = outputs.detach().cpu()
    sorted_indices = np.argsort(outputs[0])
    best = sorted_indices[-3:]
    string_predicted = ''
    string_actual = ''
    for i in range(len(best)):
        string_predicted += f"{genres[best[i]]}    "
    for i in range(len(target_indices)):
        string_actual += f"{genres[target_indices[i]]}    "

    image = image.squeeze(0)
    image = image.detach().cpu().numpy()
    image = np.transpose(image, (1, 2, 0))
    plt.imshow(image)
    plt.axis('off')
    plt.title(f"PREDICTED: {string_predicted}\nACTUAL: {string_actual}")
    plt.savefig(f"../outputs/inference_{counter}.jpg")
    plt.show()
At line 32, we get all those index positions where the labels are 1. This means that the particular poster belongs to those genres.
At line 34 and 35, we pass the image through the model and apply the sigmoid activation to get the proper outputs.
Line 37 provides us with all the index values of the sigmoid activations by sorting them in ascending order. And on line 38, we extract the best three predictions that are made by the model. These three have the highest sigmoid values out of all the 25 labels.
Starting line 39 till 44, first, we define two empty strings for the actual and predicted labels. Then we just append the actual and predicted labels by mapping the index positions of the outputs to the real indices of the genres list.
Coming to line 46, we remove the batch dimension from the image and transpose the image dimensions. Then we use Matplotlib to give the predicted and actual labels as titles to the images.
Finally, we save the resulting image to the disk.
Run the inference.py script from the command line/terminal using the following command.
python inference.py
After running the command, you should see 10 images one after the other along with the predicted and actual movie genres.
Let’s Take a Look at the Test Results for Multi-Label Image Classification with PyTorch and Deep Learning
We have reached the point to evaluate our model. Let’s take a look at some of the images that are saved to the disk. We will be able to judge how correctly our deep learning model is able to carry out multi-label classification.
Figure 6. The trained deep learning model is able to assign two of the three genres correctly by looking at the movie poster.
The movie poster in figure 5 belongs to the action, fantasy, and horror genre in reality. And our deep learning model has given action, drama, and horror as the top three predictions. Two of them are correct. And in my opinion, that is a pretty good multi-label classification. We are off by one genre, still, we got two correct. Let’s take a look at another result.
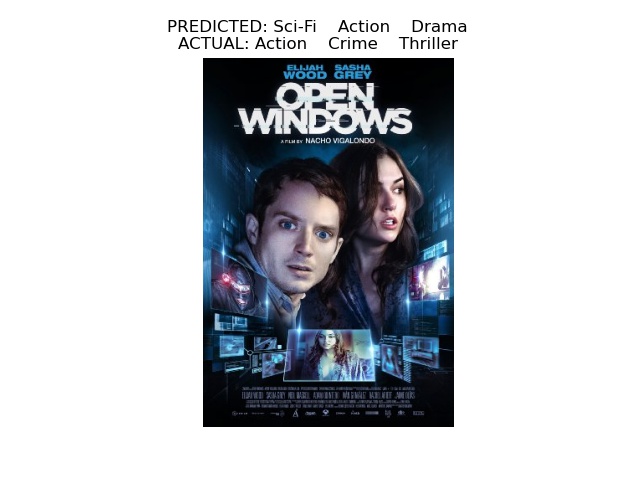
Figure 7. This time, our trained deep learning model is only able to get one genre correct. But the sci-fi one does not look too far off as well.
Here, our model is only predicting the action genre correctly. But if you look at the predictions closely, they are not that bad. From the poster, even a person might say that it can be a sci-fi movie. Although, the drama genre is not at all correct.
Now, a final result.
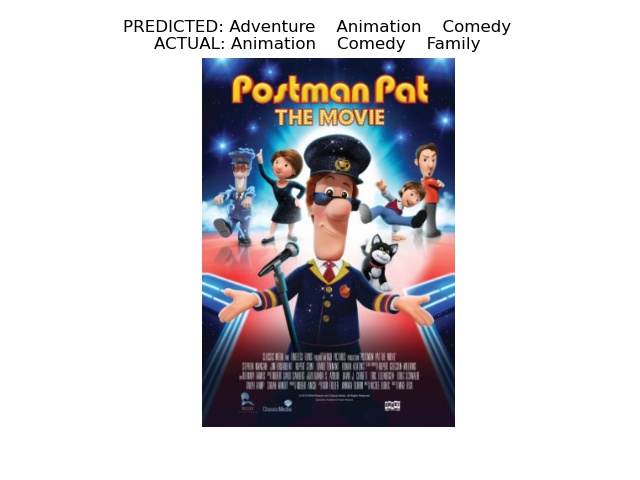
Figure 8. This time, again our trained deep learning model is able to classify two genres correctly. It is quite amazing, that it knows that it is an animated movie belonging to the comedy genre.
This is actually a really good one. The model is correctly predicting that it is an animation movie. So, it has actually learned all the features of the posters correctly. It is able to detect when there are real persons or animated characters in the poster. But the adventure genre is the wrong prediction here.
I will say that our trained deep learning is pretty good at multi-label movie genre classification.
Improving this Multi-Label Image Classification with PyTorch and Deep Learning Project
You can also take this multi-label image classification with PyTorch and deep learning a bit further. Further on, you can try increasing the dataset size and training for longer to get better results.
Summary and Conclusion
In this tutorial, you learned how to carry out simple multi-label image classification using PyTorch and deep learning. You trained a ResNet50 deep learning model to classify movie posters into different genres.
I hope that you both enjoyed and learned something new from this tutorial. If you have any suggestions, doubts, or thoughts, then please leave them in the comment section. I will surely address them.
You can contact me using the Contact section. You can also find me on LinkedIn, and X.
Liked it? Take a second to support Sovit Ranjan Rath on Patreon!
Hi,
Thank you for the wonderful code!
It is great. I implemented it step by step. However, the code does not work. I made three folders named “input”, “output”, and “src”. ran the train.py code, but it has a problem at the beginning with the file models.py
I am so beginner with python and deep learning. I don’t understand what is the problem? should I do something else except the steps you have mentioned above for running the code properly or just making above-mentioned codes in folder “src” and input is enough for running it?
Hello A B. Sorry to hear that you are facing issues. Please do the following:
1. Create “src” folder.
2. Create “outputs” folder (don’t forget the ‘s’)
3. Create “input” folder.
Keep all the .py files in src and execute the codes from within the src folder as well. If you still face issues, please reach out. Will be happy to help.
Hello, it is very helpful, but I can not enumerate my train_loader as it says can’t convert np.ndarray of type numpy.object_. The only supported types are: float64, float32, float16, complex64, complex128, int64, int32, int16, int8, uint8, and bool.
I’m curious about how to improve the performance of the model? I have an overall around 80% F1 score in my test set, for example how can we add dropout to the model? Would this be helpful? Can we use BCEWithLogitsLoss and tanh? Thank you!
Hi Gary. Replying to your latest thread about “I’m curious about how to improve the performance of the model? I have an overall around 80% F1 score in my test set, for example how can we add dropout to the model? Would this be helpful? Can we use BCEWithLogitsLoss and tanh? Thank you!” here as that thread does not allow any more nesting.
You can try different methods. Adding dropout is not that difficult. You just do nn.Dropout2d(p) where p is the percentage. Add it after the layer you wish. Be careful with dropout though. And you can obviously try the other things that you mentioned as well.
Hi, great job with the tutorial it was very informative and helpful! I implemented your base code successfully and everything worked. I tried to apply your code to a different dataset however and got an error regarding the target and input size not matching when BCEloss was called (https://imgur.com/a/zoR4uTn). I tried normalizing and reshaping the images so they are all consistently sized but still get the same issue. I would appreciate any advice you could give. Thanks in advance!
I also forgot to add that the first screenshot was with a bcewithlogits loss function however I also received a target/input size mismatch with a bce loss function as originally used in the tutorial. https://imgur.com/a/DK5VPJD
Hi. I am glad that the original code helped you. Regarding your error, can you please the number of classes of your dataset and update the model python file according to that. I think that would help.
Hi, thank you for the response. I tried changing the class size and it looks like that issue got resolved. I then seem to run into another issue during the training portion of the program. Specifically in line 19 of engine.py where the loss.item() function call results in a NaN value that forces a runtime error (https://imgur.com/a/UN8rcUi). I looked over the new dataset and can’t seem to figure out what would cause the NaN values. Do you have any ideas or suggestions that might help? Thanks!
Hello and Merry Christmas,
thanks for this guide, it has helped me a lot understanding things.
I have a question. How can i take some metrics (classification report, CM) after the validation?
I am trying with “_, y_pred = torch.max(outputs, dim=1)” which gives me the best score and then I 1-hot encode it. But as I see it, even if I predict a label right, if my target has more than 1 labels, my 1 hot encoding will be always false.
eg. y_true = [1 0 0 0 1]
y_pred = [1 0 0 0 0] which are different
Thank you so much for this great tutorials. I really learned a lot from it. Do you have any tutorial / blog on Object Detection (YOLO) project too ? If so, then kindly share that as well.
Hello, thanks for this nice work, I have a question, in some cases, we have one label as GT, however, the model always gives 3 labels. How to handle this?
“Well, after we get all the sigmoid outputs, then we can just choose the top three or top two scores. We can use the indices of those scores and map them to the genre of the movies’ list. This is a very straightforward method but it works really well. We will get to this part in more detail when we carry out the inference.”
I don’t think you are presenting a true multi-label classifier. it might work with this particular ‘movie post’ case, but data structure not logically support a generic case. the output layer essentially lost 1 dimension. Assume a problem is to identify the shape and texture of objects. Num of of shapes and num of texture types very likely can be different. In that case the output later should use a dictionary.
Thanks for explicit explanation. I wonder if the range of validation set label should also be “self.labels = list(self.all_labels[-self.valid_ratio:-10])”, line 36 in dataset.py
As current code doesnot exclude the test label (10).
Again, thanks for this greatful tutorial
Hi Sovit, thanks for your prompt reply. 🙂 I benefit a lot from this tutorial.
I have another two questions:
1) how to select the best model setting the checkpoint, then go through all the epochs?
2) how to set the accuracy on multi-label classification? Do you have further tutorial regarding this topic?
Thanks in advanced!
Hello Sonia. Can you please elaborate on the first question? Do you mean retraining using the best model?
Although I have not shown an accuracy in this post, I will try to cover them in future posts.
In case you have further questions, please start a new thread as this one will not allow any more replies.
Hi Sovit,
Thanks for your reply for previous quesiton.
I have two new question on the mutli-label classification:
1) how to evaluate the model performance?
2) how to choose a “better” model based on the valid set of model performance?
Looking forward to your future on “multilabel” issues.
This website uses cookies so that we can provide you with the best user experience possible. Cookie information is stored in your browser and performs functions such as recognising you when you return to our website and helping our team to understand which sections of the website you find most interesting and useful.
Strictly Necessary Cookies
Strictly Necessary Cookie should be enabled at all times so that we can save your preferences for cookie settings.
If you disable this cookie, we will not be able to save your preferences. This means that every time you visit this website you will need to enable or disable cookies again.


Thank you for this great tutorial. I’m a DL beginner and this post was immensely helpful.
Glad that it is helpful to you.
Hi,
Thank you for the wonderful code!
It is great. I implemented it step by step. However, the code does not work. I made three folders named “input”, “output”, and “src”. ran the train.py code, but it has a problem at the beginning with the file models.py
I am so beginner with python and deep learning. I don’t understand what is the problem? should I do something else except the steps you have mentioned above for running the code properly or just making above-mentioned codes in folder “src” and input is enough for running it?
Thank you
Hello A B. Sorry to hear that you are facing issues. Please do the following:
1. Create “src” folder.
2. Create “outputs” folder (don’t forget the ‘s’)
3. Create “input” folder.
Keep all the .py files in src and execute the codes from within the src folder as well. If you still face issues, please reach out. Will be happy to help.
Hello, it is very helpful, but I can not enumerate my train_loader as it says can’t convert np.ndarray of type numpy.object_. The only supported types are: float64, float32, float16, complex64, complex128, int64, int32, int16, int8, uint8, and bool.
Hi, really sorry to hear that. Are you using the exact code as in the tutorial? Also, can you try,
your_array = torch.from_numpy(your_array)
Thank you for your reply, I have figured it’s my input labels are number strings splitter by space, and I have changed the code. Very helpful!
Glad that you were able to solve it.
I’m curious about how to improve the performance of the model? I have an overall around 80% F1 score in my test set, for example how can we add dropout to the model? Would this be helpful? Can we use BCEWithLogitsLoss and tanh? Thank you!
Hi Gary. Replying to your latest thread about “I’m curious about how to improve the performance of the model? I have an overall around 80% F1 score in my test set, for example how can we add dropout to the model? Would this be helpful? Can we use BCEWithLogitsLoss and tanh? Thank you!” here as that thread does not allow any more nesting.
You can try different methods. Adding dropout is not that difficult. You just do nn.Dropout2d(p) where p is the percentage. Add it after the layer you wish. Be careful with dropout though. And you can obviously try the other things that you mentioned as well.
Got the code running perfectly for my assignment project… Thanks a ton
Hi Nandankumar. Glad that it helped.
Hi, great job with the tutorial it was very informative and helpful! I implemented your base code successfully and everything worked. I tried to apply your code to a different dataset however and got an error regarding the target and input size not matching when BCEloss was called (https://imgur.com/a/zoR4uTn). I tried normalizing and reshaping the images so they are all consistently sized but still get the same issue. I would appreciate any advice you could give. Thanks in advance!
I also forgot to add that the first screenshot was with a bcewithlogits loss function however I also received a target/input size mismatch with a bce loss function as originally used in the tutorial. https://imgur.com/a/DK5VPJD
Hi. I am glad that the original code helped you. Regarding your error, can you please the number of classes of your dataset and update the model python file according to that. I think that would help.
Hi, thank you for the response. I tried changing the class size and it looks like that issue got resolved. I then seem to run into another issue during the training portion of the program. Specifically in line 19 of engine.py where the loss.item() function call results in a NaN value that forces a runtime error (https://imgur.com/a/UN8rcUi). I looked over the new dataset and can’t seem to figure out what would cause the NaN values. Do you have any ideas or suggestions that might help? Thanks!
Please check that the images are being read correctly or are just empty tensors (black pixels). I hope this helps.
Hello and Merry Christmas,
thanks for this guide, it has helped me a lot understanding things.
I have a question. How can i take some metrics (classification report, CM) after the validation?
I am trying with “_, y_pred = torch.max(outputs, dim=1)” which gives me the best score and then I 1-hot encode it. But as I see it, even if I predict a label right, if my target has more than 1 labels, my 1 hot encoding will be always false.
eg. y_true = [1 0 0 0 1]
y_pred = [1 0 0 0 0] which are different
Any advice on this?
Thanks
Hello Ruby. Glad that the post helped you.
I think after getting the predictions, you can try MultiLabelBinarizer from Scikit-Learn. Although, it is difficult to explain the entire process here, I can provide two link which should help you out.
=> https://scikit-learn.org/stable/modules/generated/sklearn.preprocessing.MultiLabelBinarizer.html
=> https://www.projectpro.io/recipes/one-hot-encoding-with-multiple-labels-in-python
I hope this helps you.
Shouldn’t the validation step be outside the epoch loop?
Hello Nick. Actually we are switching to eval() model in the validate() function. So, we run the validation after each epoch of training.
Thank you so much for this great tutorials. I really learned a lot from it. Do you have any tutorial / blog on Object Detection (YOLO) project too ? If so, then kindly share that as well.
Hello. Thank you for your appreciation. Right now, I do not have a blog post for custom training. But I do have two posts using YOLOv3 and YOLOv5 for inference. I hope these help you:
https://debuggercafe.com/object-detection-using-pytorch-yolov3/
https://debuggercafe.com/object-detection-using-pytorch-yolov5/
Also, I have a GitHub repo for custom training of YOLOv3. You may check it out.
https://github.com/sovit-123/Traffic-Light-Detection-Using-YOLOv3
Hello, thanks for this nice work, I have a question, in some cases, we have one label as GT, however, the model always gives 3 labels. How to handle this?
Hello Emma. Can you please recheck that the final layer has 1 output feature, that is:
model.fc = nn.Linear(2048, 1)
Thank you so much for this great tutorials. I am thinking that the input image size of resnet should not be 3*224*224? Why did you choose 3*400*400.
Hello Haonan. Thank you for your appreciation. I think I chose 3*400*400 as slightly bigger images worked better for capturing the features.
Thanks for the fast reply! I’m a DL beginner and i am wondering how should I output the accuracy for each epoch?
Please refer to the train() function in this post to output the accuracy of the model after each epoch. You just need to add a few lines of code.
https://debuggercafe.com/comparing-pytorch-imagenetv1-and-imagenetv2-weights-for-transfer-learning-with-torchvision-0-13/
Thanks a lot! I will try to figure it out.
“Well, after we get all the sigmoid outputs, then we can just choose the top three or top two scores. We can use the indices of those scores and map them to the genre of the movies’ list. This is a very straightforward method but it works really well. We will get to this part in more detail when we carry out the inference.”
I don’t think you are presenting a true multi-label classifier. it might work with this particular ‘movie post’ case, but data structure not logically support a generic case. the output layer essentially lost 1 dimension. Assume a problem is to identify the shape and texture of objects. Num of of shapes and num of texture types very likely can be different. In that case the output later should use a dictionary.
Hello. You are very correct. We are sampling the top-k outputs and it is dependent on the dataset as well. In case you an actual multi-label classification tutorial, please take a look at this.
https://debuggercafe.com/multi-label-fashion-item-classification-using-deep-learning-and-pytorch/
Thanks for explicit explanation. I wonder if the range of validation set label should also be “self.labels = list(self.all_labels[-self.valid_ratio:-10])”, line 36 in dataset.py
As current code doesnot exclude the test label (10).
Again, thanks for this greatful tutorial
Thanks for mentioning that Sonia. I have updated that. Although, I do have to check why it ran without error.
Hi Sovit, thanks for your prompt reply. 🙂 I benefit a lot from this tutorial.
I have another two questions:
1) how to select the best model setting the checkpoint, then go through all the epochs?
2) how to set the accuracy on multi-label classification? Do you have further tutorial regarding this topic?
Thanks in advanced!
Hello Sonia. Can you please elaborate on the first question? Do you mean retraining using the best model?
Although I have not shown an accuracy in this post, I will try to cover them in future posts.
In case you have further questions, please start a new thread as this one will not allow any more replies.
Hi Sovit,
Thanks for your reply for previous quesiton.
I have two new question on the mutli-label classification:
1) how to evaluate the model performance?
2) how to choose a “better” model based on the valid set of model performance?
Looking forward to your future on “multilabel” issues.
To evaluate, you will have to integrate the accuracy code.
To choose the best model, you can choose a model with the least validation loss.