
In this tutorial, we are going to use PyTorch YOLOv3 pre-trained model to do inference on images and videos. Specifically, we will be carrying object detection using PyTorch YOLOv3 using the models provided by the Ultralytics YOLOv3 repository.
And in the next week, we will be covering object detection using PyTorch YOLOv5, again by Ultralytics.
- (This week): Object detection using PyTorch YOLOv3.
- (Next week): Object detection using PyTorch YOLOv5.
Now, you may be asking, “why to carry out inference on so many pre-trained models?” The simple and short answer is that we are going to cover custom training of many famous deep learning classification and object detection models in the near future. And knowing about them by using pre-trained models beforehand is a great way to get familiar with them. Not only that but we will also dive deep into the explanations of many such deep learning models.
Also, when we cover YOLOv5 next week, we will be able to compare it’s performance with YOLOv3.
So, what are we going to cover in this article?
- Use the Ultralytics YOLOv3 repository to infer on images and videos using pre-trained models.
- We will use both, the normal YOLOv3, and the Tiny YOLOv3 for inference on videos. This will also let us compare the computation to performance cost of both the models.
We are using the Ultralytics YOLOv3 pre-trained models as in my opinion, it is one of the best ones out there for YOLOv3 based on the PyTorch framework. There are many good ones, but the documentation and ease of use are what make this repository so special.
Before Moving Ahead…
In recent years, many state-of-the-art deep learning object detection models have come along. And perhaps, the YOLO family of models are some of the best out there.
And if you are already reading this post, this means that you have already heard about YOLO object detection models at least somewhere, if not used them. Maybe this is going to be your first hands-on experience with YOLOv3. Or maybe you have used them many times before. In any case, I hope that you learn something new from this article. And of course, I am always open to suggestions and thoughts on improving my tutorials. Please use the comment section to recommend your suggestions.
Let’s move ahead.
The Directory Structure and Data
We will need to clone the Ultralytics YOLOv3 repository onto our systems. Before that, just create a directory for this tutorial and give a proper name to it. For example, you can name it YOLOv3_Object_Detection. Enter into that directory and clone the repository using the following command.
git clone https://github.com/ultralytics/yolov3.git
After the cloning gets complete, you should see a yolov3 folder. Enter that directory. We will carry all our operations from within this directory. You should see a lot of folders and files. But the important one we want to focus on here is the detect.py Python script as we will be executing that.
We also need the PyTorch YOLOv3 pre-trained models for carrying out the inference on images and videos. To download all the YOLOv3 pre-trained weights, execute the following command within the same folder.
sh weights/download_weights.sh
This should download three pre-trained YOLOv3 weight files into the same directory. They should be yolov3.pt, yolov3-spp.pt, yolov3-tiny.pt. We will be using the yolov3.pt and yolov3-tiny.pt for all our inference tasks and comparing their performance as well.
Installing all the Requirements for PyTorch YOLOv3
The Ultralytics PyTorch YOLOv3 has quite a few requirements that need to be installed to run everything from the repository properly. It is always better if you use a separate Anaconda environment or Python virtual environment for installing and using such newer packages.
First of all, I would recommend you to install PyTorch 1.8. This is the latest stable version at the time of writing this and torch>=1.7.1 is also recommend for the Ultralytics YOLOv3 repository.
After that, just run the following command in your current terminal environment to install all the other required packages.
pip install -r requirements.txt
After all the installations are complete, we are all set for object detection using PyTorch YOLOv3.
Just more thing before we can actually carry out object detection.
The Input Data
We will be using a few images and videos for object detection inference in this tutorial. You can download the same input images and videos that I use by clicking the button below.
Using these you will get to compare all your outputs to the outputs, FPS, and detections in this tutorial. But you are free to use your own images and videos as well.
After downloading the zip file, extract it inside the yolov3 directory. Inside, you should see the following two images and two videos as well.

Now, your directory structure inside the yolov3 folder should look something like the following.
├── data
│   ├── coco128.yaml
│   ├── coco.yaml
│   ├── hyp.finetune.yaml
│   ├── hyp.scratch.yaml
│   ├── images
│   │   ├── bus.jpg
│   │   └── zidane.jpg
│   ├── scripts
│   │   ├── get_coco.sh
│   │   └── get_voc.sh
│   └── voc.yaml
├── detect.py
├── Dockerfile
├── hubconf.py
├── input
│   ├── image_1.jpg
│   ├── image_2.jpg
│   ├── video_1.mp4
│   └── video_2.mp4
├── LICENSE
├── models
│   ├── common.py
│   ├── experimental.py
│   ├── export.py
│   ├── __init__.py
│   ├── __pycache__
│   │   ├── common.cpython-37.pyc
│   │   ├── experimental.cpython-37.pyc
│   │   ├── __init__.cpython-37.pyc
│   │   └── yolo.cpython-37.pyc
│   ├── yolo.py
│   ├── yolov3-spp.yaml
│   ├── yolov3-tiny.yaml
│   └── yolov3.yaml
├── README.md
├── requirements.txt
├── test.py
├── train.py
├── tutorial.ipynb
├── utils
│   ├── activations.py
│   ├── autoanchor.py
│   ├── datasets.py
│   ├── general.py
│   ├── google_app_engine
│   │   ├── additional_requirements.txt
│   │   ├── app.yaml
│   │   └── Dockerfile
│   ├── google_utils.py
│   ├── __init__.py
│   ├── loss.py
│   ├── metrics.py
│   ├── plots.py
│   ├── __pycache__
│   │   ├── autoanchor.cpython-37.pyc
│   │   ├── datasets.cpython-37.pyc
│   │   ├── general.cpython-37.pyc
│   │   ├── google_utils.cpython-37.pyc
│   │   ├── __init__.cpython-37.pyc
│   │   ├── metrics.cpython-37.pyc
│   │   ├── plots.cpython-37.pyc
│   │   └── torch_utils.cpython-37.pyc
│   └── torch_utils.py
├── weights
│   └── download_weights.sh
├── yolov3.pt
├── yolov3-spp.pt
└── yolov3-tiny.pt
I have highlighted all the important folders and files that we will be dealing with. These include the detect.py script, the input data, and the models.
Okay, now we are all set to start the inference part of this tutorial.
Object Detection using PyTorch YOLOv3
We will carry out inference on two images and two videos using the normal YOLOv3 model and the Tiny YOLOv3 model. So, we will execute detect.py 8 times in total.
Let’s start with the images first and then we will move over to the video.
PyTorch YOLOv3 Object Detection on Images
Before executing the following scripts, make sure that you are inside the yolov3 folder that you cloned and everything is set up.
We will execute the commands for the first image using both yolov3.pt and yolov3-tiny.pt. Then we will compare the results simulaneously.
python detect.py --source input/image_1.jpg --weights yolov3.pt --project infer_yolov3
So, what are all those command line arguments.
--sourceindicates the path to the image. We haveimage_1.jpginside theinputfolder.--weightsis the path to the weight file and we are using the normal YOLOv3 here.- Finally,
--projectwill create a folder with the name that you provide. And all the detection results will be stored insideexpsubfolders inside theinfer_yolov3folder. You can give any name you want that will help you easily distinguish between the detections of the YOLOv3 and Tiny YOLOv3.
After executing the command you should see output similar to the following. Let’s see this completely just once to get an idea.
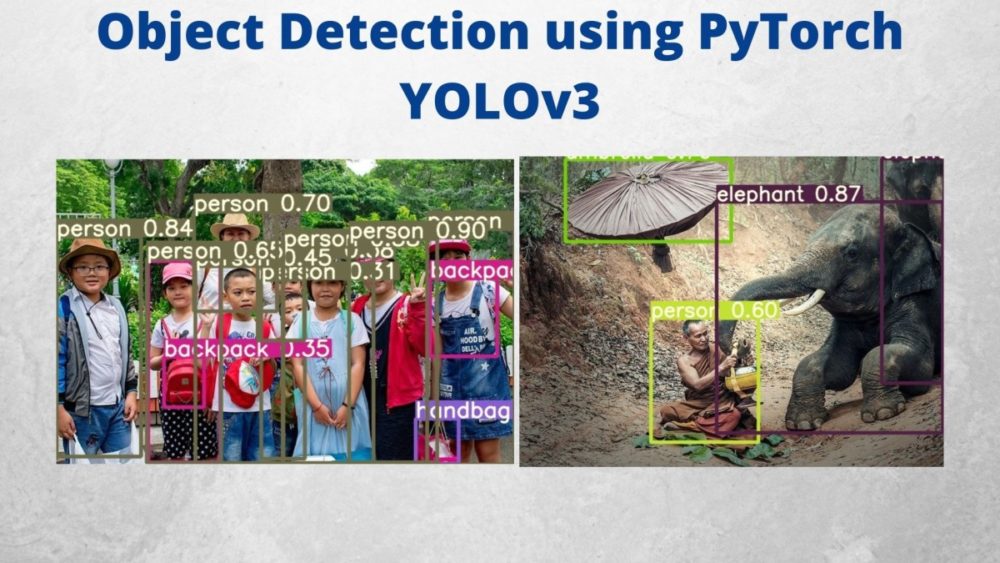
Namespace(agnostic_nms=False, augment=False, classes=None, conf_thres=0.25, device='', exist_ok=False, img_size=640, iou_thres=0.45, name='exp', project='infer_yolov3', save_conf=False, save_txt=False, source='input/image_1.jpg', update=False, view_img=False, weights=['yolov3.pt'])
YOLOv3 v9.1-7-gc1f8dd9 torch 1.8.0 CUDA:0 (GeForce GTX 1060, 6078.3125MB)

Fusing layers...
Model Summary: 261 layers, 61922845 parameters, 0 gradients, 156.3 GFLOPS
image 1/1 /home/sovit/my_data/Data_Science/Projects/current_blogs/20210405(Object Detection using PyTorch  YOLOv3)/yolov3/input/image_1.jpg: 480x640 1 persons, 2 elephants, 1 umbrellas, Done. (0.192s)
Results saved to infer_yolov3/exp
Done. (0.546s)
You can see that the model has detected 1 persons, 2 elephants, 1 umbrellas.
Before visualizing the outputs, let’s infer on the same image using yolov3-tiny.pt as well. Then we can examine the results side by side.
python detect.py --source input/image_1.jpg --weights yolov3-tiny.pt --project infer_yolov3_tiny
The following is the truncated output.
...
Results saved to infer_yolov3_tiny/exp
Done. (0.030s)
Notice that we are changing the model and project folder name here so that all the TIny YOLO results are stored in a different folder.
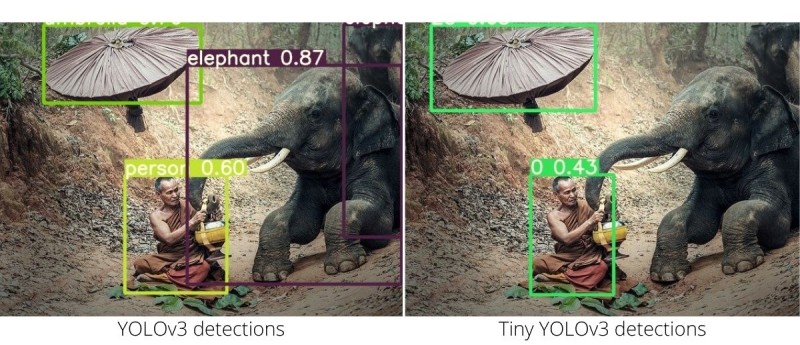
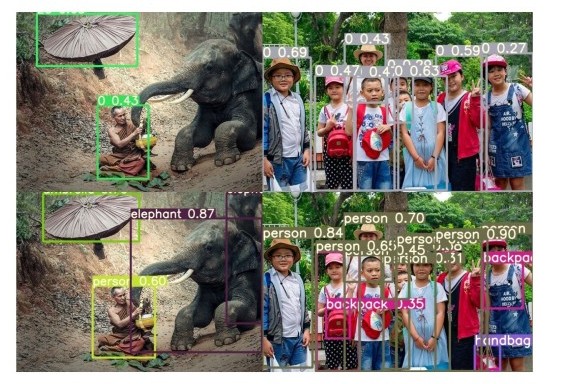
The results are really interesting. In figure 3, the left image shows the YOLOv3 detections. We can see that it has detected the umbrella, the person, and two elephants. Yes, it was able to detect the elephant which was not even 25% visible in the image. That is really amazing. Whereas, the Tiny YOLOv3 model missed the two elephants completely. But we can also see in the above outputs, that Tiny YOLOv3 took only 0.030 seconds and YOLOv3 took 0.546 seconds. So, you can imagine the speed to performance tradeoff here.
Now, inferencing on the second image using both the models.
python detect.py --source input/image_2.jpg --weights yolov3.pt --project infer_yolov3
The truncated output.
...
Results saved to infer_yolov3/exp4
Done. (0.562s)
Now, with the Tiny YOLOv3 model.
python detect.py --source input/image_2.jpg --weights yolov3-tiny.pt --project infer_yolov3_tiny
Following is the output.
Results saved to infer_yolov3_tiny/exp4
Done. (0.027s)
Again, the detection timings are much faster in case of Tiny YOLOv3 model.
The following image shows the outputs.
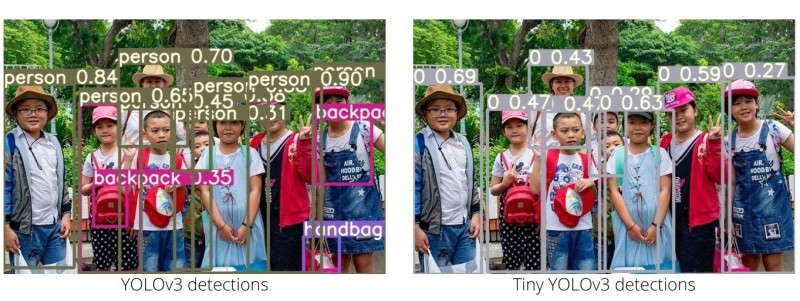
The results differ this time hugely as well. The Tiny YOLOv3 model is not able to detect a single handbag in the image. But the YOLOv3 model is able to detect everything. Of course, the Tiny YOLOv3 model is much faster.
PyTorch YOLOv3 Object Detection on Videos
In this section, we will carry out inference on videos. Again we have two videos and we will use both YOLOv3 and Tiny YOLOv3 for inference. We will also compare the FPS of both the models.
Let’s carry out inference on the first video using both the models. First, the YOLOv3 model.
python detect.py --source input/video_1.mp4 --weights yolov3.pt --project infer_yolov3 --view-img
Almost everything is same. The --view-img argument will show the outputs while the script is executing. If you wish, you can omit this one. The following is the sample output.
Fusing layers...
Model Summary: 261 layers, 61922845 parameters, 0 gradients, 156.3 GFLOPS
video 1/1 (1/902) /home/sovit/my_data/Data_Science/Projects/current_blogs/20210405(Object Detection using PyTorch  YOLOv3)/yolov3/input/video_1.mp4: 384x640 4 persons, 6 cars, 1 buss, 1 trucks, 1 dogs, 1 handbags, 1 suitcases, Done. (0.041s)
...
video 1/1 (902/902) /home/sovit/my_data/Data_Science/Projects/current_blogs/20210405(Object Detection using PyTorch  YOLOv3)/yolov3/input/video_1.mp4: 384x640 4 persons, 11 cars, 1 trucks, Done. (0.037s)
Results saved to infer_yolov3/exp2
Done. (44.502s)
Now, with Tiny YOLOv3 model.
python detect.py --source input/video_1.mp4 --weights yolov3-tiny.pt --project infer_yolov3_tiny --view-img
Fusing layers...
Model Summary: 48 layers, 8849182 parameters, 196350 gradients, 13.2 GFLOPS
video 1/1 (1/902) /home/sovit/my_data/Data_Science/Projects/current_blogs/20210405(Object Detection using PyTorch  YOLOv3)/yolov3/input/video_1.mp4: 384x640 5 0s, 2 2s, 1 7s, 1 16s, Done. (0.007s)
...
video 1/1 (902/902) /home/sovit/my_data/Data_Science/Projects/current_blogs/20210405(Object Detection using PyTorch  YOLOv3)/yolov3/input/video_1.mp4: 384x640 2 0s, 6 2s, 1 5s, Done. (0.006s)
Results saved to infer_yolov3_tiny/exp2
Done. (11.977s
If you do a bit of simple math, you will notice that YOLOv3 runs with an average FPS of 20.26 and Tiny YOLOv3 with an average FPS of 75. And these results are on a very modest GTX 1060 GPU. Obviously, Tiny YOLOv3 is much faster, but what about the detections?
YOLOv3 is detecting many more things such as the handbags, more persons in the background, and partially occluded cars as well.
Let’s detect on another video and see what kind of outputs we are getting before making a conclusion.
python detect.py --source input/video_2.mp4 --weights yolov3.pt --project infer_yolov3 --view-img
We get the following output on the terminal when using the normal YOLOv3 model for inference.
Fusing layers...
Model Summary: 261 layers, 61922845 parameters, 0 gradients, 156.3 GFLOPS
video 1/1 (1/265) /home/sovit/my_data/Data_Science/Projects/current_blogs/20210405(Object Detection using PyTorch  YOLOv3)/yolov3/input/video_2.mp4: 384x640 13 persons, 2 skiss, Done. (0.041s)
...
video 1/1 (265/265) /home/sovit/my_data/Data_Science/Projects/current_blogs/20210405(Object Detection using PyTorch  YOLOv3)/yolov3/input/video_2.mp4: 384x640 11 persons, Done. (0.037s)
Results saved to infer_yolov3/exp3
Done. (12.123s)
And now, for the Tiny YOLOv3 inference.
python detect.py --source input/video_2.mp4 --weights yolov3-tiny.pt --project infer_yolov3_tiny --view-img
Fusing layers...
Model Summary: 48 layers, 8849182 parameters, 196350 gradients, 13.2 GFLOPS
video 1/1 (1/265) /home/sovit/my_data/Data_Science/Projects/current_blogs/20210405(Object Detection using PyTorch  YOLOv3)/yolov3/input/video_2.mp4: 384x640 6 0s, 2 30s, Done. (0.007s)
...
video 1/1 (265/265) /home/sovit/my_data/Data_Science/Projects/current_blogs/20210405(Object Detection using PyTorch  YOLOv3)/yolov3/input/video_2.mp4: 384x640 4 0s, Done. (0.005s)
Results saved to infer_yolov3_tiny/exp3
Done. (3.403s)
The Tiny YOLOv3 model is again much faster than the normal YOLOv3 model. The former runs with 77 FPS on average compared to the 21.8 FPS of YOLOv3 on a GTX 1060.
The video output would give us an even better idea.
The above video clip shows the YOLOv3 results on the left and TIny YOLOv3 results on the right. If you pause at any moment, then most probably you will see that the YOLOv3 model is detecting more objects than the Tiny YOLOv3 model. Especially the skis and the two persons on the right close to each other. Tiny YOLOv3 is detecting them as a single person, whereas the YOLOv3 model is detecting them correctly as two persons.
Apart from that, the YOLOv3 model is also detecting the backpack of the person at the end.
Some Obervations
Let’s summarize what we observed in this article while using a PyTorch YOLOv3 model for object detection and inference.
- By now we know in terms of detection the normal YOLOv3 model is much better than the Tiny YOLOv3 model. It detects more objects at any given instance in video with higher confidence.
- At the same time the Tiny YOLOv3 model is much faster. It is just perfect for embedded and IoT devices if you plan to use some sort of deep learning based object detection for any of your projects.
- There is obviously some trade-off between the performance and speed and that is to be expected. Maybe the gap will reduce in the near future with more object detection algorithms to choose from.
Summary and Conclusion
In this article, we used pre-trained PyTorch YOLOv3 models for object detection. We saw how both, the normal YOLOv3 model and the Tiny YOLOv3 model differ in terms of performance and speed. We did not cover any training or paper or theory in detail here. Surely, we will do that in the coming posts.
If you have any doubts, thoughts, or suggestions, then please leave them in the comment section. I will be happy to address them.
You can contact me using the Contact section. You can also find me on LinkedIn, and X.

Excellent article. Customized object detection, preferably an ANPR application of detecting number plate will be highly appreciated.
Thank you Raj. And yes, ANPR is also added to my pipeline. Believe me, I want to post all the articles that my readers suggest. But time is the main constraint for me. I try to push out all the content based on recommendations or that I think would be useful. I also want to push out more articles and even more quickly. So, yeah, I never forget about my readers’ suggestions. I have a complete list of those and I try my best to implement them one after the other. So, stay tuned 😀.