
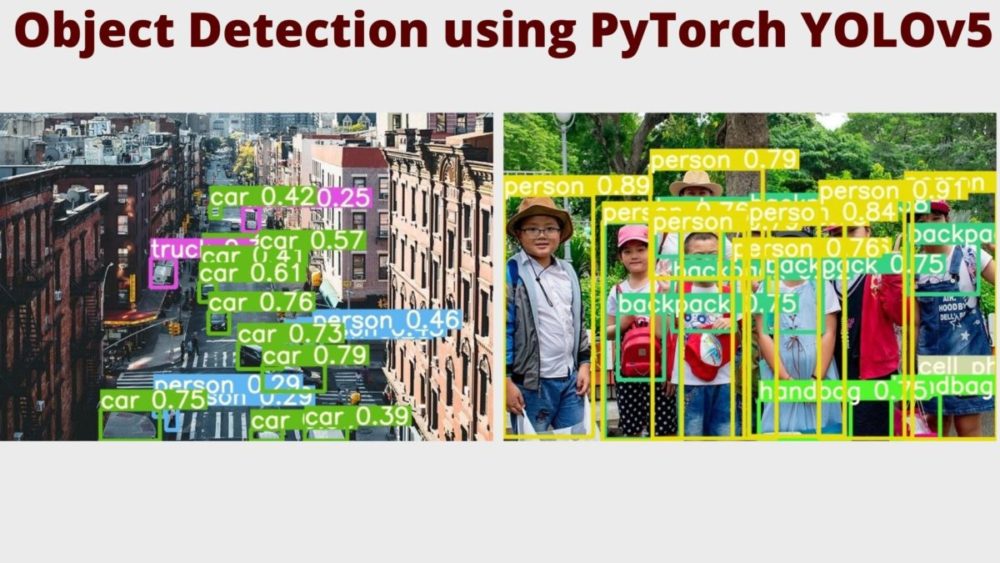
In this tutorial, we will use a pre-trained YOLOv5 model to carry out object detection on images and videos. We will carry out object detection using PyTorch YOLOv5 using the models available in the Ultralytics YOLOv5 repository.
In the last week’s tutorial, we used pre-trained PyTorch YOLOv3 models for inference on images and videos. This is a sort of a continuation of that post where we will compare how the YOLOv5 model performs in terms of detections and FPS.
- (This week): Object detection using PyTorch YOLOv5.
- (Last week): Object detection using PyTorch YOLOv3.
If you are reading this first, then I recommend that you go through the previous post and then come back to this. That way, you will have a much better idea of the detection results that we get here.
We will cover the following in this article.
- Use the Ultralytics YOLOv5 repository for inference on images and videos using pre-trained models.
- We will use both, the largest YOLOv5 model and the smallest YOLOv5 model for inference on videos. This will also let us compare the computation to the performance cost of both models.
We will use one image and one video from the previous tutorial so that we can compare the YOLOv5 detections and FPS with that of YOLOv3. Some of the images and videos are also going to be different and new so that the tutorial does not become completely boring.
Set Up the Project Directory
First, we need to set up the project directory properly to ensure that everything works properly. Create a directory for this this tutorial. Name it anything as per your choice.
Then clone the Ultralytics YOLOv5 repository using the following command.
git clone https://github.com/ultralytics/yolov5.git
You will see a yolov5 folder inside your current directory. cd into the yolov5 folder. We will execute every command from within this folder only. We will only need the detect.py Python script for all our detection purposes in this tutorial.
Requirements
The repository has some requirements to make the codes run properly. First, I will insist that you manually install the latest PyTorch framework version. I have used PyTorch 1.8 in this tutorial and this is the latest version at the time of writing this.
After that, you can install the requirements as per the repository. Just execute the following command. Be sure to create a new Anaconda environment or Python virtual environment for this project. This will ensure that none of your other projects have any conflicts due to the installation of the requirements.
pip install -r requirements.txt
This should install all the required libraries.
Download the Pre-Trained PyTorch YOLOv5 Weights for Object Detection
We need the pre-trained weights to carry out inference on images and videos.
Execute the following command to download the pre-trained PyTorch YOLOv5 weihgts.
sh weights/download_weights.sh
It will download all four pre-trained weight files into the current working directory. They are yolov5s.pt, yolov5m.pt, yolov5l.pt, and yolov5x.pt indicating the small, medium, large, and extra large models respectively. Out of these, we will use only the small and extra larges models for all our detections.
The Input File
You can use any set of images and videos that you want for the inference and detections. But I am providing a zipped file that contains two images and two videos that will showcase the object detection ability of PyTorch YOLOv5 quite well. One image and one video are same as the previous post for comparison purposes.
After downloading the file, extract it inside the yolov5 folder and you are all set.
The final directory structure should be something like the following.
├── data
│   ├── argoverse_hd.yaml
│   ├── coco128.yaml
...
├── detect.py
├── Dockerfile
├── hubconf.py
├── input
│   ├── image_1.jpg
│   ├── image_2.jpg
│   ├── video_1.mp4
│   └── video_2.mp4
├── LICENSE
├── models
│   ├── common.py
│   ├── experimental.py
│   ├── export.py
│   ├── hub
│   │   ├── anchors.yaml
│   │   ├── yolov3-spp.yaml
│   │   ├── yolov3-tiny.yaml
...
│   ├── __init__.py
│   ├── yolo.py
│   ├── yolov5l.yaml
│   ├── yolov5m.yaml
│   ├── yolov5s.yaml
│   └── yolov5x.yaml
├── README.md
├── requirements.txt
├── test.py
├── train.py
├── tutorial.ipynb
├── utils
│   ├── activations.py
│   ├── autoanchor.py
...
├── weights
│   └── download_weights.sh
├── yolov5l.pt
├── yolov5m.pt
├── yolov5s.pt
└── yolov5x.pt
I have highlighted all the important files and folders that we need for this tutorial. Those are the pre-trained PyTorch YOLOv5 weight files, the input folder, and the detect.py script.
Now, we are all set to execute the commands to carry out object detection using PyTorch YOLOv5.
Object Detection using PyTorch YOLOv5
From this section onward, we will start to detect objects in images and videos using PyTorch YOLOv5.
I hope that you have downloaded the input file and extracted its contents in the yolov5 directory.
We will start with object detection in images and then move on to videos.
Object Detection using PyTorch YOLOv5 in Images
We have two images inside the input folder. We will carry out inference on each of the images twice, once using yolov5x.pt and once using yolov5s.pt.
Detecting Objects in the First Image
Let’s start with detecting objects in the image_1.jpg. First, we will detect obejcts using the yolov5s.pt (small) model and then with the yolov5x.pt (largest) model.
Execute the following command from your terminal/command line.
python detect.py --source input/image_1.jpg --weights yolov5s.pt --project infer_yolov5s
Let’s go over the command line arguments, then we will take a look at the outputs.
--source: This is the path to the input file.--weights: This indicates the path to the yolov5 weight file that we want to use for detection. In this case, it isyolov5s.pt.--project: If we use this flag and provide a name after it, then a folder with the same name will be created to save the outputs. We have used the nameinfer_yolov5s. So, while executing, a folder with this name will be created which in-turn will contain anexpfolder that will hold all the outputs.
You should get to see output similar to the following.
Namespace(agnostic_nms=False, augment=False, classes=None, conf_thres=0.25, device='', exist_ok=False, img_size=640, iou_thres=0.45, name='exp', project='infer_yolov5s', save_conf=False, save_txt=False, source='input/image_1.jpg', update=False, view_img=False, weights=['yolov5s.pt'])
YOLOv5 🚀 v4.0-138-ged2c742 torch 1.8.0 CUDA:0 (GeForce GTX 1060, 6078.3125MB)

Fusing layers...
Model Summary: 224 layers, 7266973 parameters, 0 gradients, 17.0 GFLOPS
image 1/1 /home/.../image_1.jpg: 448x640 9 persons, 1 handbag, Done. (0.012s)
Results saved to infer_yolov5s/exp
Done. (0.026s)
We can see that the small YOLOv5 model took somewhere around 0.012 seconds to complete the execution. Also, we can see the detections. They are 9 persons, 1 handbag. This was really fast.
Now, with the yolo5x.pt, that is, the largest model.
python detect.py --source input/image_1.jpg --weights yolov5x.pt --project infer_yolov5x
You should see output similar to the following.
Namespace(agnostic_nms=False, augment=False, classes=None, conf_thres=0.25, device='', exist_ok=False, img_size=640, iou_thres=0.45, name='exp', project='infer_yolov5x', save_conf=False, save_txt=False, source='input/image_1.jpg', update=False, view_img=False, weights=['yolov5x.pt'])
YOLOv5 🚀 v4.0-138-ged2c742 torch 1.8.0 CUDA:0 (GeForce GTX 1060, 6078.3125MB)

Fusing layers...
Model Summary: 476 layers, 87730285 parameters, 0 gradients, 218.8 GFLOPS
...
...448x640 10 persons, 7 backpacks, 2 handbags, 1 cell phone, Done. (0.068s)
Results saved to infer_yolov5x/exp
Done. (0.087s)
The largest YOLOv5 model is taking much longer, 0.070 seconds for detecting 10 persons, 7 backpacks, 2 handbags, 1 cell phone. Obviously, there are more detections in this case. Let’s take a look at the image results.
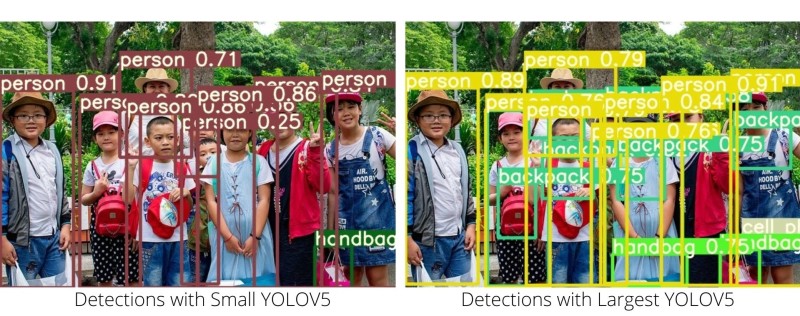
The detections are really interesting. For the small YOLOv5 detections, we can see almost all the persons are detected and one handbag is also detected. This is alright. The largest YOLOv5 detections are much more than that. It is also detecting many more backpacks, and also a cell phone. In fact, the whole image is filled with detections.
Now, if we compare the largest YOLOv5x predictions with the YOLOv3 predictions from the previous post, then the cellphone was not actually detected. Also, the number of backpacks detected by the largest YOLOv5 is much more than that of YOLOv3. Seems like YOLOv5 is actually a lot better than YOLOv3.
Detecting Objects in the Second Image
Now, let’s use the YOLOv5 models to detect objects in the second image.
First, with the small YOLOv5 model.
python detect.py --source input/image_2.jpg --weights yolov5s.pt --project infer_yolov5s
The following is the truncated output.
...
input/image_2.jpg: 448x640 5 persons, 11 cars, 2 trucks, Done. (0.012s)
Results saved to infer_yolov5s/exp2
Done. (0.041s)
This time the small YOLOv5 model was able to detect 5 persons, 11 cars, 2 trucks in 0.012 seconds.
Now, with the largest YOLOv5 model.
python detect.py --source input/image_2.jpg --weights yolov5x.pt --project infer_yolov5x
...
input/image_2.jpg: 448x640 10 persons, 11 cars, 1 bus, 3 trucks, 5 traffic lights, Done. (0.072s)
Results saved to infer_yolov5x/exp2
Done. (0.095s)
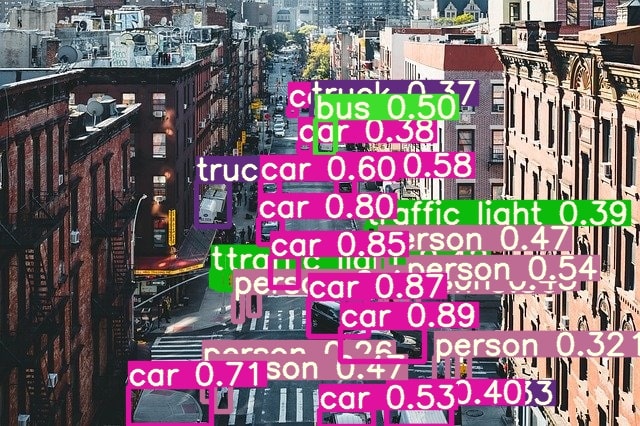
As expected, the largest YOLOv5 model is able to detect many more objects. It detected 11 cars, 1 bus, 3 trucks, 5 traffic lights in 0.072 seconds. Obviously, the detection time is longer due to the large model size.
The following figure shows the images for both the detections.
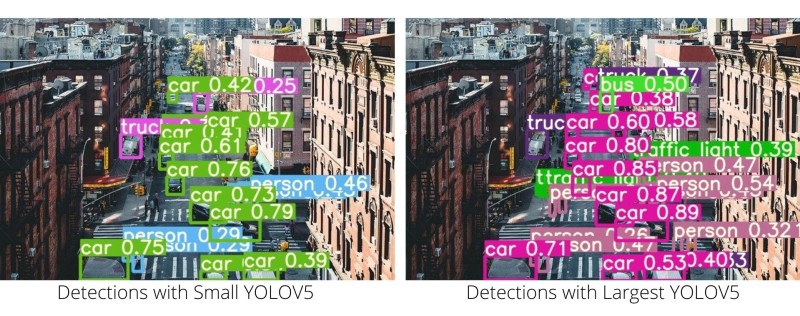
Simply, the detection results speak for themselves here. We can see many more vehicles being detected when using the largest YOLOv5 model than when using the small YOLOv5 model. Surely, the smaller model takes much less time for the detections. So, that is the one trade-off between performance and detection time we have to take care of.
Object Detection in Videos
Now, we will move over to detect objects in videos using the YOLOv5 object detectors. Here also, we have two videos and we will use both the models to carry out the detections.
Object Detection in Video 1
Let’s start off with video_1.mp4 in the input folder using the small YOLOv5 model.
python detect.py --source input/video_1.mp4 --weights yolov5s.pt --project infer_yolov5s
The following is the output. I have used a GTX 1060 GPU for all the detections.
Fusing layers...
Model Summary: 224 layers, 7266973 parameters, 0 gradients, 17.0 GFLOPS
video 1/1 (1/265) input/video_1.mp4: 384x640 12 persons, 2 skiss, Done. (0.011s)
...
video 1/1 (265/265) input/video_1.mp4: 384x640 8 persons, Done. (0.008s)
Results saved to infer_yolov5s/exp3
Done. (4.481s)
So, we are getting around 59 FPS when using the small YOLOv5 model on the video for detections. When we used the small YOLOv3 model in the previous post the FPS was around 77.
But before jumping to any solid conclusions let’s carry out the detections using the largest YOLOv5 model and take a look at the results as well.
python detect.py --source input/video_1.mp4 --weights yolov5x.pt --project infer_yolov5x
Fusing layers...
Model Summary: 476 layers, 87730285 parameters, 0 gradients, 218.8 GFLOPS
video 1/1 (1/265) /input/video_1.mp4: 384x640 13 persons, 4 skiss, Done. (0.059s)
...
video 1/1 (265/265) /input/video_1.mp4: 384x640 7 persons, 1 backpack, Done. (0.053s)
Results saved to infer_yolov5x/exp3
Done. (16.392s)
With the largest YOLOv5 model, we are getting somewhere around 16.16 FPS on an average when using a GTX 1060 GPU. This is also lower than the the 21.8 FPS that we got when using the normal YOLOv3 model.
Okay, let’s take a look at the detections.
Most probably, the lower FPS is due to the higher number of detections when using the YOLOv5 models. Even with the small YOLOv5, we are able to get the backpack class detections which was not the case when using YOLOv3.
And with the largest YOLOv5 model, we are even able to get the far away person on the top-right of the video frame. That is quite amazing.
Let’s move on to detecting objects in a new video.
Object Detection in Video 2
These are going to be the final set of detections that we will carry out in this tutorial.
We will start with using the small YOLOv5 model first.
python detect.py --source input/video_2.mp4 --weights yolov5s.pt --project infer_yolov5s
Your output should be something similar to this.
Fusing layers...
Model Summary: 224 layers, 7266973 parameters, 0 gradients, 17.0 GFLOPS
video 1/1 (1/366) /input/video_2.mp4: 384x640 1 person, 9 cars, Done. (0.011s)
...
video 1/1 (366/366) /input/video_2.mp4: 384x640 2 persons, 17 cars, 1 bus, 1 backpack, Done. (0.008s)
Results saved to infer_yolov5s/exp4
Done. (7.552s)
Now, using the largest YOLOv5 model.
python detect.py --source input/video_2.mp4 --weights yolov5x.pt --project infer_yolov5x
Fusing layers...
Model Summary: 476 layers, 87730285 parameters, 0 gradients, 218.8 GFLOPS
video 1/1 (1/366) /input/video_2.mp4: 384x640 1 person, 11 cars, Done. (0.059s)
...
video 1/1 (366/366) /input/video_2.mp4: 384x640 2 persons, 18 cars, 3 buss, 2 trucks, 1 backpack, Done. (0.053s)
Results saved to infer_yolov5x/exp4
Done. (24.501s)
This time we are getting an average of 48.4 FPS when using the small YOLOv5 model and an average of 14.9 FPS when using the largest YOLOv5 model.
The following are the detections results in video format.
The small YOLOv5 model is not able to detect the persons on the footbridge. They are appearing really small in the video. The largest YOLOv5 model is also not able to detect the persons on the footbridge very well. It is able to detect them only in a few frames. But there is one interesting thing to note here. The largest YOLOv5 model is able to detect the handbags of the persons across the street and many more vehicles in the final frames of the video as well.
Going Further From Here…
Till now we have seen how to carry out object detection using pre-trained models with both YOLOv3 and YOLOv5 models. Hopefully, in future articles, we will be able to explore fine-tuning and training of many state-of-the-art classification and object detection models.
Summary and Conclusion
In this article, we learned how to use a pre-trained YOLOv5 model to carry out object detection in images and videos. We analyzed the trade-off between detection quality and the FPS for the small YOLOv5 model and the largest YOLOv5 model. I hope that you enjoyed and learned something new from this article.
If you have any doubts, thoughts, or suggestions, then please leave them in the comment section. I will surely address them.
You can contact me using the Contact section. You can also find me on LinkedIn, and X.

when you detect some thing on a homogenous surface like road the object is contrast is more leading to detection in a frame.
while on bridge the human being and bridge surface contrast is not much besides being small.
Really appreciate the input and insight. Thanks a lot.
Hey Great example of object detection. Do you have any post on deploying yolov5 in azure and testing the services?
Thank you. Glad that you liked it. Currently, I don’t have any deployment posts. Let me see if I can put that up into my TODO posts.
Hi, I appreciate your post as I’m trying to use Yolo v5 for my work – in this moment I need to detect and count a sort of mosquitos in capture plates – ther can be more then 1k in each plate! I’ve managed to train YOLOv5 but I still have multiple detections – Do you know how to make Yolo v5 use NMS?
Thanks
Hello Maria, I am glad that you liked the post. As far as I know, the output you get already uses NMS, you only have to give the detection confidence threshold while inferencing.
It seems that your objects are quite small (mosquitos). Maybe try using the YOLOv5X model, I think that will help.
I hope that this helps.
Thanks for the blog. Can anyone tell me how to use yolov5 with resnet50 together.
Hello Rabin. For that, you may need to create a custom backbone configuration as per the YOLOv5 standards. But mostly, using the default backbones and models give really good results and are recommended as well.