
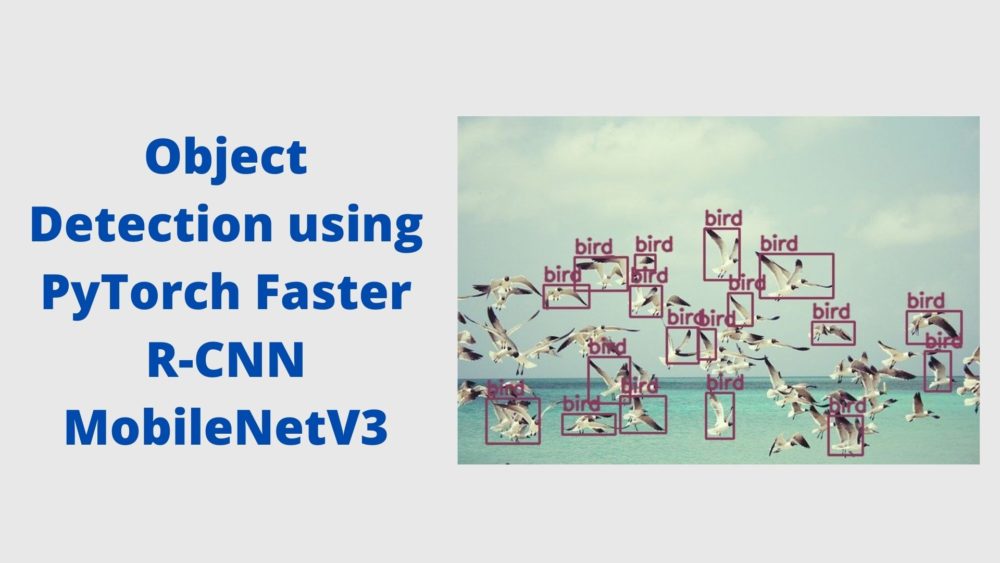
PyTorch has lots of pre-trained models for object detection in it’s torchvision.models (link) module. And recently, Faster R-CNN MobileNetv3-Large FPN has joined the list as well. So, in this tutorial, we will be using the PyTorch Faster R-CNN MobileNetv3 model for object detection in images and videos.
If you would like to explore other object detection articles, then you may take a look here. It is my hope that you will find the content valuable.
So, what are we going to learn in this tutorial? We will carry out object detection using PyTorch Faster R-CNN MobileNetV3. We will use a few images and videos that will test the model really well. This will showcase the strengths and also the weaknesses of the model on which further improvements can be done.

If you are new to deep learning based object detection, then I recommend that you go through the following blogs to get a better understanding of the concepts.
I hope that you are excited to follow along with this tutorial.
PyTorch Faster R-CNN MobileNetV3
Most of the Faster R-CNN models like Faster R-CNN ResNet50 FPN are really great at object detection. But there is one issue. It struggles to detect objects in real-time. Using a mid-range GPU, it is very difficult to get more then 6 or 7 FPS with the ResNet50 backbone.
This is where the MobileNetV3 backbone comes to the rescue. MobileNets are really great backbones if you are looking out for object detection in computationally constrained and edge devices. The complete model that PyTorch provides is called Faster R-CNN MobileNetV3 Large FPN. There is also a Faster R-CNN MobileNetV3 Large 320 FPN, but we will focus on that in another post.
The input and output formats are similar to the ResNet50 backbone Faster R-CNN models from PyTorch. So, if you are new to these models and pre-trained object detection inference, then please go through this post. It will help you a lot.
Before moving into the fun detection part, we have to set up some things.
Directory Structure, Input Data, and PyTorch Version
Let us see how the project directory is structured.
├── coco_names.py
├── detect_img.py
├── detect_utils.py
├── detect_vid.py
├── input
│   ├── image_1.jpg
│   ├── image_2.jpg
│   ├── video_1.mp4
│   └── video_2.mp4
├── outputs
│   ...
Directly inside the project folder, we have four Python scripts. We will get to know the contents of these files while writing the code for them. The input folder contains the two images and two videos that we will use for detection in this tutorial using the PyTorch Faster R-CNN MobileNetV3 model. Finally, the outputs folder will contain all the detection results.
Coming to the input data, you can use any images and videos of your choice. Still, if you want to compare and use the data as used in this tutorial, then you can download them from the below.
The above will download the source code and the input data for you. You can extract and execute the code. Still, I insist that you type along or at least follow the code here to get the most understanding.
For the PyTorch version, this tutorial is based on PyTorch 1.8. So, I recommend to use at least PyTorch version 1.8. Any recent/higher versions should not cause any issues as well.
Although, if you are updating your PyTorch version, be sure to create a new Python virtual environment or Anaconda environment, whichever you prefer to use. This will ensure that there are no version conflicts with any of your existing codes and projects.
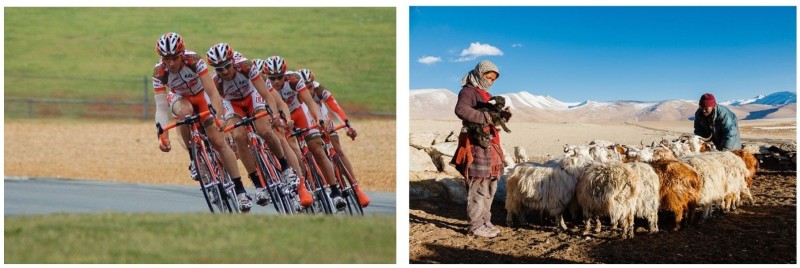
Just one more thing before moving ahead. To get an idea, the following image shows the two images from the data that we will be using.
We have everything set up. Let us move ahead and write the code for Object Detection using PyTorch Faster R-CNN MobileNetV3.
Object Detection using PyTorch Faster R-CNN MobileNetV3
We have four Python files in which we will be writing the codes. We will tackle each of them in their respective sub-sections.
Let us start with writing the code.
The MS COCO Instance Category Names
All the PyTorch object detection models have been trained on the MS COCO object detection dataset. It has almost 90 classes, which is a lot. We will need those class names (labels) as we will map the prediction indices of the objects to these classes.
We will keep all these class names in a list called COCO_INSTANCE_CATEGORY_NAMES. This will go into the coco_names.py Python file.
COCO_INSTANCE_CATEGORY_NAMES = [
    '__background__', 'person', 'bicycle', 'car', 'motorcycle', 'airplane', 'bus',
    'train', 'truck', 'boat', 'traffic light', 'fire hydrant', 'N/A', 'stop sign',
    'parking meter', 'bench', 'bird', 'cat', 'dog', 'horse', 'sheep', 'cow',
    'elephant', 'bear', 'zebra', 'giraffe', 'N/A', 'backpack', 'umbrella', 'N/A', 'N/A',
    'handbag', 'tie', 'suitcase', 'frisbee', 'skis', 'snowboard', 'sports ball',
    'kite', 'baseball bat', 'baseball glove', 'skateboard', 'surfboard', 'tennis racket',
    'bottle', 'N/A', 'wine glass', 'cup', 'fork', 'knife', 'spoon', 'bowl',
    'banana', 'apple', 'sandwich', 'orange', 'broccoli', 'carrot', 'hot dog', 'pizza',
    'donut', 'cake', 'chair', 'couch', 'potted plant', 'bed', 'N/A', 'dining table',
    'N/A', 'N/A', 'toilet', 'N/A', 'tv', 'laptop', 'mouse', 'remote', 'keyboard', 'cell phone',
    'microwave', 'oven', 'toaster', 'sink', 'refrigerator', 'N/A', 'book',
    'clock', 'vase', 'scissors', 'teddy bear', 'hair drier', 'toothbrush'
]
This is all we need for this Python file. If you want to learn more about the MS COCO dataset, then please visit this link.
Utility Functions for Drawing Bounding Boxes and Predicting Class Labels
When we will feed an image or video frame to the Faster R-CNN MobileNetV3 model, then it will predict the class labels of all the detected objects. We will also need to draw bounding boxes around all these objects. These two steps are going to be similar in case of images and video frames as well.
Therefore, we have a detect_utils.py Python script that will contain all the reusable utility functions that will make our work easier.
So, let us write all the code that will go into the detect_utils.py Python file.
Starting with all the imports that we need.
import torchvision.transforms as transforms
import cv2
import numpy as np

from coco_names import COCO_INSTANCE_CATEGORY_NAMES as coco_names
We need the transforms module from torchvision to convert the images and frames to tensors. Using OpenCV we will draw the bounding boxes and put the class name text on the current frame or image. We are also importing the COCO_INSTANCE_CATEGORY_NAMES as coco_names as we will need this for mapping the detection labels to the class names.
We know that we have almost 90 classes of objects to detect from. And we will also want to visualize and differentiate each class easily. For that, we can actually draw a different colored bounding box around each class object. The following block of code will help us do that.
# this will help us create a different color for each class
COLORS = np.random.uniform(0, 255, size=(len(coco_names), 3))

# define the torchvision image transforms
transform = transforms.Compose([
    transforms.ToTensor(),
])
In the above code block, line 7 creates a NumPy array that in-turn holds NumPy arrays of length 3 containing 3 floating point numbers each. There are 91 such arrays and each define a different color that we can use with OpenCV for each of the different classes. Just for easier, understanding, this is what the array looks like.
 [[184.48342002 219.42608876 211.52630465]
 [ 36.88195735 109.32110018 151.02849978]
 [ 70.71303684  79.98240485  43.14797754]
 [190.80393686  95.05657319 114.38657422]
...
[118.16265081 134.64153643 243.78798046]
 [198.65870634 156.07506779  89.17380366]
 [179.29825613 176.15290539 193.59857986]]
The above snippet should make things clearer. Along with the COLORS array, we are also defining the transform that will convert an image or frame into a tensor (line 10).
Function to Predict the Classes
Now, we will write a simple function to predict the classes of all the detected objects in an image.
Let us write the function first, then we will get into the explanation part.
def predict(image, model, device, detection_threshold):
    # transform the image to tensor
    image = transform(image).to(device)
    image = image.unsqueeze(0) # add a batch dimension
    outputs = model(image) # get the predictions on the image

    # get all the predicited class names
    pred_classes = [coco_names[i] for i in outputs[0]['labels'].cpu().numpy()]

    # get score for all the predicted objects
    pred_scores = outputs[0]['scores'].detach().cpu().numpy()

    # get all the predicted bounding boxes
    pred_bboxes = outputs[0]['boxes'].detach().cpu().numpy()
    # get boxes above the threshold score
    boxes = pred_bboxes[pred_scores >= detection_threshold].astype(np.int32)

    return boxes, pred_classes, outputs[0]['labels']
The predict function accepts four parameters. They are the image or frame, the object detection model, the computation device, and the confidence threshold.
Lines 15 and 16 are doing the pre-processing step of converting the image to tensor and adding an extra batch dimension.
Then we are passing the image or frame through the model and saving everything in outputs.
Lines 20 maps all the detected class labels to the coco_names list and gets all the class names of all the detected objects.
Line 23 extracts all the confidence scores of all the detected objects.
Similarly, line 26, gets all the bounding box coordinates of the objects. At line 28, we filter out all those boxes whose confidence score is less than the minimum detection_threshold.
Finally, we return the bounding boxes, the class labels, and also the class label indices.
Function to Draw the Bounding Box and Class Label on the Object
As we know, we need to draw the bounding boxes around all the relevant detected objects. We also need to put the class name text on top of the bounding box for easier recognition of the object.
The following function does all that.
def draw_boxes(boxes, classes, labels, image):
    image = cv2.cvtColor(np.asarray(image), cv2.COLOR_BGR2RGB)
    for i, box in enumerate(boxes):
        color = COLORS[labels[i]]
        cv2.rectangle(
            image,
            (int(box[0]), int(box[1])),
            (int(box[2]), int(box[3])),
            color, 2
        )
        cv2.putText(image, classes[i], (int(box[0]), int(box[1]-5)),
                    cv2.FONT_HERSHEY_SIMPLEX, 0.8, color, 2,
                    lineType=cv2.LINE_AA)
    return image
The draw_boxes() function accepts four parameters, the bounding boxes, the class names, the class label indices, and the image or frame.
Starting from line 33, we loop over the number of the bounding boxes that we have.
- First, we get the
colorfor the current object according to its label index. - Then we draw the bounding box around the object using the
cv2.rectangle()function. - We also put the class name text on top of the bounding box.
- Finally, we return the resulting image.
This completes all the utility functions that we need for object detection using Faster R-CNN MobileNetV3.
Next, we will move on to object detection in images and videos.
Object Detection in Images using PyTorch Faster R-CNN MobileNetV3
We will start with object detection in images, then will move on to videos.
All the code in this section will go into the detect_img.py Python script. We have two images inside the input folder on which we will run the inference. Also, please note that all the deep learning inferences are happening on a GTX 1060. So, your timings may vary depending upon the computation device that you are using.
Let us start with importing all the required modules and libraries.
import torchvision
import torch
import argparse
import cv2
import detect_utils

from PIL import Image
Along with all the required modules, we are also importing our own detect_utils module for the detection and drawing purposes.
Construct the Argument Parser and Define the Computation Device
We will construct the argument parser to parse the command line arguments. We just need one flag here, that will define the path to the input image.
# construct the argument parser
parser = argparse.ArgumentParser()
parser.add_argument('-i', '--input', help='path to input image/video')
args = vars(parser.parse_args())

# define the computation device
device = torch.device('cuda' if torch.cuda.is_available() else 'cpu')
Along with the argument parser, we are also defining the computation device. It is better if you can run all the inferences on a GPU. Although most probably, with the MobileNetV3 backbone you might also be able to run inferences on a CPU with no issues.
Load the Model
If you are loading the Faster R-CNN MobileNetV3 Large FPN for the first time, then it will be downloaded on to your system. From subsequent runs it will be directly loaded from the disk.
# load the model
model = torchvision.models.detection.fasterrcnn_mobilenet_v3_large_fpn(pretrained=True)
# load the model on to the computation device
model.eval().to(device)
While loading the model, we need to provide pretrained=True so that the pre-trained weights will be loaded. Then we are putting the model into eval() mode and loading it onto the computation device.
Read the Image and Run the Inference
For some of the final steps:
- We will read the image from disk.
- Then, we will detect the objects in the images.
- Finally, draw the bounding boxes and visualize the results.
# read the image and run the inference for detections
image = Image.open(args['input'])
boxes, classes, labels = detect_utils.predict(image, model, device, 0.7)
image = detect_utils.draw_boxes(boxes, classes, labels, image)
cv2.imshow('Image', image)
save_name = f"{args['input'].split('/')[-1].split('.')[0]}"
cv2.imwrite(f"outputs/{save_name}.jpg", image)
cv2.waitKey(0)
At line 21, we are calling the predict() fucntion from detect_utils that is returning us with the bounding boxes, the class names, and the label indices. Note that we are providing a confidence threshold of 0.7 for the detections. Any detections that have a confidence score of less than 0.7 will be rejected.
Then at line 22, we are using the draw_boxes() function to draw the bounding boxes around the detected objects. Finally, we are visualizing the results and saving the final image to disk as well.
Now, that we are done with the code for detecting objects in images, let us run the script and see what kind of results we are getting.
Execute detect_img.py for Object Detection in Images
We will detect objects in both the images that we have. The following command is for the first image.
python detect_img.py --input input/image_1.jpg
You should see output similar to the following.
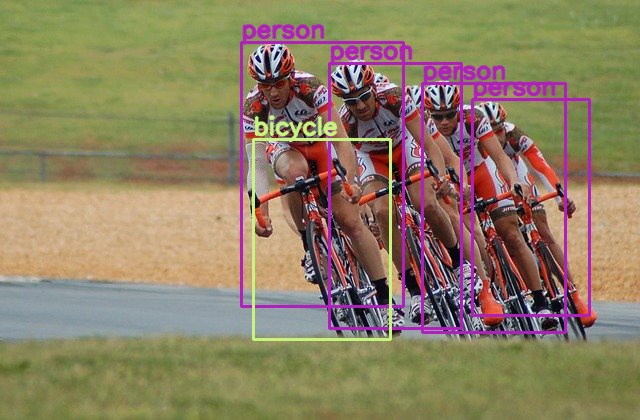
The Faster R-CNN MobileNetV3 model is detecting four persons and one bicycle. It is not able to detect the other three bicycles. And if you observe closely, then you will notice two other helmets behind indicating that there are actually 6 cyclists in the image. But most probably, any model will find it difficult to detect those. Also, because it has a MobileNetV3 backbone, it is not able to detect all the 4 bicycles.
Moving on to the next image.
python detect_img.py --input input/image_2.jpg
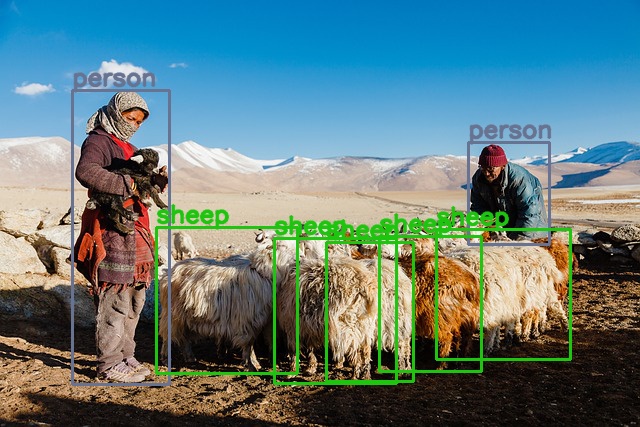
The model is able to detect the two persons and sheep very well. Although, there might be a very slight chance that there are a few false positives for the sheep. Also, the Faster R-CNN MobileNetV3 model is not able to detect the sheep that is at the far back. Maybe lowering the threshold will rectify that. But obviously, decreasing the threshold will also introduce a lot of false positives.
Object Detection in Videos using PyTorch Faster R-CNN MobileNetV3
Now, we will move on to object detection in videos.
We will be writing the video detection code in the detect_vid.py Python script.
The code till the model loading part is going to be exactly similar to the object detection in images code. Let us complete till that part first.
import torchvision
import cv2
import torch
import argparse
import time
import detect_utils

# construct the argument parser
parser = argparse.ArgumentParser()
parser.add_argument('-i', '--input', help='path to input video')
args = vars(parser.parse_args())

# define the computation device
device = torch.device('cuda' if torch.cuda.is_available() else 'cpu')

# load the model
model = torchvision.models.detection.fasterrcnn_mobilenet_v3_large_fpn(pretrained=True)
# load the model onto the computation device
model = model.eval().to(device)
Here, instead of an image file path, we will provide a video file path to the argument parser.
Next, let us read the video file and complete some preliminary set up before the detections.
cap = cv2.VideoCapture(args['input'])

if (cap.isOpened() == False):
    print('Error while trying to read video. Please check path again')

# get the frame width and height
frame_width = int(cap.get(3))
frame_height = int(cap.get(4))

save_name = f"{args['input'].split('/')[-1].split('.')[0]}"
# define codec and create VideoWriter object
out = cv2.VideoWriter(f"outputs/{save_name}.mp4",
                      cv2.VideoWriter_fourcc(*'mp4v'), 30,
                      (frame_width, frame_height))

frame_count = 0 # to count total frames
total_fps = 0 # to get the final frames per second
First, we are reading the video file. Then we are getting the video frames’s width and height for the proper setting of the VideoWriter() object. We are also defining frame_count and total_fps variables to count the number of frames and keep track of the total Frames Per Second.
The next thing we have to do is loop over the video frames and carry out the detections.
Loop Over the Frames and Detect the Objects
We will write the complete while loop in a single code block for continuity. Let’s write the code first, then we will get into the explanation part.
# read until end of video
while(cap.isOpened()):
    # capture each frame of the video
    ret, frame = cap.read()
    if ret == True:
        # get the start time
        start_time = time.time()
        with torch.no_grad():
            # get predictions for the current frame
            boxes, classes, labels = detect_utils.predict(frame, model, device, 0.7)

        # draw boxes and show current frame on screen
        image = detect_utils.draw_boxes(boxes, classes, labels, frame)

        # get the end time
        end_time = time.time()
        # get the fps
        fps = 1 / (end_time - start_time)
        # add fps to total fps
        total_fps += fps
        # increment frame count
        frame_count += 1
        # write the FPS on the current frame
        cv2.putText(image, f"{fps:.3f} FPS", (15, 30), cv2.FONT_HERSHEY_SIMPLEX,
                    1, (0, 255, 0), 2)
        # press `q` to exit
        wait_time = max(1, int(fps/4))
        # convert from BGR to RGB color format
        image = cv2.cvtColor(image, cv2.COLOR_BGR2RGB)
        cv2.imshow('image', image)
        out.write(image)
        if cv2.waitKey(wait_time) & 0xFF == ord('q'):
            break

    else:
        break
We are detecting the objects at line 46 within the with torch.no_grad() block. Then we are drawing the boxes on the current frame’s objects at line 49.
Line 54 is calculating the FPS which we are also adding to total_fps at line 56. Then we are incrementing the frame_count counter.
At line 60, we are writing the FPS on the current frame. After that, we are just converting the image to RGB format, visualizing it , and saving each frame to disk.
The final thing to do is releasing the VideoCapture() object, destroying all OpenCV windows, and printing the average FPS.
# release VideoCapture()
cap.release()
# close all frames and video windows
cv2.destroyAllWindows()

# calculate and print the average FPS
avg_fps = total_fps / frame_count
print(f"Average FPS: {avg_fps:.3f}")
We are all set with the video object detection code. Now, we can execute it and analyze the results.
Execute detect_vid.py for Object Detection in Videos
Let us start with the first video.
python detect_vid.py --input input/video_1.mp4
The following is the detection clip that has been saved to the disk.
Not bad at all. The Faster R-CNN MobileNetv3 model is able to detect a lot of persons, cars, and even traffic lights which were far off in the distance. Obviously, not everything is perfect. The model is detecting a fire hydrant as a person somewhere around the 3 second mark. But the detections are really good overall.
With a GTX 1060, I was getting an average of 16.8 FPS. Not bad for such good detection results.
Let us try another video. This one will be just a bit more challenging.
python detect_vid.py --input input/video_2.mp4
We can see that some of the persons’ bodies are half underwater. With that also, the model is able to detect many persons in the video. It is not able to detect those who are very far away. But then again, it is able to detect the surfboards correctly. Overall, I would say that the model is performing really well. Not only that, we are getting around 16 FPS on average with a GTX 1060.
Do try out some more images and videos on your own. You can also post your findings in the comment section.
Summary and Conclusion
In this tutorial, we learned how to carry out object detection using the PyTorch Faster R-CNN MobileNetV3 model. We saw some places where the model is failing and where it is performing well. I hope that you learned something new from this article.
If you have any doubts, suggestions, or questions, then please leave them in the comment section. I will surely address them.
You can contact me using the Contact section. You can also find me on LinkedIn, and X.

Thank you once again for the tutorials. Gratitude to you for sharing the knowledge and implementation. My doubts are:
1. In the 90 classes mentioned, if i want to just access one of the class and mute the rest of it what changes in the coco names and detect.py should be done.
2. Custom object detection using this model.
3. Using this model on the webcam itself in the real time feed.
I am happy that it was of help.
1. You can create a mute_classes list in the detect_utils.py (e.g. [‘bird’]). In the draw_boxes function, in the for loop do,
“`
if classes[i] in mute_classes:
continue
“`
That should do it.
2. Custom object detection using this model. Coming very soon.
3. For the webcam feed, just change the video capture input to 0.
“`cap = cv2.VideoCapture(0)“`
I hope this helps.
Thank you..that mute list helped. Regarding webcam…colab was not able to do it so i will try on my local machine. Waiting these pretrained model to be used easily for custom object detection.
Great. And yes, the tutorial will be coming.