
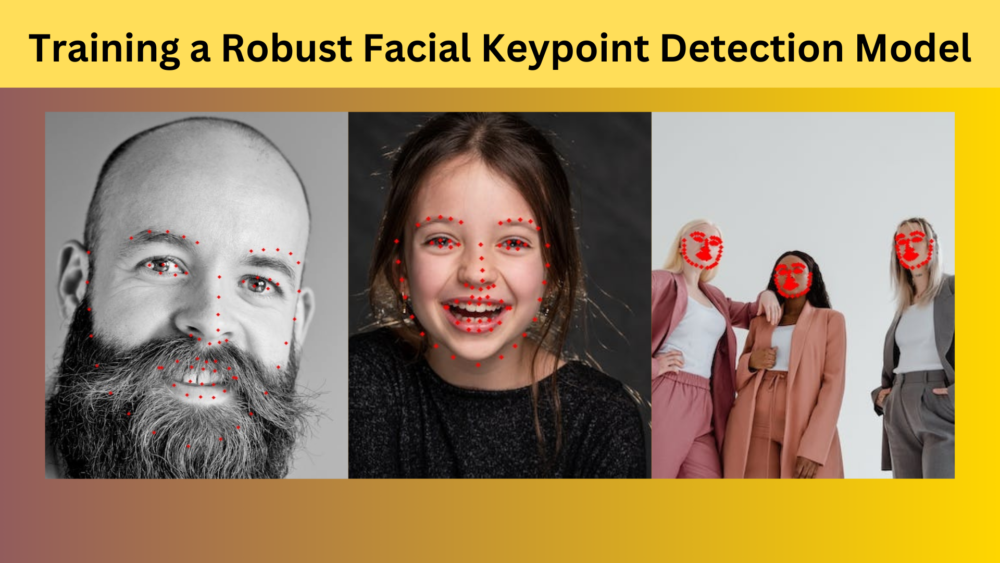
Facial keypoint (or landmark) detection is a crucial problem in computer vision. It has use cases in facial feature extraction, expression recognition, more accurate facial recognition, and even gaming. However, before any of the above applications, we need a robust facial keypoint detection model. To achieve this, in most cases, we need a good face detector and a well-trained facial keypoint detection model. To this end, we will start a new series with this article on creating a robust face detection and facial keypoint detection model.
We will start with a simple implementation of a custom robust facial keypoint detection model with this. However, there are a few changes to the pipeline that we will make along the way, especially how we prepare the training dataset. All the details will be revealed in the article.
We will cover the following topics in this article
- We will start with a discussion of the dataset and its preparation.
- Next, we will move on to the training section. Here, we will cover:
- Preprocessing and customization of the dataset according to our own needs.
- Covering dataset preparation, including utilities and data loaders.
- Discussion of the approach of training and preparing the deep learning model.
- Training the model on the custom keypoint detection model.
- After training, we will also carry out inference on images and videos.
- Finally, we will discuss further improvements that we can make to the entire pipeline and model.
The Facial Keypoint Detection Dataset
As a starting point, we will use one of the 68 facial keypoint detection datasets from Kaggle. However, we will modify and preprocess the dataset further. The original dataset contains the face images and their corresponding facial keypoints from several angles and distances.
Here are a few samples from the original dataset.
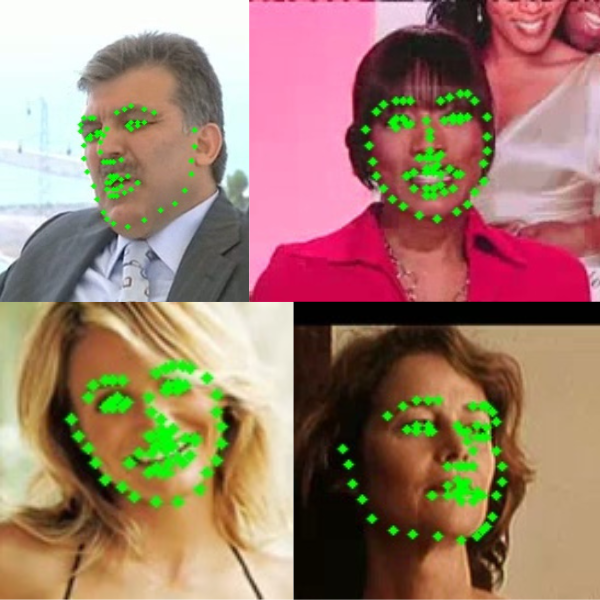
However, training a robust facial keypoint detection model directly on this is challenging. The model will learn to recognize the facial features from a certain distance only. In such cases, the trained model will not be robust enough to detect the facial keypoints from different distances and angles.
To mitigate this issue, we will take a different approach to preparing the dataset. We will create a facial keypoint detection dataset with cropped faces only. We will achieve that with the following steps:
- The initial dataset is already with us. We will run a pretrained face detection model on this dataset.
- For each face detected, we will crop the face areas and save them to disk.
- Following this, we will also need to rescale the facial keypoint annotations as the scale of the face is changing. This will require creating new annotation files (CSV format).
- While doing so, we will ignore any images from the original dataset where the face detection model is not able to find a face.
As such, after going through the above process, we have the faces and their keypoints as shown below.
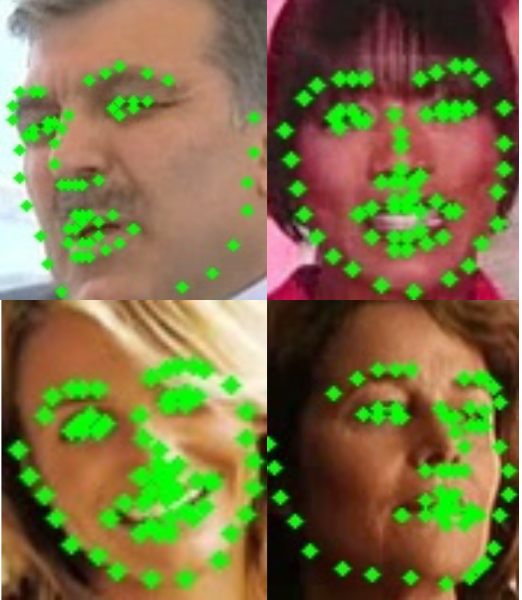
As we can see, the faces are cropped and we have discarded the surrounding areas. We will also go through the code in the dataset preprocessing section.
The Final Cropped Face Keypoint Detection Dataset
The cropped face dataset contains 3438 training and 766 validation samples. There are 68 landmark keypoints for each face and they are present in CSV files in the following format.
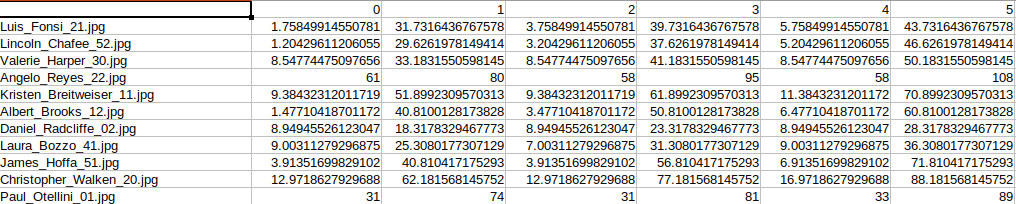
For each image row, 136 columns depict the X and Y coordinates for each keypoint. Although the code included with this article contains the script to create the cropped face dataset, you can also download the dataset from here on Kaggle.
Approach to Face Keypoint Detection During Inference
This allows us to train a robust keypoint detection model independently without any scale constraints. During inference, we will
- First, run a face detection model.
- Next, crop the face area from the detected face bounding box.
- Finally, provide the cropped face to the keypoint detection model.
This approach will work whether the face is near the camera or far away. As long as the face detection model can detect faces, our work is to train an excellent face keypoint detection model.
Note that for this article, we will not train a face detection model. Rather, we will use a pretrained model.
Project Directory Structure
The following block shows the directory structure of the entire project.
├── input
│   ├── new_data
│   │   ├── test
│   │   ├── training
│   │   ├── test.csv
│   │   └── training.csv
│   └── orig_dataset
│       ├── test
│       ├── training
│       ├── test_frames_keypoints.csv
│       └── training_frames_keypoints.csv
├── outputs [103 entries exceeds filelimit, not opening dir]
├── config.py
├── create_cropped_dataset.py
├── annoate_gt_data.py
├── datasets.py
├── inference_image.py
├── inference_video.py
├── model.py
├── train.py
└── utils.py
- The
inputdirectory contains the facial keypoint dataset. We have the original dataset, uncropped and unscaled in theorig_datasetdirectory. Thenew_datadirectory contains the dataset after cropping the face areas from the images. The corresponding CSV files contain the scaled keypoint annotations. - The
outputsdirectory contains the outputs from training and inference including the trained models and loss graphs. - Finally, directly inside the project directory, we have all the Python code files. We will go through the necessary ones in the coding section.
Libraries and Dependencies
The following are the major dependencies to train a robust facial keypoint detection model.
- We will use the PyTorch framework. You can install the desired version according to your configuration from the official site.
- Also, we will use the Facenet Pytorch library for face detection. You can install the library using the following command:
pip install facenet-pytorch
This is all the setup we need.
The trained model and the code is available via the download section.
Training a Robust Face Keypoint Detection Model
Let’s jump into the coding part of the article. We will go through some of the important parts from here onwards.
Download Code
Preparing the Cropped Face Keypoint Detection Dataset
Let’s start with the observation of the code that we use for preparing the cropped face keypoint detection dataset. The code resides in the create_cropped_dataset.py file.
First, we need to define some constants and the import statements.
"""
Create new images folder along with new CSV files for new cropped face landmark dataset.
"""

import torch
import cv2
import os
import numpy as np
import pandas as pd

from facenet_pytorch import MTCNN
from tqdm import tqdm

device = torch.device('cuda:0' if torch.cuda.is_available() else 'cpu')

# create the MTCNN model, `keep_all=True` returns all the detected faces
mtcnn = MTCNN(keep_all=True, device=device)

root_path = 'input/orig_dataset'
input_paths = ['training', 'test']

pre_padding = 7
post_padding = 7
As we discussed earlier, we will use the Facenet PyTorch library for detecting the faces in the original dataset. Then we will crop the face areas and save them to disk. We use the MTCNN class of the Facenet PyTorch library to initialize the face detector model. Next, we define the root paths of the original dataset.
Furthermore, we can observe pre_padding and post_padding. Both are initialized to 7. In some cases, the bounding box generated after the face detection may crop out some areas of the lower chin and the extremities of the left and right as well. This will generate a face where too much face is cropped out. Padding extremities of the bounding box will rectify that and all the face keypoints will remain within the final image.
Next, we need a function to crop the face areas and a loop to iterate over all the faces in the original dataset.
def crop_image(bounding_boxes, image):
    if bounding_boxes is not None:
        x1, y1, x2, y2 = bounding_boxes[0]
        x1 = x1 - pre_padding
        y1 = y1 - pre_padding
        x2 = x2 + post_padding
        y2 = y2 + post_padding
        cropped_image = image[int(y1):int(y2), int(x1):int(x2)]
        return cropped_image, x1, y1
    else:
        return image, 0, 0

for input_path in input_paths:
    out_dir = os.path.join('input', 'new_data', input_path)
    os.makedirs(out_dir, exist_ok=True)

    valid_samples = pd.read_csv(os.path.join(root_path, input_path+'_frames_keypoints.csv'))

    image_names_list = []
    keypoints_list = []

    cols = [str(i) for i in range(136)]
    cols.insert(0, '')
    new_df = pd.DataFrame(columns=cols)

    for i in tqdm(range(len(valid_samples)), total=len(valid_samples)):
        try:
            image_name = valid_samples.iloc[i, 0]

            image = cv2.imread(f"{root_path}/{input_path}/{image_name}")

            orig_image = image.copy()

            bounding_boxes, conf = mtcnn.detect(image, landmarks=False)

            cropped_image, x1, y1 = crop_image(bounding_boxes, orig_image)

            cv2.imwrite(os.path.join(out_dir, image_name), cropped_image)
            keypoints = valid_samples.iloc[i][1:]
            keypoints = np.array(keypoints)

            # reshape the keypoints
            keypoints = keypoints.reshape(-1, 2)

            keypoints =  keypoints - [x1, y1]

            keypoints = keypoints.reshape(-1)

            keypoints = list(keypoints)
            keypoints.insert(0, image_name)

            new_df.loc[i] = keypoints
        except:
            continue

    print(new_df)
    new_df.to_csv('input/new_data/'+input_path+'.csv', index=False)
The crop_image function pads the original bounding boxes with the padding pixels that we defined above. If a bounding box is detected, it returns the largest face (as there is only one face per image in the original dataset) along with the padded top left coordinates.
After reading the keypoints from the original CSV file, we adjust them by subtracting the padded top left coordinates (line 68). Finally, the script saves the new images and the CSV files to disk in the input/new_data directory.
If you have not downloaded the dataset from Kaggle, you can prepare it by executing the following command.
python create_cropped_dataset.py
The Training Configuration
We maintain a simple configuration file to define the training parameters in the config.py file.
import torch

# Paths.
ROOT_PATH = 'input/new_data'
OUTPUT_PATH = 'outputs'

# Training parameters.
BATCH_SIZE = 32
LR = 0.0001
EPOCHS = 100
DEVICE = torch.device('cuda' if torch.cuda.is_available() else 'cpu')

# Show dataset keypoint plot.
SHOW_DATASET_PLOT = False
Here we define the data paths, batch size, learning rate for training, the number of epochs to train for, and the computation device.
We also have a boolean variable, SHOW_DATASET_PLOT. If it is True, then the dataset script will plot the keypoints and faces from the data loader and show a grid of images just before the training starts. It is a good way to validate whether our dataset preparation is correct or not.
ResNet50 Model for Keypoint Detection
Face keypoint detection is a regression problem where the deep learning model has to predict the coordinates. We can simply use a pretrained image classification model and modify the final layer according to our use case. ResNets perform really well on this problem. We will use a pretrained ResNet50 model from Torchvision to do so.
The following is the model preparation code which is in the model.py file.
import torch.nn as nn

from torchvision.models import resnet50

class FaceKeypointModel(nn.Module):
    def __init__(self, pretrained=False, requires_grad=True):
        super(FaceKeypointModel, self).__init__()
        if pretrained:
            self.model = resnet50(weights='DEFAULT')
        else:
            self.model = resnet50(weights=None)

        if requires_grad:
            for param in self.model.parameters():
                param.requires_grad = True
            print('Training intermediate layer parameters...')
        else:
            for param in self.model.parameters():
                param.requires_grad = False
            print('Freezing intermediate layer parameters...')

        # change the final layer
        self.model.fc = nn.Linear(in_features=2048, out_features=136)

    def forward(self, x):
        out = self.model(x)
        return out
We simply load the ResNet50 model with the pretrained weights and modify the final linear layer. There are 68 landmark points and each landmark has X and Y coordinates. So, that brings us to a total of 136 values to be predicted by the model.
The Dataset and Data Loader Preparation
Next is the dataset preparation. The code for this goes into the datasets.py file.
Starting with the import statements and the custom dataset class.
import torch
import cv2
import pandas as pd
import numpy as np
import config
import utils
import os

from torch.utils.data import Dataset, DataLoader

class FaceKeypointDataset(Dataset):
    def __init__(self, samples, path):
        self.data = samples
        self.path = path
        self.resize = 224

    def __len__(self):
        return len(self.data)

    def __getitem__(self, index):
        image = cv2.imread(f"{self.path}/{self.data.iloc[index][0]}")
        image = cv2.cvtColor(image, cv2.COLOR_BGR2RGB)
        orig_h, orig_w, channel = image.shape
        # Resize the image into `resize` defined above.
        image = cv2.resize(image, (self.resize, self.resize))

        image = image / 255.0
        # Transpose for getting the channel size to index 0.
        image = np.transpose(image, (2, 0, 1))
        # Get the keypoints.
        keypoints = self.data.iloc[index][1:]
        keypoints = np.array(keypoints, dtype='float32')
        # Reshape the keypoints.
        keypoints = keypoints.reshape(-1, 2)
        # Rescale keypoints according to image resize.
        keypoints = keypoints * [self.resize / orig_w, self.resize / orig_h]

        return {
            'image': torch.tensor(image, dtype=torch.float),
            'keypoints': torch.tensor(keypoints, dtype=torch.float),
        }
The FaceKeypointDataset accepts the read CSV file (samples), and the path to the image directory (path) while initializing. As the first column of each CSV file stores the image file name, we can easily trace each image file’s path from its name and the root image folder path.
As we are starting simple, we do not apply any image augmentation. We just normalize the image pixels.
Note that we are resizing each image to 224×224 resolution. So, we scale the keypoints accordingly on line 36.
The dataset returns a dictionary containing the 'image' and 'keypoints' keys.
Next, we read the CSV file and initialize the datasets and data loaders.
training_samples = pd.read_csv(os.path.join(config.ROOT_PATH, 'training.csv'))
valid_samples = pd.read_csv(os.path.join(config.ROOT_PATH, 'test.csv'))

# Initialize the dataset - `FaceKeypointDataset()`.
train_data = FaceKeypointDataset(training_samples,
                                 f"{config.ROOT_PATH}/training")
valid_data = FaceKeypointDataset(valid_samples,
                                 f"{config.ROOT_PATH}/test")

# Prepare data loaders.
train_loader = DataLoader(train_data,
                          batch_size=config.BATCH_SIZE,
                          shuffle=True)
valid_loader = DataLoader(valid_data,
                          batch_size=config.BATCH_SIZE,
                          shuffle=False)

print(f"Training sample instances: {len(train_data)}")
print(f"Validation sample instances: {len(valid_data)}")

# Whether to show dataset keypoint plots.
if config.SHOW_DATASET_PLOT:
    utils.dataset_keypoints_plot(valid_data)
At the end of the file, we check whether we want to visualize a few images from the data loaders along with the keypoints or not. If so, we call the dataset_keypoints_plot function in the utils module.
The Training Script
The training script (train.py) to train the face keypoint detection model is going to be straightforward.
import torch
import torch.optim as optim
import matplotlib.pyplot as plt
import torch.nn as nn
import matplotlib
import config
import utils
import os

from model import FaceKeypointModel
from datasets import train_data, train_loader, valid_data, valid_loader
from tqdm import tqdm

matplotlib.style.use('ggplot')

os.makedirs('outputs', exist_ok=True)

# Model.
model = FaceKeypointModel(pretrained=True, requires_grad=True).to(config.DEVICE)
# Optimizer.
optimizer = optim.Adam(model.parameters(), lr=config.LR)
# Loss function.
criterion = nn.SmoothL1Loss()

# Training function.
def fit(model, dataloader, data):
    print('Training')
    model.train()
    train_running_loss = 0.0
    counter = 0

    for i, data in tqdm(enumerate(dataloader), total=len(train_loader)):
        counter += 1
        image, keypoints = data['image'].to(config.DEVICE), data['keypoints'].to(config.DEVICE)
        # flatten the keypoints
        keypoints = keypoints.view(keypoints.size(0), -1)
        optimizer.zero_grad()
        outputs = model(image)
        loss = criterion(outputs, keypoints)
        train_running_loss += loss.item()
        loss.backward()
        optimizer.step()

    train_loss = train_running_loss/counter
    return train_loss

# Validatioon function.
def validate(model, dataloader, data, epoch):
    print('Validating')
    model.eval()
    valid_running_loss = 0.0
    counter = 0

    with torch.no_grad():
        for i, data in tqdm(enumerate(dataloader), total=len(dataloader)):
            counter += 1
            image, keypoints = data['image'].to(config.DEVICE), data['keypoints'].to(config.DEVICE)
            # flatten the keypoints
            keypoints = keypoints.view(keypoints.size(0), -1)
            outputs = model(image)
            loss = criterion(outputs, keypoints)
            valid_running_loss += loss.item()
            # Plot the predicted validation keypoints after every
            # predefined number of epochs.
            if (epoch+1) % 1 == 0 and i == 0:
                utils.valid_keypoints_plot(image, outputs, keypoints, epoch)

    valid_loss = valid_running_loss/counter
    return valid_loss
In the above code block, we have the fit function for training and the validate function for validation on each epoch.
Note that we are flattening the keypoints before passing them to the model as the model expects 136 values in the final output layer.
Furthermore, in the validation loop, we save one image along with the predicted keypoints to disk. This will help us analyze the model’s results qualitatively even before the training finishes.
As this is a regression problem, we use the SmoothL1Loss function.
Now, coming to the training loop.
train_loss = []
val_loss = []
for epoch in range(config.EPOCHS):
    print(f"Epoch {epoch+1} of {config.EPOCHS}")
    train_epoch_loss = fit(model, train_loader, train_data)
    val_epoch_loss = validate(model, valid_loader, valid_data, epoch)
    train_loss.append(train_epoch_loss)
    val_loss.append(val_epoch_loss)
    print(f"Train Loss: {train_epoch_loss:.4f}")
    print(f'Val Loss: {val_epoch_loss:.4f}')

# Loss plots.
plt.figure(figsize=(10, 7))
plt.plot(train_loss, color='orange', label='train loss')
plt.plot(val_loss, color='red', label='validataion loss')
plt.xlabel('Epochs')
plt.ylabel('Loss')
plt.legend()
plt.savefig(f"{config.OUTPUT_PATH}/loss.png")
plt.show()

torch.save({
            'epoch': config.EPOCHS,
            'model_state_dict': model.state_dict(),
            'optimizer_state_dict': optimizer.state_dict(),
            'loss': criterion,
            }, f"{config.OUTPUT_PATH}/model.pth")

print('DONE TRAINING')
After each epoch, we print the training and validation loss. Finally, we save the loss plots and the trained model to disk.
Executing the Training Script
We can run the following command to execute the training script.
python train.py
Here are the losses from the last few epochs.
Epoch 98 of 100
Training
100%|██████████████████████████████████████████████████████████████████| 108/108 [00:09<00:00, 11.84it/s]
Validating
100%|████████████████████████████████████████████████████████████████████| 24/24 [00:01<00:00, 17.65it/s]
Train Loss: 2.0925
Val Loss: 3.1530
Epoch 99 of 100
Training
100%|██████████████████████████████████████████████████████████████████| 108/108 [00:09<00:00, 11.83it/s]
Validating
100%|████████████████████████████████████████████████████████████████████| 24/24 [00:01<00:00, 18.18it/s]
Train Loss: 2.0176
Val Loss: 3.0498
Epoch 100 of 100
Training
100%|██████████████████████████████████████████████████████████████████| 108/108 [00:09<00:00, 11.83it/s]
Validating
100%|████████████████████████████████████████████████████████████████████| 24/24 [00:01<00:00, 18.15it/s]
Train Loss: 2.0380
Val Loss: 3.1298
DONE TRAINING
Following is the loss plot.
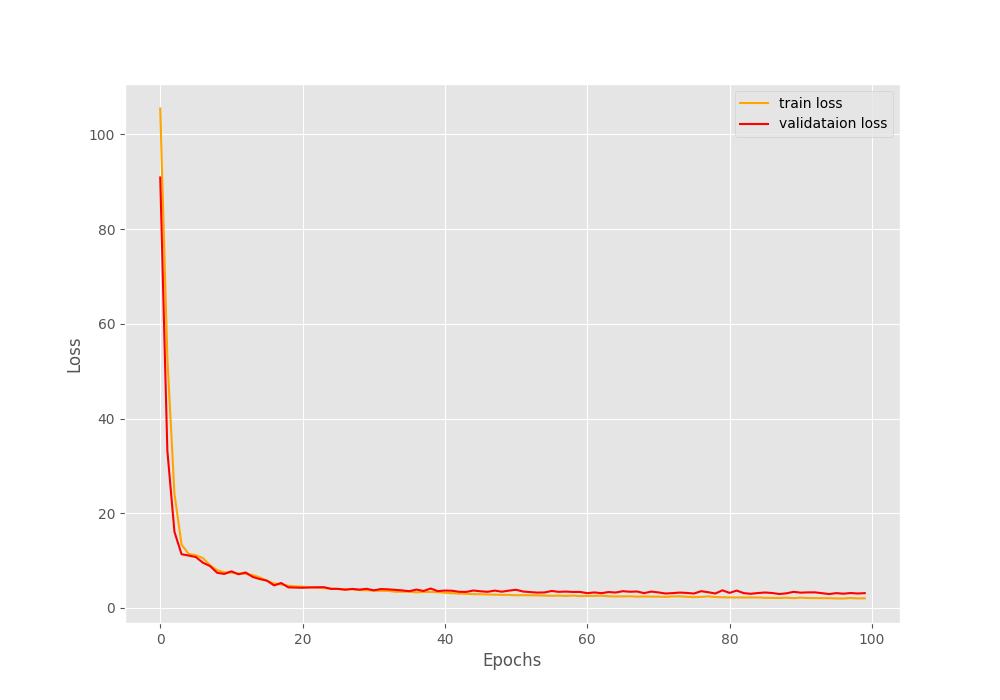
It seems that the model was improving till the end of training.
Face Keypoint Detection – Inference on Images
Let’s move on to inference on images. We will run inference on unseen images from the internet. These images are present in the input/inference_images directory. Now, let’s check how robust our trained face keypoint detection model is.
The code for running inference on images is in the inference_image.py file.
Starting with the import statements and a function to crop all the detected faces.
import torch
import numpy as np
import cv2
import config
import os
import glob

from model import FaceKeypointModel
from facenet_pytorch import MTCNN
from tqdm import tqdm

# Crop the detected face with padding and return it.
def crop_image(box, image, pre_padding=7, post_padding=7):
    x1, y1, x2, y2 = box
    x1 = x1 - pre_padding
    y1 = y1 - pre_padding
    x2 = x2 + post_padding
    y2 = y2 + post_padding
    cropped_image = image[int(y1):int(y2), int(x1):int(x2)]
    return cropped_image, x1, y1
Just as we did with the data preparation step, during inference also, we crop the face area and pad with a certain number of pixels.
Next, we need to define the computation device, the models, and the output directories.
device = torch.device('cuda:0' if torch.cuda.is_available() else 'cpu')

out_dir = os.path.join('outputs', 'image_inference')
os.makedirs(out_dir, exist_ok=True)

model = FaceKeypointModel(pretrained=False, requires_grad=False).to(config.DEVICE)
# load the model checkpoint
checkpoint = torch.load('outputs/model.pth')
# load model weights state_dict
model.load_state_dict(checkpoint['model_state_dict'])
model.eval().to(device)

# create the MTCNN model, `keep_all=True` returns all the detected faces
mtcnn = MTCNN(keep_all=True, device=device)
We initialize both the models, our custom trained face keypoint detection model, and the MTCNN model for face detection. Also, we move both models to the computation device.
The next step is to define the inference data directory and run inference on each image in the directory.
input_path = 'input/inference_images'

all_image_paths = glob.glob(os.path.join(input_path, '*'))

for image_path in tqdm(all_image_paths, total=len(all_image_paths)):
    image_name = image_path.split(os.path.sep)[-1]

    orig_image = cv2.imread(image_path)

    bounding_boxes, conf = mtcnn.detect(orig_image, landmarks=False)

    # Detect keypoints only if face is detected.
    if bounding_boxes is not None:
        for box in bounding_boxes:
            cropped_image, x1, y1 = crop_image(box, orig_image)

            image = cropped_image.copy()

            if image.shape[0] > 1 and image.shape[1] > 1:
                image = cv2.resize(image, (224, 224))

                image = image / 255.0

                image = np.transpose(image, (2, 0, 1))
                image = torch.tensor(image, dtype=torch.float)
                image = image.unsqueeze(0).to(config.DEVICE)

                with torch.no_grad():
                    outputs = model(image)

                outputs = outputs.cpu().detach().numpy()

                outputs = outputs.reshape(-1, 2)
                keypoints = outputs

                # Draw keypoints on face.
                for i, p in enumerate(keypoints):
                    p[0] = p[0] / 224 * cropped_image.shape[1]
                    p[1] = p[1] / 224 * cropped_image.shape[0]

                    p[0] += x1
                    p[1] += y1

                    cv2.circle(
                        orig_image,
                        (int(p[0]), int(p[1])),
                        2,
                        (0, 0, 255),
                        -1,
                        cv2.LINE_AA
                    )

    cv2.imwrite(os.path.join(out_dir, image_name), orig_image)
When we are detecting faces on line 44, we do not detect the keypoints using MTCNN. For each detected face, we crop and pad the face area, and pass it through the custom face keypoint detection model.
Note that while we pass the cropped face to the keypoint detection model, we draw the keypoints on the original image. For this, we are scaling and interpolating the final facial keypoints according to the original image size from lines 72 to 76.
Let’s execute the script and check the results.
python inference_image.py
Here are the results.

As we can see, the model is able to detect keypoint of all the faces in the above images. We also need to give credit to the MTCNN face detector which does a good job in this case.
Face Keypoint Detection – Inference on Videos
Now, it is time to check how well our model performs in varied conditions across videos. For this, we will use the code in the inference_video.py file.
The code till the initialization of the models remains almost the same.
import torch
import numpy as np
import cv2
import config
import time
import argparse
import os

from model import FaceKeypointModel
from facenet_pytorch import MTCNN

parser = argparse.ArgumentParser()
parser.add_argument(
    '--input',
    help='path to input video',
    default='input/inference_videos/video_1.mp4'
)
args = parser.parse_args()

# Crop the detected face with padding and return it.
def crop_image(box, image, pre_padding=7, post_padding=7):
    x1, y1, x2, y2 = box
    x1 = x1 - pre_padding
    y1 = y1 - pre_padding
    x2 = x2 + post_padding
    y2 = y2 + post_padding
    cropped_image = image[int(y1):int(y2), int(x1):int(x2)]
    return cropped_image, x1, y1

device = torch.device('cuda:0' if torch.cuda.is_available() else 'cpu')

out_dir = os.path.join('outputs', 'video_inference')
os.makedirs(out_dir, exist_ok=True)

model = FaceKeypointModel(pretrained=False, requires_grad=False).to(device)
# load the model checkpoint
checkpoint = torch.load('outputs/model.pth')
# load model weights state_dict
model.load_state_dict(checkpoint['model_state_dict'])
model.eval()

# create the MTCNN model, `keep_all=True` returns all the detected faces
mtcnn = MTCNN(keep_all=True, device=device)
This time we define an argument parser so that we can provide any video of our choice to the model.
Next, read the video and set the VideoWriter object.
# capture the webcam
cap = cv2.VideoCapture(args.input)
if (cap.isOpened() == False):
    print('Error while trying to open video. Plese check again...')

# get the frame width and height
frame_width = int(cap.get(3))
frame_height = int(cap.get(4))
frame_fps = int(cap.get(5))

# set up the save file path
file_name = args.input.split(os.path.sep)[-1]
save_path = f"{out_dir}/{file_name}"
# define codec and create VideoWriter object
out = cv2.VideoWriter(f"{save_path}",
                      cv2.VideoWriter_fourcc(*'mp4v'),
                      frame_fps,
                      (frame_width, frame_height))
Finally, loop over each frame and do similar processing as we did in the case of images.
while(cap.isOpened()):
    # capture each frame of the video
    ret, frame = cap.read()
    if ret == True:
        with torch.no_grad():
            start_time = time.time()
            bounding_boxes, conf = mtcnn.detect(frame, landmarks=False)

            # Detect keypoints if face is detected.
            if bounding_boxes is not None:
                for box in bounding_boxes:
                    cropped_image, x1, y1 = crop_image(box, frame)

                    image = cropped_image.copy()

                    if image.shape[0] > 1 and image.shape[1] > 1:
                        image = cv2.resize(image, (224, 224))

                        image = cv2.cvtColor(image, cv2.COLOR_BGR2RGB)
                        image = image / 255.0
                        image = np.transpose(image, (2, 0, 1))
                        image = torch.tensor(image, dtype=torch.float)
                        image = image.unsqueeze(0).to(config.DEVICE)

                        outputs = model(image)

                        outputs = outputs.cpu().detach().numpy()

                        outputs = outputs.reshape(-1, 2)
                        keypoints = outputs

                        # Draw keypoints on face.
                        for i, p in enumerate(keypoints):
                            p[0] = p[0] / 224 * cropped_image.shape[1]
                            p[1] = p[1] / 224 * cropped_image.shape[0]

                            p[0] += x1
                            p[1] += y1
                            cv2.circle(
                                frame,
                                (int(p[0]), int(p[1])),
                                2,
                                (0, 0, 255),
                                -1,
                                cv2.LINE_AA
                            )

            end_time = time.time()

            fps = 1 / (end_time - start_time)

            cv2.putText(
                frame,
                text=f"FPS: {fps:.1f}",
                org=(15, 25),
                fontFace=cv2.FONT_HERSHEY_SIMPLEX,
                fontScale=1,
                thickness=2,
                color=(0, 255, 0),
                lineType=cv2.LINE_AA
            )

            cv2.imshow('Facial Keypoint Frame', frame)
            out.write(frame)

            # press `q` to exit
            if cv2.waitKey(27) & 0xFF == ord('q'):
                break

    else:
        break

# release VideoCapture()
cap.release()

# close all frames and video windows
cv2.destroyAllWindows()
One additional step we do here is adding the FPS (Frames Per Second) on each frame. This will give us a good idea of how fast our pipeline is running.
Let’s run inference on a video where only a single face is present.
python inference_video.py --input input/inference_videos/video_1.mp4
The results look excellent here. The MTCNN model can detect the face in all frames and our robust face keypoint detection model is detecting the face landmarks as well.
Moreover, on an RTX 3080 GPU, we are getting an average of 45 FPS which is good given that it is a two-stage pipeline.
For our final experiment, let’s run inference on a video where multiple faces are present.
python inference_video.py --input input/inference_videos/video_2.mp4
We can see some issues right away here. Firstly, the MTCNN model detects a lot of false positives. As these false positives go into the keypoint detection model, we get keypoints where faces are not present. Secondly, there is a big hit on the FPS when multiple faces are present. This can be a bottleneck when trying to create a real-time application.
Further Improvements
Some obvious improvements can be made to the entire pipeline.
- We can train our lightweight face detection model with recent improvements, augmentations, and approaches. This will most probably give us a more accurate and faster face detection model.
- We can train an even smaller and more robust face keypoint detection model with more data, augmentations, and different poses.
Doing the above will surely give us a better face keypoint detection pipeline.
Further Reading
- Getting Started with Facial Keypoint Detection using Deep Learning and PyTorch
- Advanced Facial Keypoint Detection with PyTorch
- Simple Facial Keypoint Detection using TensorFlow and Keras
- Face Landmark Detection using Dlib
Summary and Conclusion
In this article, we carried an end-to-end pipeline for face keypoint detection. We fine tuned a ResNet50 model for 68 facial landmark detection and used a pretrained face detection model in the pipeline. Although the results are fairly good, we also discussed the issues that we will try to tackle in future articles. I hope that this article was worth your time.
If you have any doubts, thoughts, or suggestions, please leave them in the comment section. I will surely address them.
You can contact me using the Contact section. You can also find me on LinkedIn, and X.
References

3 thoughts on “Training a Robust Facial Keypoint Detection Model”