
In this tutorial, we will be covering Face Landmark Detection using Dlib.
Computer vision is powering face application likes detection, verification, and recognition to a great extent. One such application is face landmark detection where we need to detect the key points on the face. Such key points are placed on a person’s eyes, nose, lip, and around the face. This in turn helps in recognizing the shape of the face, the mood, and can even tell whether a person is smiling or not. All of this starts with detecting the face and its key points which we will cover in this tutorial.
What are we going to cover in this tutorial?
- A brief about face landmark detection.
- About Dlib’s shape and face landmark detector.
- Setting up the project directory for our mini-project.
- Face and face landmark detection using Dlib in images as well as videos.
- Trying to detect multiple faces in an image or video.
Although we will not cover very advanced concepts in this tutorial, still, I hope that this acts as a beginning step to many upcoming amazing tutorials and projects.
Also, if you want to know more deep learning techniques about face landmark detection, please visit the following links.
- Getting Started with Facial Keypoint Detection using Deep Learning and PyTorch.
- Advanced Facial Keypoint Detection with PyTorch.
- Automatic Face and Facial Landmark Detection with Facenet PyTorch.
A Brief About Face Landmark Detection
Face key points or landmarks represent very specific and important features on a person’s face.
These features are mostly located around the eyes, lips, nose, and around the face in general.
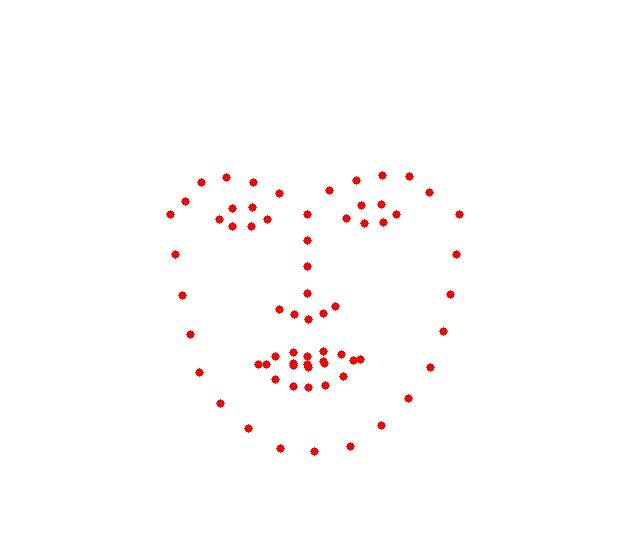
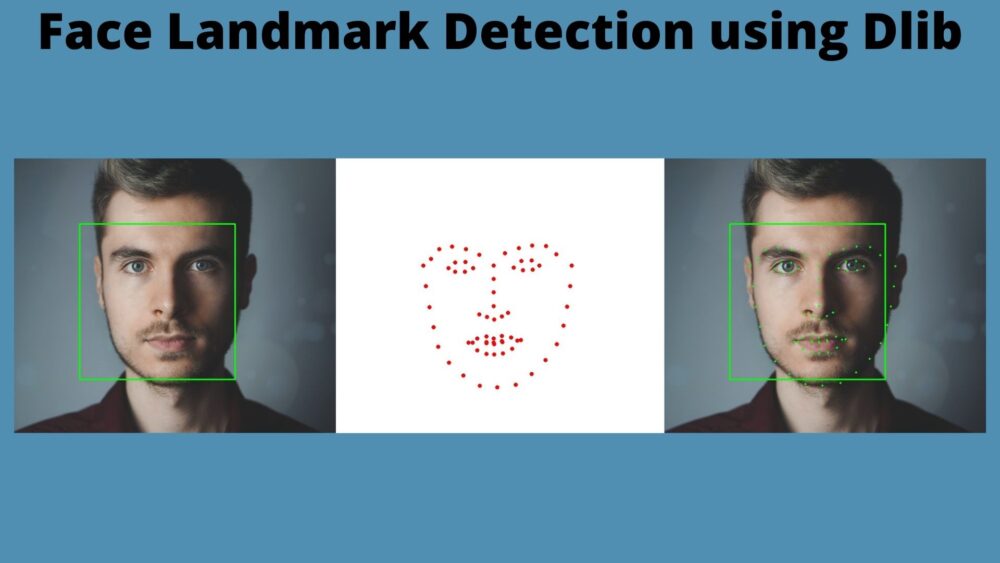
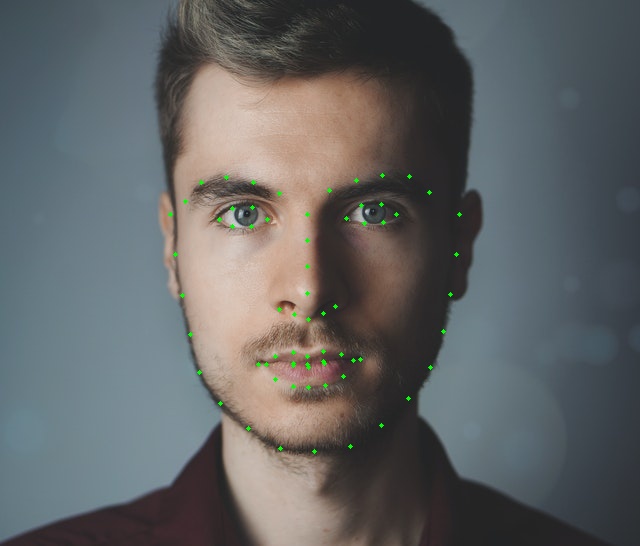
Figure 2 shows how plotting all the key points of a person’s face on a white background will look like. From the figure, we can exactly point out where the person’s eyes, lips, and nose are. Not only that, but we can also make a rough guess about the shape of the face. That’s quite nice.
Face landmark detection has many interesting and useful applications in the real world as well.
- We can detect a persons’s emotion after approximating the shape of the face from the landmarks.
- Detecting whether a person is happy or sad.
- Detecting the shape of a person’s face.
The above list does not contain all the applications, but good enough for a starting point.
Dlib’s Shape Predictor and Face Landmark Detector
We will use the Dlib library for face landmark detection in this tutorial. Dlib is known for providing many easy to use pre-trained models for face applications like detection, face alignment, face recognition etc. And the face landmark detection model is one of them.
It is a pre-trained model which detects 68 face landmarks similar to the images we see above. This model was trained on the iBUG 300-W face landmark dataset.
You can download the pre-trained model from the following link (Note: If you have already downloaded the source code for this tutorial, then you need not download the model as the source contains all the files that we need).
Download Dlib’s pre-trained Face Landmark Detector.
After downloading the file, extract it and keep the shape_predictor_68_face_landmarks.dat file in your current working directory where you will be keeping the code for this tutorial.
The Directory Structure
The following the tree structure of the project directory:
├── input
│   ├── image_1.jpg
│   ├── image_2.jpg
│   ├── image_3.jpg
│   └── video_1.mp4
├── outputs
│   ├── image_1_uNone.jpg
│   ...
├── landmark_image.py
├── landmark_video.py
├── shape_predictor_68_face_landmarks.dat
├── shape_predictor_68_face_landmarks.dat.bz2
└── utils.py
- We have the input images and videos inside the
inputfolder. - The
outputsfolder will contain the resulting images and videos after we carry out the face landmark detection. - Then we have three Python scripts, one for landmark detection in images and one in videos.
- Finally, we have the
shape_predictor_68_face_landmarks.datmodel file.
You can download all the source code and all the data by clicking on the button below.
From the next section onward, we will start the coding part of the tutorial.
Face Landmark Detection using Dlib
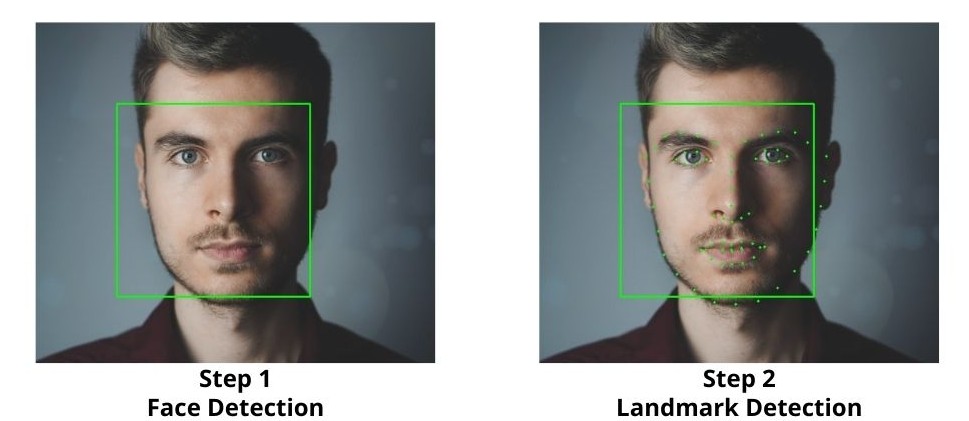
Face landmark detection is actually a two step process:
- First, we need to detect the face of the person/persons in an image or frame.
- The second step is to detect the landmarks for the faces detected in the first step.
We will be using Dlib’s Frontal Face Detector for the face detections, which uses HOG and Linear SVM. Then we will use the face landmark detector on those detected faces.
I hope that the above steps are clear. Now we can start writing the code.
Small Utility Script
First, we will create a small utility script that will contain a helper function to process the bounding boxes which Dlib detects. This function will return the top-left and bottom-right coordinates of the bounding boxes after which we can easily plot them around the faces using OpenCV.
This code will go into the utils.py Python file.
def process_boxes(box):
    xmin = box.left()
    ymin = box.top()
    xmax = box.right()
    ymax = box.bottom()
    return [int(xmin), int(ymin), int(xmax), int(ymax)]
The above function returns the bounding box coordinates as a list. To know more about the details, please visit one of the previous Dlib tutorials where we detect faces in images and videos.
Face Landmark Detection in Images
We will start with face landmark detection in images.
The code that we will write in this section will go into the landmark_image.py script.
Let’s start with importing the modules and constructing the argument parser.
import time
import sys
import cv2
import dlib
import argparse

from utils import process_boxes

parser = argparse.ArgumentParser()
parser.add_argument('-i', '--input', default='input/image_1.jpg',
                    help='path to the input image')
parser.add_argument('-u', '--upsample', default=None, type=int,
                    help='factor by which to upsample the image, default None, ' + \
                          'pass 1, 2, 3, ...')
args = vars(parser.parse_args())
Along with all the required libraries, we are importing the process_box function from the utils module that we wrote above.
For the argument parser, we have two flags.
--input: It accepts the path to the input image.--upsample: This defines by how much to upsample (increase the resolution) of the image.
To know more about the --upsample flag, you may visit this post.
Essentially, we can provide an upsampling value of 1, 2, 3, and so on.
Read the Image and Detect the Faces
Here, we will detect the faces in an image after reading an image from the disk. For that, we need to define the HOG + SVM face detector from Dlib. Along with that, we will load Dlib’s face landmark detector.
image = cv2.imread(args['input'])
image_rgb = cv2.cvtColor(image, cv2.COLOR_BGR2RGB)

# define the outfile file name
save_name = f"outputs/{args['input'].split('/')[-1].split('.')[0]}_u{args['upsample']}.jpg"

# define the SVM + HOG  face detector
detector = dlib.get_frontal_face_detector()
# define the Dlib face landmark detector
predictor = dlib.shape_predictor('shape_predictor_68_face_landmarks.dat')

if args['upsample'] == None:
    start_time = time.time()
    detected_boxes = detector(image_rgb)
    end_time = time.time()
elif args['upsample'] > 0 and args['upsample'] < 4:
    start_time = time.time()
    detected_boxes = detector(image_rgb, args['upsample'])
    end_time = time.time()
else:
    # quit the program with a warning if upsampling value too high
    warn_string = 'Please provide usample value > 1 and < 4.' + \
             ' Else it might lock your CPU.'
    print(warn_string)
    sys.exit(0)
- We are converting the image to RGB color format after reading it.
- The
save_namestring defines the name of the output file. We will use this while saving the resulting image to disk. - On line 23 we define the face detector using Dlib’s
get_frontal_face_detector()function. And line 25 loads the 68 key points face landmark detector from the disk.
Starting from lines 27 to 40, we detect the faces in the image. The if, elif, and else blocks are executed according to the upsampling value that we provide. All the details are discussed in this Dlib face detection post. Please have look if you are interested. For now, let’s keep in mind that detected_boxes holds all the boxes that Dlib’s face detector has detected. Another thing to keep in mind is that if the upsample value is greater than or equal to 4, then we exit out of the program.
Draw the Bounding Boxes and Face Landmarks
Now, we need to detect the predict the landmarks for each of the detected faces as well. This will follow a few simple steps:
- We have detected the faces in the image.
- We iterate over each of detected faces.
- For the current face, we need to predict the landmarks or key points.
- Then draw the bounding boxes on the face and plot the keypoints on the face as well.
Let’s write that in code.
# iterate over the total number of faces detected
for box in detected_boxes:
    shape = predictor(image_rgb, box)

    # process the detection boxes
    res_box = process_boxes(box)
    cv2.rectangle(image, (res_box[0], res_box[1]),
                (res_box[2], res_box[3]), (0, 255, 0),
                2)
    # iterate over all the keypoints
    for i in range(68):
        # draw the keypoints on the detected faces
        cv2.circle(image, (shape.part(i).x, shape.part(i).y),
                   2, (0, 255, 0), -1)

cv2.imshow('Result', image)
cv2.waitKey(0)
cv2.imwrite(save_name, image)
print(f"FPS: {1/(end_time-start_time):.3f}")
- Line 42 starts to iterate over the detected faces.
- Then we pass the current detected face area (
box) along with the RGB image to the shapepredictorwhich detects the landmarks. The landmarks are stored inshape. - Line 46 processes the current bounding box which gives us the coordinates. Then line 47 draws the bounding box on the current detected face.
- Starting from line 51, we run a
forloop for 68 times (for the 68 landmarks). The Dlibshapewhich holds the landmarks has x and y attributes referring to the x and y coordinates of the current (\(i^{th}\)) landmark. We can access those usingshape.part(i).x,shape.part(i).yand draw the circle with the OpenCVcircle()function.
Finally, we show the result on the screen and save it to disk as well.
Executing landmark_image.py
The experiments were carried out on an laptop with i7 8670H processor with base clock speed of 2.3 GHz and 16 GB of RAM.
We are all set to execute the landmark_image.py script to detect faces and landmarks in images. Open the terminal in the current working directory and type in the following command.
python landmark_image.py --input input/image_1.jpg
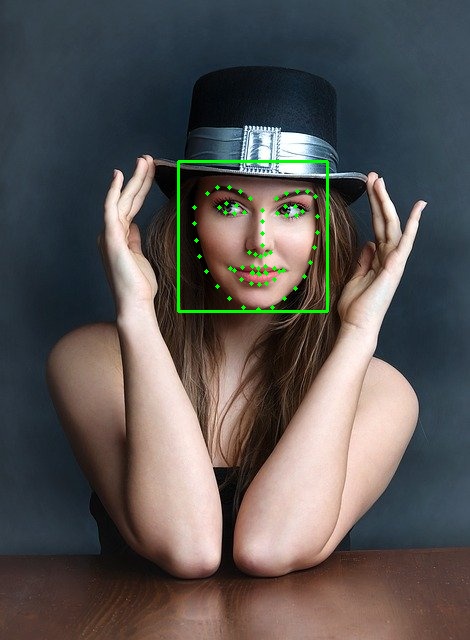
We can see that even without any upsampling value, the Dlib’s face and landmark detector are working pretty well. But then again, this was only one face and was quite easy as well.
Let’s try an image with multiple faces.
python landmark_image.py --input input/image_2.jpg
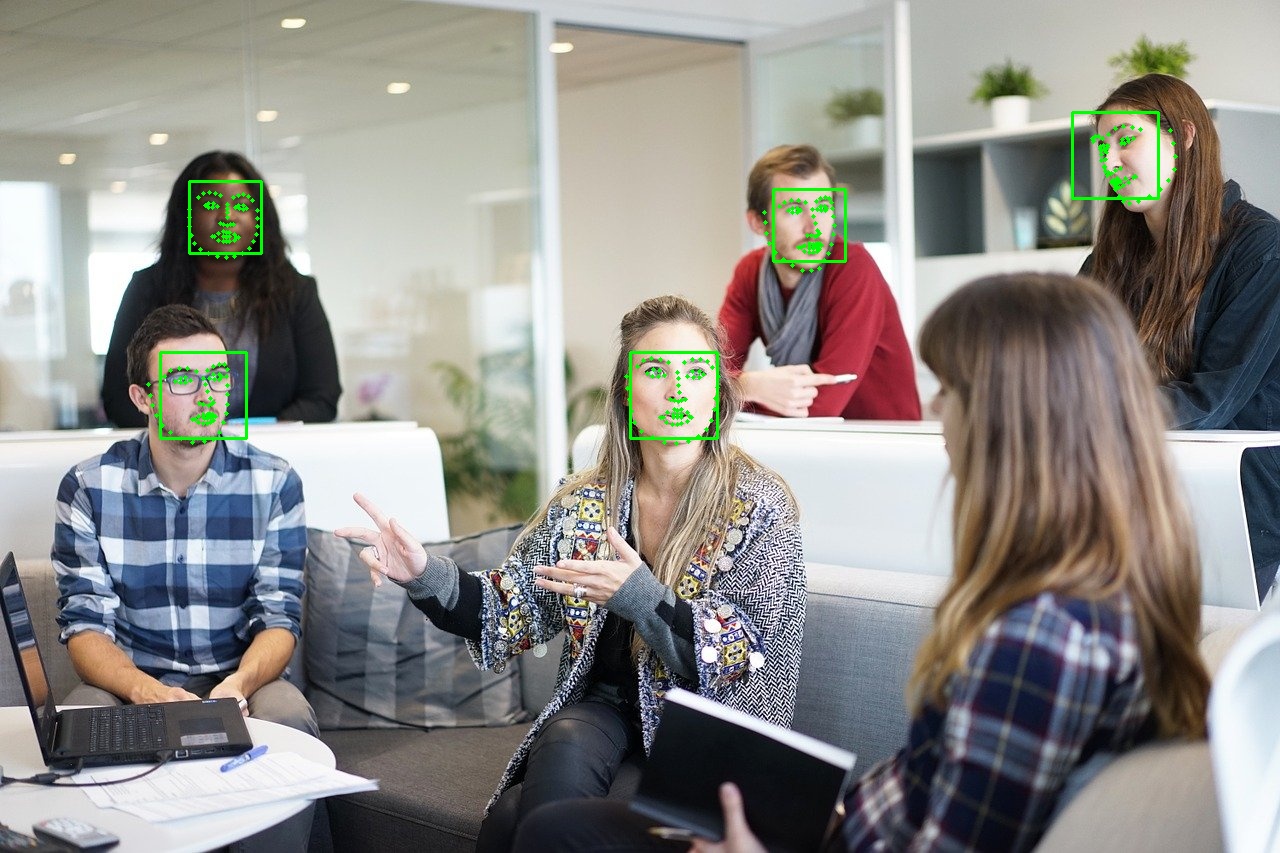
This time the HOG + Linear SVM face detector was able to detect 5 out of the 6 faces. We do not have any landmarks for the face that is not detected. The reason for the non-detection can be that the HOG + Linear SVM detector is good at detecting frontal faces only. Faces which are at different angles, or sideways are difficult to detect by the model.
Face Landmark Detection in Videos
Until now, we have completed face landmark detection in images. Let’s get on with face detection in videos now.
The code that we will write here will go into the landmark_video.py script.
The following code block contains the import statements and the construction of the argument parser. This is the same as was in the landmark detection in images. Along with that, let’s define the Frontal Face Detector and face landmark detection model as well.
import time
import sys
import cv2
import dlib
import argparse

from utils import process_boxes

parser = argparse.ArgumentParser()
parser.add_argument('-i', '--input', default='input/video_1.mp4',
                    help='path to the input video')
parser.add_argument('-u', '--upsample', default=None, type=int,
                    help='factor by which to upsample the image, default None, ' + \
                          'pass 1, 2, 3, ...')
args = vars(parser.parse_args())

# define the SVM + HOG  face detector
detector = dlib.get_frontal_face_detector()
# define the Dlib face landmark detector
predictor = dlib.shape_predictor('shape_predictor_68_face_landmarks.dat')
This time, instead of the path to an image, --input will accept the path to a video file.
Reading the Video File
Now, let’s read the video file from disk and write some preliminary code that will prepare everything for the next steps to be taken.
cap = cv2.VideoCapture(args['input'])

if (cap.isOpened() == False):
    print('Error opening video file. Please check file path...')

# get the frame width and height
frame_width = int(cap.get(3))
frame_height = int(cap.get(4))

# define the outfile file name
save_name = f"{args['input'].split('/')[-1].split('.')[0]}_u{args['upsample']}"
# define codec and create VideoWriter object
out = cv2.VideoWriter(f"outputs/{save_name}.mp4",
                      cv2.VideoWriter_fourcc(*'mp4v'), 30,
                      (frame_width, frame_height))

# to count the total number of frames iterated through
frame_count = 0
# to keep adding the frames' FPS
total_fps = 0
The above code block completes some of the required set up that we need moving forward.
- The
frame_widthandframe_heightfor proper initialization of theVideoWriter()object on line 33. Thesave_nameis a string defining the resulting file name that we will be saved to the disk. - With
frame_count, we keep track of the total number of frames looped through. Andtotal_fpswill store the cumulative FPS for each frame.
Loop the Video Frames and Detect the Landmarks
We need to loop through each of the video frames and then detect the face and corresponding landmarks in those frames. The next block of code contains the entire while loop.
while(cap.isOpened()):
    # capture each frame of the video
    ret, frame = cap.read()
    if ret:
        image_rgb = cv2.cvtColor(frame, cv2.COLOR_BGR2RGB)

        if args['upsample'] == None:
            start_time = time.time()
            detected_boxes = detector(image_rgb)
            end_time = time.time()
        elif args['upsample'] > 0 and args['upsample'] < 4:
            start_time = time.time()
            detected_boxes = detector(image_rgb, args['upsample'])
            end_time = time.time()
        else:
            # quit the program with a warning if upsampling value too high
            warn_string = 'Please provide usample value > 1 and < 4.' + \
                    ' Else it might lock your CPU.'
            print(warn_string)
            sys.exit(0)

        # iterate over the total number of faces detected
        for box in detected_boxes:
            shape = predictor(image_rgb, box)

            # process the detection boxes
            res_box = process_boxes(box)
            cv2.rectangle(frame, (res_box[0], res_box[1]),
                        (res_box[2], res_box[3]), (0, 255, 0),
                        2)
            # iterate over all the keypoints
            for i in range(68):
                # draw the keypoints on the detected faces
                cv2.circle(frame, (shape.part(i).x, shape.part(i).y),
                        2, (0, 255, 0), -1)
        end_time = time.time()

        # get the current fps
        fps = 1 / (end_time - start_time)
        # add `fps` to `total_fps`
        total_fps += fps
        # increment frame count
        frame_count += 1

        cv2.putText(frame, f"{fps:.3f} FPS", (15, 30), cv2.FONT_HERSHEY_SIMPLEX,
                        1, (0, 255, 0), 2)
        cv2.imshow('Result', frame)
        out.write(frame)
        if cv2.waitKey(1) & 0xFF == ord('q'):
            break
    else:
        break

# release VideoCapture()
cap.release()
# close all frames and video windows
cv2.destroyAllWindows()

# calculate and print the average FPS
avg_fps = total_fps / frame_count
print(f"Average FPS: {avg_fps:.3f}")
After reading each frame, we are just treating it as an image and doing all the operations on it as we did with a single image.
On line 72, we draw the key points on the current frame. Then we calculate the FPS, put the FPS text on the current frame, visualize it on the screen, and save it to disk as well.
In the final few lines, we release the VideoCapture() object, destroy the OpenCV windows and print the average FPS on the terminal.
With this, we have completed our code for landmark detection in videos as well.
Executing landmark_video.py
Let’s execute the script on the video file that we have in our input folder.
python landmark_video.py --input input/video_1.mp4
Average FPS: 19.645
We are getting an average of 19.645 FPS. The following is the output video.
The face detector and landmark detector are performing well for the most part. The face detector is able to detect the faces which are forward facing and missing out on the two persons on the extreme left and right. We already know this issue of the HOG + Linear SVM detector. The landmark detector is sometimes giving wrong predictions for the key points. But this is most likely because of the orientation of the face.
A Few Takeaways
- We saw that the landmark detector is heavily dependent on the face detector. If no face is detected, no landmarks as well.
- Even if the face detector detects a face whose orientation is a bit sideways, then there is a chance that the landmark detection maybe wrong.
Summary
In this article, you learned about face landmark detection using Dlib after doing face detection with the HOG + Linear SVM model. We also got to know some drawbacks of the current models and approaches. I hope that you learned something new from this tutorial.
If you have any doubts, suggestions, or thoughts, please leave them in the comment section. I will surely address them.
You can contact me using the Contact section. You can also find me on LinkedIn, and X.

good combination of SVM + HOG. you can use occuluded face try this .
Hi M S Prasad. Thanks. Will check it out.
I am trying to make a line connecting the lip coordinates for image. Only the upper and lower lip leaving the between region. Also I am trying to get the inside coordinates of the lip region alone. Kindly help!
Hello yang. To get the lip coordinates you will need the exact keypoint numbers of the lips and only iterate over them.