

When the first Molmo models were released by AllenAI, they made a great impact within the Vision Language Models community and researchers. Because of their open nature, with the dataset, architecture, and training, they opened doors for others to experiment and create their own models and applications. Recently, the researchers from AllenAI have released Molmo2. In this article, we will cover the same and understand how it differs from its predecessors and the advantages it provides.
We will cover the following while discussing Molmo2:
- Covering the official article and the tech report to understand the architecture, data curation, and training.
- Running inference with Molmo2 for image & video understanding, image pointing, and question answering.
Short Introduction of Molmo2
Molmo2 was introduced by authors from AllenAI in the technical report Molmo2
Open Weights and Data for Vision-Language Models with Video Understanding and Grounding.
The authors also published an official technical article with the report highlighting:
- What led to Molmo2?
- What are its strengths?
- How does it differ from Molmo1?
- How does it compete against other models in the same domain?
In this article, we will take a closer look at some of the aspects of the technical article and the report. We will also walk through a simple inference notebook using the smaller Molmo2 version.
From Image Grounding to Video-Native Intelligence
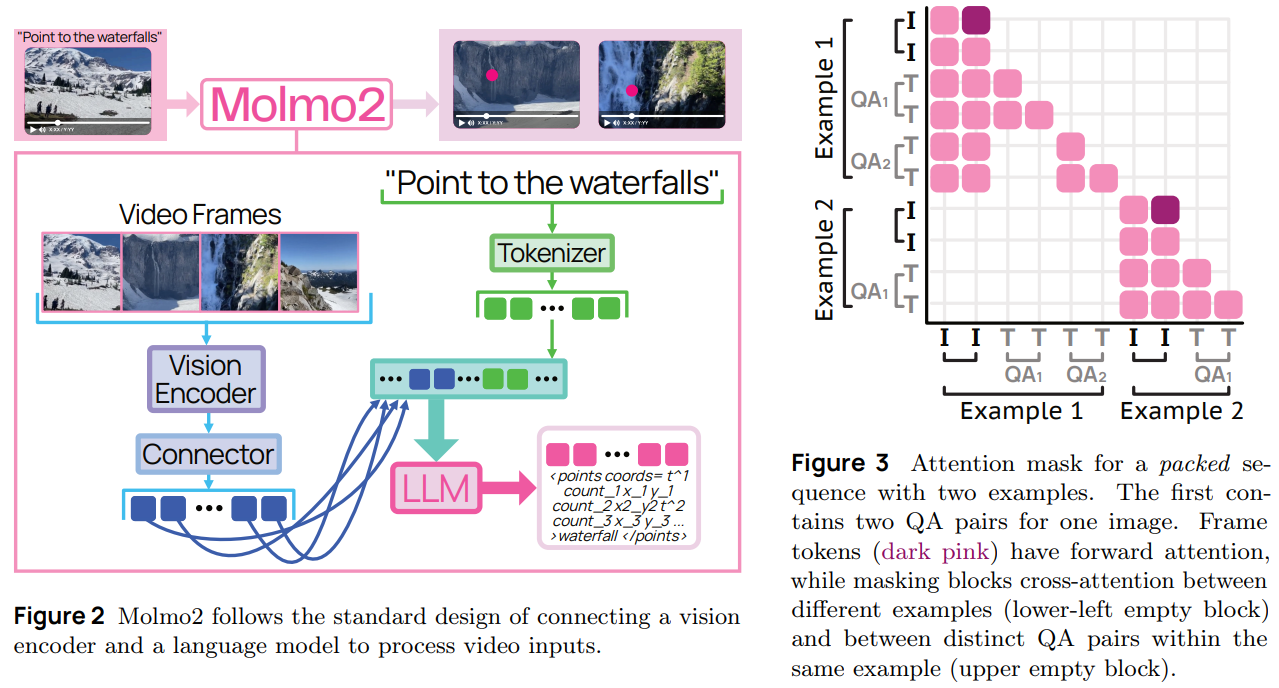
Molmo2 extends the original Molmo philosophy into the video domain. The first Molmo models established strong image grounding capabilities, particularly image pointing, and were released with open weights and datasets. Molmo2 builds on that foundation and generalizes grounding from static images to video frames.
As described in the technical report, Molmo2 is designed not only to answer questions about visual content but to provide explicit spatial and temporal evidence. Instead of responding with only text, the model can emit coordinates, timestamps, and persistent object identifiers. The official release article frames this as a shift toward video-native intelligence – where models do not merely describe events, but localize them.
This distinction is important. Many video-language models perform high-level reasoning but lack precise grounding. Molmo2 treats grounding as a first-class capability.
Model Variants and Open Design Philosophy
Molmo2 has three variants:
- Molmo2-8B (Qwen3-based, strongest overall performance)
- Molmo2-4B (efficiency-oriented)
- Molmo2-O-7B (built on OLMo for a fully open end-to-end stack)
The inclusion of the OLMo-based variant is particularly meaningful. It enables researchers to inspect and control the entire stack, which includes:
- Vision encoder
- Connector
- And the language backbone
This also takes away the reliance on partially closed components.
Unlike many recent open-weight multimodal models, Molmo2 does not rely on distillation from proprietary APIs. The datasets and training mixture are open source.
Architectural Overview
Molmo2 follows a modular vision-language architecture. It combines:
- A Vision Transformer (ViT) encoder
- A connector module for projecting visual features
- A Large Language Model backbone
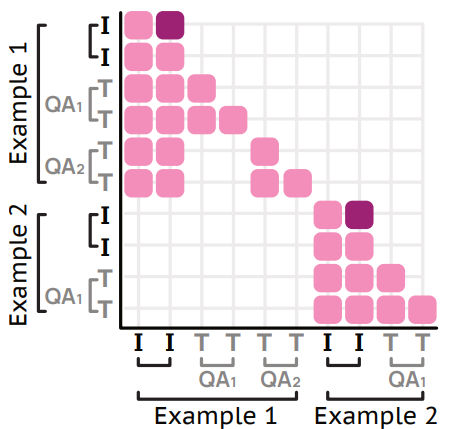
For video inputs, frames are sampled at a fixed rate (2 FPS) and encoded into patch-level features. The connector pools and projects these into visual tokens, which are then interleaved with text tokens and passed into the LLM.
During training, the model processes up to 128 frames. During long-context training, this increases to 384 frames. A notable architectural decision is allowing visual tokens from different frames to forward-attend to one another. This improves temporal reasoning, especially for tracking and counting tasks.
The result is a unified system that handles single images, multi-image inputs, and videos within the same token framework.
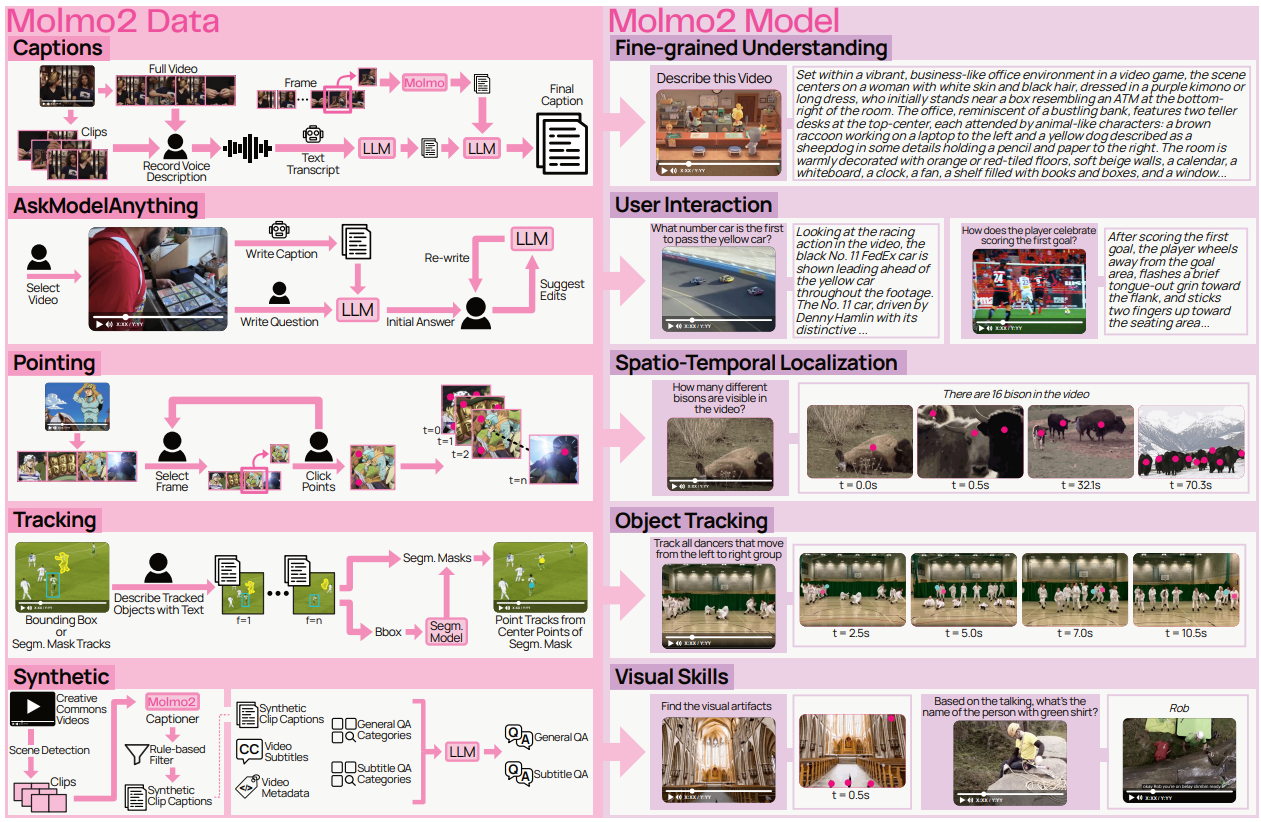
Data Strategy and Grounded Supervision
A core contribution of Molmo2 is its dataset construction. The team introduces multiple new datasets targeting dense captioning, open-vocabulary pointing, counting, tracking, and long-form QA. These design choices strengthen the spatio-temporal reasoning of the model.
The dense captioning dataset stands out in particular. Videos are described in long-form, detailed narratives. Annotators provide spoken descriptions, which are transcribed and refined, then augmented with frame-level visual details before being merged into extended captions. This produces unusually rich supervision compared to typical short caption datasets.
In addition, the video pointing and tracking datasets enable models to learn:
- Counting by emitting multiple grounded points
- Localizing events in time
- Maintaining persistent object IDs across frames
Crucially, the authors do not distill proprietary closed-source models to generate the data. The technical report emphasizes that Molmo2 avoids proprietary supervision pipelines. This makes it one of the few large-scale video-language models with fully open training data.
Grounding in Space and Time
Grounding is central to Molmo2’s design. When asked a question such as “How many times does the robot grasp the red block?”, the model does not simply return a number. Instead, it emits structured outputs containing normalized spatial coordinates, timestamps, and object identifiers.
Points are sorted by time and encoded directly into text output. This unified representation allows the model to:
- Count via explicit pointing
- Track objects across occlusions
- Localize actions within a temporal window
- Support multi-turn pointing and tracking queries
This approach moves video-language modeling beyond descriptive reasoning toward verifiable spatial-temporal reasoning. Even strong proprietary systems show limitations in video grounding benchmarks, while Molmo2 demonstrates significant improvements among open models.
Training Pipeline and Engineering Decisions
Molmo2 is trained in three stages. The first stage focuses on image-based pretraining, including captioning and pointing. The second stage performs joint supervised fine-tuning across image, multi-image, and video datasets. The final stage extends the context length to support longer video reasoning.
Several engineering decisions make this training process effective.
A token-weighting strategy prevents long video captions from dominating the loss. Without this adjustment, tasks with thousands of output tokens would overwhelm shorter QA or multiple-choice tasks. By balancing loss contributions, the model maintains broad capability.
Furthermore, an efficient packing mechanism merges multiple shorter examples into a single long sequence. This minimizes padding waste.
These techniques significantly increase training efficiency and stability, particularly when handling long multimodal sequences.
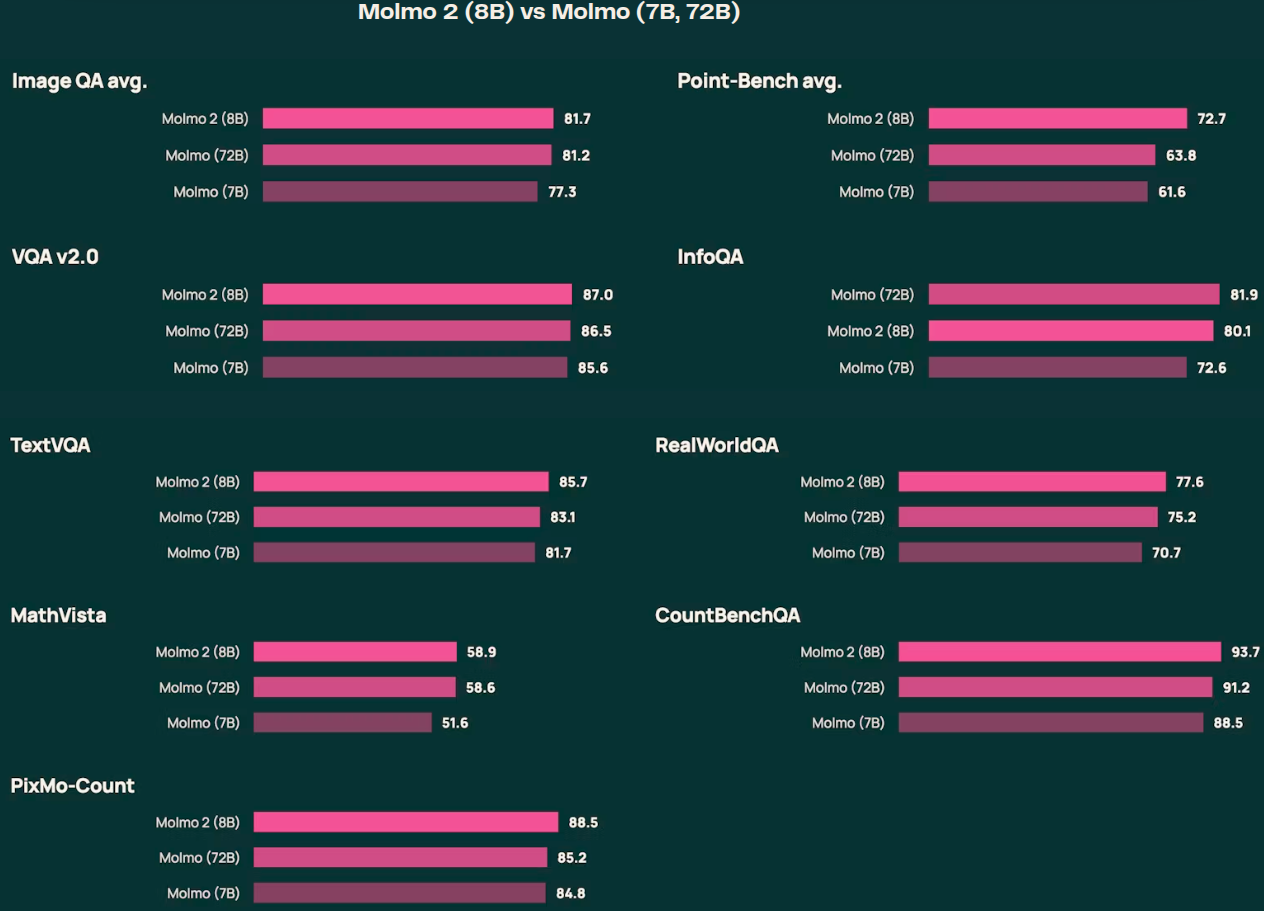
Evaluation and Positioning
Molmo2 achieves state-of-the-art performance among fully open models on short-video QA, counting, and grounding tasks. It also performs strongly in human preference evaluations and competes closely with larger proprietary systems in several benchmarks.
While long-video reasoning remains an open challenge and large closed models still lead in some ultra-long tasks, Molmo2 narrows the gap significantly – especially in grounding-heavy scenarios such as tracking and counting.
More importantly, it demonstrates that high-performance video-language modeling can be achieved without proprietary distillation.
I would highly recommend going through Section 4 of the technical report to know more about the evaluation and benchmarks.
Inference with Molmo2
From this section onward, we will carry out inference with Molmo2.
We will run inference for:
- Video QA
- Image QA
- Image Pointing
The following experiments use the Molmo2-4B model.
Directory Structure
The following is the directory structure that we are following:
.
├── input
└── molmo2_4b_image_guide.ipynb
- We have one notebook containing the code, and the
inputdirectory contains the data that we want to use for inference. - The notebook contains the options to use the data from the
inputdirectory or download the images and videos from the official Hugging Face guide.
The Jupyter Notebook is available for download with this article.
Download Code
Molmo2-4B Image and Video Inference
The first few cells contain the installation steps and the import statements.
# Uncomment and run if packages are not installed
!pip install transformers==4.57.1
!pip install torch pillow einops torchvision accelerate decord2 molmo_utils
!pip install matplotlib opencv-python requests
import os
import re
import requests
from pathlib import Path
from typing import List, Tuple

import torch
import matplotlib.pyplot as plt
import matplotlib.patches as patches
import cv2
import numpy as np
from PIL import Image

from transformers import AutoProcessor, AutoModelForImageTextToText
from molmo_utils import process_vision_info

print(f"PyTorch version: {torch.__version__}")
print(f"CUDA available: {torch.cuda.is_available()}")
if torch.cuda.is_available():
    print(f"CUDA device: {torch.cuda.get_device_name(0)}")
Let’s set up all the directories that we need along the way.
DATA_DIR = Path('downloaded_data')
DATA_DIR.mkdir(exist_ok=True)

VIDEO_DIR = DATA_DIR / 'videos'
IMAGE_DIR = DATA_DIR / 'images'
OUTPUT_DIR = DATA_DIR / 'outputs'

VIDEO_DIR.mkdir(exist_ok=True)
IMAGE_DIR.mkdir(exist_ok=True)
OUTPUT_DIR.mkdir(exist_ok=True)

print(f"Data directories created at: {DATA_DIR.absolute()}")
We have directories for downloading the images, videos, and saving the outputs.
Helper Functions
We have a few helper functions for downloading the data and visualization.
def download_file(url: str, save_path: Path) -> Path:
    """Download a file from URL to save_path."""
    if save_path.exists():
        print(f"File already exists: {save_path}")
        return save_path

    print(f"Downloading from {url}...")
    response = requests.get(url, stream=True)
    response.raise_for_status()

    with open(save_path, 'wb') as f:
        for chunk in response.iter_content(chunk_size=8192):
            f.write(chunk)

    print(f"Downloaded to: {save_path}")
    return save_path


def download_image_from_url(url: str) -> Image.Image:
    """Download and return PIL Image from URL."""
    response = requests.get(url, stream=True)
    response.raise_for_status()
    return Image.open(response.raw)


def visualize_image_with_points(image: Image.Image, points: List[Tuple], title: str = 'Image with Points'):
    """Visualize image with points overlaid."""
    fig, ax = plt.subplots(1, 1, figsize=(12, 8))
    ax.imshow(image)

    for point in points:
        if len(point) == 3:
            frame_id, x, y = point
            ax.plot(x, y, 'ro', markersize=8)
            ax.text(x, y-10, f"F{int(frame_id)}", color='red', fontsize=10, weight='bold')
        elif len(point) == 2:
            x, y = point
            ax.plot(x, y, 'ro', markersize=8)

    ax.axis('off')
    ax.set_title(title, fontsize=14, weight='bold')
    plt.tight_layout()
    plt.show()


def extract_video_frames(video_path: Path, num_frames: int = 8) -> List[np.ndarray]:
    """Extract evenly spaced frames from video."""
    cap = cv2.VideoCapture(str(video_path))
    total_frames = int(cap.get(cv2.CAP_PROP_FRAME_COUNT))
    frame_indices = np.linspace(0, total_frames - 1, num_frames, dtype=int)

    frames = []
    for idx in frame_indices:
        cap.set(cv2.CAP_PROP_POS_FRAMES, idx)
        ret, frame = cap.read()
        if ret:
            frame = cv2.cvtColor(frame, cv2.COLOR_BGR2RGB)
            frames.append(frame)

    cap.release()
    return frames


def visualize_video_frames(frames: List[np.ndarray], title: str = 'Video Frames'):
    """Visualize video frames in a grid."""
    n = len(frames)
    cols = 4
    rows = (n + cols - 1) // cols

    fig, axes = plt.subplots(rows, cols, figsize=(16, 4 * rows))
    axes = axes.flatten() if n > 1 else [axes]

    for idx, frame in enumerate(frames):
        axes[idx].imshow(frame)
        axes[idx].axis('off')
        axes[idx].set_title(f"Frame {idx + 1}", fontsize=10)

    for idx in range(n, len(axes)):
        axes[idx].axis('off')

    plt.suptitle(title, fontsize=16, weight='bold')
    plt.tight_layout()
    plt.show()
We have helper functions for:
- Downloading images and videos from URLs.
- Visualizing points on images after inference.
- Extracting and visualizing video frames.
Regex Patterns for Point Extraction
For pointing experiments, we need to extract the point coordinates from the model’s text response. The following regex helper functions will carry that out.
COORD_REGEX = re.compile(r"<(?:points|tracks).*? coords=\"([0-9\t:;, .]+)\"/?>")
FRAME_REGEX = re.compile(r"(?:^|\t|:|,|;)([0-9\.]+) ([0-9\. ]+)")
POINTS_REGEX = re.compile(r"([0-9]+) ([0-9]{3,4}) ([0-9]{3,4})")


def _points_from_num_str(text, image_w, image_h, extract_ids=False):
    """Parse point coordinates from numeric string format."""
    for points in POINTS_REGEX.finditer(text):
        ix, x, y = points.group(1), points.group(2), points.group(3)
        x, y = float(x) / 1000 * image_w, float(y) / 1000 * image_h
        if 0 <= x <= image_w and 0 <= y <= image_h:
            yield ix, x, y

def extract_multi_image_points(text, image_w, image_h, extract_ids=False):
    """Extract multi-image pointing coordinates as list of (frame_id, x, y) triplets."""
    all_points = []
    if isinstance(image_w, (list, tuple)) and isinstance(image_h, (list, tuple)):
        assert len(image_w) == len(image_h)
        diff_res = True
    else:
        diff_res = False

    for coord in COORD_REGEX.finditer(text):
        for point_grp in FRAME_REGEX.finditer(coord.group(1)):
            frame_id = int(point_grp.group(1)) if diff_res else float(point_grp.group(1))
            w, h = (image_w[frame_id - 1], image_h[frame_id - 1]) if diff_res else (image_w, image_h)
            for idx, x, y in _points_from_num_str(point_grp.group(2), w, h):
                if extract_ids:
                    all_points.append((frame_id, idx, x, y))
                else:
                    all_points.append((frame_id, x, y))
    return all_points


print("Point extraction functions loaded!")
Load the Molmo2-4B Model
Let’s load the model now.
MODEL_ID = 'allenai/Molmo2-4B'

print(f"Loading Molmo2-4B model: {MODEL_ID}")
print("This may take a few minutes...\n")

processor = AutoProcessor.from_pretrained(
    MODEL_ID,
    trust_remote_code=True,
    dtype='auto',
    device_map='auto'
)

model = AutoModelForImageTextToText.from_pretrained(
    MODEL_ID,
    trust_remote_code=True,
    # dtype='auto',
    dtype=torch.bfloat16,
    device_map='auto'
)

print(f"Model loaded successfully!")
print(f"Model device: {model.device}")
We are loading the model in BF16 format. This requires around 11GB VRAM. However, we need around 24GB VRAM for inference. Unfortunately, at the time of writing this, Molmo2 models do not work in INT4 format with BitsAndBytes. So, we have to carry out inference in BF16/FP16.
Video QA with Molmo2-4B
Let’s start with the video QA experiments.
In the following code blocks, we are using our own images for inference. If you wish, you can download the official videos by uncommenting the respective lines.
# video_qa_url = 'https://storage.googleapis.com/oe-training-public/demo_videos/many_penguins.mp4'
# video_qa_path = VIDEO_DIR / 'many_penguins.mp4'
# Replace with your own video path
video_qa_path = Path('input/video_1.mp4')
if not video_qa_path.exists():
download_file(video_qa_url, video_qa_path)
# Visualize video frames
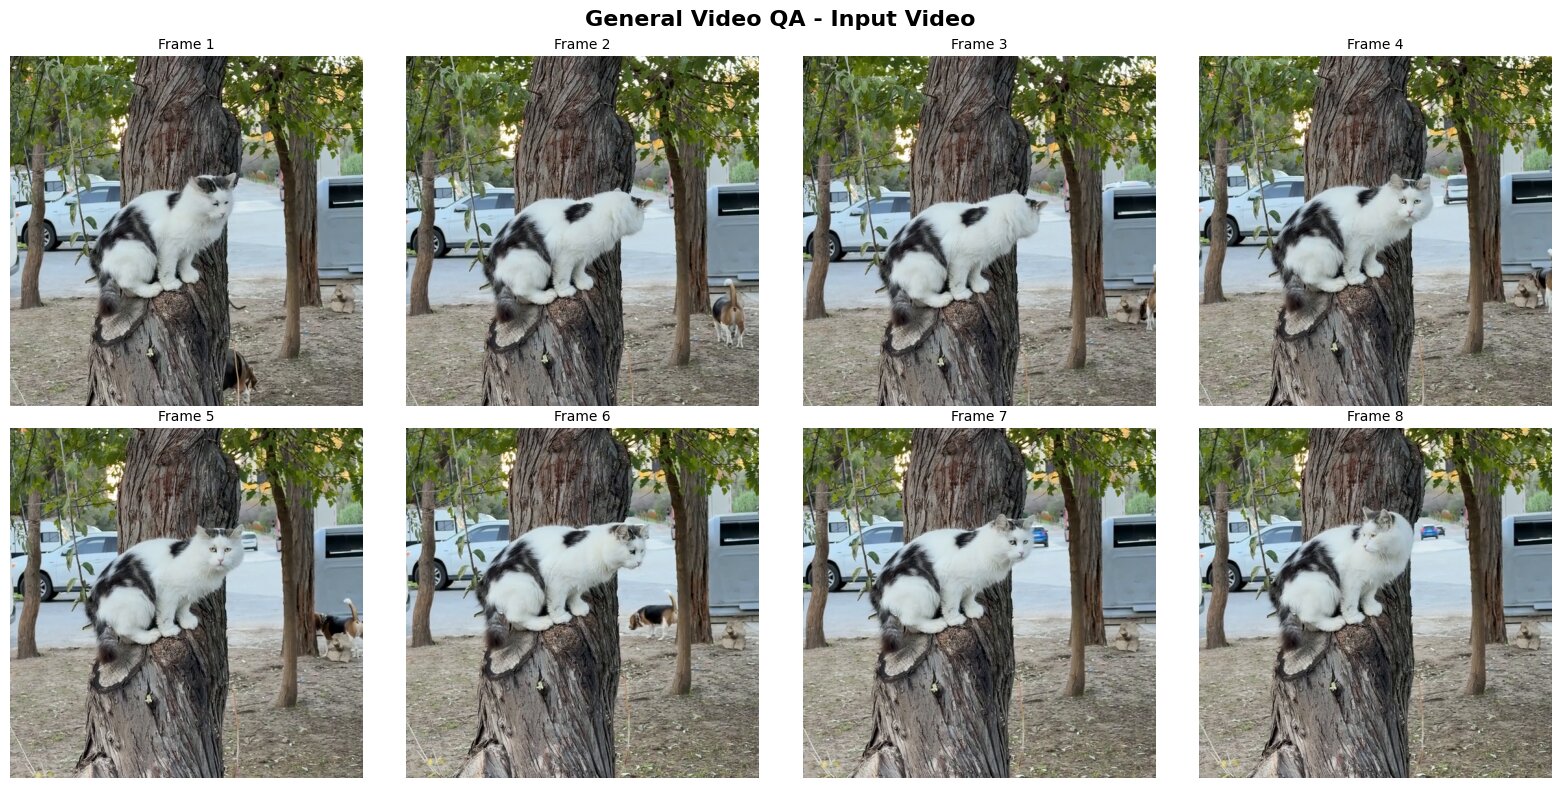
frames = extract_video_frames(video_qa_path, num_frames=8)
visualize_video_frames(frames, 'General Video QA - Input Video')
The following are a few of the frames from the video.
The next code block sets the prompt and runs the inference.
# Replace with your own question
question = "What animals appear in the video?"

messages = [
    {
        "role": "user",
        "content": [
            dict(type="text", text=question),
            dict(type="video", video=str(video_qa_path)),
        ],
    }
]

inputs = processor.apply_chat_template(
    messages,
    tokenize=True,
    add_generation_prompt=True,
    return_tensors="pt",
    return_dict=True,
)

inputs = {k: v.to(model.device) for k, v in inputs.items()}

with torch.inference_mode():
    generated_ids = model.generate(**inputs, max_new_tokens=2048)

generated_tokens = generated_ids[0, inputs['input_ids'].size(1):]
generated_text = processor.tokenizer.decode(generated_tokens, skip_special_tokens=True)

print("="*60)
print("GENERAL VIDEO QA RESULT")
print("="*60)
print(f"Question: {question}")
print(f"\nAnswer: {generated_text}")
print("="*60)
We get the following response from the model.
============================================================
GENERAL VIDEO QA RESULT
============================================================
Question: What animals appear in the video?

Answer: The animals that appear in the video are a cat and two dogs.
============================================================
In reality, two cats and one dog appear in the video. However, the models answers that two dogs and one cat appear in the video.
Multi-Image QA
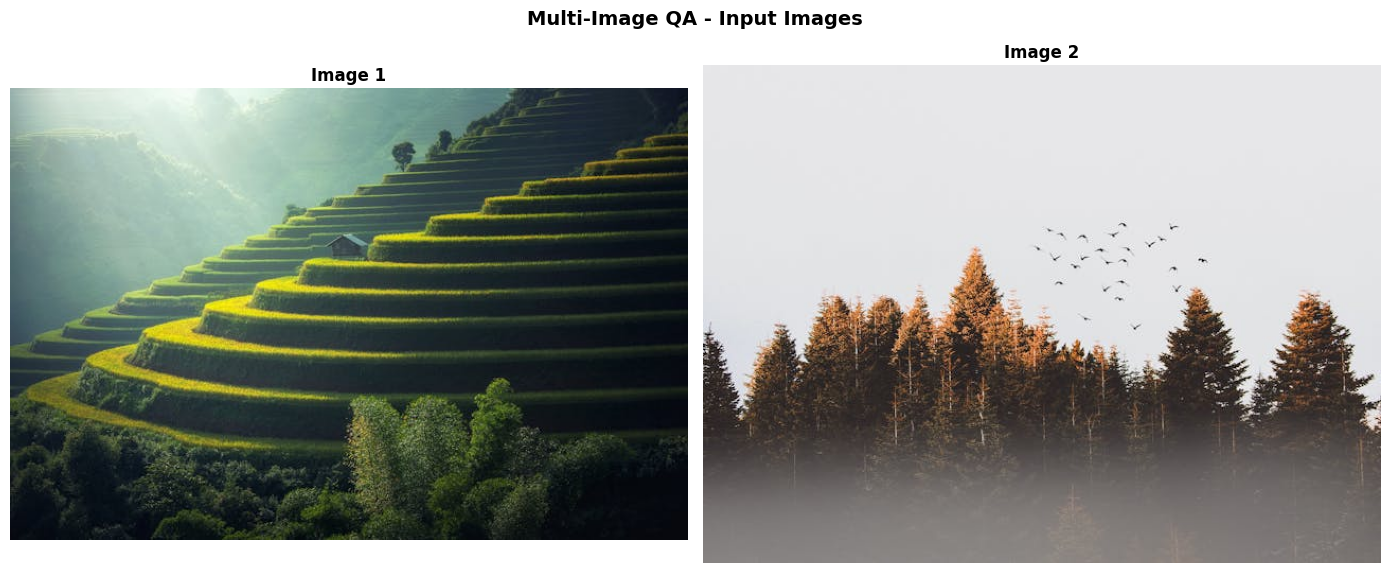
The next inference example is for multi-image QA. We will use the following two images for this purpose.
# Download sample images
# image1_url = 'https://picsum.photos/id/237/536/354'
# image2_url = 'https://vllm-public-assets.s3.us-west-2.amazonaws.com/vision_model_images/cherry_blossom.jpg'
# image1 = download_image_from_url(image1_url)
# image2 = download_image_from_url(image2_url)

# Replace with your own image paths
image1 = Image.open('input/image_2.jpg')
image2 = Image.open('input/image_3.jpg')

# Save images
image1.save(IMAGE_DIR / 'multi_image1.jpg')
image2.save(IMAGE_DIR / 'multi_image2.jpg')

# Visualize
fig, axes = plt.subplots(1, 2, figsize=(14, 6))
axes[0].imshow(image1)
axes[0].axis('off')
axes[0].set_title('Image 1', fontsize=12, weight='bold')

axes[1].imshow(image2)
axes[1].axis('off')
axes[1].set_title('Image 2', fontsize=12, weight='bold')

plt.suptitle('Multi-Image QA - Input Images', fontsize=14, weight='bold')
plt.tight_layout()
plt.show()
The next code block runs the inference.
# Replace with your own question
multi_image_question = "Compare these images."

messages = [
    {
        "role": "user",
        "content": [
            dict(type="text", text=multi_image_question),
            dict(type="image", image=image1),
            dict(type="image", image=image2)
        ],
    }
]

inputs = processor.apply_chat_template(
    messages,
    tokenize=True,
    add_generation_prompt=True,
    return_tensors="pt",
    return_dict=True,
)

inputs = {k: v.to(model.device) for k, v in inputs.items()}

with torch.inference_mode():
    generated_ids = model.generate(**inputs, max_new_tokens=448)

generated_tokens = generated_ids[0, inputs['input_ids'].size(1):]
generated_text = processor.tokenizer.decode(generated_tokens, skip_special_tokens=True)

print("="*60)
print("MULTI-IMAGE QA RESULT")
print("="*60)
print(f"Question: {multi_image_question}")
print(f"\nAnswer: {generated_text}")
print("="*60)
We are providing both images to the model and asking it compare the two. We get the following response from the model.
============================================================
MULTI-IMAGE QA RESULT
============================================================
Question: Compare these images.

Answer: These two images showcase different aspects of natural landscapes, each with its own unique characteristics.

The first image presents a terraced hillside, likely in a rice paddy region. It features a series of green steps ascending a mountainside, creating a striking visual pattern. A small house sits on one of these terraces, adding a human element to the scene. The background is filled with misty mountains, and sunlight filters through, casting a warm glow on the landscape. This image emphasizes the harmony between human agricultural practices and natural beauty.

The second image depicts a dense forest scene. Tall pine trees dominate the foreground, their dark green needles contrasting with the lighter sky. The forest floor is obscured by a thick layer of fog, creating a mysterious atmosphere. A flock of birds is visible in the sky, adding movement to the otherwise still scene. This image focuses on the raw, untouched beauty of a forest ecosystem.

Both images capture the majesty of nature, but in different ways. The terraced hillside shows the interaction between humans and the environment, while the forest scene presents a more untouched, wild landscape. The first image has a more structured, geometric quality, while the second is more organic and fluid in its composition.

The color palettes in both images are predominantly green, but they're used differently. In the first image, green is used to create a sense of depth and pattern, while in the second, it's used to create contrast between the trees and the sky.

Overall, these images offer a complementary view of natural landscapes, one showcasing human influence and the other presenting a more pristine wilderness.
============================================================
The model gives a detailed answer comparing both images.
Multi-Image Pointing
The final experiment that we will carry out is for multi-image pointing. We are using the following images for this purpose.
# Download sample images
# boat1_url = 'https://storage.googleapis.com/oe-training-public/demo_images/boat1.jpeg'
# boat2_url = 'https://storage.googleapis.com/oe-training-public/demo_images/boat2.jpeg'
# image1 = download_image_from_url(boat1_url)
# image2 = download_image_from_url(boat2_url)

# Replace with your own image paths
image1 = Image.open('input/image_1.jpg')
image2 = Image.open('input/image_4.jpg')

# Save images
image1.save(IMAGE_DIR / 'point_image1.jpg')
image2.save(IMAGE_DIR / 'point_image2.jpg')

images = [image1, image2]

# Visualize
fig, axes = plt.subplots(1, 2, figsize=(14, 6))
axes[0].imshow(images[0])
axes[0].axis('off')
axes[0].set_title('Image 1 (Boats)', fontsize=12, weight='bold')

axes[1].imshow(images[1])
axes[1].axis('off')
axes[1].set_title('Image 2 (Boats)', fontsize=12, weight='bold')

plt.suptitle('Multi-Image Pointing QA - Input Images', fontsize=14, weight='bold')
plt.tight_layout()
plt.show()
In the next code block, we ask the model to point to the birds.
# Replace with your own pointing query
multi_image_pointing_query = "Point to the birds"

messages = [
    {
        "role": "user",
        "content": [
            dict(type="text", text=multi_image_pointing_query),
            dict(type="image", image=images[0]),
            dict(type="image", image=images[1]),
        ],
    }
]

inputs = processor.apply_chat_template(
    messages,
    tokenize=True,
    add_generation_prompt=True,
    return_tensors="pt",
    return_dict=True,
)

inputs = {k: v.to(model.device) for k, v in inputs.items()}

with torch.inference_mode():
    generated_ids = model.generate(**inputs, max_new_tokens=2048)

generated_tokens = generated_ids[0, inputs['input_ids'].size(1):]
generated_text = processor.tokenizer.decode(generated_tokens, skip_special_tokens=True)

multi_image_points = extract_multi_image_points(
    generated_text,
    [images[0].width, images[1].width],
    [images[0].height, images[1].height],
)

print("="*60)
print("MULTI-IMAGE POINTING QA RESULT")
print("="*60)
print(f"Query: {multi_image_pointing_query}")
print(f"\nExtracted Points (frame_id, x, y): {len(multi_image_points)} points")
print(f"Points: {multi_image_points}")
print("="*60)
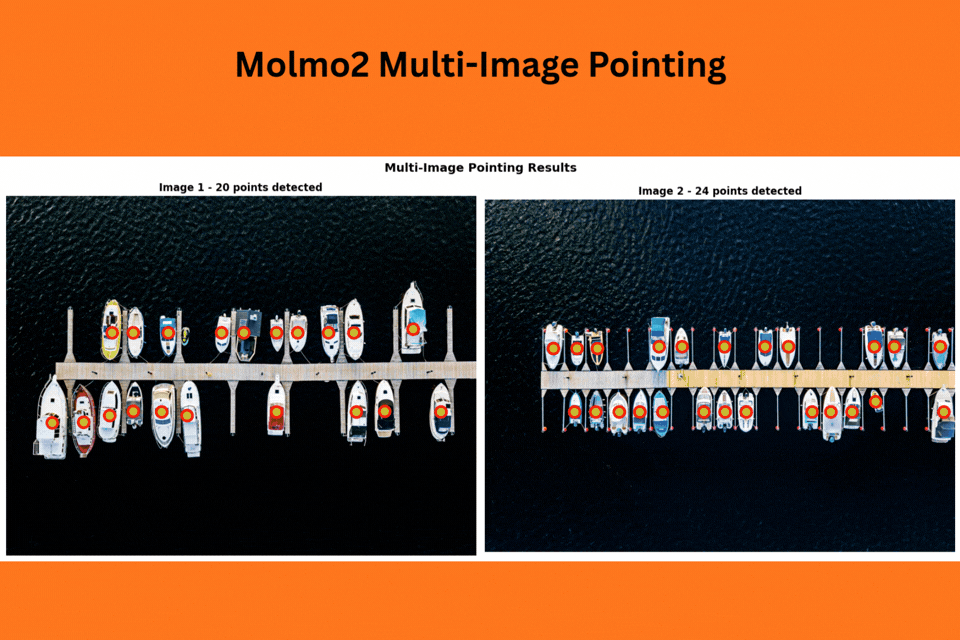
We get the outputs in the following format.
============================================================
MULTI-IMAGE POINTING QA RESULT
============================================================
Query: Point to the birds

Extracted Points (frame_id, x, y): 45 points
Points: [(1, 267.52, 721.638), (1, 311.03999999999996, 707.137), (1, 357.12, 721.638), (1, 417.28000000000003, 721.638), (1, 455.67999999999995, 730.168), (1, 481.28, 687.518), (1, 537.6, 713.108), (1, 550.4, 730.168), (1, 569.6, 738.698), (1, 576.0, 670.4580000000001), (1, 595.2, 661.928), (1, 620.8, 696.048), (1, 646.4, 687.518), (1, 672.0, 661.928), (1, 697.6, 687.518), (1, 736.0, 687.518), (1, 748.8, 661.928), (1, 774.4, 661.928), (1, 787.2, 687.518), (1, 876.8000000000001, 687.518), (1, 902.4, 670.4580000000001), (1, 966.4, 678.988), (1, 1004.8000000000001, 670.4580000000001), (2, 23.04, 279.36), (2, 96.0, 322.56), (2, 125.44, 214.56), (2, 215.04000000000002, 236.16), (2, 224.0, 488.16), (2, 288.0, 365.76), (2, 294.40000000000003, 423.35999999999996), (2, 300.79999999999995, 495.35999999999996), (2, 454.4, 423.35999999999996), (2, 601.5999999999999, 574.5600000000001), (2, 678.4000000000001, 192.96), (2, 678.4000000000001, 300.96), (2, 697.6, 444.96), (2, 736.0, 236.16), (2, 768.0, 336.96000000000004), (2, 812.8, 588.9599999999999), (2, 819.2, 646.5600000000001), (2, 838.4000000000001, 365.76), (2, 1043.1999999999998, 473.76000000000005), (2, 1158.4, 128.16), (2, 1248.0, 192.96), (2, 1254.4, 351.36)]
============================================================
We have the frame IDs and the x, y coordinates, which we next annotate on the images.
# Separate points by image
points_by_image = {1: [], 2: []}
for point in multi_image_points:
    frame_id, x, y = point
    if frame_id in points_by_image:
        points_by_image[frame_id].append((x, y))

# Visualize each image with its points
fig, axes = plt.subplots(1, 2, figsize=(16, 7))

for idx, (img, pts) in enumerate([(images[0], points_by_image[1]), (images[1], points_by_image[2])]):
    axes[idx].imshow(img)

    for x, y in pts:
        axes[idx].plot(x, y, 'ro', markersize=9)
        axes[idx].plot(x, y, 'yo', markersize=3)

    axes[idx].axis('off')
    axes[idx].set_title(f"Image {idx + 1} - {len(pts)} points detected", fontsize=12, weight='bold')

plt.suptitle('Multi-Image Pointing Results', fontsize=14, weight='bold')
plt.tight_layout()
plt.show()
This gives the following result.

Surprisingly, the Molmo2-4B model is able to point to all the birds in both images. This goes towards to show the strong spatial reasoning the model has.
Summary and Conclusion
In this article, we covered a basic introduction to Molmo2. We discussed some of the important aspects of the official article and the technical report. Along with that, we carried out inference using the Molmo2-4B model for video QA, image QA, and image pointing. In the next articles, we will take this further by experimenting with video pointing and tracking.
If you have any questions, thoughts, or suggestions, please leave them in the comment section. I will surely address them.
You can contact me using the Contact section. You can also find me on LinkedIn, and X.
References
