
In the last two articles, we covered the fundamentals of DeepSeek-OCR 2 in detail. These involved the inference pipeline using DeepSeek-OCR 2 and understanding the architecture as well. Both articles gave us a good idea of how the model performs, which components are novel, and how the model works in code. This article takes the next step, fine-tuning DeepSeek-OCR 2 using Unsloth.
Although DeepSeek-OCR 2 performs well on the English language out of the box, Indic languages are not its strong suit. Here, we will try to solve for such a use case by fine-tuning the model on Hindi-language images and the corresponding text.
What are we going to cover while fine-tuning DeepSeek-OCR 2?
- Preparing the Hindi-language dataset and splitting it into training and test sets.
- Training the DeepSeek-OCR 2 model on the dataset using the Unsloth library.
- Analyzing performance via validation loss.
- Running inference on test images using a simple Gradio UI.
Note: Although we are going to use the Unsloth version of DeepSeek-OCR 2, some of the inference components seem to be broken at the moment. Both Free-OCR and Grounded-OCR via Unsloth give inferior results compared to the pure Hugging Face Transformers implementation. Fine-tuning of course solves some of the pain points; however, we are mostly sticking with Unsloth for GPU memory efficiency while training the model. I have also raised an issue on Hugging Face regarding the same.
The Hindi OCR Dataset That We Are Using for Fine-Tuning DeepSeek-OCR 2
We will be using an OCR dataset from Hugging Face. This contains 388 images, primarily from the Bhagavad Gita in Devanagari script.
The text is rich in ligatures and is representative of formal Hindi typography. All in all, this is a good use case for fine-tuning the model.
Following is an example of the image and the OCR response using the pretrained Unsloth DeepSeek-OCR model.
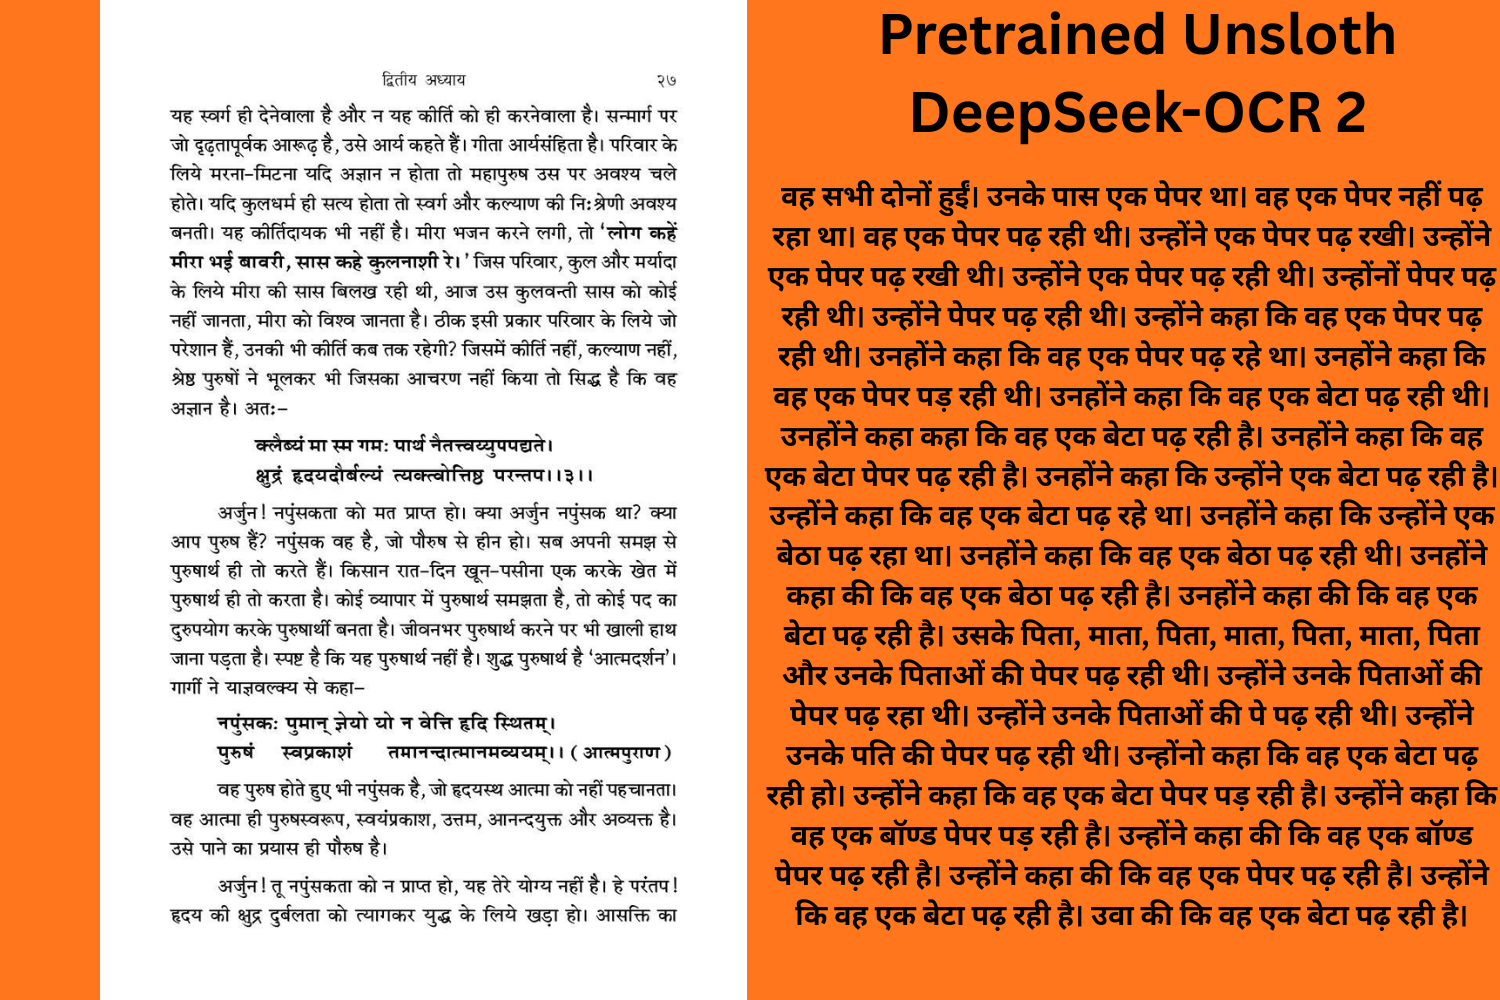
We can clearly see that the pretrained model is not capable of recognizing the text. Fine-tuning the model will help it understand Devanagari scripts with dense paragraphs.
Project Directory Structure
Following is the project directory structure:
├── deepseek_ocr2
│   ├── assets
│   ...
│   ├── model.safetensors.index.json
│   ├── processor_config.json
│   ├── README.md
│   ├── special_tokens_map.json
│   ├── tokenizer_config.json
│   └── tokenizer.json
├── deepseek_ocr_lora
│   ├── adapter_config.json
│   ├── adapter_model.safetensors
│   ├── README.md
│   ├── special_tokens_map.json
│   ├── tokenizer_config.json
│   └── tokenizer.json
├── inference
│   ├── assets
│   ├── images
│   ├── outputs
│   ├── app.py
│   ├── config.py
│   ├── LICENSE
│   ├── README.md
│   ├── requirements.txt
│   └── run.py
├── test_data  [156 entries exceeds filelimit, not opening dir]
└── deepseek_ocr_2_unsloth_ft_hindi_ocr.ipynb
- We have the training code in the
deepseek_ocr_2_unsloth_ft_hindi_ocr.ipynbnotebook. - The
deepseek_ocr2directory contains the Unsloth version of the locally downloaded DeepSeek-OCR 2 model. deepseek_ocr_loracontains the fine-tuned LoRA.- The
inferencedirectory contains the inference code for DeepSeek-OCR 2. This covers both a CLI script and a simple Gradio application that we covered in one of the previous articles. It is a slightly modified version of that codebase to cater to the current article. - Finally, the
test_datadirectory contains all the test images and their ground truth text after we split the dataset into a training and test set.
The article provides a zip file containing the training Jupyter Notebook, the inference scripts, the trained LoRA, and test data. You can unzip the file, install the requirements, and start experimenting right away.
Download Code
Installing Dependencies
All the training dependencies are installed via the Jupyter Notebook.
For inference, we can install all the necessary libraries using the requirements.txt file in the inference directory.
pip install -r inference/requirements.txt
This is all that we need to know before diving into the code.
Code for Fine-Tuning DeepSeek-OCR 2
All the code for fine-tuning code that we are going to discuss here is present in deepseek_ocr_2_unsloth_ft_hindi_ocr.ipynb Jupyter Notebook.
We will only discuss the crucial parts of the notebook in detail, as some of the code is standard boilerplate LLM code.
Installation, Imports, and Download the Model
The first few cells focus on the installation of the libraries, the necessary imports, and downloading the model into the current working directory.
from huggingface_hub import snapshot_download
from unsloth import FastVisionModel
from transformers import AutoModel
from datasets import load_dataset
from transformers import Trainer, TrainingArguments
from unsloth import is_bf16_supported

import torch
import os

os.environ['UNSLOTH_WARN_UNINITIALIZED'] = '0'
snapshot_download('unsloth/DeepSeek-OCR-2', local_dir='deepseek_ocr2')
# For Unsloth Data Collator.
import torch
import math
import io

from dataclasses import dataclass
from typing import Dict, List, Any, Tuple
from PIL import Image, ImageOps
from torch.nn.utils.rnn import pad_sequence
from deepseek_ocr2.modeling_deepseekocr2 import (
    format_messages,
    text_encode,
    BasicImageTransform,
    dynamic_preprocess,
)
The above code block imports the necessary modules from the locally downloaded Unsloth DeepSeek-OCR repository. This is necessary to create the data collator that we will cover further in the article.
Loading the DeepSeek-OCR 2 Model
The next code block loads the DeepSeek-OCR 2 model.
model, tokenizer = FastVisionModel.from_pretrained(
    './deepseek_ocr2',
    load_in_4bit=False,
    auto_model=AutoModel,
    trust_remote_code=True,
    unsloth_force_compile=True,
    use_gradient_checkpointing='unsloth',
)
Currently, Unsloth does not support loading the model in INT4 format. So, loading and running inference requires between 7.5GB and 8GB VRAM.
Loading the Dataset
Next, let’s download the dataset and create training and test splits.
dataset = load_dataset('damerajee/hindi-ocr')

train_dataset = dataset['train']

split_dataset = train_dataset.train_test_split(test_size=0.10, seed=42)

train_data = split_dataset['train']
test_data = split_dataset['test']

print(f"Training samples: {len(train_data)}")
print(f"Test samples: {len(test_data)}")

# Save an image
test_data[0]['image'].save('image.jpg')

# Save all the test data in a directory.
os.makedirs('test_data', exist_ok=True)
for i in range(len(test_data)):
    test_data[i]['image'].save(f"test_data/test_data_{str(i)}.jpg")

    with open(f"test_data/test_data_{str(i)}.txt", 'w') as f:
        f.write(test_data[i]['text'])
We reserve 10% of the data for testing and will use the rest for training. This amounts to 349 samples for training and 39 for testing. Along with that, we also save all the test images and their corresponding ground truth text locally so that we can test and compare the results later.
Creating the PEFT Model
Next, we will create the PEFT version of the DeepSeek-OCR 2 model.
model = FastVisionModel.get_peft_model(
    model,
    target_modules = [
        'q_proj',
        'k_proj',
        'v_proj',
        'o_proj',
        'gate_proj',
        'up_proj',
        'down_proj',
    ],

    r=16,
    lora_alpha=16, # alpha=r at least
    lora_dropout=0,
    bias='none',
    random_state=3407,
    use_rslora=False,
    loftq_config=None,
    # target_modules = 'all-linear', # Optional now! Can specify a list if needed
)
We are using a rank and alpha of 16. And you may also note that we are not fine-tuning any of the vision modules.
Instruction-Based Data Preparation
We need to format the current dataset into an instruction format for training. For this, we will follow the standard Unsloth vision fine-tuning format shown below.
[
{ "role": "<|User|>",
  "content": "",
  "images": []
},
{ "role": "<|Assistant|>",
  "content": ""
},
]
The following code block creates the formatted dataset.
instruction = "\nFree OCR. "

def convert_to_conversation(sample):
    """Convert dataset sample to conversation format"""
    conversation = [
        {
            "role": "<|User|>",
            "content": instruction,
            "images": [sample['image']]
        },
        {
            "role": "<|Assistant|>",
            "content": sample["text"]
        },
    ]
    return {"messages": conversation}

final_train = [convert_to_conversation(sample) for sample in train_data]
final_test = [convert_to_conversation(sample) for sample in test_data]

print(len(final_train))
print(len(final_test))
One of the most important aspects of dataset preparation is the data collator. We use a custom data collator here that is provided as part of the official Unsloth DeepSeek-OCR 2 fine-tuning. We use the class as is and the next code block shows a truncated version of the same.
@dataclass
class DeepSeekOCR2DataCollator:
    """
    Args:
        tokenizer: Tokenizer
        model: Model
        image_size: Size for image patches (default: 768)
        base_size: Size for global view (default: 1024)
        crop_mode: Whether to use dynamic cropping for large images
        train_on_responses_only: If True, only train on assistant responses (mask user prompts)
    """
    tokenizer: Any
    model: Any
    image_size: int = 768
    base_size: int = 1024
    crop_mode: bool = True
    image_token_id: int = 128815
    train_on_responses_only: bool = True

    def __init__(
        self,
        tokenizer,
        model,
        image_size: int = 768,
        base_size: int = 1024,
        crop_mode: bool = True,
        train_on_responses_only: bool = True,
    ):
        self.tokenizer = tokenizer
        self.model = model
        self.image_size = image_size
        self.base_size = base_size
        self.crop_mode = crop_mode
        self.image_token_id = 128815
        self.dtype = model.dtype  # Get dtype from model
        self.train_on_responses_only = train_on_responses_only

        self.image_transform = BasicImageTransform(
            mean = (0.5, 0.5, 0.5),
            std = (0.5, 0.5, 0.5),
            normalize = True
        )
        self.patch_size = 16
        self.downsample_ratio = 4

        # Get BOS token ID from tokenizer
        if hasattr(tokenizer, 'bos_token_id') and tokenizer.bos_token_id is not None:
            self.bos_id = tokenizer.bos_token_id
        else:
            self.bos_id = 0
            print(f"Warning: tokenizer has no bos_token_id, using default: {self.bos_id}")
.
.
.
    def __call__(self, features: List[Dict[str, Any]]) -> Dict[str, torch.Tensor]:
        """Collate batch of samples"""
        batch_data = []

        # Process each sample
        for feature in features:
            try:
                processed = self.process_single_sample(feature['messages'])
                batch_data.append(processed)
            except Exception as e:
                print(f"Error processing sample: {e}")
                continue

        if not batch_data:
            raise ValueError("No valid samples in batch")

        # Extract lists
        input_ids_list = [item['input_ids'] for item in batch_data]
        images_seq_mask_list = [item['images_seq_mask'] for item in batch_data]
        prompt_token_counts = [item['prompt_token_count'] for item in batch_data]

        # Pad sequences
        input_ids = pad_sequence(input_ids_list, batch_first = True, padding_value = self.tokenizer.pad_token_id)
        images_seq_mask = pad_sequence(images_seq_mask_list, batch_first = True, padding_value = False)

        # Create labels
        labels = input_ids.clone()

        # Mask padding tokens
        labels[labels == self.tokenizer.pad_token_id] = -100

        # Mask image tokens (model shouldn't predict these)
        labels[images_seq_mask] = -100

        # Mask user prompt tokens when train_on_responses_only = True (only train on assistant responses)
        if self.train_on_responses_only:
            for idx, prompt_count in enumerate(prompt_token_counts):
                if prompt_count > 0:
                    labels[idx, :prompt_count] = -100

        # Create attention mask
        attention_mask = (input_ids != self.tokenizer.pad_token_id).long()

        # Prepare images batch (list of tuples)
        images_batch = []
        for item in batch_data:
            images_batch.append((item['images_crop'], item['images_ori']))

        # Stack spatial crop info
        images_spatial_crop = torch.cat([item['images_spatial_crop'] for item in batch_data], dim = 0)

        return {
            "input_ids": input_ids,
            "attention_mask": attention_mask,
            "labels": labels,
            "images": images_batch,
            "images_seq_mask": images_seq_mask,
            "images_spatial_crop": images_spatial_crop,
        }
The above class returns a dictionary containing the input IDs, the attention mask, labels, images, image sequence masks, and the image spatial crops.
Training the Model
Let’s prepare the model for training, initialize the data collator, and the Trainer API.
FastVisionModel.for_training(model)

data_collator = DeepSeekOCR2DataCollator(
    tokenizer=tokenizer,
    model=model,
    image_size=768,
    base_size=1024,
    crop_mode=True,
    train_on_responses_only=True,
)

trainer = Trainer(
    model=model,
    tokenizer=tokenizer,
    data_collator=data_collator,
    train_dataset=final_train,
    eval_dataset=final_test,
    args = TrainingArguments(
        per_device_train_batch_size=4,
        per_device_eval_batch_size=4,
        gradient_accumulation_steps=1,
        warmup_steps=5,
        max_steps=500,
        # num_train_epochs = 1, # Set this instead of max_steps for full training runs
        learning_rate=2e-4,
        logging_steps=1,
        optim='adamw_8bit',
        weight_decay=0.001,
        lr_scheduler_type='linear',
        seed=3407,
        fp16=not is_bf16_supported(),  # Use fp16 if bf16 is not supported
        bf16=is_bf16_supported(),  # Use bf16 if supported
        output_dir='training_outputs',
        report_to='none',     # For Weights and Biases
        dataloader_num_workers=4,
        remove_unused_columns=False,
        save_steps=100,
        eval_steps=100,
        eval_strategy='steps',
        save_strategy='steps',
        load_best_model_at_end=True,
        metric_for_best_model='eval_loss',
        greater_is_better=False,
    ),
)
In the above, we are using:
- A batch size of 4 for both training and evaluation data loaders
- Gradient accumulation step of 1
- Maximum training steps of 500
- 4 data loader workers
With the above batch size and gradient accumulation configuration, the GPU requirement is just above 22GB. An L4 GPU was used for the above training. Howeever, you can reduce the batch size to 1 and increase the gradient accumulation steps to 4 to train it on a 16GB T4 GPU on either Colab or Kaggle notebooks.
The following code cell starts the training.
trainer_stats = trainer.train()
The following are the training stats.
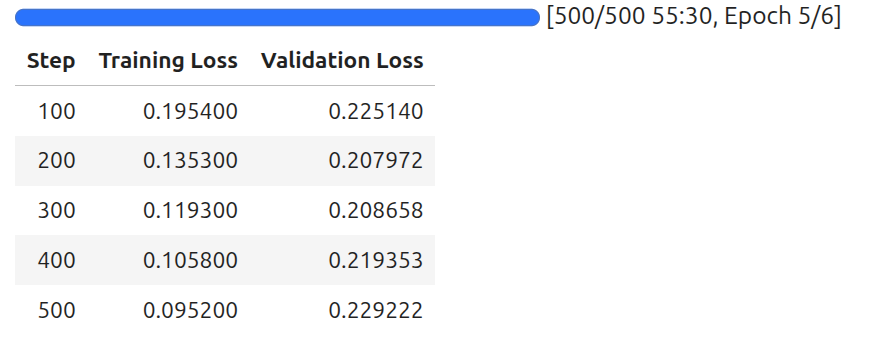
As we can see, although we trained the model for 500 steps, we got the best model after 200 steps. We are saving the best model here and will use the same for inference later.
Saving the LoRA
Finally, we save the LoRA locally for loading and carrying out inference later.
model.save_pretrained("deepseek_ocr_lora")
tokenizer.save_pretrained("deepseek_ocr_lora")
With this, we complete all the necessary training code. In the next section, we will carry out inference using the fine-tuned model and extensively test the model on different test images.
Inference Using the Fine-Tuned DeepSeek-OCR 2 Model
We will use the Gradio app for running inference here that we have modified to accomodate for loading the Unsloth model. In this article, we will not cover the inference code in detail; however, please feel free to visit the previous articles in the series to understand the scripts.
Within the inference directory, we can run it using the following command:
cd inference

python app.py
Then navigate to http://127.0.0.1:7860/ in your browser.
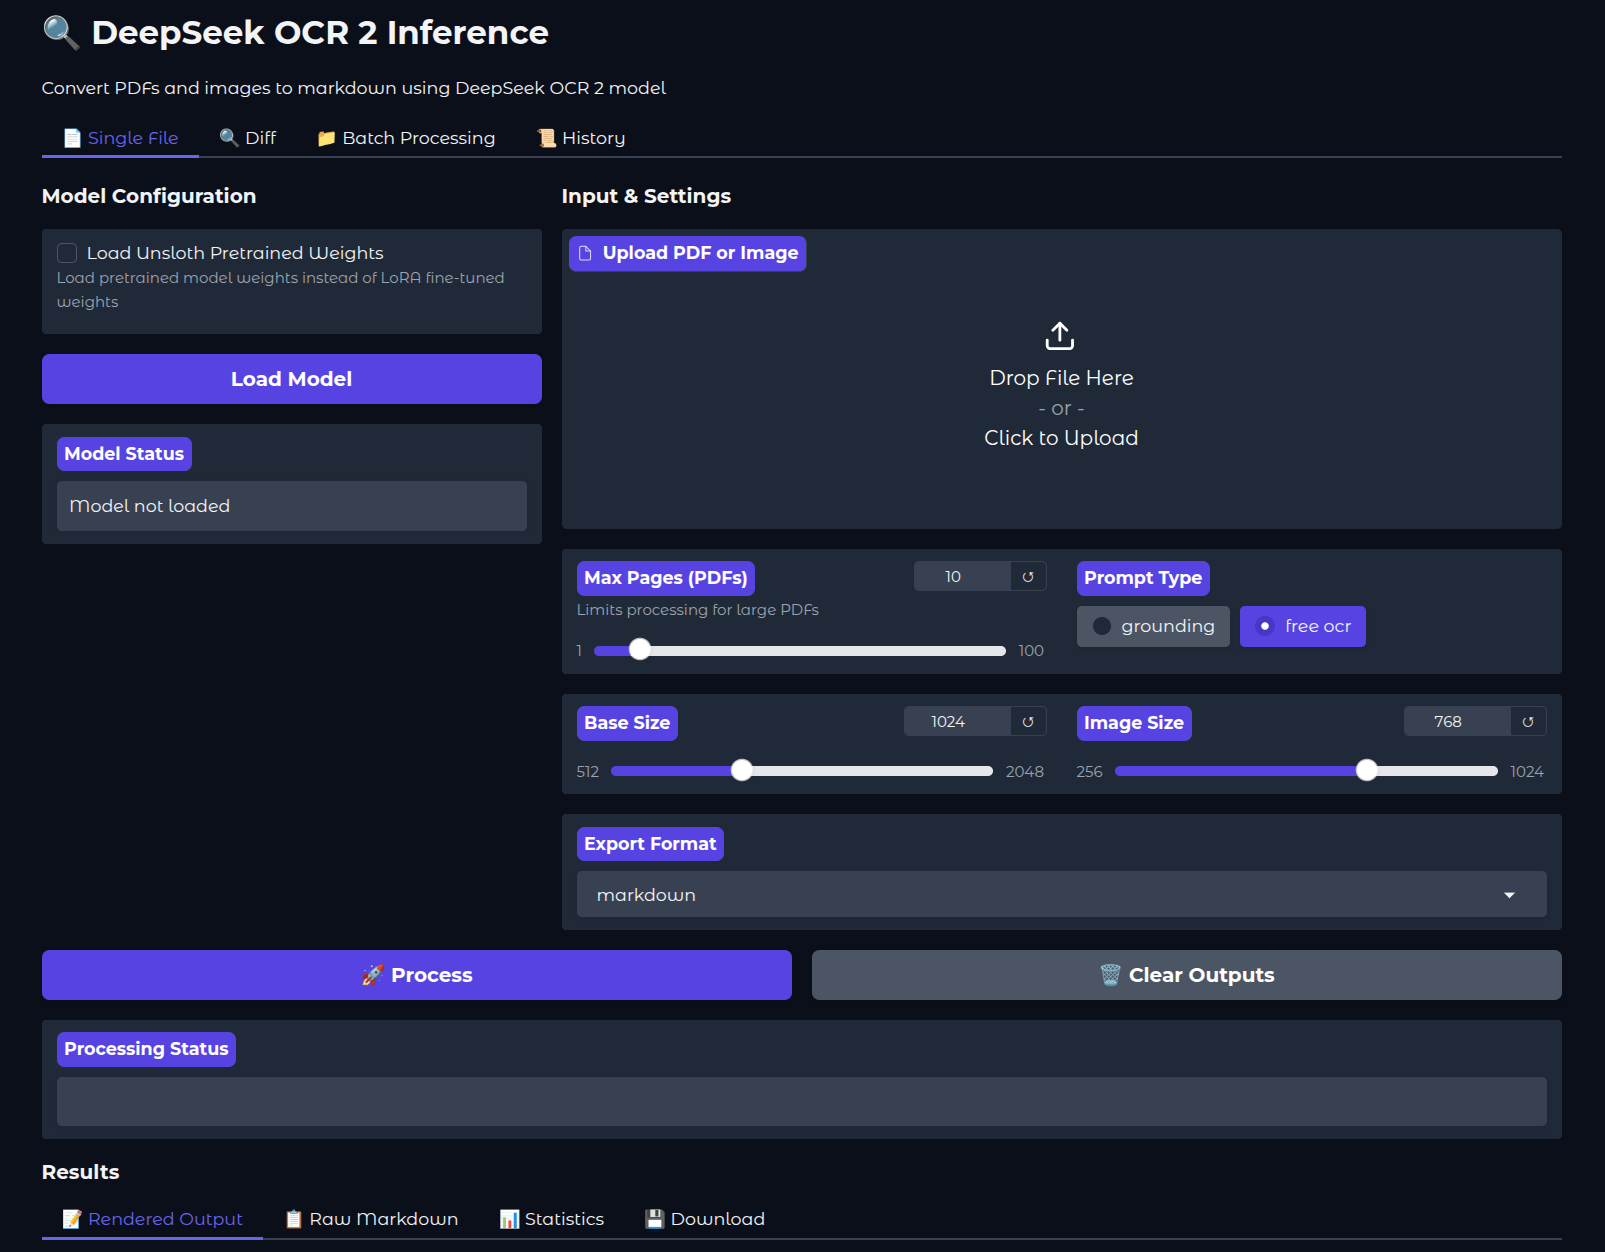
If we wish, we can also load the pretrained weights by checking the appropriate option from the UI. By default, the trained LoRA is loaded from the parent project directory.
The following video shows one complete workflow of the application, where we upload an image and run inference.
Note: Be sure to always choose “free ocr” as the prompt for this application, as that is the prompt with which the model has been trained on.
After the inference is complete, we get the rendered output in the Rendered Output tab. We can visualize the raw markdown and inference statistics in the respective tabs. However, we can see right away that the inference is not perfect. The OCR starts with “like this:” and then the Hindi text starts.
Let’s compare the generated and the original text. On top of the Gradio application, we have a Diff tab. This is for analyzing the difference between the inference text and the original text. We copied the inference text from the Raw Markdown tab. Let’s analyze the difference between the two.
In the above video, we paste the text generated by the fine-tuned model in text box 2 and the original text in text box 1. We can see all the additional text and the text that has been added by the model by hovering over the + and – buttons. By analyzing the results, we can infer that there is a lot of room for improvement.
Further Improvements and Actions
- Try to play around with the inference application. You can do batch inference by providing the absolute path to a directory in the Batch Processing tab.
- You can also train with a LoRA rank of 32 and alpha of 64 to check if the performance improves.
- Furthermore, there is a high chance that the results will improve by fine-tuning the vision modules as well.
Summary and Conclusion
In this article, we covered the fine-tuning of DeepSeek-OCR 2 on Hindi images and text, specifically, the Devanagari script. We started with the discussion of the dataset, followed by the training and inference. We also analyzed the inference and discussed the room for improvement.
If you have any questions, thoughts, or suggestions, please leave them in the comment section. I will surely address them.
You can contact me using the Contact section. You can also find me on LinkedIn, and X.
