
In last week’s tutorial, we discussed getting started with facial keypoint detection using deep learning. The readers got hands-on experience to train a deep learning model on a simple grayscale face image dataset using PyTorch. In this article, we will further our discussions on the topic of facial keypoint detection using deep learning and PyTorch. We will learn about some more advanced techniques. This time also we will train a deep learning model on a facial keypoint dataset. But in this article, the images are going to be colored (RGB), a bit more complex. Also, we will try to detect facial keypoints in faces from a live webcam feed.
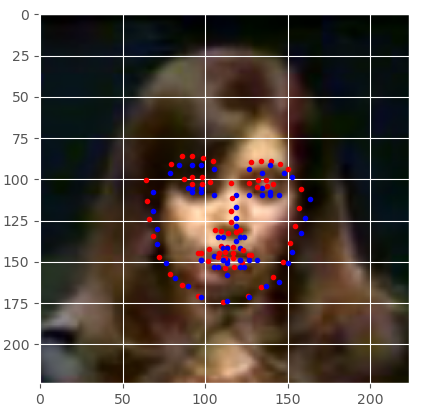
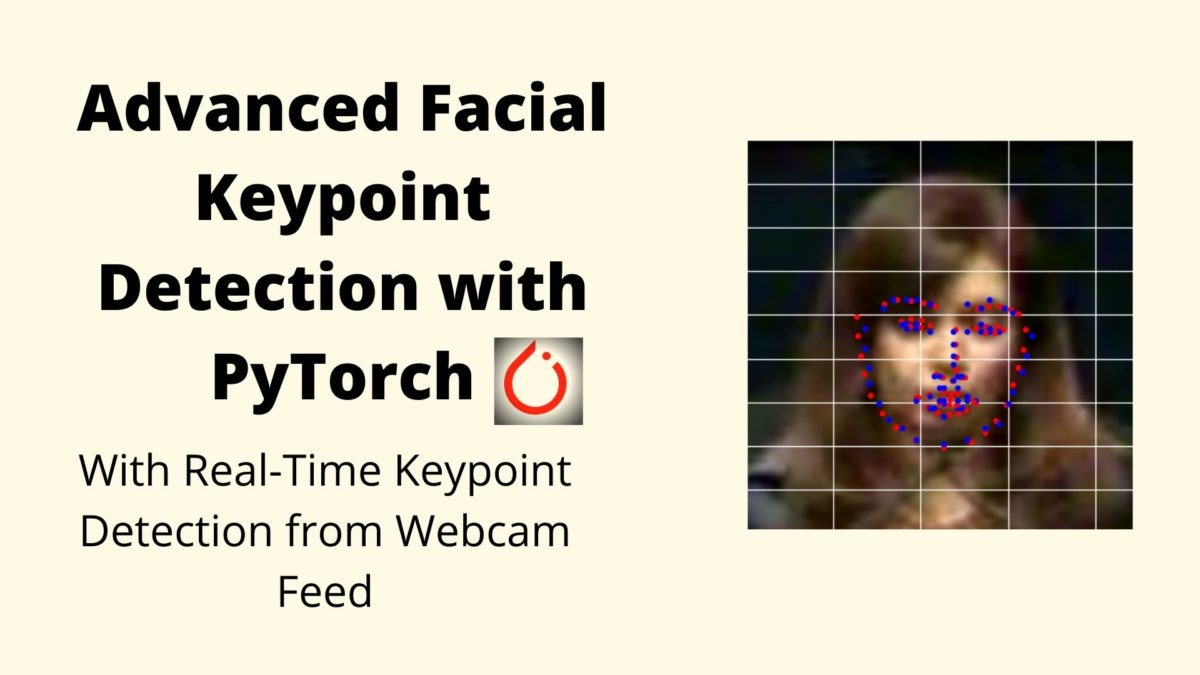
Figure 1 shows how detecting keypoints on faces will look. In the figure, the blue dots show the actual keypoints and the red dots show the predicted keypoints. Our aim in this tutorial is to achieve similar results as in figure 1. We will also try to detect keypoints in faces from a live webcam video feed.
What will you learn in this tutorial?
- Using colored (RGB) face images dataset for facial keypoint detection using deep learning. We will use the PyTorch deep learning framework.
- Using transfer learning and a pre-trained ResNet50 model to detect facial keypoints. We will try our best to fine-tune it and achieve the best results that we can.
- Validating on a split of the dataset using the trained model.
- Using the deep learning model to detect facial keypoints in faces from live webcam feed.
I hope that you are excited to move further into this tutorial and learn about deep learning facial keypoint detection.
A Bit of Background
In the previous tutorial, we discussed getting started with facial keypoint detection. We used a dataset with grayscale facial images. The deep learning model that we trained on was very basic as the dataset was quite simple. The images were small in dimension, 96×96, were grayscale (only one channel), and most of the samples had missing keypoints.
Due to the missing keypoints we had to drop the majority of the samples and trained our deep learning model with only around 2000 samples. Despite all these, that article will work as the groundwork for this article. We followed a pretty simple and efficient project and file structure for that project.
We will be reusing much of the code from there while making changes where we need them. Also, I will be explaining the codes where there are changes compared to the previous article. Else, things will become too redundant. So, if you are new to the concept of facial keypoint detection using deep learning, then I highly recommend that you follow that tutorial and then come back here.
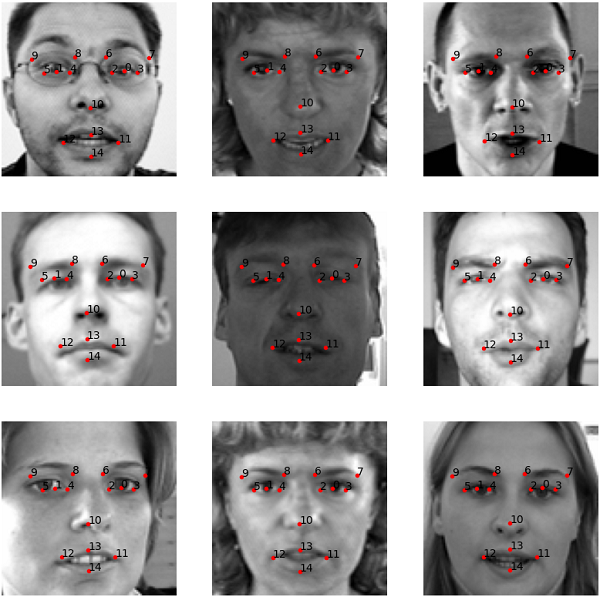
What you see in figure 2 is the output after running our trained deep neural network on the test dataset in the previous tutorial. You can see that there are only 15 keypoints for each of the faces. This was quite simple for our deep learning neural network to predict after training. In contrast to this, we will use a dataset that has 68 keypoints for each of the faces in this tutorial. In addition to that, the images are going to be colored having three channels. This means that there are going to be more pixels. All in all, we will be tackling a harder problem in this tutorial than the previous one.
The Dataset
We will be using a Kaggle dataset for facial keypoint detection using PyTorch. You can find the dataset here.
Go ahead and download the dataset. Extracting the dataset will give you two folders and two CSV files.
The training and test folders contain the training and test images respectively. Similarly, the training_frames_keypoints.csv and test_frames_keypoints.csv contain the keypoints for the face images in training and test folders respectively.

Figure 3 shows some of the samples from the training_frames_keypoints.csv file. You can see that the first column contains the name of the file for the image in training folder. The rest of the 136 columns contain the coordinate values for the face. There are 68 keypoints for each face. And each keypoint has two coordinate values (x, y) in the image. That is how we end up with 136 values for 68 keypoints. There are 5770 images in total. Out of those, 3462 are in the training folder, and 2308 are in the test folder.
But there is a slight problem with this division. I have observed that the images in the test folders are some of the copies from the training folder. Therefore, it will make no sense if we use those images for validation. Thus, we will divide the samples from the training folder into training and validation sets. I hope that this makes sense.
Now, let’s take a look at a few of the images from the training dataset with their keypoints.
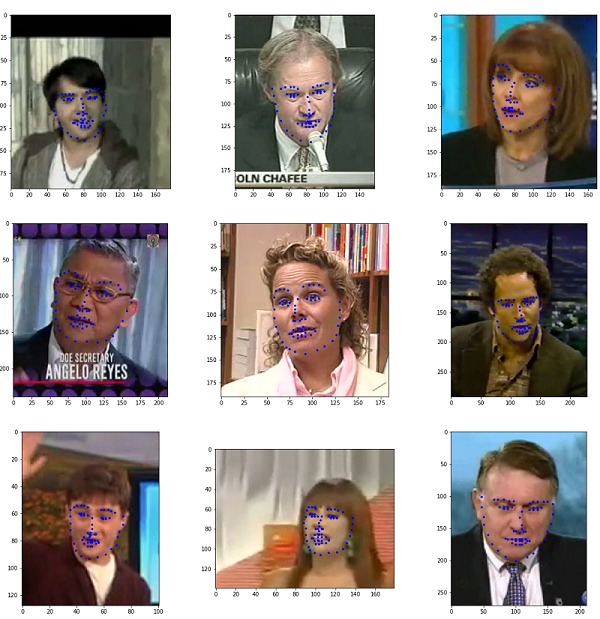
The blue dots show the actual keypoints on each of the faces. We can see that the keypoints cover quite a lot of features of the faces. They capture the nose, the lips, the chin and outline of the face, and even the eyebrows and eyes. This dataset will provide a good challenge for our deep learning model.
The Project Structure
Let’s take a look at the project directory structure that we will follow.
├───src
│   │   config.py
│   │   dataset.py
│   │   model.py
│   │   test_video.py
│   │   train.py
│   │   utils.py
│   │
├───input
│   │   test_frames_keypoints.csv
│   │   training_frames_keypoints.csv
│   │
│   ├───test
│   └───training
├───outputs
- The
srcfolder contains six Python scripts. We will get into the details of those while writing the code for each of them. - We have our dataset inside the
inputfolder. The folders and files that you see in theinputfolder are what we get after extracting the Kaggle dataset. - The
outputsfolder will contain all the outputs. This includes the validation results, the loss plot, and the trained deep learning model.
Using a clean project structure will make our work really easier to navigate around and code our way through the project. This is all we need for the project structure.
Some Details About the Model and Approach that We Will Use
There are a lot of tutorials on the internet to train a PyTorch-based facial keypoint detection model. But all of those tutorials convert the colored RGB channel images into single channel grayscale images before feeding them to the network.
There must be performance reasons for this. But to me, this does not make much sense. Since we use RGB images instead of grayscale images we can feed our neural network with more information. Then I tried some custom models on the dataset that we are going to use. Well, the result was not good. Seems that it is actually a difficult problem to solve. Training a custom deep learning model on the RGB facial keypoint dataset does not give the desired performance.
Also, a custom trained deep learning model on the colored images provided really bad results for real-time face detection on webcam feeds. But still, I wanted to train a deep learning model on the colored images instead of converting them to grayscale.
So, I used some tried and tested models. And yes, a pre-trained ResNet50 did the work. At least to a good extent. Basically, transfer learning again to the rescue.
Therefore, we will be training our RGB facial keypoint images using a pre-trained ResNet50 deep learning model. This will also give us the chance to see some of the results on the live webcam feed. The results of webcam facial keypoint detection are not perfect. But it is a good starting point. So, let’s move ahead to installing the libraries and frameworks that we will need.
Libraries and Frameworks
- We will surely need the PyTorch framework for this tutorial. Make sure that you install the latest version of PyTorch before moving further. I have used PyTorch 1.6 for the project. So, it is better if you have the same version as well.
- For the ResNet50 model, we will be using the PyTorch pre-trained model libraries by Cadene from the pretrained-models.pytorch GitHub repository. Install it using the following command.
pip install pretrainedmodels- This repository contains many other awesome pre-trained vision models for PyTorch. Give it a look if you have some time.
This is all the preparation that we need. That was really a lot of theory. Let’s jump into the coding part now.
Facial Keypoint Detection using Deep Learning and PyTorch
From this section onward, we will write the code to detect facial keypoints on colored images using deep learning and PyTorch.
We will write the code into each of the Python scripts in their respective sections.
Setting the Configuration Script
In this section, we will set up our configuration Python script. All the code here will go into the config.py file.
The following are the contents for config.py file.
import torch

# constant paths
ROOT_PATH = '../input'
OUTPUT_PATH = '../outputs'

# learning parameters
BATCH_SIZE = 32
LR = 0.001
EPOCHS = 30
DEVICE = torch.device('cuda' if torch.cuda.is_available() else 'cpu')

# train/test split
TEST_SPLIT = 0.1

# show dataset keypoint plot
SHOW_DATASET_PLOT = True
- First, we are defining the paths for our input files and output files. They are
ROOT_PATHandOUTPUT_PATHat lines 4 and 5. - Then we are defining some learning parameters for our deep learning model. We will use a batch size of 32, a learning rate of 0.001, and we will train for 30 epochs. We are also defining the computation device here.
- At line 14, we are defining the
TEST_SPLIT. We will use 10% of the training data for validation. - Finally, we have
SHOW_DATASET_PLOT = True. This will plot the images with the facial keypoints just before training starts and show them on the screen. Using this, we can easily verify that we are actually feeding the right images and facial keypoints to the ResNet50 deep learning model.
Write a Few Utility Functions
In this section, we will write a few utility functions. This is very similar to the utility functions from the previous post. Therefore, we will not go into much of the explanation of the code. I highly recommend that you go through the previous post which has a pretty detailed explanation.
Basically, we will two utility functions here, which will make our plotting work a lot easier. Let’s tackle them one by one.
The code here will go into the utils.py file.
Let’s start with the imports and the first function.
import matplotlib.pyplot as plt
import numpy as np
import config

def valid_keypoints_plot(image, outputs, orig_keypoints, epoch):
    """
    This function plots the regressed (predicted) keypoints and the actual
    keypoints after each validation epoch for one image in the batch.
    """
    # detach the image, keypoints, and output tensors from GPU to CPU
    image = image.detach().cpu()
    outputs = outputs.detach().cpu().numpy()
    orig_keypoints = orig_keypoints.detach().cpu().numpy()

    # just get a single datapoint from each batch
    img = image[0]
    output_keypoint = outputs[0]
    orig_keypoint = orig_keypoints[0]

    img = np.array(img, dtype='float32')
    img = np.transpose(img, (1, 2, 0))
    plt.imshow(img)

    output_keypoint = output_keypoint.reshape(-1, 2)
    orig_keypoint = orig_keypoint.reshape(-1, 2)
    for p in range(output_keypoint.shape[0]):
        plt.plot(output_keypoint[p, 0], output_keypoint[p, 1], 'r.')
        plt.plot(orig_keypoint[p, 0], orig_keypoint[p, 1], 'b.')

    plt.savefig(f"{config.OUTPUT_PATH}/val_epoch_{epoch}.png")
    plt.close()
The above function, that is valid_keypoints_plot() accepts one image after each epoch during the validation step of our training. This will also save the image and predicted keypoints to the disk inside the outputs folder. By analyzing the validation images and their regressed keypoints, we can easily have an idea of how our model is performing. It will also let us know whether the deep learning model is actually learning or not.
Let’s move on to the next utility function.
def dataset_keypoints_plot(data):
    """
    This function shows the image faces and keypoint plots that the model
    will actually see. This is a good way to validate that our dataset is in
    fact corrent and the faces align wiht the keypoint features. The plot
    will be show just before training starts. Press `q` to quit the plot and
    start training.
    """
    plt.figure(figsize=(10, 10))
    for i in range(9):
        sample = data[i]
        img = sample['image']
        img = np.array(img, dtype='float32')
        img = np.transpose(img, (1, 2, 0))
        plt.subplot(3, 3, i+1)
        plt.imshow(img)
        keypoints = sample['keypoints']
        for j in range(len(keypoints)):
            plt.plot(keypoints[j, 0], keypoints[j, 1], 'b.')
    plt.show()
    plt.close()
The dataset_keypoints_plot() will plot a few images from the prepared dataset that we will see just before training begins. This function will only execute if SHOW_DATASET_PLOT is True in the config.py script.
Do take some time to analyze both the functions and understand them. Also, please take a look at the previous post to get some more details.
Preparing the PyTorch Dataset for Facial Keypoint Detection
Now, we will write the code to prepare the facial keypoint dataset. This is one of the most important parts of this project. In fact, preparing the dataset is perhaps one of the most important parts of any deep learning project.
All of the code here will go into the dataset.py Python script.
Let’s start with importing the required modules and libraries.
import torch
import cv2
import pandas as pd
import numpy as np
import config
import utils

from torch.utils.data import Dataset, DataLoader
Note that we are importing the config and utils scripts that we will use while preparing our dataset.
The following function divides our training samples into a training and validation set. We will be using 90% of the data for training and 10% of the data for validation.
def train_test_split(csv_path, split):
    df_data = pd.read_csv(csv_path)
    len_data = len(df_data)
    # calculate the validation data sample length
    valid_split = int(len_data * split)
    # calculate the training data samples length
    train_split = int(len_data - valid_split)
    training_samples = df_data.iloc[:train_split][:]
    valid_samples = df_data.iloc[-valid_split:][:]
    return training_samples, valid_samples
The train_test_split() function takes in the training CSV file path and the split ratio as the parameters. It then divides the data into training_samples and valid_samples.
Next, we will write the class for preparing the facial keypoint dataset. We will call it FacialKeypointDataset(). The following code block contains the whole class to prepare the dataset.
class FaceKeypointDataset(Dataset):
    def __init__(self, samples, path):
        self.data = samples
        self.path = path
        self.resize = 224

    def __len__(self):
        return len(self.data)

    def __getitem__(self, index):
        image = cv2.imread(f"{self.path}/{self.data.iloc[index][0]}")
        image = cv2.cvtColor(image, cv2.COLOR_BGR2RGB)
        orig_h, orig_w, channel = image.shape
        # resize the image into `resize` defined above
        image = cv2.resize(image, (self.resize, self.resize))
        # again reshape to add grayscale channel format
        image = image / 255.0
        # transpose for getting the channel size to index 0
        image = np.transpose(image, (2, 0, 1))
        # get the keypoints
        keypoints = self.data.iloc[index][1:]
        keypoints = np.array(keypoints, dtype='float32')
        # reshape the keypoints
        keypoints = keypoints.reshape(-1, 2)
        # rescale keypoints according to image resize
        keypoints = keypoints * [self.resize / orig_w, self.resize / orig_h]

        return {
            'image': torch.tensor(image, dtype=torch.float),
            'keypoints': torch.tensor(keypoints, dtype=torch.float),
        }
If you explore the dataset, then you will find that all of the images have different dimensions. Therefore, we are resizing all the images to 224×224 dimension. Keep in mind that if we resize the images, then we have to rescale the keypoint coordinates as well. This will ensure that they match for the resized images. Forgetting to rescale the keypoints will make our model learn all the wrong coordinates for facial features of the images. We are rescaling them at line 26.
Next, let’s get our training_samples and valid_samples based on the split of the data.
# get the training and validation data samples
training_samples, valid_samples = train_test_split(f"{config.ROOT_PATH}/training_frames_keypoints.csv",
                                                   config.TEST_SPLIT)
Now, we are all ready to prepare the training dataset, validation dataset, train data loader, and validation data loader.
# initialize the dataset - `FaceKeypointDataset()`
train_data = FaceKeypointDataset(training_samples,
                                 f"{config.ROOT_PATH}/training")
valid_data = FaceKeypointDataset(valid_samples,
                                 f"{config.ROOT_PATH}/training")

# prepare data loaders
train_loader = DataLoader(train_data,
                          batch_size=config.BATCH_SIZE,
                          shuffle=True)
valid_loader = DataLoader(valid_data,
                          batch_size=config.BATCH_SIZE,
                          shuffle=False)

print(f"Training sample instances: {len(train_data)}")
print(f"Validation sample instances: {len(valid_data)}")
Finally, we just need to call the dataset_keypoint_plot() function to visualize the faces and their keypoints from the dataset.
# whether to show dataset keypoint plots
if config.SHOW_DATASET_PLOT:
    utils.dataset_keypoints_plot(valid_data)
Remember that the above function will only execute if SHOW_DATASET_PLOT is True in config.py.
Preparing The PyTorch ResNet50 Deep Learning Model for Facial Keypoint Detection
In this section, we will prepare the ResNet50 model for training on the facial keypoints dataset. I hope that you have already installed the pretrainedmodels library as discussed before. We will be using the pretrainedmodels library to define our model class.
We will write this code inside the model.py file.
Let’s import the required libraries and modules first.
import torch.nn as nn
import torch.nn.functional as F
import pretrainedmodels
The next block of code defines the model class, that is the FaceKeypointResNet50() class.
class FaceKeypointResNet50(nn.Module):
    def __init__(self, pretrained, requires_grad):
        super(FaceKeypointResNet50, self).__init__()
        if pretrained == True:
            self.model = pretrainedmodels.__dict__['resnet50'](pretrained='imagenet')
        else:
            self.model = pretrainedmodels.__dict__['resnet50'](pretrained=None)


        if requires_grad == True:
            for param in self.model.parameters():
                param.requires_grad = True
            print('Training intermediate layer parameters...')
        elif requires_grad == False:
            for param in self.model.parameters():
                param.requires_grad = False
            print('Freezing intermediate layer parameters...')

        # change the final layer
        self.l0 = nn.Linear(2048, 136)

    def forward(self, x):
        # get the batch size only, ignore (c, h, w)
        batch, _, _, _ = x.shape
        x = self.model.features(x)
        x = F.adaptive_avg_pool2d(x, 1).reshape(batch, -1)
        l0 = self.l0(x)
        return l0
We will be using the pre-trained ImageNet weights for initializing the weights of the deep learning model. Along with that, we will also be updating the intermediate layer parameters. From my experimentation, I observed that initializing with the pre-trained weights and updating the intermediate layer parameters gives the best results.
We are also changing the final Linear layer of the ResNet50 model at line 20. The final layer has 136 output features that correspond to the 136 facial keypoint coordinates from the dataset (two coordinates for each of the 68 facial keypoints).
Writing the Code to Train PyTorch Model on the Facial Keypoint Detection Dataset
We are all set to write the code to train our FaceKeypointResNet50 model on the FaceKeypointDataset dataset.
This part is going to be very simple as it will be almost similar to any other PyTorch training code. All of this code will go into the train.py Python script.
Let’s import the modules and libraries first.
import torch
import torch.optim as optim
import matplotlib.pyplot as plt
import torch.nn as nn
import matplotlib
import config
import utils

from model import FaceKeypointResNet50
from dataset import train_data, train_loader, valid_data, valid_loader
from tqdm import tqdm

matplotlib.style.use('ggplot')
We are also importing our own scripts like config and utils. Along with that, we are also importing the model module, our datasets, and data loaders (lines 9 and 10).
Initializing the Model, Optimizer, and Loss Function
The following block of code initializes the model, optimizer, and the loss function.
# model
model = FaceKeypointResNet50(pretrained=True, requires_grad=True).to(config.DEVICE)
# optimizer
optimizer = optim.Adam(model.parameters(), lr=config.LR)
# we need a loss function which is good for regression like SmmothL1Loss ...
# ... or MSELoss
criterion = nn.SmoothL1Loss()
- We are passing
pretrained=Trueandrequires_grad=Truefor ourFaceKeypointResNet50as we need the pre-trained ImageNet weights and also need to update the intermediate layer parameters. - We are using the Adam optimizer with a learning rate of 0.001.
- For the loss function, we need a regression loss as we will be predicting the facial keypoint coordinates. We have two good choices for that. The MSELoss (Mean Square Loss) or the SmoothL1Loss. From observations, I found out that the SmoothL1Loss gives better performance than MSELoss for this dataset. Whereas, in the previous tutorial, for the grayscale images, the MSELoss worked much better.
The Training Function
The following code block defines the training function, that is fit(), to train our ResNet50 neural network.
# training function
def fit(model, dataloader, data):
    print('Training')
    model.train()
    train_running_loss = 0.0
    counter = 0
    # calculate the number of batches
    num_batches = int(len(data)/dataloader.batch_size)
    for i, data in tqdm(enumerate(dataloader), total=num_batches):
        counter += 1
        image, keypoints = data['image'].to(config.DEVICE), data['keypoints'].to(config.DEVICE)
        # flatten the keypoints
        keypoints = keypoints.view(keypoints.size(0), -1)
        optimizer.zero_grad()
        outputs = model(image)
        loss = criterion(outputs, keypoints)
        train_running_loss += loss.item()
        loss.backward()
        optimizer.step()

    train_loss = train_running_loss/counter
    return train_loss
The fit() function accepts three parameters, the model, the training data, and the training data loader. The rest of the fit() function is very similar to any other PyTorch training function. Still, one important point here. We are flattening the keypoints at line 13. This is important because we will be getting flattened outputs from the neural network’s last linear layer as well.
Finally, we are returning the train_loss for each epoch at line 21.
The Validation Function
During the validation, we do not need to backpropagate the loss or update the parameters. Also, the whole validation can occur within a with torch.no_grad() block as we do not want to compute and store the gradients as well.
# validatioon function
def validate(model, dataloader, data, epoch):
    print('Validating')
    model.eval()
    valid_running_loss = 0.0
    counter = 0
    # calculate the number of batches
    num_batches = int(len(data)/dataloader.batch_size)
    with torch.no_grad():
        for i, data in tqdm(enumerate(dataloader), total=num_batches):
            counter += 1
            image, keypoints = data['image'].to(config.DEVICE), data['keypoints'].to(config.DEVICE)
            # flatten the keypoints
            keypoints = keypoints.view(keypoints.size(0), -1)
            outputs = model(image)
            loss = criterion(outputs, keypoints)
            valid_running_loss += loss.item()
            # plot the predicted validation keypoints after every...
            # ... predefined number of epochs
            if (epoch+1) % 1 == 0 and i == 0:
                utils.valid_keypoints_plot(image, outputs, keypoints, epoch)

    valid_loss = valid_running_loss/counter
    return valid_loss
Line 20 is really important here. This line saves one of the images after each epoch with the predicted and the actual facial keypoints. This image will be saved to the disk that we can analyze. This will give us a good idea of whether our model is actually learning or not.
Executing the Training and Validation Functions
Next, we need to execute the training and validation functions for the number of epochs that we want. We can easily do that using a for loop.
train_loss = []
val_loss = []
for epoch in range(config.EPOCHS):
    print(f"Epoch {epoch+1} of {config.EPOCHS}")
    train_epoch_loss = fit(model, train_loader, train_data)
    val_epoch_loss = validate(model, valid_loader, valid_data, epoch)
    train_loss.append(train_epoch_loss)
    val_loss.append(val_epoch_loss)
    print(f"Train Loss: {train_epoch_loss:.4f}")
    print(f'Val Loss: {val_epoch_loss:.4f}')
The train_loss and valid_loss lists save the training and validation losses respectively after each epoch. We are also printing the information to show the training and validation loss.
Finally, we just need to plot the loss graphs and save the trained model to the disk. The following block of code does that.
# loss plots
plt.figure(figsize=(10, 7))
plt.plot(train_loss, color='orange', label='train loss')
plt.plot(val_loss, color='red', label='validataion loss')
plt.xlabel('Epochs')
plt.ylabel('Loss')
plt.legend()
plt.savefig(f"{config.OUTPUT_PATH}/loss.png")
plt.show()

torch.save({
            'epoch': config.EPOCHS,
            'model_state_dict': model.state_dict(),
            'optimizer_state_dict': optimizer.state_dict(),
            'loss': criterion,
            }, f"{config.OUTPUT_PATH}/model.pth")

print('DONE TRAINING')
This is all we need to train and validate our model. It is time that we execute the train.py script and see how well our model learns.
Executing the train.py Script From Command Line/Terminal
Open up your command line/terminal and head to the src folder of the project directory there. We simply need to execute the train.py script to start the training.
python train.py
You may see face images with keypoints after some time. Just press q to start the training. You should be getting something similar to the following.
Training sample instances: 3116
Validation sample instances: 346
Training intermediate layer parameters...
Epoch 1 of 30
Training
98it [00:48,  2.00it/s]
Validating
11it [00:04,  2.33it/s]
Train Loss: 40.2244
Val Loss: 7.8612
Epoch 2 of 30
Training
 30%|███████████████████▋                                              | 29/97 [00:14<00:35,  1.94it/s]
 ...
 Epoch 20 of 20
Training
98it [00:48,  2.00it/s]
Validating
11it [00:04,  2.33it/s]
Train Loss: 1.7895
Val Loss: 1.7736
DONE TRAINING
By the end of 30 epochs, we are getting around 1.78 training loss and 1.77 validation loss. Let’s take a look at the loss plot.
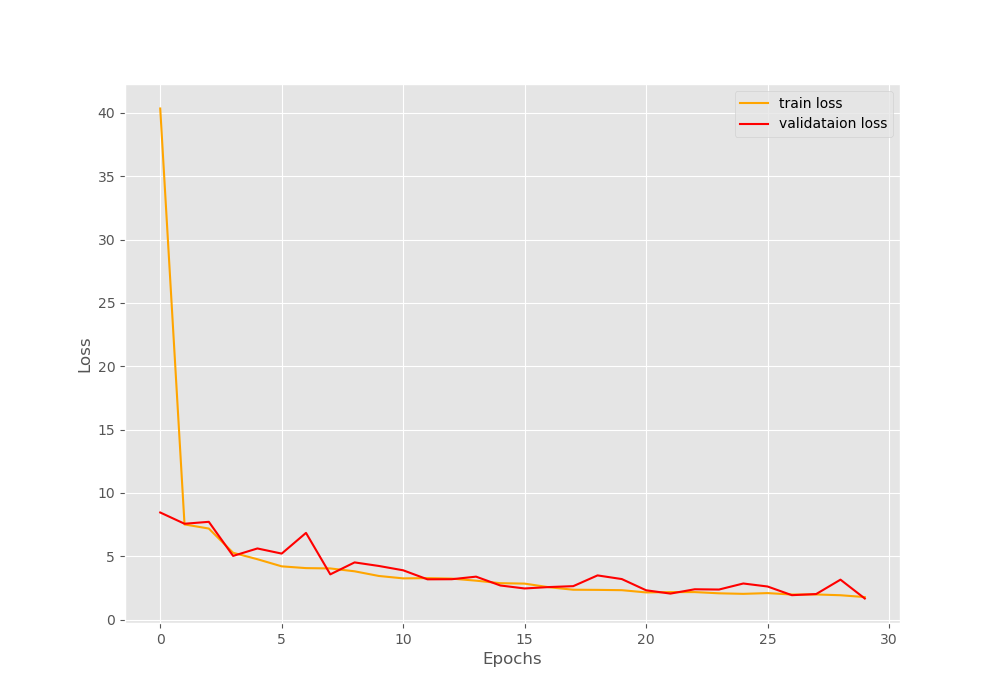
The loss plots look good. There are some minor fluctuations but not many. But we will get to know the most about our model performance from the validation images that are saved to the disk. Let’s have a look at them.
Analyzing the Predicted Facial Keypoint Images
The following image is after the model has been trained for 1 epoch.
The blue dots show the original keypoints and the red dots show the predicted keypoints. We can see that the actual and predicted keypoints do not align properly. Then again, it is only after the first epoch.

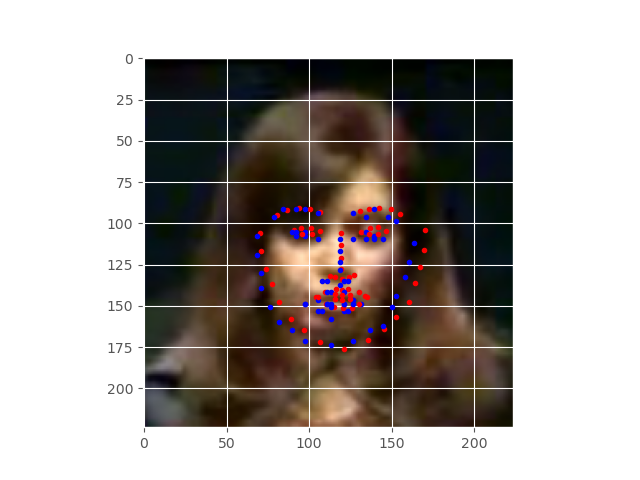
Figure 7 shows the keypoints after training for 10 epochs. The results are much better now. But there is still more room for improvement.
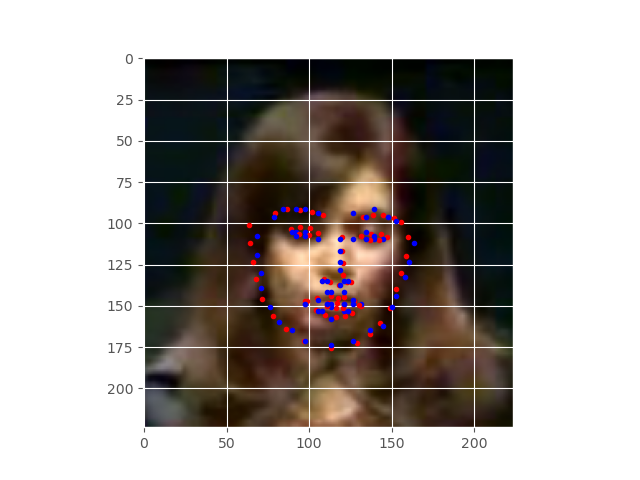
The above image, that is figure 8, shows the predicted keypoints after completely training for 30 epochs. The results are really good now. We can see that the actual and predicted keypoints almost align with each other. The model has learned really well. But it seems that training for more epochs will improve the results even more.
Using the Trained PyTorch Model Facial Keypoint Detection from Webcam Feed
In this section, we will see how we can use our trained ResNet50 neural network model to predict the keypoints from the webcam feed.
We will write this code inside the test_video.py file.
As always, we will start with the imports.
import torch
import numpy as np
import cv2
import albumentations
import config

from model import FaceKeypointResNet50
Initialize the Model and Load the Trained Weights
The next block of code initializes the ResNet50 model and loads the trained weights.
model = FaceKeypointResNet50(pretrained=False, requires_grad=False).to(config.DEVICE)
# load the model checkpoint
checkpoint = torch.load('../outputs/model.pth')
# load model weights state_dict
model.load_state_dict(checkpoint['model_state_dict'])
model.eval()
Set Up OpenCV for Video Capture and Saving
We need to capture the webcam using OpenCV.
# capture the webcam
cap = cv2.VideoCapture(0, cv2.CAP_DSHOW)
if (cap.isOpened() == False):
    print('Error while trying to open webcam. Plese check again...')

# get the frame width and height
frame_width = int(cap.get(3))
frame_height = int(cap.get(4))

# set up the save file path
save_path = f"{config.OUTPUT_PATH}/vid_keypoint_detection.mp4"
# define codec and create VideoWriter object
out = cv2.VideoWriter(f"{save_path}",
                      cv2.VideoWriter_fourcc(*'mp4v'), 20,
                      (frame_width, frame_height))
We are also capturing the width and height of our webcam feed as we will need it later for saving the frame. Starting from line 11 till 15, we set up our saving path, and also the VideoWriter() to define the codec in which we will save the video frames. We will save the video as a .mp4 file.
Predicting Keypoints on Webcam Feed
The whole of the prediction on the webcam feed will happen until the user presses q on the keyboard. We will write that code within a while loop.
while(cap.isOpened()):
    # capture each frame of the video
    ret, frame = cap.read()
    if ret == True:
        with torch.no_grad():
            image = frame
            image = cv2.resize(image, (224, 224))
            orig_frame = image.copy()
            orig_h, orig_w, c = orig_frame.shape
            image = cv2.cvtColor(image, cv2.COLOR_BGR2RGB)
            image = image / 255.0
            image = np.transpose(image, (2, 0, 1))
            image = torch.tensor(image, dtype=torch.float)
            image = image.unsqueeze(0).to(config.DEVICE)

            outputs = model(image)

        outputs = outputs.cpu().detach().numpy()

        outputs = outputs.reshape(-1, 2)
        keypoints = outputs
        for p in range(keypoints.shape[0]):
            cv2.circle(orig_frame, (int(keypoints[p, 0]), int(keypoints[p, 1])),
                        1, (0, 0, 255), -1, cv2.LINE_AA)

        orig_frame = cv2.resize(orig_frame, (frame_width, frame_height))
        cv2.imshow('Facial Keypoint Frame', orig_frame)
        out.write(orig_frame)

        # press `q` to exit
        if cv2.waitKey(27) & 0xFF == ord('q'):
            break

    else:
        break
We need to resize the frames to 224×224 dimensions before predicting to get the best results. This is because we have trained the model on images of that dimension. So, the trained neural network model will perform best with that dimension.
At line 8, we are making a copy of the original frame and keeping it as orig_frame. We need this as we will be plotting the keypoints on the original frame only and then saving them to the disk.
The plotting of the predicted keypoints happens at line 22. We are using cv2.circle to plot the keypoints on the frame. At line 26, we are resizing the frame to the original size as we need that for the proper saving of the frames.
At lines 27 and 28, we are showing the frames on the screen and saving them to the disk. We just need to press q on the keyboard whenever we want to exit out of the loop.
Finally, we need to release our camera capture and destroy any OpenCV windows.
# release VideoCapture()
cap.release()

# close all frames and video windows
cv2.destroyAllWindows()
Running test_video.py to Predict Facial Keypoints from Webcam Feed
Within the src directory, execute the test_video.py script from the command line/terminal.
python test_video.py
The following clip shows what kind of results you can expect.
The neural network model is working pretty well. Obviously, it’s not perfect as too much head movement is leading to wrong predictions. Perhaps we need to train even more or we need a better dataset that contains many more types of facial positions. Still, this is not too bad for a starting point. We can now do much more and take the project even further.
Summary and Conclusion
In this tutorial, you learned how to train a PyTorch ResNet50 model for facial keypoint detection. We also used our trained neural network model to predict facial keypoints in real-time from a webcam feed. I hope that you learned something new and are willing to take the project even further from here.
If you have any doubts, thoughts, or suggestions, then please leave them in the comment section. I will surely address them.
You can contact me using the Contact section. You can also find me on LinkedIn, and X.

great implementation using pytorch. can we access the individual keypoints? (for example eyes) and then use it to process if the eyes are opened or closed. thank you.
Thanks a lot. Glad that you liked it. Yes, we can extract specific keypoints as well. So, we just need to extract those keypoint pairs that lie around the eyes. I have not shows that in this tutorial. Perhaps, it will be best if I will write a separate tutorial on it.
Thanks for this great implementation. This blog is very informative. But is this code available in form of a notebook.
I am happy that you liked it. Currently, I don’t have a notebook for it. But I am in the process of making notebooks for all of my coding posts. Might take some time though.
Thank you very much for this tutorial Mr. Sovit Ranjan, You provide a very nice walk-through to face recognition using ResNet50. blessings!
Hello Francisco. Really glad that you liked it.
Hello, thank you so much for the post, very informative. I was wondering if there is any other way to get the data, the links provided don’t seem to be functional anymore.
Hello Gonzalo. Yes, you are right, the dataset has been deleted from Kaggle. Although I have the dataset locally, I am not sure whether it will be the right decision to upload it publicly on Kaggle without contacting the original author. Please give me some time to check what can be done.
Dataset i not find
Yes, Zen. The dataset has been removed from Kaggle. I am not very sure what to do in this case.
How can i improve this model
Hello Abhishek. The next step will be to use a detector for face detection and training a landmark detector in the cropped faces for more accuracy.