
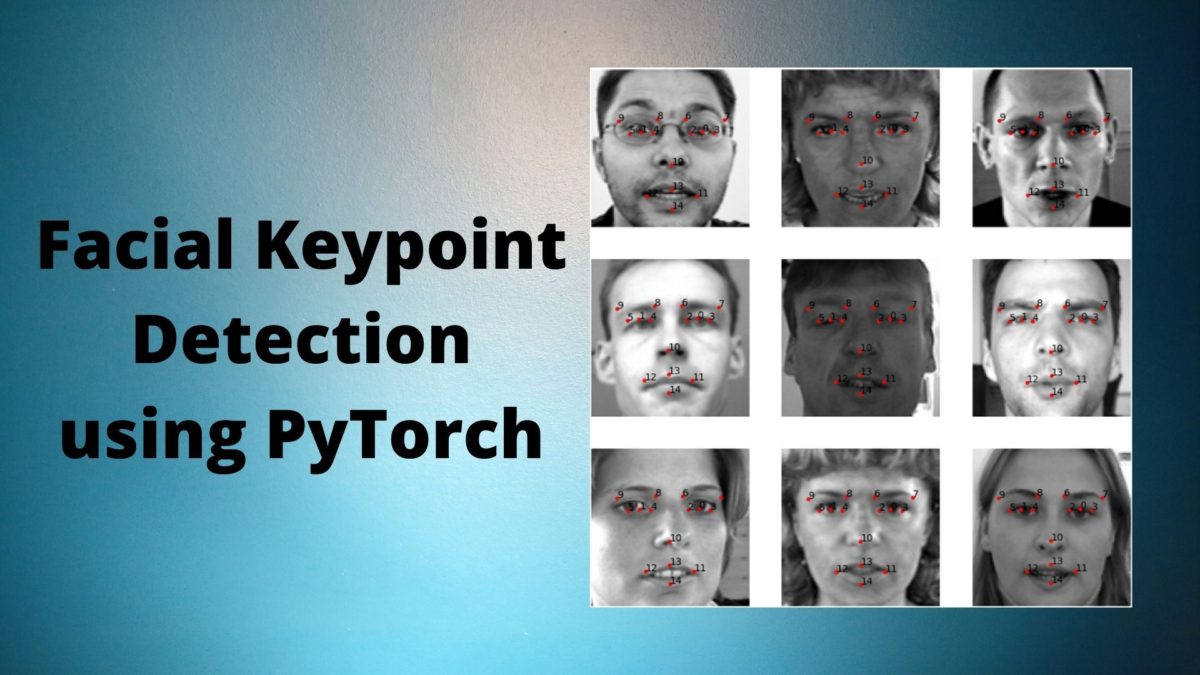
In this article, you will get to learn about facial keypoint detection using deep learning and PyTorch. This article will be fully hands-on and practical. We will go through the coding part thoroughly and use a simple dataset for starting out with facial keypoint detection using deep learning PyTorch. This is also known as facial landmark detection.
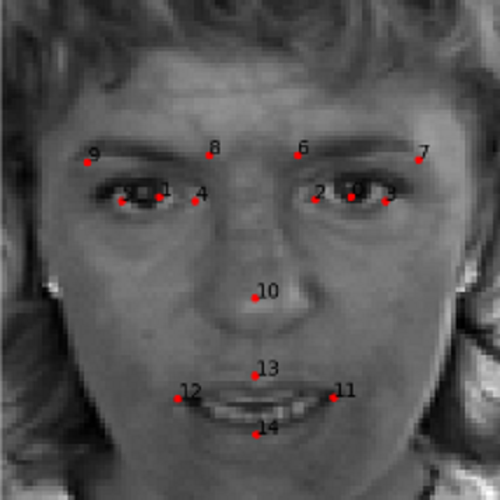
Figure 1 shows an example of facial keypoint detection on a grayscale image. Our aim is to achieve similar results by the end of this tutorial.
What will you learn in this tutorial?
- A brief introduction to the need for facial keypoint detection.
- Using a simple dataset to get started with facial keypoint detection using deep learning and PyTorch.
- Using a simple convolutional neural network model to train on the dataset.
- Then, we will use the trained model to detect keypoints on the faces of unseen images from the test dataset.
- Finally, we will get to the advantages, disadvantages, and further steps to take for more experimentation and improvement.
Why Do We Need Facial Keypoint Detection?
Before moving further, let’s try to answer a simple question. Why do we need technology such as facial keypoint detection? There are many but we will outline a few.
- You must have seen filters on some of the popular smartphone apps. There are many animal filters like faces of cute puppies and kittens. To apply such filters accurately on faces, we need to determine the correct keypoint or points of interest on the face of a person. We can achieve this by using facial keypoint detection.
- Facial keypoint detection can also be used to determine the age of a person. In fact, many industries and companies are using it today.
- Unlocking of smartphones using face recognition uses facial keypoint detection as well.
The above are only some of the real-life use cases. There are many more but we will not go into the details of those now. If you want to learn more, you may read this article which lays many more points on the use cases.
As discussed above, we will be using deep learning for facial keypoint detection in this tutorial. Deep learning and convolutional neural networks are playing a major role in the field of face recognition and keypoint detection nowadays. We will try and get started with the same.
The Dataset
We will use a dataset from one of the past Kaggle competitions. The competition is Facial Keypoints Detection. Go ahead and download the dataset after accepting the competition rules if it asks you to do so.
The dataset is not big. It is only around 80 MB. It consists of CSV files containing the training and test dataset. The images are also within the CSV files with the pixel values. All the images are 96×96 dimensional grayscale images. As the images are grayscale and small in dimension, that is why it is a good and easy dataset to start with facial keypoint detection using deep learning.
The dataset contains the keypoints for 15 coordinate features in the form of (x, y). So, there are a total of 30 point features for each face image. All the data points are in different columns of the CSV file with the final column holding the image pixel values.
The following code snippet shows the data format in the CSV files.
left_eye_center_x  left_eye_center_y  right_eye_center_x  ...  mouth_center_bottom_lip_x  mouth_center_bottom_lip_y                                              Image
0             66.033564          39.002274           30.227008  ...                  43.130707                  84.485774  238 236 237 238 240 240 239 241 241 243 240 23...
1             64.332936          34.970077           29.949277  ...                  45.467915                  85.480170  219 215 204 196 204 211 212 200 180 168 178 19...
2             65.057053          34.909642           30.903789  ...                  47.274947                  78.659368  144 142 159 180 188 188 184 180 167 132 84 59 ...
3             65.225739          37.261774           32.023096  ...                  51.561183                  78.268383  193 192 193 194 194 194 193 192 168 111 50 12 ...
4             66.725301          39.621261           32.244810  ...                  44.227141                  86.871166  147 148 160 196 215 214 216 217 219 220 206 18...
...                 ...                ...                 ...  ...                        ...                        ...                                                ...
7044          67.402546          31.842551           29.746749  ...                  50.426637                  79.683921  71 74 85 105 116 128 139 150 170 187 201 209 2...
7045          66.134400          38.365501           30.478626  ...                  50.287397                  77.983023  60 60 62 57 55 51 49 48 50 53 56 56 106 89 77 ...
7046          66.690732          36.845221           31.666420  ...                  49.462572                  78.117120  74 74 74 78 79 79 79 81 77 78 80 73 72 81 77 1...
7047          70.965082          39.853666           30.543285  ...                  50.065186                  79.586447  254 254 254 254 254 238 193 145 121 118 119 10...
7048          66.938311          43.424510           31.096059  ...                  45.900480                  82.773096  53 62 67 76 86 91 97 105 105 106 107 108 112 1...
You can see the keypoint feature columns. There are 30 such columns for the left and right sides of the face. The last column is the Image column with the pixel values. They are in string format. So, we will have to do a bit of preprocessing before we can apply our deep learning techniques to the dataset.
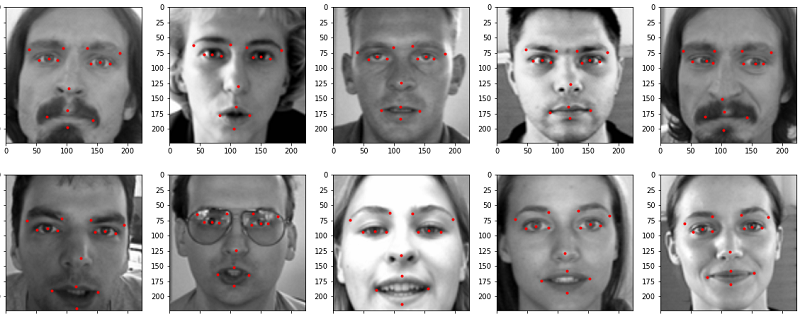
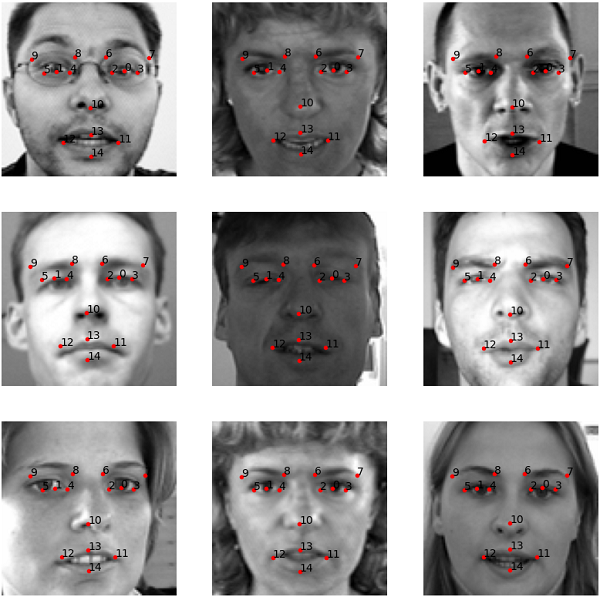
The following are some sample images from the training.csv file with the keypoints on the faces.
The dataset also contains a lot of missing values. Out of the 7048 instances (rows), 4909 rows contain at least one null value in one or more columns. Only 2140 rows have complete data with all the keypoints available. We will have to handle this situation while preparing our dataset.
I hope that you have a good idea of the dataset that we are going to use. Be sure to explore the dataset a bit on your own before moving further.
Project Structure
In this section, we will lay out the directory structure for the project. Maintaining a good project directory structure will help us to easily navigate around and write the code as well. Take a
Take a look at the following structure.
├───input
│   └───facial-keypoints-detection
│       │   IdLookupTable.csv
│       │   SampleSubmission.csv
│       │
│       ├───test
│       │       test.csv
│       │
│       └───training
│               training.csv
│
├───outputs
│       loss.png
|        ...
│
└───src
    │   config.py
    │   dataset.py
    │   model.py
    │   test.py
    │   train.py
    │   utils.py
- The
inputfolder contains the dataset inside thefacial-keypoints-detectionfolder after you download and extract the dataset. Thetrainingsubfolder contains thetraining.csvfile and thetestsubfolder contains thetest.csvfile. We can safely ignore theIdLookupTable.csvandSampleSubmission.csvfile. - We have an
outputsfolder. This will contain all the files that will be generated while executing the python scripts. These include the loss plots and the model as well. - Then we have the
srcfolder containing six python scripts. Just take a look at them for now. We will get into the details while writing the code for each of them.
Important Libraries and Modules
As we will use PyTorch in this tutorial, be sure to install the latest version of PyTorch (1.6 at the time of writing this) before moving further. There are no other very specific library or framework requirements. All others are very generic to data science, machine learning, and deep learning. However, if you are missing one, install them as you move forward.
I hope that it has been easy to follow along till now. You are free to ask any of your doubts in the comment section. From the next section onward, we will start to write the code for this tutorial. I hope that you will enjoy the learning along the way.
Facial Keypoint Detection using Deep Learning and PyTorch
From here on, we will get our hands into the coding part for facial keypoint detection using deep learning and the PyTorch framework. As there are six Python scripts, we will tackle each of them one by one.
Let’s start with the configuration file.
Setting Up the Configuration Python Script
In the configuration script, we will define the learning parameters for deep learning training and validation. Along with that, we will also define the data paths, and the train and validation split ratio.
The code here will go into the config.py Python script.
import torch

# constant paths
ROOT_PATH = '../input/facial-keypoints-detection'
OUTPUT_PATH = '../outputs'

# learning parameters
BATCH_SIZE = 256
LR = 0.0001
EPOCHS = 300
DEVICE = torch.device('cuda' if torch.cuda.is_available() else 'cpu')

# train/test split
TEST_SPLIT = 0.2

# show dataset keypoint plot
SHOW_DATASET_PLOT = True
The following are the learning parameters for training and validation.
- We are using a batch size of 256. As the images very small in dimension (96×96) and grayscale as well, a large batch size will not cause any memory issues. However, feel free to increase or decrease the batch size according to your GPU memory.
- The learning rate is 0.0001. After a lot of experimentations with different learning rates, this seems to be the most stable learning rate for the model and dataset that we will use.
- We will train our model on the facial keypoint dataset for 300 epochs. It may seem a lot but actually, the model benefits from such a large number of epochs.
- We are using a test split of 0.2. We will use 80% of the data for training and 20% for validation.
- At line 17, we have
SHOW_DATASET_PLOT. If this isTrue, we will see a plot of a few faces along with their corresponding facial keypoints just before training. You can keep thisFalseif you want. - Among all the other things, we are also defining the computation device at line 11.
This is all we need for the config.py file.
Writing Some Utility Functions for Facial Keypoint Detection using Deep Learning and PyTorch
In this section, we will write a few utility functions that will make our work easier along the way. There are three utility functions in total. All of the three utility functions will help us in plotting the facial keypoints on the images of the faces. But all three will be for different scenarios. Let’s tackle them one by one.
The code for this will go into the utils.py Python file.
Function to Plot Validation Keypoints on the Faces
We will start with function to plot the validation keypoints. We will call this function valid_keypoints_plot(). This function will basically plot the validation (regressed keypoints) on the face of an image after a certain number of epochs that we provide.
First, let’s write the code, then we will get to the explanation of the important parts. The following are the imports for the utils.py script followed by the function.
import matplotlib.pyplot as plt
import numpy as np
import config
Now, the valid_keypoints_plot() function.
def valid_keypoints_plot(image, outputs, orig_keypoints, epoch):
    """
    This function plots the regressed (predicted) keypoints and the actual
    keypoints after each validation epoch for one image in the batch.
    """
    # detach the image, keypoints, and output tensors from GPU to CPU
    image = image.detach().cpu()
    outputs = outputs.detach().cpu().numpy()
    orig_keypoints = orig_keypoints.detach().cpu().numpy()

    # just get a single datapoint from each batch
    img = image[0]
    output_keypoint = outputs[0]
    orig_keypoint = orig_keypoints[0]

    img = np.array(img, dtype='float32')
    img = np.transpose(img, (1, 2, 0))
    img = img.reshape(96, 96)
    plt.imshow(img, cmap='gray')

    output_keypoint = output_keypoint.reshape(-1, 2)
    orig_keypoint = orig_keypoint.reshape(-1, 2)
    for p in range(output_keypoint.shape[0]):
        plt.plot(output_keypoint[p, 0], output_keypoint[p, 1], 'r.')
        plt.text(output_keypoint[p, 0], output_keypoint[p, 1], f"{p}")
        plt.plot(orig_keypoint[p, 0], orig_keypoint[p, 1], 'g.')
        plt.text(orig_keypoint[p, 0], orig_keypoint[p, 1], f"{p}")

    plt.savefig(f"{config.OUTPUT_PATH}/val_epoch_{epoch}.png")
    plt.close()
If you read the comment in the first two lines then you will easily get the gist of the function. We provide the image tensors (image)outputs), and the original keypoints from the dataset (orig_keypoints) along with the epoch number to the function.
- At lines 7, 8, and 9 we detach the data from the GPU and load them onto the CPU.
- The tensors are in the form of a batch containing 256 datapoints each for the image, the predicted keypoints, and the original keypoints. We get just the first datapoint from each from lines 12 to 14.
- Then we convert the image to NumPy array format, transpose it make channels last, and reshape it into the original 96×96 dimensions. Then we plot the image using Matplotlib.
- At lines 21 and 22, we reshape the predicted and original keypoints. This will make them have 2 columns along with the respective number of rows.
- Starting from lines 23 till 27, we plot the predicted and original keypoints on the image of the face. The predicted keypoints will be red dots while the original keypoints will be green dots. We also plot the corresponding keypoint numbers using
plt.text(). - Finally, we save the image in the
outputsfolder.
Now, we will move onto the next function for the utils.py file.
Function to Plot the Test Keypoints on the Faces
Here, we will write the code for plotting the keypoints that we will predict during testing. Specifically, this is for those images whose pixel values are in the test.csv file.
def test_keypoints_plot(images_list, outputs_list):
    """
    This function plots the keypoints for the outputs and images
    in the `test.py` script which used the `test.csv` file.
    """
    plt.figure(figsize=(10, 10))
    for i in range(len(images_list)):
        outputs = outputs_list[i]
        image = images_list[i]
        outputs = outputs.cpu().detach().numpy()
        outputs = outputs.reshape(-1, 2)
        plt.subplot(3, 3, i+1)
        plt.imshow(image, cmap='gray')
        for p in range(outputs.shape[0]):
                plt.plot(outputs[p, 0], outputs[p, 1], 'r.')
                plt.text(outputs[p, 0], outputs[p, 1], f"{p}")
        plt.axis('off')
    plt.savefig(f"{config.OUTPUT_PATH}/test_output.png")
    plt.show()
    plt.close()
The input parameters to the test_keypoints_plot() function are images_list and outputs_list. These are two lists containing a specific number of input images and the predicted keypoints that we want to plot. This function is quite simple.
- Starting from line 7, we run a simple
forloop and loop over the images and predicted keypoints in the two lists. - We follow the same path as in the
valid_keypoints_plot()function. - But this time we use Matplotlib’s
subplot()function as we want all the images in a single plot. We useplt.subplot(3, 3, i+1)as we will be plotting for 9 images. - In the end, we again save the plotted images along with the predicted keypoints in the
outputsfolder.
This is all for this function. Now, let’s move on to the final function for the utils.py file.
Function to Plot the Face Images and Keypoints for the Input Dataset
Before we feed our data to the neural network model, we want to know whether our data is correct or not. We may not be sure whether all the keypoints correctly correspond to the faces or not. For that reason, we will write a function that will show us the face images and the corresponding keypoints just before training begins. This will only happen if SHOW_DATASET_PLOT is True in the config.py script.
def dataset_keypoints_plot(data):
    """
    This function shows the image faces and keypoint plots that the model
    will actually see. This is a good way to validate that our dataset is in
    fact corrent and the faces align wiht the keypoint features. The plot
    will be show just before training starts. Press `q` to quit the plot and
    start training.
    """
    plt.figure(figsize=(20, 40))
    for i in range(30):
        sample = data[i]
        img = sample['image']
        img = np.array(img, dtype='float32')
        img = np.transpose(img, (1, 2, 0))
        img = img.reshape(96, 96)
        plt.subplot(5, 6, i+1)
        plt.imshow(img, cmap='gray')
        keypoints = sample['keypoints']
        for j in range(len(keypoints)):
            plt.plot(keypoints[j, 0], keypoints[j, 1], 'r.')
    plt.show()
    plt.close()
This function will plot a few images and the keypoints just before training. We can make sure whether all the data points correctly align or not. We can be sure that we are in fact feeding the correct data to our deep neural network model. Take a look at the dataset_keypoints_plot(). I think that after going through the previous two functions, you will get this one easily.
This is all the code that we need for the utils.py script. Next, we will move on to prepare the dataset.
Prepare the Facial Keypoint Dataset
This is most probably one of the most important sections in this tutorial. We need to prepare the dataset properly for our neural network model.
All the code in this section will go into the dataset.py file. Let’s start with importing the modules and libraries.
import torch
import cv2
import pandas as pd
import numpy as np
import config
import utils

from torch.utils.data import Dataset, DataLoader
from tqdm import tqdm

resize = 96
We are importing the config and utils script along with PyTorch’s Dataset and DataLoader classes.
There is also a resize variable that we will use while resizing and reshaping the dataset. This corresponds to the original image dimensions of 96×96.
Function to Split the Data into Training and Validation Samples
We need to split the dataset into training and validation samples. For that we will write a simple function called train_test_split(). Remember that we will use 20% of our data for validation and 80% for training.
def train_test_split(csv_path, split):
    df_data = pd.read_csv(csv_path)
    # drop all the rows with missing values
    df_data = df_data.dropna()
    len_data = len(df_data)
    # calculate the validation data sample length
    valid_split = int(len_data * split)
    # calculate the training data samples length
    train_split = int(len_data - valid_split)
    training_samples = df_data.iloc[:train_split][:]
    valid_samples = df_data.iloc[-valid_split:][:]
    print(f"Training sample instances: {len(training_samples)}")
    print(f"Validation sample instances: {len(valid_samples)}")
    return training_samples, valid_samples
The function takes two input parameters, the training CSV file path, and the validation split ratio. We read the CSV file as df_data.
- We know that the training CSV file contains almost 5000 rows with missing values out of the 7000 rows. To keep things simple, we are dropping all the rows with missing values at line 4. That leaves us with only 2140 rows of data. This is not a very big number and our model may not also learn properly. But this should be a good starting point for us.
- Starting from line 7, we are simply calculating the length for validation and training split. Then we are splitting data and storing them as
training_samplesandvalid_samples. - Finally, we return the training and validation samples.
The Facial Keypoint Dataset Class
Now, we will write the dataset class for our facial keypoint data. We will call it FaceKeypointDataset().
The following is the whole class to prepare the dataset.
class FaceKeypointDataset(Dataset):
    def __init__(self, samples):
        self.data = samples
        # get the image pixel column only
        self.pixel_col = self.data.Image
        self.image_pixels = []
        for i in tqdm(range(len(self.data))):
            img = self.pixel_col.iloc[i].split(' ')
            self.image_pixels.append(img)

        self.images = np.array(self.image_pixels, dtype='float32')

    def __len__(self):
        return len(self.images)

    def __getitem__(self, index):
        # reshape the images into their original 96x96 dimensions
        image = self.images[index].reshape(96, 96)
        orig_w, orig_h = image.shape
        # resize the image into `resize` defined above
        image = cv2.resize(image, (resize, resize))
        # again reshape to add grayscale channel format
        image = image.reshape(resize, resize, 1)
        image = image / 255.0
        # transpose for getting the channel size to index 0
        image = np.transpose(image, (2, 0, 1))
        # get the keypoints
        keypoints = self.data.iloc[index][:30]
        keypoints = np.array(keypoints, dtype='float32')
        # reshape the keypoints
        keypoints = keypoints.reshape(-1, 2)
        # rescale keypoints according to image resize
        keypoints = keypoints * [resize / orig_w, resize / orig_h]

        return {
            'image': torch.tensor(image, dtype=torch.float),
            'keypoints': torch.tensor(keypoints, dtype=torch.float),
        }
Let’s start with the __init__() function.
- We define a
self.image_pixelslist at line 6 to store the pixel values after extracting them from theImagecolumn. - Starting from line 7, we iterate over all the rows in the dataset and append the pixel values to the
self.image_pixelslist. We split the pixel values by space as they are space separated in the CSV file as well. - At line 11, we convert the pixel values to NumPy float 32 format and store them as
self.images.
Now, coming to the __getitem__() function.
- First, we reshape the image pixel values to 96×96 (height x width).
- Then we extract the original height and width of the images at line 19. This we need if we resize the images to any different sizes before feeding them to the neural network. If we resize the images to any other size, then we have to rescale the coordinates of the keypoints as well.
- After resizing to grayscale format and rescaling, we transpose the dimensions to make the image channels first.
- Then we get the keypoints at line 28. We convert the keypoints to NumPy array and reshape them as well so that each of them will have two columns.
- At line 33, we rescale the keypoints according to the image resizing. This is important if we are actually resizing the image into some other dimensions than the original.
- Finally, we return the image and keypoints as tensors.
Prepare the Training and Validation Datasets and Data Loaders
Finally, we can prepare the training and validation datasets and data loaders as well.
# get the training and validation data samples
training_samples, valid_samples = train_test_split(f"{config.ROOT_PATH}/training/training.csv",
                                                   config.TEST_SPLIT)

# initialize the dataset - `FaceKeypointDataset()`
print('\n-------------- PREPARING DATA --------------\n')
train_data = FaceKeypointDataset(training_samples)
valid_data = FaceKeypointDataset(valid_samples)
print('\n-------------- DATA PREPRATION DONE --------------\n')


# prepare data loaders
train_loader = DataLoader(train_data,
                          batch_size=config.BATCH_SIZE,
                          shuffle=True)
valid_loader = DataLoader(valid_data,
                          batch_size=config.BATCH_SIZE,
                          shuffle=False)
First, we get the training_samples and valid_samples split. Then from line 6, we prepare the training and validation datasets and eventually the data loaders.
One final step is to execute the function to show the data along with the keypoints.
# whether to show dataset keypoint plots
if config.SHOW_DATASET_PLOT:
    utils.dataset_keypoints_plot(valid_data)
This will show the faces and the keypoints just before training.
This completes the code for preparing the facial keypoint dataset. I hope that everything is clear till this point.
Building Our Deep Neural Network Model for Facial Keypoint Detection
Now, we will write the code to build the neural network model. It is going to be a very simple neural network.
There will be three convolutional layers and one fully connected layers. This code will be within in the model.py script.
The following is the code for the neural network model.
import torch.nn as nn
import torch.nn.functional as F

class FaceKeypointModel(nn.Module):
    def __init__(self):
        super(FaceKeypointModel, self).__init__()

        self.conv1 = nn.Conv2d(1, 32, kernel_size=5)
        self.conv2 = nn.Conv2d(32, 64, kernel_size=3)
        self.conv3 = nn.Conv2d(64, 128, kernel_size=3)

        self.fc1 = nn.Linear(128, 30)

        self.pool = nn.MaxPool2d(2, 2)

        self.dropout = nn.Dropout2d(p=0.2)

    def forward(self, x):
         x = F.relu(self.conv1(x))
         x = self.pool(x)
         x = F.relu(self.conv2(x))
         x = self.pool(x)
         x = F.relu(self.conv3(x))
         x = self.pool(x)

         bs, _, _, _ = x.shape
         x = F.adaptive_avg_pool2d(x, 1).reshape(bs, -1)
         x = self.dropout(x)
         out = self.fc1(x)

         return out
- We are applying ReLU activation and Max-Pooling after every convolutional layer.
- Before the fully connected layer, we are applying dropout once.
- For the final fully connected layer, we are not applying any activation, as we directly need the regressed coordinates for the keypoints.
As our dataset is quite small and simple, we have a simple neural network model as well.
Writing the Training Code for the Facial Keypoint Detection
In this section, we will be writing the code to train and validate our neural network model on the Facial Keypoint dataset. This is going to be really easy to follow along. In fact, you must have seen such code a number of times before.
All this code will go into the train.py Python script.
We will start with the importing of the modules and libraries.
import torch
import torch.optim as optim
import matplotlib.pyplot as plt
import torch.nn as nn
import matplotlib
import config
import utils

from model import FaceKeypointModel
from dataset import train_data, train_loader, valid_data, valid_loader
from tqdm import tqdm

matplotlib.style.use('ggplot')
- We are importing our own
configandutilsscript. - Along with that, we are also importing the
train_data,train_loader,valid_data, andvalid_loaderat line 10.
Initialize the Model, Optimizer, and Loss Function
The following block of code initializes the neural network model, the optimizer, and the loss function.
# model
model = FaceKeypointModel().to(config.DEVICE)
# optimizer
optimizer = optim.Adam(model.parameters(), lr=config.LR)
# we need a loss function which is good for regression like MSELoss
criterion = nn.MSELoss()
For the optimizer, we are using the Adam optimizer. As for the loss function, we need a loss function that is good for regression like MSELoss or SmoothL1lLoss. This is because we are going to predict the coordinates for the keypoints. We will compare these with the actual coordinate points. So, a regression loss makes the most sense here. We are opting for the MSELoss here.
The Training Function
We will call our training function as fit(). A very simple function which you can understand quite easily.
# training function
def fit(model, dataloader, data):
    print('Training')
    model.train()
    train_running_loss = 0.0
    counter = 0
    # calculate the number of batches
    num_batches = int(len(data)/dataloader.batch_size)
    for i, data in tqdm(enumerate(dataloader), total=num_batches):
        counter += 1
        image, keypoints = data['image'].to(config.DEVICE), data['keypoints'].to(config.DEVICE)
        # flatten the keypoints
        keypoints = keypoints.view(keypoints.size(0), -1)
        optimizer.zero_grad()
        outputs = model(image)
        loss = criterion(outputs, keypoints)
        train_running_loss += loss.item()
        loss.backward()
        optimizer.step()

    train_loss = train_running_loss/counter
    return train_loss
- The
fit()function takes three input parameters, the model, the training data loader, and the training dataset. - Take look at line 13, where we are flattening the input (original) keypoints. This is because, the
outputskeypoints will also be in flattened form as they will be the output from a linear layer. We therefore, need to flatten the input keypoints as well before feeding them both to the loss function at line 16. - At lines 18 and 19, we are backpropagating the loss and updating the model parameters respectively.
- Finally, we calculate the per epoch loss and return it.
The Validation Function
The validation function will be very similar to the training function. Except, we neither need backpropagation here, nor updating the model parameters.
# validatioon function
def validate(model, dataloader, data, epoch):
    print('Validating')
    model.eval()
    valid_running_loss = 0.0
    counter = 0
    # calculate the number of batches
    num_batches = int(len(data)/dataloader.batch_size)
    with torch.no_grad():
        for i, data in tqdm(enumerate(dataloader), total=num_batches):
            counter += 1
            image, keypoints = data['image'].to(config.DEVICE), data['keypoints'].to(config.DEVICE)
            # flatten the keypoints
            keypoints = keypoints.view(keypoints.size(0), -1)
            outputs = model(image)
            loss = criterion(outputs, keypoints)
            valid_running_loss += loss.item()
            # plot the predicted validation keypoints after every...
            # ... 25 epochs and from the first batch
            if (epoch+1) % 25 == 0 and i == 0:
                utils.valid_keypoints_plot(image, outputs, keypoints, epoch)

    valid_loss = valid_running_loss/counter
    return valid_loss
The validation happens within the with torch.no_grad() block as we do not need the gradients to be calculated or stores in memory during validation.
Also, take a look at line 20. Every 25 epochs, we are calling the valid_keypoints_plot() function from utils for the first batch. This will help us store a single image with the predicted and original keypoints to the disk which we will analyze later. This way, we will get to know how our model is actually performing after every 25 epochs.
Execute the fit() and validate() Functions
The following block of code executes the fit() and validate() function and stores the loss values in their respective lists.
train_loss = []
val_loss = []
for epoch in range(config.EPOCHS):
    print(f"Epoch {epoch+1} of {config.EPOCHS}")
    train_epoch_loss = fit(model, train_loader, train_data)
    val_epoch_loss = validate(model, valid_loader, valid_data, epoch)
    train_loss.append(train_epoch_loss)
    val_loss.append(val_epoch_loss)
    print(f"Train Loss: {train_epoch_loss:.4f}")
    print(f'Val Loss: {val_epoch_loss:.4f}')
We are using a for loop for the training and printing the loss values after each epoch.
Finally, we just need to plot the loss graphs and save the trained neural network model.
# loss plots
plt.figure(figsize=(10, 7))
plt.plot(train_loss, color='orange', label='train loss')
plt.plot(val_loss, color='red', label='validataion loss')
plt.xlabel('Epochs')
plt.ylabel('Loss')
plt.legend()
plt.savefig(f"{config.OUTPUT_PATH}/loss.png")
plt.show()

torch.save({
            'epoch': config.EPOCHS,
            'model_state_dict': model.state_dict(),
            'optimizer_state_dict': optimizer.state_dict(),
            'loss': criterion,
            }, f"{config.OUTPUT_PATH}/model.pth")

print('DONE TRAINING')
Train the Model on the Facial Keypoint Dataset
Now, we are all set to train the model on the Facial Keypoint dataset. We just need to execute the train.py script from the src folder. So, head over to the src folder in your terminal/command line and execute the script.
python train.py
If you have SHOW_DATASET_PLOT as True in the config file, then first you will see a plot of the faces with the keypoints. The training will start after you close that. I am skipping the visualization of the plots here. You will see outputs similar to the following.
-------------- PREPARING DATA --------------

100%|████████████████████████████████████████████████████████████| 1712/1712 [00:01<00:00, 1320.45it/s]

100%|██████████████████████████████████████████████████████████████| 428/428 [00:00<00:00, 1411.67it/s]

-------------- DATA PREPRATION DONE --------------

Epoch 1 of 300
Training
7it [00:02,  2.38it/s]
Validating
2it [00:00,  2.77it/s]
Train Loss: 2606.5361
Val Loss: 2667.5312
...
Epoch 300 of 300
Training
7it [00:01,  6.32it/s]
Validating
2it [00:00,  7.62it/s]
Train Loss: 25.7659
Val Loss: 18.5057
DONE TRAINING
The following is the loss plot that is saved to the disk.
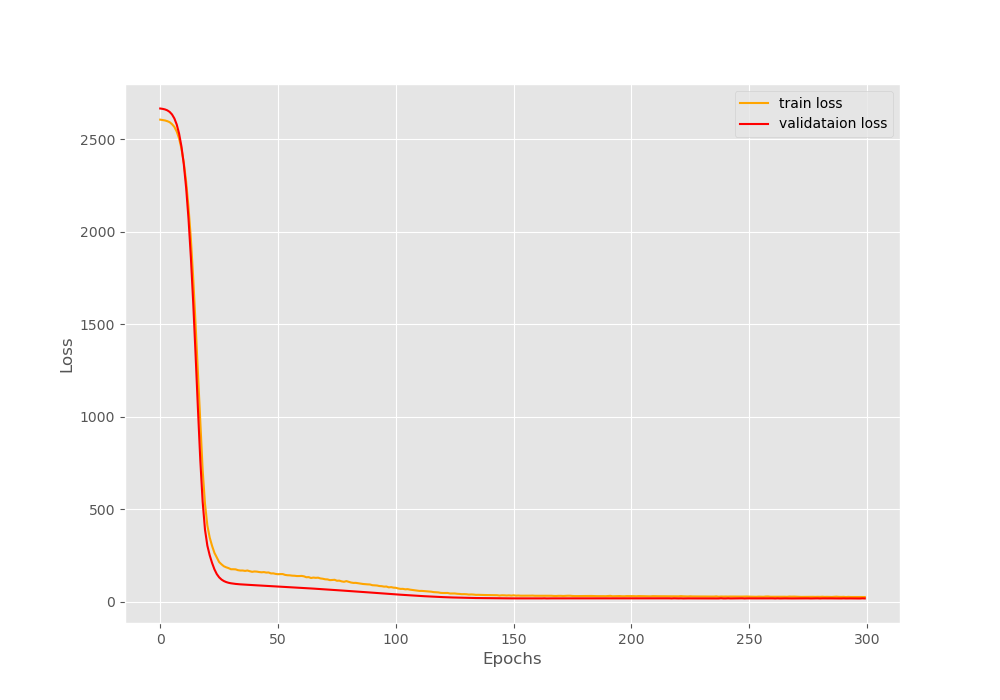
We can see that the loss decreases drastically within the first 25 epochs. After that the decrease in loss is very gradual but it is there. In fact, the loss keeps on decreasing for the complete 300 epochs. By the end of training, we have a validation loss of 18.5057.
Analyzing the Validation Keypoints That are Saved to the Disk
Let’s analyze images of the predicted keypoints images that are saved to the disk during validation.
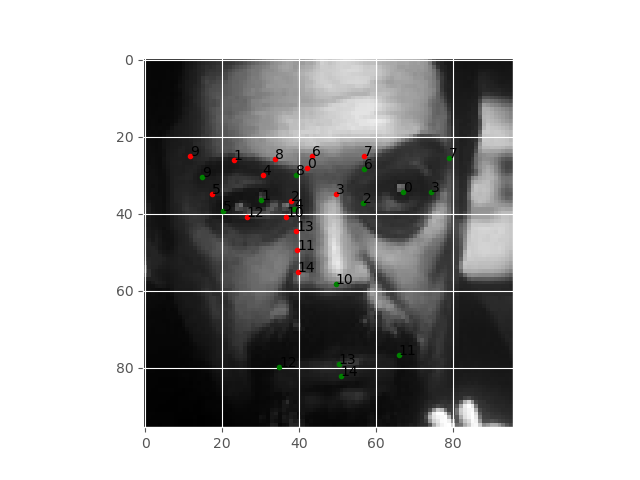
Figure 4 shows the predicted keypoints on the face after 25 epochs. The green dots show the original keypoints, while the red dots show the predicted keypoints. We can see that the keypoints do not align at all. Then again, its only been 25 epochs.

Figure 5 shows the plots after 100 epochs. By now, the plots are beginning to align a bit. Still, they are not completely aligned. Now, let’s take a look at the final epoch results.
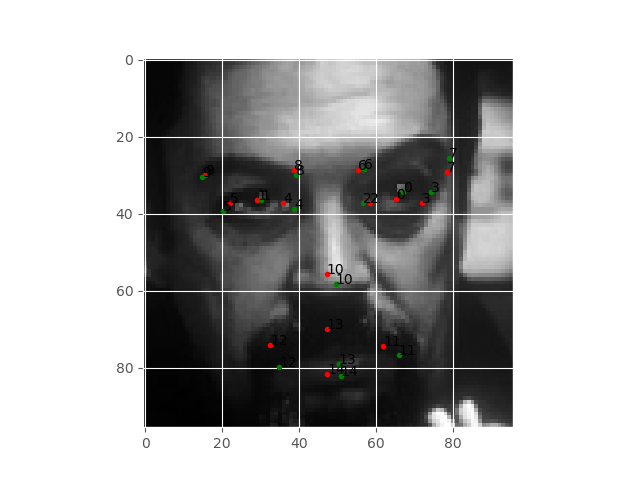
The above image shows the results after 300 epochs of training. Now, the keypoints are almost aligned, but still not completely. In fact, the keypoints around the lips are much more misaligned than the rest of the face.
The results are good but not great. The main reason can be the small size of the dataset that we are using. Remember, that we have dropped majority of the dataset points due to missing values.
Next, let’s move to predict the keypoints on unseen images. That is the test.csv file.
Facial Keypoint Detection using Deep Learning and PyTorch – Testing Trained Model on Unseen Data
In this section, we will write the code to predict the facial keypoints on the unseen images using the trained model.
The code in this section will go into the test.py file.
The following are the imports that we need.
import torch
import matplotlib.pyplot as plt
import numpy as np
import pandas as pd
import cv2
import utils
import config

from model import FaceKeypointModel
from tqdm import tqdm

# image resize dimension
resize = 96
We are also defining the resize dimension here.
Prepare the Model
The following block of code initializes the neural network model and loads the trained weights.
model = FaceKeypointModel().to(config.DEVICE)
# load the model checkpoint
checkpoint = torch.load(f"{config.OUTPUT_PATH}/model.pth")
# load model weights state_dict
model.load_state_dict(checkpoint['model_state_dict'])
model.eval()
Prepare the Data
We need to load the test.csv file and prepare the image pixels. For that, we will convert the images into Float32 NumPy format.
# read the test CSV file
csv_file = f"{config.ROOT_PATH}/test/test.csv"
data = pd.read_csv(csv_file)
pixel_col = data.Image
image_pixels = []
for i in tqdm(range(len(pixel_col))):
    img = pixel_col[i].split(' ')
    image_pixels.append(img)

# convert to NumPy array
images = np.array(image_pixels, dtype='float32')
Now, images holds all the pixel data.
Predict the Keypoints
This the final part of the code. Here, we will predict the keypoints for 9 images.
images_list, outputs_list = [], []
for i in range(9):
    with torch.no_grad():
        image = images[i]
        image = image.reshape(96, 96, 1)
        image = cv2.resize(image, (resize, resize))
        image = image.reshape(resize, resize, 1)
        orig_image = image.copy()
        image = image / 255.0
        image = np.transpose(image, (2, 0, 1))
        image = torch.tensor(image, dtype=torch.float)
        image = image.unsqueeze(0).to(config.DEVICE)

        # forward pass through the model
        outputs = model(image)
        # append the current original image
        images_list.append(orig_image)
        # append the current outputs
        outputs_list.append(outputs)

utils.test_keypoints_plot(images_list, outputs_list)
We get the predicted keypoints at line15 and store them in outputs. After every forward pass, we are appending the image, and the outputs to the images_list and outputs_list respectively.
Finally, at line 22, we call the test_keypoints_plot() from utils that will plot the predicted keypoints on the images of the faces for us.
Execute the test.py script from the terminal/command prompt.
python test.py
Now, let’s take a look at the test results.
The test results look good compared to the validation results. But if we take a look at the first image from the left in the third row, we can see that the nose keypoint is not aligned properly. Other results look good.
Taking Further Steps and Improving Facial Keypoint Detection using Deep Learning and PyTorch
We have the results now for facial keypoint detection using deep learning and PyTorch. The results are obviously good for such a simple model and such a small dataset. But there are many things that you do to take this project even further.
- Try using other methods of dealing with the missing values rather than just dropping them. You can fill in the missing columns either using mean values or even from the values of the previous rows. That way, you will be able to train on the whole dataset.
- Using a larger neural network model might also help. Try this one as well.
Do tell in the comment sections of your results if you try the above things. It will surely help the other readers.
Summary and Conclusion
In this tutorial, you learned the basics of facial keypoint detection using deep learning and PyTorch. I hope that you learned a lot in this tutorial.
If you have any doubts, suggestions, or thoughts, then please use the comment section to tell about them. I will surely address them.
You can contact me using the Contact section. You can also find me on LinkedIn, and X.

That was a great tutorial…. I see that I must read it many times to get a better grip at it.
thanks a lot for this tutorial. It was hard to find facial landmark detection tutorial. And yours was amazing with a great result.
Thank you Carlos. Really happy that it helped you.
Well, I found the post quite interesting, but if I change the data for something 9not human face) and my data doesn’t always have the same number of keypoints, what should I do?
Hello. You have to take care of a few things. One important thing is properly resizing your keypoints array during the data preparation stage. And maybe you will have to change the plotting fuction a bit. But other than that, I think the code should work fine as long as you have the dataset in the same format as used in this post.
Thanks for this wonderful tutorial. However running the same code, I didn’t get the same result or even a close result. my training loss is still too high and the validation and test landmarks are quite far from where they should be.
Hello. Sorry to hear that you are facing issues.
Can you double check by copy-pasting the entire code again? Also, please that you train for the entire 300 epochs. I hope this helps.