

In this article, we will face and facial landmark detection using Facenet PyTorch.
In the last two articles, I covered training our own neural network to detect facial keypoints (landmarks).
- The first one was a very easy dataset with small dimensional grayscale images. We trained a simple custom neural network that was able to detect the facial keypoints.
- In the article following, we took on a bit bigger challenge. We used colored face images with larger dimensions and more keypoints per face (68). We used a pre-trained ResNet50 neural network for transfer learning. In that article, we also saw how to use our learned ResNet50 neural network to detect facial keypoints in videos in real-time.
But both of the articles had one drawback in common. In none of our trained models, we were able to detect landmarks in multiple faces in an image or video. We will be addressing that issue in this article.
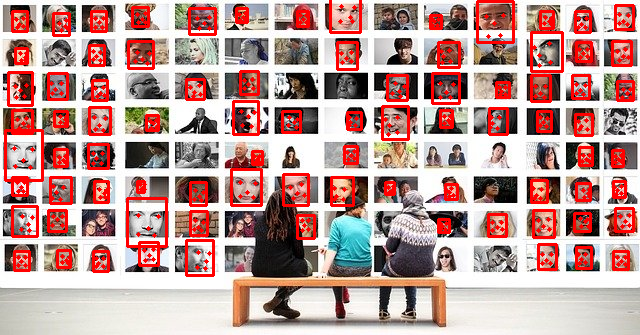
The above figure shows an example of what we will try to learn and achieve in this tutorial.
So, let’s see what you will get to learn in this tutorial.
- Using Facenet PyTorch library along with pre-trained models for detection of faces and their landmarks.
- Detecting multiple faces and the respective landmarks in images.
- Detecting multiple faces and the respective landmarks in videos as well.
The Facenet PyTorch Library
The Facenet PyTorch library contains pre-trained Pytorch face detection models.
The base model is the InceptionResnetV1 deep learning model. If you wish to learn more about Inception deep learning networks, then be sure to take a look at this.
The Facenet PyTorch models have been trained on VGGFace2 and CASIA-Webface datasets. These are huge datasets containing millions of face images, especially the VGGFace2 dataset. These datasets prove useful for training face recognition deep learning models.
Now coming to the face detection model of Facenet PyTorch. For face detection, it uses the famous MTCNN model. MTCNN stands for Multi-task Cascaded Convolutional Networks. You can find the original paper here.
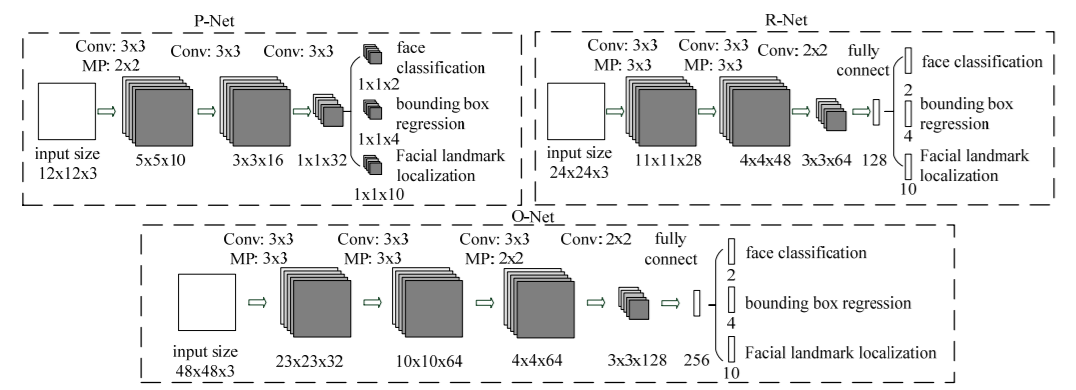
Figure 2 shows the MTCNN model architecture. The MTCNN model architecture consists of three separate neural networks. They are called P-Net, R-Net, and O-net which have their specific usage in separate stages.
Do give the MTCNN paper a read if you want to know about the deep learning model in depth. In this tutorial, we will focus more on the implementation side of the model.
There are many implementations of MTCNN in frameworks like PyTorch and TensorFlow. Facenet PyTorch is one such implementation in PyTorch which will make our work really easier. This is because it is not always feasible to train such models on such huge datasets as VGGFace2.
We will not go into much details of the MTCNN network as this is out of scope of this tutorial. We will focus on the hands-on part and gain practical knowledge on how to use the network for face detection in images and videos.
Library and Framework Requirements
For facial landmark detection using Facenet PyTorch, we need two essential libraries.
- The first one is PyTorch. I have used PyTorch 1.6 in my implementations. So, it will be much smoother for you, if you use the same version as well.
- The next one of Facenet PyTorch library. You can easily install this using
pipcommand. Use the following command to install the library.pip install facenet-pytorch
We need the OpenCV and PIL (Python Imaging Library) computer vision libraries as well. If you do not have them already, then go ahead and install them as well.
Project Structure
We will follow the following project directory structure for the tutorial.
├───input
│       image1.jpg
|       ...
│
├───outputs
│       ...
│
└───src
    │   face_detection_images.py
    │   face_detection_videos.py
    │   utils.py
- Inside your main project directory, make three subfolders. They are
input,outputs, andsrc. - The
inputfolder contains our input images and videos that we will use to test the Facenet deep learning model. - The
outputsfolder will contain the images and videos after the face and landmark detection takes place. - Finally, the
srcfolder contains three Python scripts. We will get into the details of each of them while coding.
Now, coming to the input data, you can use your own images and videos. Or you can use the images and videos that we will use in this tutorial. You can download the zipped input file by clicking the button below.
Download and extract the input file in your parent project directory. This folder contains three images and two video clips. These images and videos are taken from Pixabay.
We are all set with the prerequisites and set up of our project. Let’s get into the coding part now.
Automatic Face and Facial Landmark Detection using Facenet PyTorch and Deep Learning
From this section onward, we will tackle the coding part of the tutorial. We will write the code for each of the three scripts in their respective subsections.
Let’s begin.
Writing Some Utility Functions
We will start with writing some utility functions that are repetitive pieces of code and can be used a number of times. This will make our work easier.
This code will go into the utils.py file inside the src folder.
It will contain two small functions. The first one is draw_bbox() function.
import cv2

# draw the bounding boxes for face detection
def draw_bbox(bounding_boxes, image):
    for i in range(len(bounding_boxes)):
        x1, y1, x2, y2 = bounding_boxes[i]
        cv2.rectangle(image, (int(x1), int(y1)), (int(x2), int(y2)),
                     (0, 0, 255), 2)

    return image
- First, we import
cv2at line 1 as this is the only import we need for this file. - We use the
draw_bbox()function to draw the bounding boxes around the faces while running the images/frames through the Facenet model. - The
draw_bbox()function accepts two parameters, the image or frame and the bounding box coordinates that are calculated by the Facenet model. - The bounding box array returned by the Facenet model has the shape
(num_faces, 4). So, for each face detected, it also returns four bounding box coordinates. - We are using a simple
forloop andcv2.rectangle()function to draw the bounding boxes.
The next utility function is plot_landmarks().
# plot the facial landmarks
def plot_landmarks(landmarks, image):
    for i in range(len(landmarks)):
        for p in range(landmarks[i].shape[0]):
            cv2.circle(image,
                      (int(landmarks[i][p, 0]), int(landmarks[i][p, 1])),
                      2, (0, 0, 255), -1, cv2.LINE_AA)

    return image
- We use the above function to plot the facial landmarks on the detected faces. It accepts the image/frame and the landmarks array as parameters.
- Facenet model returns the landmarks array having the shape
(num_faces, 5, 2). For each face, it returns the landmarks for 5 points, the two eyes, the two endpoints of lips, and a single point for the noise. And each of these points contains 2 coordinates, the x and y coordinate. - Again, we use nested
forloop andcv2.circleto plot the landmarks on the faces.
This is all we need for the utils.py script.
Detecting Faces and Facial Landmarks in Images
Now, we will write the code to detect faces and facial landmarks in images using the Facenet PyTorch library.
All of this code will go into the face_detection_images.py Python script.
Let’s start with the imports.
import cv2
import numpy as np
import torch
import argparse
import utils

from PIL import Image
from facenet_pytorch import MTCNN
- Notice that we are importing our
utilsscript that we wrote above. - We need the
PILlibrary as the input for the MTCNN model in the Facenet library should be aPILimage. - We are importing the
MTCNNface detection model from thefacenet_pytorchlibrary at line 8.
Next, let’s construct the argument parser that will parse the command line arguments while executing the script.
# create the argument parser
parser = argparse.ArgumentParser()
parser.add_argument('-i', '--input', required=True,
                    help='path to the input data')
args = vars(parser.parse_args())
We just need one command line argument, that is the path to the input image in which we want to detect faces.
The next few lines of code set the computation device and initialize the MTCNN model from the facenet_pytorch library.
# computation device
device = torch.device('cuda' if torch.cuda.is_available else 'cpu')

# create the MTCNN model, `keep_all=True` returns all the detected faces
mtcnn = MTCNN(keep_all=True, device=device)
While initializing the model, we are passing the argument keep_all=True. This means that the model will detect the multiple faces in the image if there are any. The computation device is the second argument.
Reading the Image and Detecting the Faces and Facial Landmarks
We will read the image using PIL.
# read the image
image = Image.open(args['input']).convert('RGB')
# create an image array copy so that we can use OpenCV functions on it
image_array = np.array(image, dtype=np.float32)
# cv2 image color conversion
image_array = cv2.cvtColor(image_array, cv2.COLOR_RGB2BGR)
On line 4, in the above code block, we are keeping a copy of the image as NumPy array in image_array and then converting it into OpenCV BGR color format. This is required as we will be using OpenCV functions for drawing the bounding boxes, plotting the landmarks, and visualizing the image as well.
The next code block contains the code for detecting the faces and their landmarks by passing the image through the MTCNN face detection model.
# the detection module returns the bounding box coordinates and confidence ...
# ... by default, to get the facial landmarks, we have to provide ...
# ... `landmarks=True`
bounding_boxes, conf, landmarks = mtcnn.detect(image, landmarks=True)
# print(f"Bounding boxes shape: {bounding_boxes.shape}")
# print(f"Landmarks shape: {landmarks.shape}")
By default, the MTCNN model from facenet_pytorch library returns only the bounding boxes and the confidence score for each detection. To detect the facial landmarks as well, we have to pass the argument landmarks=True. Now, we have all the things from the MTCNN model that we need. But we do not have any use of the confidence scores in this tutorial.
You can also uncomment lines 5 and 6 to see the shapes of the bounding_boxes and landmarks arrays. This will give you a better idea of how many faces the MTCNN model is detecting in the image.
Draw the Bounding Boxes and Plot the Facial Coordinates
For drawing the bounding boxes around the faces and plotting the facial landmarks, we just need to call the functions from the utils script.
# draw the bounding boxes around the faces
image_array = utils.draw_bbox(bounding_boxes, image_array)

# plot the facial landmarks
image_array = utils.plot_landmarks(landmarks, image_array)
Note that in both cases, we are passing the converted image_array as arguments as we are using OpenCV functions. The direct PIL image will not work in this case.
Now, we just need to visualize the output image on the screen and save the final output to the disk in the outputs folder.
# set the save path
save_path = f"../outputs/{args['input'].split('/')[-1].split('.')[0]}.jpg"
# save image
cv2.imwrite(save_path, image_array)
# shoe the image
cv2.imshow('Image', image_array/255.0)
cv2.waitKey(0)
In the above code block, at line 2, we are setting the save_path by formatting the input image path directly. This way, we need not hardcode the path to save the image. Finally, we show and save the image.
Now, let’s execute the face_detection_images.py file and see some outputs.
Executing the face_detection_images.py Script
Open up your command line or terminal and cd into the src directory.
Next type the following command.
python face_detection_images.py --input ../input/image1.jpg
The following is the output.
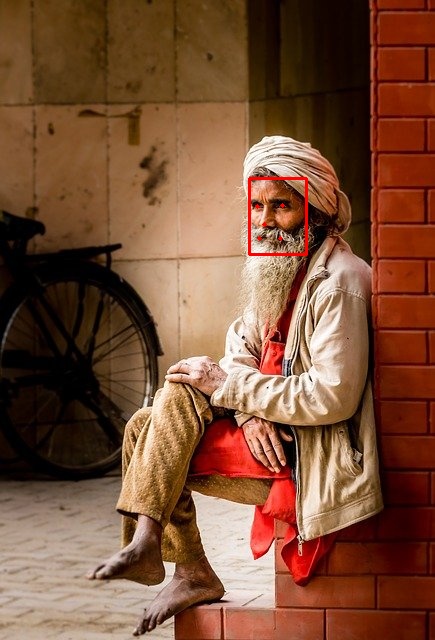
We just have one face in the image which the MTCNN model has detected accurately. It has also detected the facial landmarks quite perfectly.
Now let’s see how the model performs with multiple faces.
python face_detection_images.py --input ../input/image2.jpg

The MTCNN model is working quite well. Except a few really small faces, it has detected all other faces almost quite accurately along with the landmarks. The model is really good at detecting faces and their landmarks.
Let’s throw in a final image challenge at the model.
python face_detection_images.py --input ../input/image3.jpg
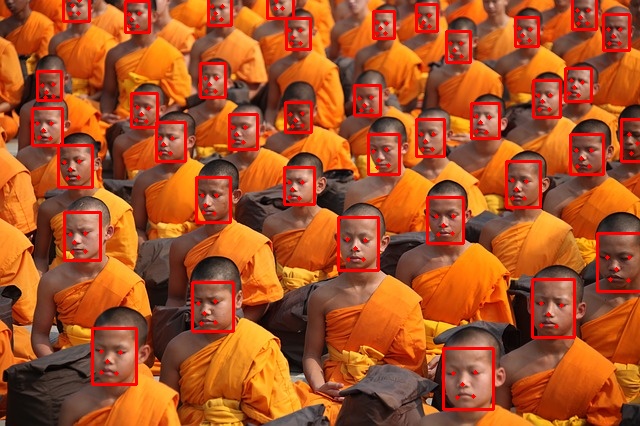
Amazing! It has detected all the faces along with the landmarks that are visible in the image. Deep learning has made face detection algorithms and models really powerful.
But how does the MTCNN model performs on videos? That is what we will see from the next section onwards.
Facial Landmark Detection using Facenet PyTorch on Videos
We will now write the code to execute the MTCNN model from the Facenet PyTorch library on vidoes.
All of this code will go into the face_detection_videos.py file.
The following are the imports that we will need along the way.
import cv2
import torch
import time
import argparse
import utils

from PIL import Image
from facenet_pytorch import MTCNN
Now, let’s create the argument parser, set the computation device, and initialize the MTCNN model.
# create the argument parser
parser = argparse.ArgumentParser()
parser.add_argument('-i', '--input', required=True,
                    help='path to the input data')
args = vars(parser.parse_args())

# computation device
device = torch.device('cuda' if torch.cuda.is_available else 'cpu')

# create the MTCNN model, `keep_all=True` returns all the detected faces
mtcnn = MTCNN(keep_all=True, device=device)
Set Up OpenCV for Video Capture
We will use OpenCV for capturing video frames so that we can use the MTCNN model on the video frames.
The following block of code captures video from the input path of the argument parser.
cap = cv2.VideoCapture(args['input'])
if (cap.isOpened() == False):
    print('Error while trying to read video. Please check path again')
# get the video frames' width and height
frame_width = int(cap.get(3))
frame_height = int(cap.get(4))
At lines 5 and 6, we are also getting the video frames’ width and height so that we can properly save the video frames later on.
Now, let’s define the save path for our video and also the format (codec) in which we will save our video.
# set the save path
save_path = f"../outputs/{args['input'].split('/')[-1].split('.')[0]}.mp4"

# define codec and create VideoWriter object
out = cv2.VideoWriter(save_path,
                      cv2.VideoWriter_fourcc(*'mp4v'), 30,
                      (frame_width, frame_height))

frame_count = 0 # to count total frames
total_fps = 0 # to get the final frames per second
We will save the resulting video frames as a .mp4 file. Note that we are also initializing two variables, frame_count, and total_fps. These two will help us calculate the average FPS (Frames Per Second) while carrying out detection even if we discontinue the detection in between.
Looping Over the Video Frames to Carry Out Face and Facial Landmark Detection
The next block of code will contain the whole while loop inside which we carry out the face and facial landmark detection using the MTCNN model.
I am keeping the complete loop in one block of code to avoid indentation problems and confusion.
# read until end of video
while(cap.isOpened()):
    # capture each frame of the video
    ret, frame = cap.read()
    if ret == True:
        frame = cv2.cvtColor(frame, cv2.COLOR_BGR2RGB)
        pil_image = Image.fromarray(frame).convert('RGB')

        # get the start time
        start_time = time.time()

        # the detection module returns the bounding box coordinates and confidence ...
        # ... by default, to get the facial landmarks, we have to provide ...
        # ... `landmarks=True`
        bounding_boxes, conf, landmarks = mtcnn.detect(pil_image, landmarks=True)

        # get the end time
        end_time = time.time()
        # get the fps
        fps = 1 / (end_time - start_time)
        # add fps to total fps
        total_fps += fps
        # increment frame count
        frame_count += 1

        wait_time = max(1, int(fps/4))

        # color conversion for OpenCV
        frame = cv2.cvtColor(frame, cv2.COLOR_RGB2BGR)
        # draw the bounding boxes around the faces
        frame = utils.draw_bbox(bounding_boxes, frame)

        # plot the facial landmarks
        frame = utils.plot_landmarks(landmarks, frame)

        cv2.imshow('Face detection frame', frame)
        out.write(frame)
        # press `q` to exit
        if cv2.waitKey(wait_time) & 0xFF == ord('q'):
            break

    else:
        break
- We are reading the video until the end.
- If we detect that a frame is present, then we convert that frame into RGB format first, and then into PIL Image format (lines 6 and 7). Converting to PIL Image format is really important as the MTCNN model accepts that format only.
- Then we start the counter for
start_timeso that it will help us in calculating the FPS later on. - We carry out the bounding boxes and landmarks detection at line 15.
- Then we stop the timing counter.
- Starting from line 20 till 24, we calculate the FPS, the total FPS, and increment the frame count by 1. At line 26, we calculate the
wait_time, the time for which each frame will appear on the screen. - At line 29, we again convert the frame onto the OpenCV BGR format. Then we draw the bounding boxes and plot the facial landmarks on the frame.
- Finally, we show each frame on the screen and break out of the loop when no more frames are present. If you wish to discontinue the detection in between, just press the
qkey on your keyboard.
There are just a few lines of code remaining now.
# release VideoCapture()
cap.release()
# close all frames and video windows
cv2.destroyAllWindows()
# calculate and print the average FPS
avg_fps = total_fps / frame_count
print(f"Average FPS: {avg_fps:.3f}")
We release the VideoCapture() object, destroy all frame windows, calculate the average FPS, and print it on the terminal.
That is all the code we need. Now, we can run our MTCNN model from Facenet library on videos.
Executing the face_detection_videos.py Script
Let’s try one of the videos from our input folder.
Type the following command in your command line/terminal while being within the src folder.
python face_detection_videos.py --input ../input/video1.mp4
On my GTX 1060, I was getting around 3.44 FPS. That is not much and not even real-time as well. But still, let’s take a look at the results.
We can see that the results are really good. At least, what it lacks in FPS, it makes up with the detection accuracy. There are a few false positives as well. Like detecting one of the child’s palms as a face in between. But it is picking up even the smallest of faces in the group.
Let’s test the MTCNN model on one last video. This video has dim lighting, like that of a conference room, so it will be a good challenge for the detector.
python face_detection_videos.py --input ../input/video2.mp4
On this video I was getting around 7.6 FPS. Yours may vary depending on the hardware.
We can see that the MTCNN model also detects faces in low lighting conditions. Although, it is missing out on a few faces in the back. Most probably, it would have easily detected those if the lighting had been a bit better. There is also the problem of a few false positives as well. Still, it is performing really well.
Summary and Conclusion
In this tutorial, we carried face and facial landmark detection using Facenet PyTorch in images and videos. You also got to see a few drawbacks of the model like low FPS for detection on videos and a bit of above-average performance in low-lighting conditions. I hope that you are equipped now to take on this project further and make something really great out of it.
If you have doubts, suggestions, or thoughts, then please leave them in the comment section. I will surely address them.
You can contact me using the Contact section. You can also find me on LinkedIn, and X.

Excellent tutorial once again. I have altered the code to work for webcam itself. Just make changes to utils.py also whenever len of bounding boxes and landmarks return null …make it an If condition. The code is below:
import cv2
import torch
import time
import argparse
import utils
from PIL import Image
from facenet_pytorch import MTCNN
# computation device
device = torch.device(‘cpu’)
mtcnn = MTCNN(keep_all=True, device=device)
cap = cv2.VideoCapture(0)
frame_width = int(cap.get(3))
frame_height = int(cap.get(4))
# set the save path
save_path = f”../outputs/webcam.mp4″
# define codec and create VideoWriter object
out = cv2.VideoWriter(save_path,
cv2.VideoWriter_fourcc(*’mp4v’), 30,
(frame_width, frame_height))
frame_count = 0 # to count total frames
total_fps = 0 # to get the final frames per second
while True:
# Capture frame-by-frame
ret, frame = cap.read()
if ret == True:
frame = cv2.cvtColor(frame, cv2.COLOR_BGR2RGB)
pil_image = Image.fromarray(frame).convert(‘RGB’)
# get the start time
start_time = time.time()
# the detection module returns the bounding box coordinates and confidence …
# … by default, to get the facial landmarks, we have to provide …
# … `landmarks=True`
bounding_boxes, conf, landmarks = mtcnn.detect(pil_image, landmarks=True)
# get the end time
end_time = time.time()
# get the fps
fps = 1 / (end_time – start_time)
# add fps to total fps
total_fps += fps
# increment frame count
frame_count += 1
wait_time = max(1, int(fps/4))
# color conversion for OpenCV
frame = cv2.cvtColor(frame, cv2.COLOR_RGB2BGR)
# draw the bounding boxes around the faces
print(bounding_boxes)
if bounding_boxes is None:
print(‘NO RESULTS’)
frame = utils.draw_bbox(bounding_boxes, frame)
# plot the facial landmarks
frame = utils.plot_landmarks(landmarks, frame)
cv2.imshow(‘Face detection frame’, frame)
out.write(frame)
# press `q` to exit
if cv2.waitKey(wait_time) & 0xFF == ord(‘q’):
break
else:
break
# release VideoCapture()
cap.release()
# close all frames and video windows
cv2.destroyAllWindows()
# calculate and print the average FPS
avg_fps = total_fps / frame_count
print(f”Average FPS: {avg_fps:.3f}”)
Great Gaurav. Appreciate your taking the initiative. Keep it up.