
In this tutorial, we will learn how to carry out human pose detection using PyTorch and the Keypoint RCNN neural network.
We will use a pre-trained PyTorch KeyPoint RCNN with ResNet50 backbone to detect keypoints in human bodies. The following image will make things much more clear about what we will be doing in this article.

The above image (figure 1) is from COCO 2018 Keypoint Detection Task dataset. It is one of the largest datasets for keypoint detection that is publicly available.
But before diving further into the code, let’s gain some more knowledge about human keypoint detection.
What will we be learning in this article?
- What is human body keypoint detection or pose detection?
- Different models and systems that are available for human pose detection.
- Detecting human pose in images and videos using PyTorch Keypoint RCNN?
Human Pose Detection using PyTorch in Deep Learning and Computer Vision
In general, pose detection or estimation is not a deep learning problem. In fact, it is a computer vision problem. But in recent years, deep learning based computer vision techniques have helped the research community a lot in achieving great results.
So, what is pose estimation in human body?
Human pose detection is detecting the important keypoints that can describe the orientation or movement of a person. You can also relate it to facial keypoint detection where we detect the interesting parts of a face and mark them. We can also do this in real-time.
Similarly, we can also detect the keypoints in a human body which describe the movement of the human body. This is known as human pose detection.
For example, take a look at the following image.
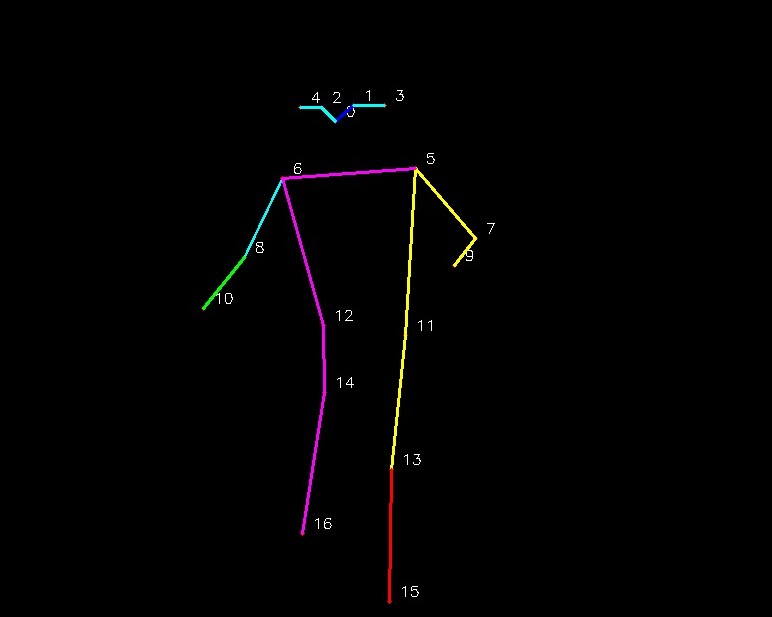
Figure 2 shows 17 keypoints of a human body while the person is walking. You can see that each of the major joints below the face are all numbered. Similarly, the important points on the head are also numbered.
I hope that the above image gives you a good idea of what we are trying to achieve here.
PyTorch Keypoint RCNN for Human Pose Detection
In this section, we will take learn a bit more about the Keypoint RCNN deep learning model for pose detection.
But before that, let’s have a brief look at different deep learning methods available for human pose detection. Although we will not go into the details, still you may wish to explore these methods on your own.
OpenPose
OpenPose is of one of the most famous human keypoints and pose detection systems.
It is a real-time multi-person keypoint detection library for body, face, hands, and foot estimation. Along with that, it can detect a total of 135 keypoints on a human body.
The above are only some of the features. There are many more and I insist that you take a look at their GitHub repository which is quite impressive.
Also, if you wish, you can also read the OpenPose paper. It is authored by Gines Hidalgo, Zhe Cao, Tomas Simon, Shih-En Wei, Hanbyul Joo, and Yaser Sheikh.
AlphaPose
AlphaPose is another real-time multi-person human pose detection system.
The GitHub repository is also quite actively maintained. Do take a look at it to get some more details.
The original paper was published under the name RMPE: Regional Multi-person Pose Estimation by Hao-Shu Fang, Shuqin Xie, Yu-Wing Tai, and Cewu Lu. The updated and better version has been renamed to AlphaPose.
DeepCut
DeepCut is another such multi-person keypoint detection system. To fully do justice to the method, I am quoting the authors here.
We propose an approach that jointly solves the tasks of detection and pose estimation: it infers the number of persons in a scene, identifies occluded body parts, and disambiguates body parts between people in close proximity of each other.
DeepCut: Joint Subset Partition and Labeling for Multi Person Pose Estimation
You can visit the official website to get the complete details. There, you will also find the link to their GitHub repository and pre-trained models as well.
Keypoint RCNN
Now, coming to the deep learning model and technique that we will use in this tutorial.
We will use one of the PyTorch pre-trained models for human pose and keypoint detection. It is the Keypoint RCNN deep learning model with a ResNet-50 base architecture.
This model has been pre-trained on the COCO Keypoint dataset. It outputs the keypoints for 17 human parts and body joints. They are: ‘nose’, ‘left_eye’, ‘right_eye’, ‘left_ear’, ‘right_ear’, ‘left_shoulder’, ‘right_shoulder’, ‘left_elbow’, ‘right_elbow’, ‘left_wrist’, ‘right_wrist’, ‘left_hip’, ‘right_hip’, ‘left_knee’, ‘right_knee’, ‘left_ankle’, ‘right_ankle’.
Do you remember the keypoints and joints that you saw in figure 2? The following is the complete image with the keypoints and pose shown on the human body.
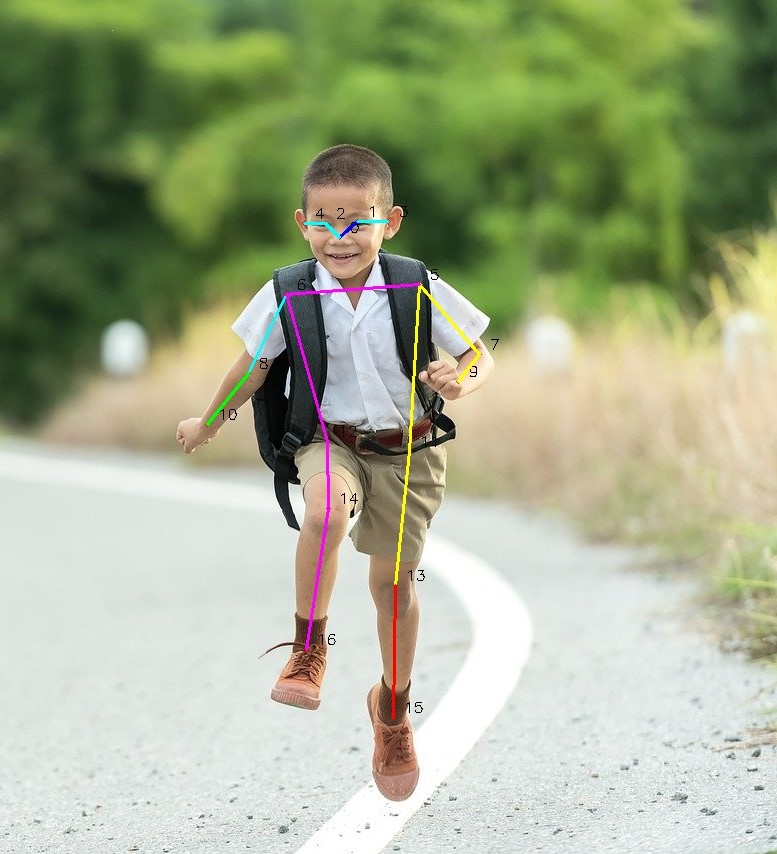
Figure 3 shows the boy along with all the keypoints and the body pose. It is quite impressive what deep learning models are capable of achieving when trained on the right dataset.
Input and Output Format of Keypoint RCNN
The Keypoint RCNN model takes an image tensor as input during inference. It is of the format [batch_size x num_channels x height x width]. For inference, the batch size is mostly going to be one.
For the output, the model returns a list of dictionary which in turn contains the resulting tensors. The fields of the dictionary are as follows:
- Boxes (
FloatTensor[N, 4]): the predicted boxes in[x1, y1, x2, y2]format, with values ofxbetween0andWand values ofybetween0andH. - Labels (
Int64Tensor[N]): the predicted labels for each image - Scores (
Tensor[N]): the scores or each prediction. - Keypoints (
FloatTensor[N, K, 3]): the locations of the predicted keypoints, in[x, y, v]format.
And for figure 3, the actual output is the following.
[{'boxes': tensor([[617.7941, 152.0900, 943.1877, 775.0088]], device='cuda:0'), 'labels': tensor([1], device='cuda:0'), 'scores': tensor([0.9999], device='cuda:0'), 'keypoints': tensor([[[785.8252, 237.9547,   1.0000],
         [803.9619, 221.9550,   1.0000],
         [771.9560, 223.0217,   1.0000],
         [834.9009, 221.9550,   1.0000],
         [750.6187, 223.0217,   1.0000],
         [865.8401, 284.8869,   1.0000],
         [732.4820, 294.4867,   1.0000],
         [925.5844, 354.2186,   1.0000],
         [694.0748, 373.4182,   1.0000],
         [904.2471, 381.9513,   1.0000],
         [653.5340, 424.6169,   1.0000],
         [855.1714, 451.2830,   1.0000],
         [773.0228, 441.6832,   1.0000],
         [841.3022, 585.6799,   1.0000],
         [774.0897, 508.8817,   1.0000],
         [839.1684, 717.9435,   1.0000],
         [752.7524, 649.6784,   1.0000]]], device='cuda:0'), 'keypoints_scores': tensor([[16.1233, 17.6176, 16.5380, 16.0087, 14.1357, 10.5159,  9.5042, 10.7226,
         11.4684, 15.8394, 11.3504, 10.8490, 11.1282, 11.4942, 14.9927, 10.8179,
         10.6713]], device='cuda:0')}]
So, it outputs the bounding boxes, the labels, the scores, and the keypoints. All in all, it is a full fledge deep learning object detection model along with human pose detection capabilities.
This is all the detail we need about the Keypoint RCNN model for now. We will get to know the rest of the details while coding.
Project Structure and PyTorch Version
By now you know that we will be using PyTorch in this tutorial. PyTorch already provides a pre-trained Keypoint RCNN model with ResNet50 base which has been trained on the COCO keypoint dataset.
To follow along smoothly, I recommend that you download the latest version of PyTorch (PyTorch 1.6 at the time of writing this). This will ensure that you can download all the pre-trained models without any hassle.
Now, coming to the project directory structure. We will follow the following structure.
├───input
│       image1.jpg
│       ...
│       video1.mp4
│       video2.mp4
│
├───outputs
└───src
    │   keypoint_rcnn_images.py
    │   keypoint_rcnn_videos.py
    │   utils.py
We have three folders.
- The
inputfolder contains the images and videos that we will use for inference. - The
outputsfolder will contain all the output images and videos that we will obtain after running them through the Keypoint RCNN model. - And the
srcfolder contains three Python scripts. We will write the code for each of them shortly.
You can either use your own images and videos for inference and keypoint detection. Or if you want to use the same data as in this tutorial, then you can download the input files by clicking the button below.
After downloading, you can unzip the file and keep them in the same project directory. All these images and videos are taken from Pixabay.
Human Pose Detection using PyTorch and Keypoint RCNN
From this section onward, we will get into the coding part of this tutorial. We have three Python scripts and we will fill them with code as per our requirements.
Writing Utility Code for Human Pose Detection
First, we will write some helper/utility code that will help us along to detect the human poses efficiently. These utility scripts are mostly repetitive scripts that we can re-use many times.
All of this code will go into the utils.py Python file inside the src folder.
Let’s start with the imports.
import cv2
import matplotlib
We need only two libraries here. One is the OpenCV module to plot the different edges joining the keypoints. The other one is the Matplotlib library to get different sets of colors for different edges.
Define the Different Edges that We Will Join
Remember how Keypoint RCNN outputs 17 keypoints for each person. To get the skeletal lines that we have seen above, we need to define the pairs of keypoints that we need to join. Let’s define those now.
# pairs of edges for 17 of the keypoints detected ...
# ... these show which points to be connected to which point ...
# ... we can omit any of the connecting points if we want, basically ...
# ... we can easily connect less than or equal to 17 pairs of points ...
# ... for keypoint RCNN, not  mandatory to join all 17 keypoint pairs
edges = [
    (0, 1), (0, 2), (2, 4), (1, 3), (6, 8), (8, 10),
    (5, 7), (7, 9), (5, 11), (11, 13), (13, 15), (6, 12),
    (12, 14), (14, 16), (5, 6)
]
I have provided detailed documentation in the form of comment in the above code snippet.
So, how will we use the edges list that is holding the tuples?
- Suppose that we have the 17 keypoints that Keypoint RCNN outputs. Those are marked from 0 to 16.
- Now, each of the tuples pairs in the edges list contains those two points that we will connect. This means that we will connect point 0 with 1, point 0 with 2, point 2 with 4, and so on.
- Also, we need not connect all the 17 keypoints with another keypoint. We can decide to connect any point that we want to get the skeletal shape that we want.
Code to Join the Keypoints and Draw the Skeletal Lines
We have the pairs of the edges now. But how do we connect those keypoints to get the skeletal frame. We will write a very simple Python function for that.
The following block of code does that.
def draw_keypoints(outputs, image):
    # the `outputs` is list which in-turn contains the dictionaries
    for i in range(len(outputs[0]['keypoints'])):
        keypoints = outputs[0]['keypoints'][i].cpu().detach().numpy()

        # proceed to draw the lines if the confidence score is above 0.9
        if outputs[0]['scores'][i] > 0.9:
            keypoints = keypoints[:, :].reshape(-1, 3)
            for p in range(keypoints.shape[0]):
                # draw the keypoints
                cv2.circle(image, (int(keypoints[p, 0]), int(keypoints[p, 1])),
                            3, (0, 0, 255), thickness=-1, lineType=cv2.FILLED)

                # uncomment the following lines if you want to put keypoint number
                # cv2.putText(image, f"{p}", (int(keypoints[p, 0]+10), int(keypoints[p, 1]-5)),
                #             cv2.FONT_HERSHEY_SIMPLEX, 0.5, (0, 0, 0), 1)

            for ie, e in enumerate(edges):
                # get different colors for the edges
                rgb = matplotlib.colors.hsv_to_rgb([
                    ie/float(len(edges)), 1.0, 1.0
                ])
                rgb = rgb*255
                # join the keypoint pairs to draw the skeletal structure
                cv2.line(image, (keypoints[e, 0][0], keypoints[e, 1][0]),
                        (keypoints[e, 0][1], keypoints[e, 1][1]),
                        tuple(rgb), 2, lineType=cv2.LINE_AA)
        else:
            continue

    return image
- We are defining a
draw_keypoints()function which accepts theoutputslist and the NumPy image as input parameters. - We loop over the
keypointsin the list from line 15. - Then we detach the keypoints from the GPU that is detected for each person and convert them to NumPy array. This happens at line 16.
- Starting from line 19, we only proceed if the confidence score of the detection is greater than 0.9. Less than 0.9 tends to give a lot of false positives and error-prone results.
- Then we reshape the
keypointsto convert them into 17 rows. Starting from line 21, we loop over each row and draw the keypoints on the image. Also, if you want to draw the keypoint numbers, then you can uncomment lines 27 and 28. - Now, coming to line 30. Here, we loop over each of the edge pairs defined above.
- At line 32, first, we get different colors for different lines that we will draw using the Matplotlib library.
- Then starting from line 37, we join each of the edge pairs to draw the skeletal structure over the image.
- Finally, we return the resulting image.
Actually, most of the heavy work is done. Drawing the keypoints and skeletal structures is one of the most important tasks regarding human pose detection. Now, most of the work will be done done by the pre-trained Keypoint RCNN model.
Human Pose Detection in Images
We are all set to write the code for human pose detection using deep learning in images. We will start with images and then move over to videos as well.
The code in this section will go into the keypoint_rcnn_images.py Python script.
We will start with importing all the modules and libraries that we will need.
import torch
import torchvision
import numpy as np
import cv2
import argparse
import utils

from PIL import Image
from torchvision.transforms import transforms as transforms
We are importing utils script at line 6 that we have just written. Also, we need the PIL library to read the image so that we have the image pixel values in the proper range for PyTorch pre-trained model.
Next, let’s define the argument parser to parse the command line arguments.
parser = argparse.ArgumentParser()
parser.add_argument('-i', '--input', required=True,
                    help='path to the input data')
args = vars(parser.parse_args())
We will provide just one command line argument, that is the path to the input image.
The next block of code defines the image transforms.
# transform to convert the image to tensor
transform = transforms.Compose([
    transforms.ToTensor()
])
The above will transform the PIL image to PyTorch tensors.
Initialize the Model and Set the Computation Device
We will use the torchvision module from PyTorch to initialize the Keypoint RCNN model.
# initialize the model
model = torchvision.models.detection.keypointrcnn_resnet50_fpn(pretrained=True,
                                                               num_keypoints=17)
# set the computation device
device = torch.device('cuda' if torch.cuda.is_available() else 'cpu')
# load the modle on to the computation device and set to eval mode
model.to(device).eval()
For the keypointrcnn_resnet50_fpn model, we need to provide two arguments. The first one is pretrained=True, so that it returns a pre-trained model. The second one is num_keypoints=17 which will instruct the model to detect 17 of the keypoints in the human body. Here, we are also defininfg the computation device, loading the Keypoint RCNN model onto it and getting the model into eval() mode.
Read and Prepare the Image
The following block of code reads the image and prepares it to be fed into the Keypoint RCNN neural network model.
image_path = args['input']
image = Image.open(image_path).convert('RGB')
# NumPy copy of the image for OpenCV functions
orig_numpy = np.array(image, dtype=np.float32)
# convert the NumPy image to OpenCV BGR format
orig_numpy = cv2.cvtColor(orig_numpy, cv2.COLOR_RGB2BGR) / 255.
# transform the image
image = transform(image)
# add a batch dimension
image = image.unsqueeze(0).to(device)
At line 28, we are keeping a copy of the image by converting it into NumPy array so that we can apply different OpenCV functions to it. Then we are converting it into the OpenCV BGR color format as well.
Line 32 transforms the image and line 34 adds a batch dimension.
Predict the Keypoints and Visualize the Result
We need to perform a forward pass so that the Keypoint RCNN model can detect the keypoints on the image.
with torch.no_grad():
    outputs = model(image)

output_image = utils.draw_keypoints(outputs, orig_numpy)

# visualize the image
cv2.imshow('Keypoint image', output_image)
cv2.waitKey(0)
We do not need to calculate the gradients during inference, therefore, we are keeping the forward pass within the with torch.no_grad() block.
At line 38, we are calling the draw_keypoints() function from utils script to draw the keypoints and skeletal structure. Then we are visualizing the image.
Finally, we just need to save our results to disk.
# set the save path
save_path = f"../outputs/{args['input'].split('/')[-1].split('.')[0]}.jpg"
cv2.imwrite(save_path, output_image*255.)
We are just setting a save_path using the input path and saving the result to outputs folder.
This is all the code we need to detect human pose and keypoints using deep learning on images.
Executing keypoint_rcnn_images.py Script to Detect Human Pose in Images
We are all set to execute keypoint_rcnn_images.py script and take a look at how the Keypoint RCNN model is performing.
We will use the images from the input folder that I have provided above. Let’s start with the first image.
Open up your command line/terminal and cd into the src folder of the project directory. Then type the following command.
python keypoint_rcnn_images.py --input ../input/image1.jpg
You should get the following output.
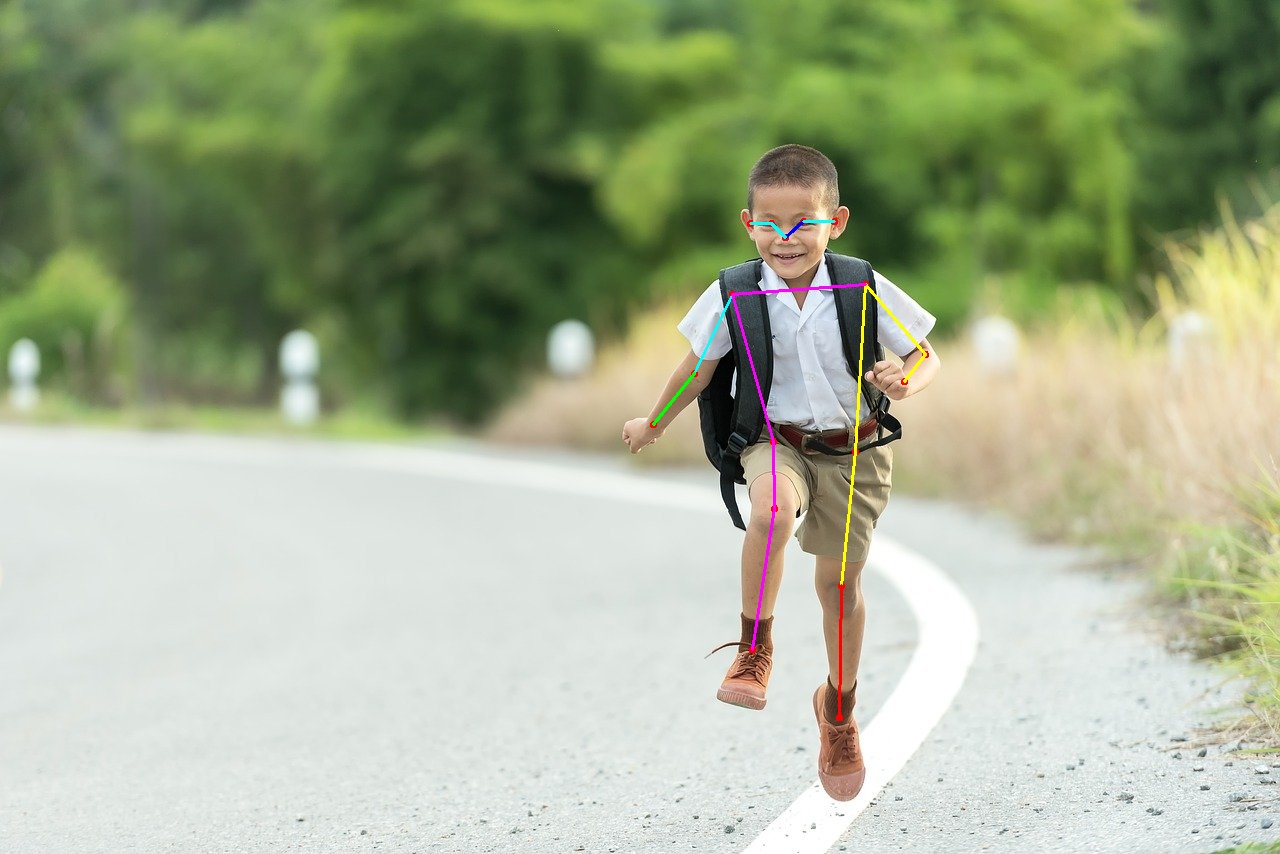
The PyTorch Keypoint RCNN model is working perfectly in this case. It is correctly detecting all the 17 keypoints and joining the desired keypoint pairs is also giving a good structure. Looks like deep learning has made keypoint detection in humans really effective.
Now, let’s throw a bit more challenging image to the model for keypoint detection.
python keypoint_rcnn_images.py --input ../input/image2.jpg
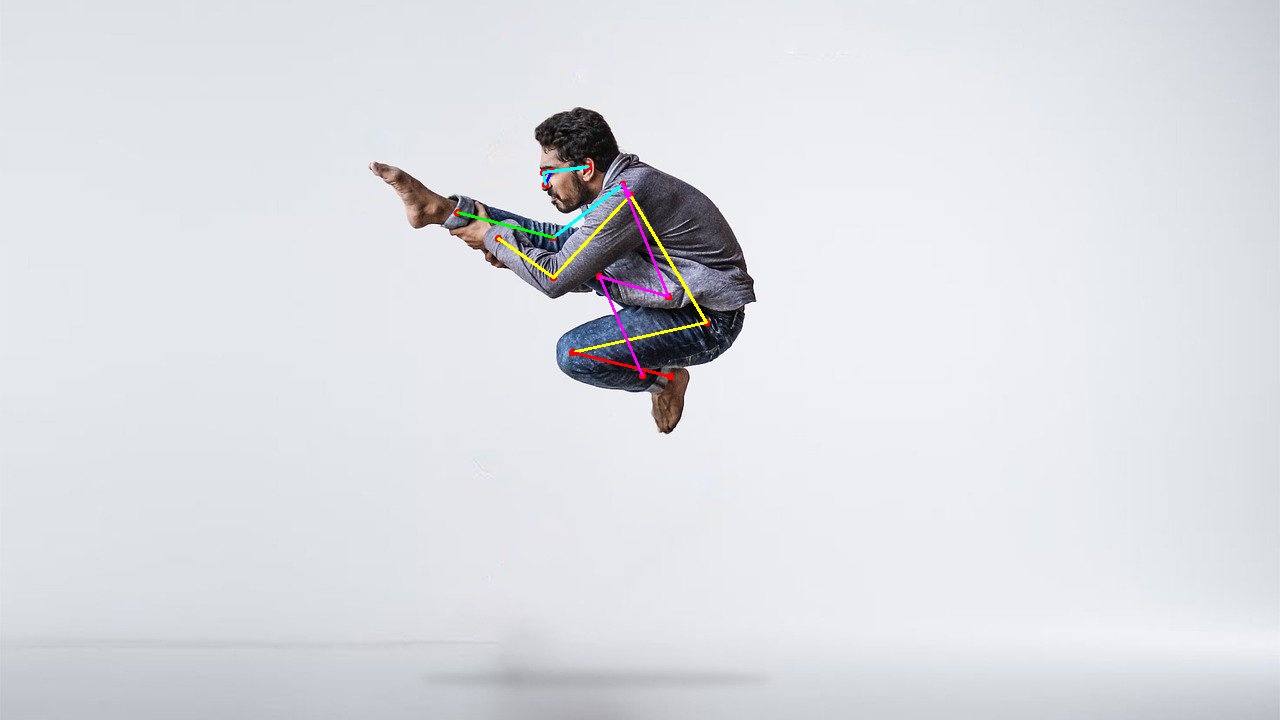
In figure 5, we can see that the model is detecting the keypoints for one of the legs and one of the hands wrongly. It is detecting keypoint for one of the legs when there should not be any, and it is detecting the keypoints for the legs as keypoints for hands. Looks like our dancing man photo was a bit too much for the Keypoint RCNN model.
What about multi-person detection? Let’s throw a final image challenge at our model.
python keypoint_rcnn_images.py --input ../input/image3.jpg
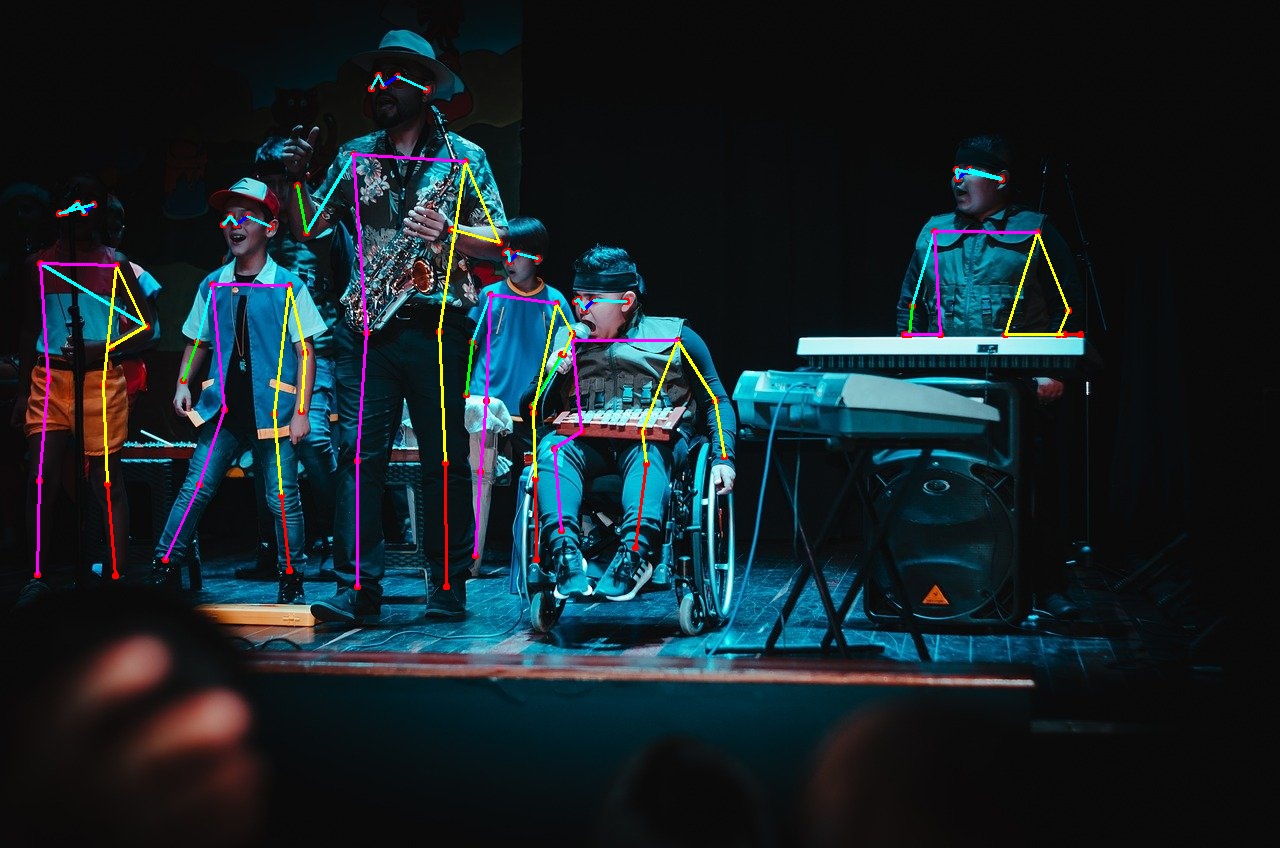
Frankly, the results are better than I expected. It is detecting all the keypoints correctly, except the boy’s right arm at the extreme left corner. Looks like because of low-lighting, the Keypoint RCNN neural network is finding it difficult to correctly regress the final keypoint for the right arm. Still, it is much better than expected.
Our Keypoint RCNN deep neural network is performing well on images, but what about videos? This is what we are going to find out in the next section, where we will write the code to detect keypoints and human pose in videos using Keypoint RCNN deep neural network.
Human Pose Detection in Videos using PyTorch and Keypoint RCNN
In this section, we will write the code to detect keypoints and human pose in videos using PyTorch and Keypoint RCNN neural network.
It is going to be very similar to what we did for images. For videos, we just need to treat each individual frame as an image and our work is mostly done. The rest of the work will done by our utils.py script.
All of this code will go into the keypoint_rcnn_videos.py Python script.
As usual, we will start with the imports.
import torch
import torchvision
import cv2
import argparse
import utils
import time

from PIL import Image
from torchvision.transforms import transforms as transforms
In the above block, we are also importing the time module to keep track of the time and calculate the average FPS (Frames Per Second) which we will do later.
The next block of code does some preliminary work. This includes defining the argument parser, the transforms, and preparing the Keypoint RCNN model. It is going to be the same as we did in the case of images.
parser = argparse.ArgumentParser()
parser.add_argument('-i', '--input', required=True,
                    help='path to the input data')
args = vars(parser.parse_args())

# transform to convert the image to tensor
transform = transforms.Compose([
    transforms.ToTensor()
])

# initialize the model
model = torchvision.models.detection.keypointrcnn_resnet50_fpn(pretrained=True,
                                                               num_keypoints=17)
# set the computation device
device = torch.device('cuda' if torch.cuda.is_available() else 'cpu')
# load the modle on to the computation device and set to eval mode
model.to(device).eval()
Setting Up OpenCV for Video Capture and Saving
We will use OpenCV VideoCapture() to capture the videos.
cap = cv2.VideoCapture(args['input'])
if (cap.isOpened() == False):
    print('Error while trying to read video. Please check path again')
# get the video frames' width and height
frame_width = int(cap.get(3))
frame_height = int(cap.get(4))

# set the save path
save_path = f"../outputs/{args['input'].split('/')[-1].split('.')[0]}.mp4"
# define codec and create VideoWriter object
out = cv2.VideoWriter(save_path,
                      cv2.VideoWriter_fourcc(*'mp4v'), 20,
                      (frame_width, frame_height))
frame_count = 0 # to count total frames
total_fps = 0 # to get the final frames per second
After capturing the video, we are getting the video frames’ width and height at lines 31 and 32.
At line 35, we are defining the name for the save_path of the output video file. The resulting video with the keypoints will save under this name in the outputs folder.
Then we are using the cv2.VideoWriter() for defining the codec and save format of the video file. We will save the resulting video files in .mp4 format.
Finally, at lines 40 and 41, we are defining frame_count and total_fps to keep track of the total number of video frames and the total Frames Per Second as well.
Detecting Keypoints and Pose in Each Video Frame
To detect pose in human bodies and predict the keypoints, we need to treat each individual frame in a video as one image. We can easily do that by iterating over all the video frames using a while loop.
The next block of code does just that. Let’s write the code for that and then get into the explanation part.
# read until end of video
while(cap.isOpened()):
    # capture each frame of the video
    ret, frame = cap.read()
    if ret == True:

        pil_image = Image.fromarray(frame).convert('RGB')
        orig_frame = frame

        # transform the image
        image = transform(pil_image)
        # add a batch dimension
        image = image.unsqueeze(0).to(device)

        # get the start time
        start_time = time.time()

        with torch.no_grad():
            outputs = model(image)

        # get the end time
        end_time = time.time()

        output_image = utils.draw_keypoints(outputs, orig_frame)

        # get the fps
        fps = 1 / (end_time - start_time)
        # add fps to total fps
        total_fps += fps
        # increment frame count
        frame_count += 1

        wait_time = max(1, int(fps/4))

        cv2.imshow('Pose detection frame', output_image)
        out.write(output_image)
        # press `q` to exit
        if cv2.waitKey(wait_time) & 0xFF == ord('q'):
            break

    else:
        break
- We are iterating over the frames until they are present. Else we break out of the loop.
- If a frame is present, then we convert the frame from OpenCV format to PIL image format at line 48 and convert it into RGB color format. We also keep a copy of the original frame at line 49.
- Lines 52 and 54 transform the frame and add a batch dimension to it respectively.
- At line 57, we define
start_timejust before we feed our frame to the Keypoint RCNN model. - After detections happen at line 60, we define
end_timeso that we can know the time taken for each forward pass. - Line 65 calls the
draw_keypoints()function ofutilsscript to draw the keypoints and skeletal structure. - Line 68 calculates the FPS for the current frame, line 70 adds FPS to the total FPS, and line 72 increments the frame count.
- We show the image on the screen at line 76 and write it to disk at line 77.
- Finally, when there are no more frames present, then we break out of the loop.
There are just a few more lines of code. We need to release the VideoCapture() object, destroy all cv2 windows and calculate the average FPS.
# release VideoCapture()
cap.release()
# close all frames and video windows
cv2.destroyAllWindows()
# calculate and print the average FPS
avg_fps = total_fps / frame_count
print(f"Average FPS: {avg_fps:.3f}")
That is all the code we need for human pose detection in videos using Keypoint RCNN and PyTorch. Now, we can move forward and execute the script to see how well the neural network performs.
Executing keypoint_rcnn_videos.py for Human Pose Detection on Videos
We have two videos in our input folder. Let’s begin with the first video.
python keypoint_rcnn_videos.py --input ../input/video1.mp4
The following is the final video that is saved to the disk. You should also get result similar to this.
In clip 1, we can see that the neural network is predicting the keypoints quite accurately for the most part. Even when the person is lifting his legs and moving his hands, the keypoints are correct. But the detections go wrong when the person is too near to the camera at the end of the clip. This is most probably because the neural network is not getting enough information to predict the keypoints correctly. It is not able to see the whole body in those frames.
Also, I got around 4.8 FPS on an average on my GTX 1060. It is not real-time, at least not on a mid-range GPU. Yours may vary according to your hardware.
Now, let’s move on to the detect keypoints on the second video.
python keypoint_rcnn_videos.py --input ../input/video2.mp4
The following is the output clip.
We can clearly see that Keypoint RCNN can easily detect poses and keypoints for multiple people at the same time. There are some wrong detections for sure but they are for those people who are at the far back and appear small. The people who are closer to the camera, for them, the keypoint detections are quite accurate.
I got around 3.6 FPS on an average for this clip. The reduction in FPS might to be due to the more number of detections.
Further Improvements
There are many ways in which you can improve upon this project. You can try:
- Using a better and bigger network as the backbone. Like ResNet101 pre-trained model.
- You can also try inferencing over the video frames in batches instead of a single frame. This may also help to increase the FPS.
Summary and Conclusion
In this tutorial, you got to learn about human pose detection using deep learning and PyTorch. We used PyTorch Keypoint RCNN neural network model to detect keypoints and human pose in images and videos. I hope that you learned new things regarding deep learning in this article.
If you have any doubts, thoughts, or suggestions, then please leave them in the comment section. I will surely address them.
You can contact me using the Contact section. You can also find me on LinkedIn, and X.

realy nice article
where is the link to github repo for this
Hello Fahad. I have not made any GitHub repo for this article till now. But you can easily implement the code as I have provided the directory structure and the Python filenames above each code snippet for easy and fast implementation.
Hi Sovit Ranjan Rath,
I have not left your blog since I found it 2 days. I enjoyed this blog. I have a question, how do I use this pre-trained network to do transfer learning as I want to return a different number of keypoints?
Thanks
Thanks for the appreciation Omo. Currently, I have not written any blog post for transfer learning for human pose detection. I hope to write one soon. There are a lot of things lined up. So, it might take a while.
How to get the mask of the person in the image?
Hi Neelam. To get the masks, you can use Mask RCNN. Maybe this post will help you => https://debuggercafe.com/instance-segmentation-with-pytorch-and-mask-r-cnn/
Hi Sovit Ranjan Rath,
I tried implementing this, but am running into error. Can you please help in resolving?
I have attached a snippet here: https://drive.google.com/file/d/1Kte02mF79DAwPoJD0YJ_Kp215KHpvlHS/view?usp=sharing
Thanks,
Parnashri
Hi Parnashri. Looks like you need to convert the keypoints into integer. I think you must be using updated packages. I ran using PyTorch 1.6 which I have mentioned in the post. Let me know if you are using updated package and if the issue persists after integer conversion. Hope this helps.
which version of python have you used?
Hello Huma. It’s Python 3.7.x for this tutorial.
what should we do to show the pose only without showing picture in background?
You just need to create a black canvas using NumPy and plot the points on that instead of the image. You can create one using the following:
image = np.zeros((200, 200))
can you please tell me the position of the changes in code and the exact code that should be written there?
Hi Huma. Creating a new thread as the older one cannot go any deeper. I understand that you need the code. But it is really not possible to point out all the code here in the comment section. Will need to think of something else.
so can you share the .py file with the required changes done?
Can you please let me know where can I share it?
You can share the drive link of python file here in comment section or at my email it will be a great favour.
Hi Huma. I have sent the scripts to the same email as the one you logged in with to this website. Please let me know if you find it.
I was having the error :
cv2.error: OpenCV(4.5.5) :-1: error: (-5:Bad argument) in function ‘line’
It was corrected putting all to int.
cv2.line(image, ( int(keypoints[e, 0][0]), int(keypoints[e, 1][0])),
( int( keypoints[e, 0][1] ) , int(keypoints[e, 1][1]) ),
tuple(rgb), thickness=2)
Maybe you should point up which version of opencv are you using because it seems that some versions do not allow floating points.
Hi Jose. Thanks for the heads up. Yes, this surely occurs with newer OpenCV versions. Instead of mentioning the OpenCV version, better yet, I will update the code soon. Again, thanks for the info.
thx
i need this code ,if you give me i will be very thank you
Hello Tang. Actually, the code you see in the post, that’s all the code. If you just set them up in the directory structure as mentioned, everything will run fine.
Hi! I am implementing your tutorial (which is very nice), but I am getting an error from ” parser = argparse.ArgumentParser()
parser.add_argument(‘-i’, ‘–input’, required=True,
help=’path to the input data’)”
the error message says: usage: ipykernel_launcher.py [-h] -i INPUT
ipykernel_launcher.py: error: the following arguments are required: -i/–input
do you know anything about this? (could the reason be pytorch? I am using 2.0.1+cu118)
If I do not try to run the files individually, I get this other error:
Traceback (most recent call last):
File “keypoint_rcnn_videos.py”, line 68, in
output_image = utils.draw_keypoints(outputs, orig_frame)
File “/home/dora/Downloads/py-rcnn/src/utils.py”, line 59, in draw_keypoints
cv2.line(image, (keypoints[e, 0][0], keypoints[e, 1][0]),
cv2.error: OpenCV(4.7.0) :-1: error: (-5:Bad argument) in function ‘line’
> Overload resolution failed:
> – Can’t parse ‘pt1’. Sequence item with index 0 has a wrong type
> – Can’t parse ‘pt1’. Sequence item with index 0 has a wrong type
Could you help maybe?
Hello Eamm. Please convert the keypoints to integers. That is, the annotation code will become:
cv2.line(image, (int(keypoints[e, 0][0]), int(keypoints[e, 1][0]))
I will update this blog post’s code.
I hope this helps.
Hi Emma. This code is supposed to run as a Python script. If you want to run them in a notebook, please remove the argument parsers and hardcode the required values. It should work.
Thank you!!!
Welcome.
[{‘boxes’: tensor([[617.7941, 152.0900, 943.1877, 775.0088]], device=’cuda:0′), ‘labels’: tensor([1], device=’cuda:0′), ‘scores’: tensor([0.9999], device=’cuda:0′), ‘keypoints’: tensor([[[785.8252, 237.9547, 1.0000],
[803.9619, 221.9550, 1.0000],
[771.9560, 223.0217, 1.0000],
[834.9009, 221.9550, 1.0000],
[750.6187, 223.0217, 1.0000],
[865.8401, 284.8869, 1.0000],
[732.4820, 294.4867, 1.0000],
[925.5844, 354.2186, 1.0000],
[694.0748, 373.4182, 1.0000],
[904.2471, 381.9513, 1.0000],
[653.5340, 424.6169, 1.0000],
[855.1714, 451.2830, 1.0000],
[773.0228, 441.6832, 1.0000],
[841.3022, 585.6799, 1.0000],
[774.0897, 508.8817, 1.0000],
[839.1684, 717.9435, 1.0000],
[752.7524, 649.6784, 1.0000]]], device=’cuda:0′), ‘keypoints_scores’: tensor([[16.1233, 17.6176, 16.5380, 16.0087, 14.1357, 10.5159, 9.5042, 10.7226,
11.4684, 15.8394, 11.3504, 10.8490, 11.1282, 11.4942, 14.9927, 10.8179,
10.6713]], device=’cuda:0′)}]
how to show actual output from output image in output folder?
Hello Setty. The output images and videos are already being stored in the folder. Is there something that I am missing in the question? If so, I would be happy to answer.