
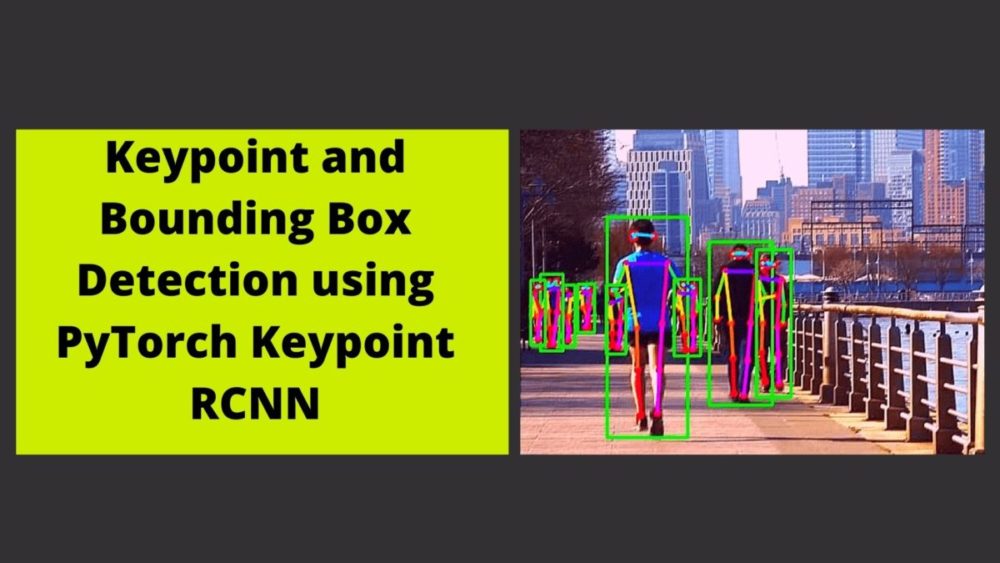
In this tutorial, we are going to learn how we can detect keypoints and bounding boxes using Keypoint RCNN deep learning model and PyTorch. Basically, we will get complete hands-on with keypoint and bounding box detection using PyTorch Keypoint RCNN.
A Bit of Background
A few days back, I got a comment from one of the readers on one of my previous tutorials. She asked whether it is possible to detect keypoint and segment masks using PyTorch MaskRCNN model or not. Actually, it is not and currently, I am trying to find a workaround or open source project that I can work upon and put up a tutorial for as well. In the meantime, I thought that it would be helpful if I put a tutorial on keypoint and bounding box detection using PyTorch Keypoint RCNN. Many people use the PyTorch Keypoint RCNN pre-trained model, but not everyone (especially beginners) knows that it also outputs bounding boxes as well. So, we will tackle that in this tutorial.
Many things for this article are going to be similar to the Human Pose Detection using PyTorch Keypoint RCNN. Still, we will try our best to improve upon it.
So, what are you going to learn in this article?
- How to detect keypoints and carry out human pose detection using PyTorch keypoint RCNN?
- How to draw bounding boxes around the person as well.
- What effect does the
min_sizeargument have on the FPS in videos when carrying out keypoint and bounding box detection with PyTorch Keypoint RCNN?
The Output Structure of Keypoint RCNN
When evaluating, then Keypoint RCNN output looks something like this.
[{'boxes': tensor([[617.7941, 152.0900, 943.1877, 775.0088]], device='cuda:0'), 'labels': tensor([1], device='cuda:0'), 'scores': tensor([0.9999], device='cuda:0'), 'keypoints': tensor([[[785.8252, 237.9547,   1.0000],
         [803.9619, 221.9550,   1.0000],
         [771.9560, 223.0217,   1.0000],
         [834.9009, 221.9550,   1.0000],
         [750.6187, 223.0217,   1.0000],
         [865.8401, 284.8869,   1.0000],
         [732.4820, 294.4867,   1.0000],
         [925.5844, 354.2186,   1.0000],
         [694.0748, 373.4182,   1.0000],
         [904.2471, 381.9513,   1.0000],
         [653.5340, 424.6169,   1.0000],
         [855.1714, 451.2830,   1.0000],
         [773.0228, 441.6832,   1.0000],
         [841.3022, 585.6799,   1.0000],
         [774.0897, 508.8817,   1.0000],
         [839.1684, 717.9435,   1.0000],
         [752.7524, 649.6784,   1.0000]]], device='cuda:0'), 'keypoints_scores': tensor([[16.1233, 17.6176, 16.5380, 16.0087, 14.1357, 10.5159,  9.5042, 10.7226,
         11.4684, 15.8394, 11.3504, 10.8490, 11.1282, 11.4942, 14.9927, 10.8179,
         10.6713]], device='cuda:0')}]
It is a list containing a dictionary. And the keys of the dictionaries are:
boxes: The values contain the bounding box coordinates of the detected objects.labels: This stores the class label values that correspond to labels of the MS COCO object detection dataset.scores: This contains the confidence scores of the detections.keypoints: Thekeypointskey contains the location of the keypoints on the image inx,yformat. You can see that there is a third value. It is either 0 or 1. 0 indicates that the keypoint is not visible, whereas, 1 indicates that the keypoint is visible.
Now, that we have discussed the output format of PyTorch Keypoint RCNN, let’s move on to discuss how to structure this mini-project of ours.
Directory Structure and PyTorch Version
We will use the following directory structure for this tutorial.
├───input
│
├───outputs
└───src
    │   keypoint_bbox_images.py
    │   keypoint_bbox_videos.py
    │   models.py
    │   utils.py
- The
inputfolder will contain all the images and videos that we will run inference on using the PyTorch Keypoint RCNN model. - The
outputsfolder will contain all the resulting images and videos. These outputs will have the keypoints as well as the bounding boxes on them. - And the
srcfolder will contain our Python scripts. We will get into the content of these while writing the code.
The PyTorch Version
I have used PyTorch 1.7.1 for this tutorial. A slightly older version (like 1.6) should not cause any issues. Still, to avoid any unwanted hurdles you can update your PyTorch version to the latest version before moving forward.
The Input Data
There is just one other thing before moving forward. The input data that we will use. You can either choose your own images and videos or can download the zipped input file by clicking the button below. This file contains the same images and videos that I have used and we will use those in this tutorial as well.
If you download the input file, then extract its content into the input folder inside your project directory. This contains three images and one video. All the images and videos are taken from Pixabay and are completely free to use.
Keypoint and Bounding Box Detection with PyTorch Keypoint RCNN
From this section, we will start the coding part of this tutorial. We will tackle each of the Python scripts one by one.
Utilities Script for Keypoint and Bounding Box Detection with PyTorch Keypoint RCNN
First, we will write the code for utils.py file. This Python file contains some utility scripts that we will need along the way. Explaining more without taking a look at the code would be a bad idea. Let’s start with importing the modules.
import cv2
import matplotlib
import numpy
The Keypoint RCNN model will give us 17 pairs of keypoints which are just coordinates. To get the skeletal structure that we see in so many images and videos (and even in figure 1), we need to join those 17 pairs of keypoints correctly. For that, we will create a list that will contain paired tuples of the those keypoints. Take a look at the following code block.
# pairs of edges for 17 of the keypoints detected ...
# ... these show which points to be connected to which point ...
# ... we can omit any of the connecting points if we want, basically ...
# ... we can easily connect less than or equal to 17 pairs of points ...
# ... for keypoint RCNN, not  mandatory to join all 17 keypoint pairs
edges = [
    (0, 1), (0, 2), (2, 4), (1, 3), (6, 8), (8, 10),
    (5, 7), (7, 9), (5, 11), (11, 13), (13, 15), (6, 12),
    (12, 14), (14, 16), (5, 6)
]
So, we enumerate the coordinate points from 0-16 (17 in total). Then each tuple in the edges list contains a pair of those numbered keypoints. One pair of tuple indicates that those two keypoints will be connected. This means that keypoint 0 will be connected to keypoint 1 and so on. We need not even join all the pairs of keypoints. But that will look really weird. We want to correctly join all the pairs.
Function for Drawing the Keypoints and Bounding Boxes
Next, we will write a function to draw the keypoints that are detected, join all the keypoint pairs, and draw the bounding boxes as well. The following code block contains that code.
def draw_keypoints_and_boxes(outputs, image):
    # the `outputs` is list which in-turn contains the dictionary
    for i in range(len(outputs[0]['keypoints'])):
        # get the detected keypoints
        keypoints = outputs[0]['keypoints'][i].cpu().detach().numpy()
        # get the detected bounding boxes
        boxes = outputs[0]['boxes'][i].cpu().detach().numpy()

        # proceed to draw the lines and bounding boxes
        if outputs[0]['scores'][i] > 0.9: # proceed if confidence is above 0.9
            keypoints = keypoints[:, :].reshape(-1, 3)
            for p in range(keypoints.shape[0]):
                # draw the keypoints
                cv2.circle(image, (int(keypoints[p, 0]), int(keypoints[p, 1])),
                            3, (0, 0, 255), thickness=-1, lineType=cv2.FILLED)
            # draw the lines joining the keypoints
            for ie, e in enumerate(edges):
                # get different colors for the edges
                rgb = matplotlib.colors.hsv_to_rgb([
                    ie/float(len(edges)), 1.0, 1.0
                ])
                rgb = rgb*255
                # join the keypoint pairs to draw the skeletal structure
                cv2.line(image, (keypoints[e, 0][0], keypoints[e, 1][0]),
                        (keypoints[e, 0][1], keypoints[e, 1][1]),
                        tuple(rgb), 2, lineType=cv2.LINE_AA)

            # draw the bounding boxes around the objects
            cv2.rectangle(image, (int(boxes[0]), int(boxes[1])), (int(boxes[2]), int(boxes[3])),
                          color=(0, 255, 0),
                          thickness=2)
        else:
            continue

    return image
- The
draw_keypoints_and_boxes()accepts the output of the PyTorch Keypoint RCNN model and the NumPy image as input parameters. - From line 16, we loop over the outputs as many times as there are number of keypoints detected. As that would amount to the total number of detections as well.
- Lines 18 and 20 extract all the keypoints and bounding boxes that are detected for that particular image or frame.
- Line 23 ensures that we only proceed to draw the keypoints and bounding boxes, if the confidence score for that particular detection is above 0.9. Else, we just continue with the next detection.
- At line 24, we reshape the keypoints just to ensure that we have 17 rows and three columns for each of the detections. These will be in the form of
x,y, andvisibilityas discussed above. - From line 25, we start to loop over the keypoint rows for the current detection. Then at line 27, we use OpenCV draw function to draw circles on the coordinates of the current keypoint detections.
- Next, we need to join each of these keypoints, which we start doing from line 30. We loop over the
edgeslist and obtain a different color for each pair of keypoint at line 32. Then at line 37, we draw the line connecting the current pair of keypoints. - We also need to draw the bounding boxes for the current detection. This part is simple and we are doing it at line 42.
If the above function is clear to you, then the rest of the tutorial is just dealing with images and video frames.
The PyTorch Keypoint RCNN Model
It is time to write the code for the Keypoint RCNN model that PyTorch provides. It is just two lines of code as PyTorch already provides the pre-trained model.
This code will go into the models.py Python file.
import torchvision

def get_model(min_size=800):
    # initialize the model
    model = torchvision.models.detection.keypointrcnn_resnet50_fpn(pretrained=True,
                                                                   num_keypoints=17,
                                                                   min_size=min_size)

    return model
The get_model() function accepts a min_size parameter which we will use while initializing the keypoint RCNN model.
We initialize the model at line 5. The Keypoint RCNN model has a ResNet50 backbone. Let’s discuss the arguments that we pass to it:
- First of all, we are using a pre-trained model.
- The
num_keypointsindicates the number of keypoints that we want for each detection. That default value is 17 as well. - And the
min_sizeargument defines the minimum value the image gets rescaled to before feeding it to the network. Using this, we can control the size of image being fed into the network. This in-turn has an effect on both, the prediction time and the quality of detections. We will discuss this later on in the video detection part.
This completes the model preparation code. Next, we will move on to keypoint and bounding box detections in images using PyTorch Keypoint RCNN.
Keypoint and Bounding Box Detection with PyTorch Keypoint RCNN in Images
First we will cover the keypoint and bounding box detections in images and then we will also do the same for videos.
All the code from here on will go into the keypoint_bbox_images.py Python script.
The following are the modules and libraries we will need.
import torch
import numpy as np
import cv2
import argparse
import utils

from PIL import Image
from torchvision.transforms import transforms as transforms
from models import get_model
Along with all the standard modules, we are also importing our own models, and utils modules.
Next, let’s construct the argument parser to parse the command line arguments.
# construct the argument parser to parse the command line arguments
parser = argparse.ArgumentParser()
parser.add_argument('-i', '--input', required=True,
                    help='path to the input data')
args = vars(parser.parse_args())
We have only the --input flag for images, which is the path to the input image.
Define the Image Transforms, Computation Device, and the Model
For the image transforms, we just need to convert the image to tensor and we are good to go.
# transform to convert the image to tensor
transform = transforms.Compose([
    transforms.ToTensor()
])
Coming to the computation device, it is obviously better if you have an NVidia GPU in your system. The GPU is not particularly necessary for the images part. But it will really help when doing inference on videos.
# set the computation device
device = torch.device('cuda' if torch.cuda.is_available() else 'cpu')
# load the modle on to the computation device and set to eval mode
model = get_model().to(device).eval()
In the above code block, we are also initializing the model, loading it onto the computation device, and putting it into evaluation mode.
Read the Image and Forward Pass Through the Model
For the inference, we will follow these steps:
- Read the image from disk and convert it into RGB color mode.
- Transform and normalize it for proper evaluation.
- Add an extra batch dimension and forward pass it through the Keypoint RCNN model to get the detections.
- Finally, draw the keypoints and bounding boxes using the
draw_keypoints_and_boxes()from ourutilsmodule.
The following code block contains all the above steps.
image_path = args['input']
image = Image.open(image_path).convert('RGB')
# NumPy copy of the image for OpenCV functions
orig_numpy = np.array(image, dtype=np.float32)
# convert the NumPy image to OpenCV BGR format
orig_numpy = cv2.cvtColor(orig_numpy, cv2.COLOR_RGB2BGR) / 255.
# transform the image
image = transform(image)
# add a batch dimension
image = image.unsqueeze(0).to(device)

# get the detections, forward pass the image through the model
with torch.no_grad():
    outputs = model(image)

# draw the keypoints, lines, and bounding boxes
output_image = utils.draw_keypoints_and_boxes(outputs, orig_numpy)
The final step is to show the output on screen and save it to the disk.
# visualize the image
cv2.imshow('Keypoint image', output_image)
cv2.waitKey(0)

# set the save path
save_path = f"../outputs/{args['input'].split('/')[-1].split('.')[0]}.jpg"
cv2.imwrite(save_path, output_image*255.)
Execute keypoint_bbox_images.py for Inference on Images
Our code for inference on images is ready. Open up your terminal/command line and cd into the src folder of the project directory.
We have three images in the input folder. Let’s start with image_1.jpg.
python keypoint_bbox_images.py --input ../input/image_1.jpg
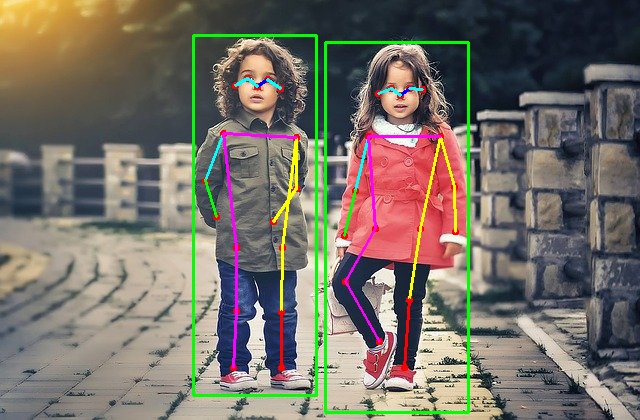
The model correctly detects all the keypoints and also the bounding box coordinates here. Although it was an easy one, still there is one point of interest. Take a look at the boy’s left hand keypoints. The model is able to detect the keypoint correctly even though his hand is hidden. Now, that is really good.
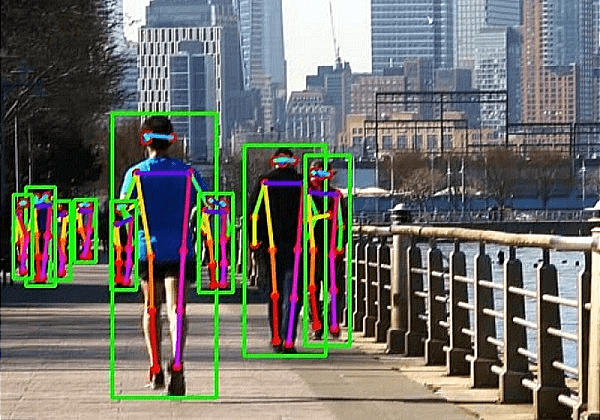
Moving on to the next image. This is slightly more complex.
python keypoint_bbox_images.py --input ../input/image_2.jpg
Wow! this is really amazing. Note that the image is not particularly bright or not every person is very clearly visible. Still, the PyTorch Keypoint RCNN model was able to detect 16 persons’ keypoints and bounding box coordinates correctly. Even though, the fourth person of from left is partially occluded, the model managed to detect its keypoints and bounding boxes also.
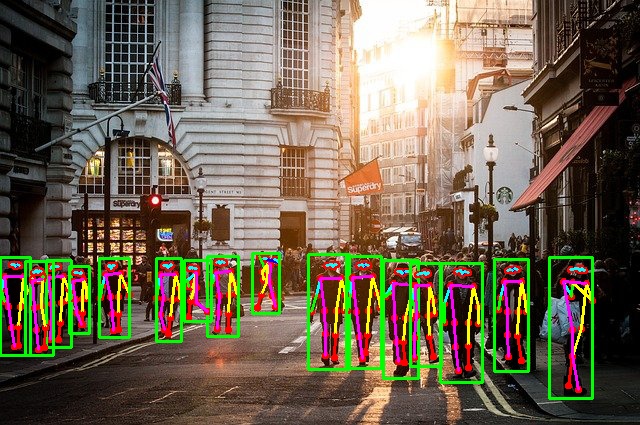
Okay, one final image. This is going to be a really tough one for the model.
python keypoint_bbox_images.py --input ../input/image_3.jpg
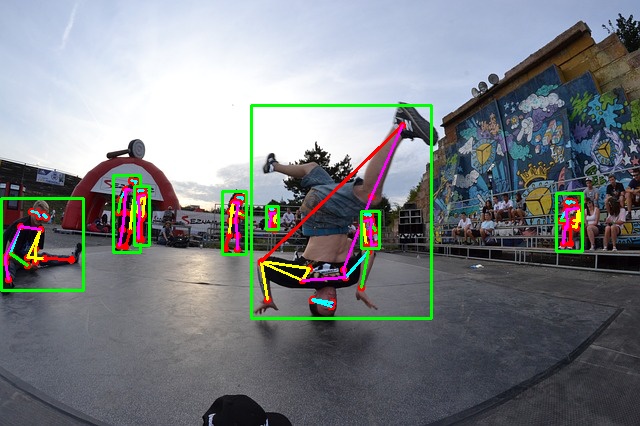
This is where the model goes a bit wrong. When the person in the middle is upside down, the model is unable to predict all the keypoints correctly. Most probably, the model has not seen many such images while training. The other detections in the image look correct.
Okay, now we have seen how the Keypoint RCNN model performs on simple and complex images. The results are really impressive, nonetheless.
Now, we will move into keypoint and bounding box detection with PyTorch Keypoint RCNN on videos.
Keypoint and Bounding Box Detection with PyTorch Keypoint RCNN on Videos
As of now, we have already seen how PyTorch Keypoint RCNN performs on images, for both, pose estimation and bounding box detection. Now, let’s see how it performs in real-time videos. The coding part will be similar to the images section, except, we just need to loop over the video frames.
All the code from here on will go into the keypoint_bbox_videos.py script.
We will need the following modules and libraries to execute the script.
import torch
import cv2
import argparse
import utils
import time

from PIL import Image
from torchvision.transforms import transforms as transforms
from models import get_model
We also need to construct the argument parser to parse the command line arguments.
# construct the argument parser to parse the command line arguments
parser = argparse.ArgumentParser()
parser.add_argument('-i', '--input', required=True,
                    help='path to the input data')
parser.add_argument('-m', '--min-size', dest='min_size', default=800,
                    help='path to the input data')
args = vars(parser.parse_args())
You can see that apart from the input file path, we have one additional flag here. That is the --min-size flag. Remember that the get_model() function of the models module accepts one min_size argument. We will control that argument value using the --min-size flag while executing the script. The important thing we want to analyze here is the speed of inference vs. performance (inference quality) when using different values for min_size.
Define the Image Transforms, the Computation Device, and the Model
The image transforms are going to be the same as in the case of images.
# transform to convert the image to tensor
transform = transforms.Compose([
    transforms.ToTensor()
])
We will just convert each frame into a tensor.
For the computation device, it is a lot better if you can run this script on a GPU rather than a CPU. Most probably, you will be able to run this on a CPU as well but the Frames Per Second will be very low.
# set the computation device
device = torch.device('cuda' if torch.cuda.is_available() else 'cpu')
# load the modle on to the computation device and set to eval mode
model = get_model(min_size=args['min_size']).to(device).eval()
Also, take a look at the get_model() function that we are invoking here. We are passing the min_size value that is parsed by the argument parser. This part is different from when we prepared our model for inference on images. Then we are loading the model into the computation device and putting it into evaluation mode.
Read the Video File
Now, we will read the video file from disk.
cap = cv2.VideoCapture(args['input'])
if (cap.isOpened() == False):
    print('Error while trying to read video. Please check path again')
# get the video frames' width and height
frame_width = int(cap.get(3))
frame_height = int(cap.get(4))

# set the save path
save_path = f"../outputs/{args['input'].split('/')[-1].split('.')[0]}_{args['min_size']}.mp4"
# define codec and create VideoWriter object
out = cv2.VideoWriter(save_path,
                      cv2.VideoWriter_fourcc(*'mp4v'), 20,
                      (frame_width, frame_height))
frame_count = 0 # to count total frames
total_fps = 0 # to get the final frames per second
At lines 29 and 30, we are getting the frame width and height that we use to prepare the VideoWriter() object at line 35. You can also see that we are dynamically changing the save_path for the VideoWriter() object according to the min_size argument. This will ensure that the resulting videos will not get overwritten for different runs.
Along with that we also initialize two variables, frame_count and total_fps. These two will keep track of the total number of frames iterated through and the total added FPS.
Loop Through the Video Frames and Get the Predictions
To get the predictions, we just have to loop through the video frames and carry the steps that we did in the case of images. In short, we will treat each frame as a single image.
# read until end of video
while(cap.isOpened()):
    # capture each frame of the video
    ret, frame = cap.read()
    if ret == True:

        pil_image = Image.fromarray(frame).convert('RGB')
        orig_frame = frame

        # transform the image
        image = transform(pil_image)
        # add a batch dimension
        image = image.unsqueeze(0).to(device)

        # get the start time
        start_time = time.time()
        # get the detections, forward pass the frame through the model
        with torch.no_grad():
            outputs = model(image)

        # get the end time
        end_time = time.time()

        output_image = utils.draw_keypoints_and_boxes(outputs, orig_frame)

        # get the fps
        fps = 1 / (end_time - start_time)
        # add fps to total fps
        total_fps += fps
        # increment frame count
        frame_count += 1

        wait_time = max(1, int(fps/4))

        cv2.imshow('Pose detection frame', output_image)
        out.write(output_image)
        # press `q` to exit
        if cv2.waitKey(wait_time) & 0xFF == ord('q'):
            break

    else:
        break
- You can see that after all the preprocessing steps, we are doing the forward pass at lines 57 and 58.
- We are calculating the start time and end time of predictions so that we can use them to calculate FPS later (lines 55 and 61).
- We are drawing the keypoints, skeletal structure, and the bounding boxes on the image at line 63.
- Then we are calculating the FPS at line 66, showing the resulting frame on screen at line 74, then writing the frames to disk.
- Finally, we just break out of the loop.
The final step is to release the VideoCapture() object and destroy all OpenCV windows.
# release VideoCapture()
cap.release()
# close all frames and video windows
cv2.destroyAllWindows()
# calculate and print the average FPS
avg_fps = total_fps / frame_count
print(f"Average FPS: {avg_fps:.3f}")
We are also calculating the average FPS and printing it on the terminal/command line.
This completes the code for inference on videos as well. We are all set to execute the script.
Execute keypoint_bbox_videos.py for Inferencing on Videos
We just have one video with us. So, we will test it with different min_size arguments. Let’s start with the default size of 800.
python keypoint_bbox_videos.py --input ../input/video_1.mp4 --min-size 800
With min_size of 800, the average FPS was around 3 on a GTX 1060. Yours will vary depending upon the compute capability and device. Obviously, this not real-time, at least not on a mid-range GPU. The following clip shows the result.
The detections are really good no doubt. In fact, the model is able to detect the persons on the far-right within the first few frames. Now, that was really amazing given how small and far they were appearing. But we can see a bit of flickering for the poses. This is most probably because many of the persons’ backs are towards the camera.
Now, let’s check with min_size of 300.
python keypoint_bbox_videos.py --input ../input/video_1.mp4 --min-size 300
This time the average FPS is around 6.8 on a GTX 1060.
The detection speed is a lot better this time but the prediction quality takes a hit. Many of the persons in the far back are not getting detected and the flickering is also more. This is a trade-off that we have to deal with when we consider whether we want good predictions or good speed on a mid-range GPU or an edge device.
Now, you can also try the video inferencing on other videos that you want. And maybe even post your findings in the comment section where other will also get to see know about your results.
Summary and Conclusion
In this article, you learned about detecting keypoints and bounding boxes on persons using the Pytorch Keypoint RCNN model. We also got to see how changing the input size affects the prediction quality and speed. I hope that you learned something new in this tutorial.
If you have any doubts, thoughts, or suggestions, then please leave them in the comment section. I will surely address them.
You can contact me using the Contact section. You can also find me on LinkedIn, and X.

Thank you sir, ANy help on ANPR shall be greatly appreciated.
Hi Raj. Surely, ANPR is on my checklist.
Sir,
I received the following error. How to rectify that
line 41, in draw_keypoints_and_boxes
tuple(rgb), 2, lineType=cv2.LINE_AA)
cv2.error: OpenCV(4.5.3) :-1: error: (-5:Bad argument) in function ‘line’
> Overload resolution failed:
> – Can’t parse ‘pt1’. Sequence item with index 0 has a wrong type
> – Can’t parse ‘pt1’. Sequence item with index 0 has a wrong type
Hi Alphonse. Looks like some data type mismatch issue. Can you please specify the PyTorch and Python versions you are using?
Hello,
I have a dataset where I generated random multiple shapes per image. I used your simple pipeline for object detection of these shapes and now using the keypoint from this code, I want to detect the keypoints.
How do I write this for the shapes?
edges = [
(0, 1), (0, 2), (2, 4), (1, 3), (6, 8), (8, 10),
(5, 7), (7, 9), (5, 11), (11, 13), (13, 15), (6, 12),
(12, 14), (14, 16), (5, 6)
]
kindly help.
It really depends what are keypoints of the dataset. I think if the dataset does not contain keypoint annotation then it will be difficult to define what the keypoints should be.