
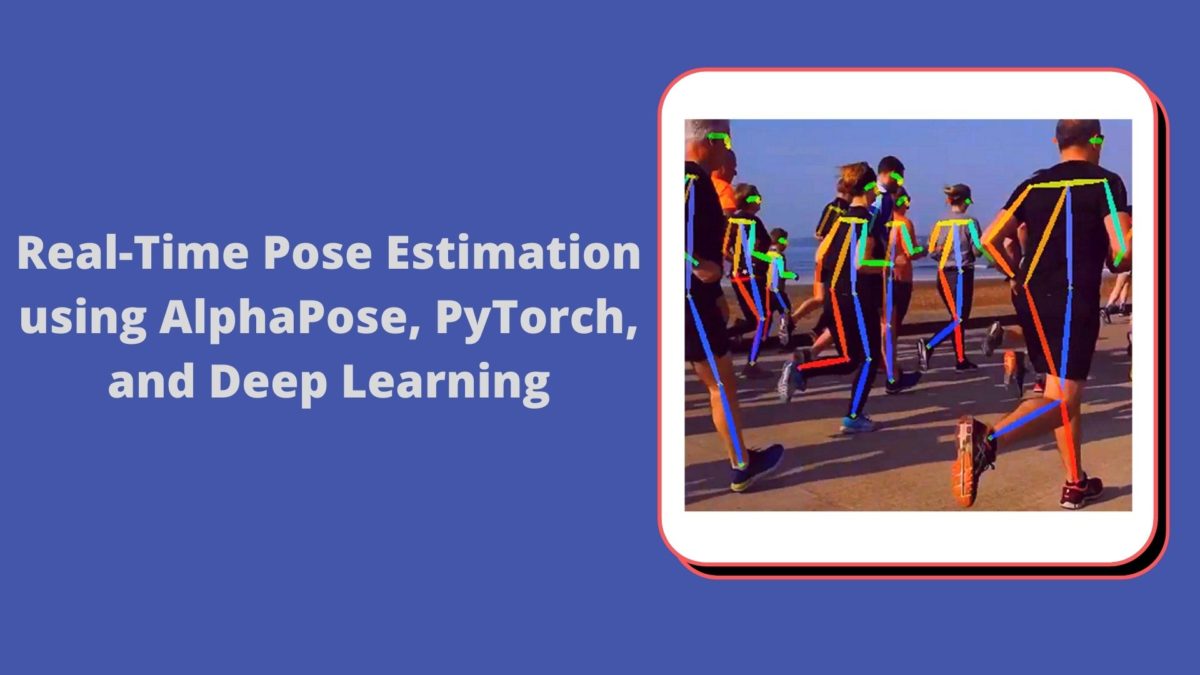
In this article, you will get to learn about real-time pose estimation using AlphaPose, PyTorch, and Deep Learning. In one of the previous tutorials, the readers got to learn about human pose detection using PyTorch and Keypoint RCNN. But using Keypoint RCNN has its problems. And the most important one is that it is not really very fast in estimating human poses in videos when using a mid-range GPU.

But now, we have AlphaPose, a deep learning based pose estimation system. It can easily run pose estimation on multiple humans in real-time in videos. You will get really good Frames Per Second even on a mid-range GPU. For example, take a look at the following clip.
Clip 1 is available on the official AlphaPose GitHub repository. It is really amazing to see that it can detect the poses of so many humans in a single frame.
So, what will we learn in this tutorial?
- We will get to know a bit more about the AlphaPose deep learning pose detection system.
- Then we will clone the official PyTorch branch of the AlphaPose GitHub repository and set up our systems to easily execute the scripts. I will guide you through some of the complicated parts.
- After that, we will see how well AlphaPose performs on videos containing multiple humans and complex movements.
The AlphaPose System, Architecture, and Model
We will go through the AlphaPose system and architecture in this section as provided in the original paper. The paper RMPE: Regional Multi-Person Pose Estimation was first published in December 2016 by Hao-Shu Fang, Shuqin Xie, Yu-Wing Tai, and Cewu Lu. Since then, the paper has been updated to a great extent and the performance has also increased. We will limit all our discussions as published here.
AlphaPose System and Architecture
Basically, the paper and experimentation aim to solve the problem of multi-person pose estimation in the wild. The main problem problem is that the a slightly wrong detection of humans also leads to wrong detection of poses.
The AlphaPose framework consists of three components:
- Symmetric Spatial Transformer Network (SSTN).
- Parametric Pose Non-Maximum-Suppression (NMS)
- And Pose-Guided Proposals Generator (PGPG).
The RMPE Pipeline
Let’s learn about the RMPE system by looking the pipeline image that is provided in the paper.
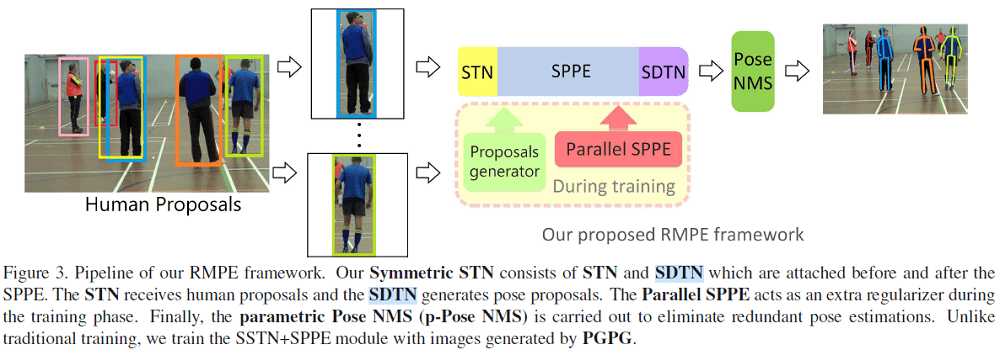
Let’s go through the above pipeline in steps.
- First, we have the bounding box proposals by the human detector. According to the paper, the authors used a VGG based SSD512 detector for detecting humans.
- These bounding box proposals are then fed into the Symmetric STN (Spatial Transformer Network) + SPPE module. This step generates the pose proposals.
- Now, we can also see a Parallel SPPE module in figure 2. This module is used during training to avoid the local minimums.
- The detected poses may also contain many redundant detections. To reduce these, the authors used a parametric Pose-NMS to eliminate the redundant poses.
- Also, to augment the training samples, the authors used a Pose Guided Proposals Generator (PGPG) during training.
Now, coming to some questions that may be arising in your mind.
- What is the SDTN in the pipeline?
- SDTN is the Spatial De-Transformer which remaps the estimated human poses to the original coordinates.
- How does the STN (Spatial Transformer Network) work?
- Well, the explanation of the architecture of STN requires its own article. Fortunately, I have two articles that you can read and learn about STNs in more detail. You may take a look at these two.
- Spatial Transformer Network using PyTorch.
- Reducing Image Distortion using Spatial Transformer Network.
The authors trained and benchmarked their neural network model on two multi-person datasets. They are the MPII and MSCOCO 2016 Keypoints Challenge dataset.
To know more about the results and get into more details, you may give the paper a read. We will not go into more details of the paper implementations here. Rather, we will focus more on the application and execution of the code.
The AlphaPose GitHub Repository
As mentioned earlier, we will clone the PyTorch branch of the AlphaPose repository, set up our systems, and then detect poses in humans.
This is the original AlphaPose branch on GitHub. But we will not be using this, Instead, we will be using this PyTorch branch which makes the work really easy for us.
Let’s go ahead and clone this repository.
Cloning the AlphaPose PyTorch Branch and Setting Up Our System
We will go over everything step-by-step. If you wish, you can also follow the instructions directly from the repository for cloning and installing. Else, you may follow along with me here.
Okay, the first step is to clone the GitHub repository. Use the following command for this.
git clone -b pytorch https://github.com/MVIG-SJTU/AlphaPose.git
Be sure to use a fresh directory for this tutorial. If possible, you may also create a completely new deep learning environment but that won’t be necessary for most.
The next step is to install the requirements using the requirements.txt file. But there is a catch here. The instructions say that the code works with torch version 0.4.0 and torchvision version 0.2.0. But I have tested everything on PyTorch version 1.6 and all works great. So, if you are using an existing deep learning environment, you do not want your PyTorch version to change. In that case, I would recommend that you manually install the remaining requirements as there are not many. In case, you are using a completely new environment for this, then execute the following command from the terminal/command line while being within the cloned repository directory.
pip install -r requirements.txt
That’s all we need for the cloning and installing of the required files.
Downloading the Pre-Trained Models
Now, that we have installed everything, we are ready to download the pre-trained models.
There are two models that we need to download. One is the object detector that is trained to detect humans. And the other one is the trained SPPE model (Single-Person Pose Estimator).
I hope that you remember that the authors used the SSD512 object detector with a VGG backbone as the human detector in their paper experimentations. Since then, the project has seen many improvements and we will be using the YOLO detector. They have provided the link to download the pre-trained model. You can also click here to download the model. After downloading this, place the yolov3-spp.weights in the models/yolo/ folder inside the cloned repository.
Now, coming to the SPPE model. Download the model from here, After that, place the duc_se.pth in the models/sppe/ folder.
These two are the models we need to detect human body poses using the AlphaPose framework.
The Input Data and Folder
Now, we will be using some of our videos for inference using the AlphaPose framework. We need a folder to keep the input videos. Along with that we need a output folder where all our resulting videos with the detected human poses will be stored.
For that, go ahead and create two folders in the clone repository directory. One is the input folder and the other one is the outputs folder.
After setting up everything, the directory structure will be similar to the following.
├───doc
├───examples
│   └───demo
├───input
├───models
│   ├───sppe
│   ├───ssd
│   └───yolo
├───outputs
├───PoseFlow
│   └───deepmatching
├───SPPE
│   ├───src
│   │   ├───models
│   │   │   ├───layers
│   │   │   │   └───__pycache__
│   │   │   └───__pycache__
│   │   ├───utils
│   │   │   ├───dataset
│   │   │   └───__pycache__
│   │   └───__pycache__
│   └───__pycache__
├───train_sppe
│   ├───data
│   │   └───coco
│   └───src
│       ├───.tensorboard
│       │   └───coco
│       │       └───test
│       ├───models
│       │   └───layers
│       ├───predict
│       │   └───annot
│       │       └───coco-minival-images-newnms
│       └───utils
│           └───dataset
├───yolo
│   ├───cfg
│   ├───data
│   └───__pycache__
└───__pycache__
In the above block, I have highlighted the input and outputs folder lines so that you can be sure that they are in the right place.
Coming to the videos that we will be using. You are free to use any video of your choice. If you wish to use the same videos as this tutorial, then download the zipped input file from below.
After downloading, extract all the files into the input folder that you have created. All the videos are taken from Pixabay.
This is all the setup we need for detecting human poses using the AlphaPose framework.
Real-Time Pose Estimation using AlphaPose, PyTorch, and Deep Learning
We are all set to execute the commands to detect human body pose in real-time using AlphaPose.
Open up your command line/terminal and cd into the cloned repository directory. We will be executing all the commands from here only and using the videos from the input folder.
Real-Time Pose Estimation on video1.mp4
Let’s run the code to detect poses using AlphaPose on video1.mp4.
python video_demo.py --video input/video1.mp4 --outdir outputs --save_video --sp
First, let’s go over all the command line arguments.
--video: This is the path to the input video file that we want to detect human poses on.--outdir: This is the directory where we want to save the resulting video file.--save_video: We provide this video so that the final rendered video will be saved to disk.--sp: For many users, while using PyTorch you may get an error if using multi-processing. This option ensures that a single process is used for PyTorch.
After executing the command, you will see output similar to this on your command line/terminal.
Loading YOLO model..
Loading pose model from ./models/sppe/duc_se.pth
100%|████████████████████████████████████████████████████████████████| 176/176 [00:22<00:00,  7.75it/s]
===========================> Finish Model Running.
===========================> Rendering remaining images in the queue...
===========================> If this step takes too long, you can enable the --vis_fast flag to use fast rendering (real-time).
The following is the rendered video that is saved to the disk.
The results are quite good, to be frank. Even with the fast motion of the dancer’s body, the pose estimations are very accurate. Still, we can see some wrong estimations when the two feet are up in the air. In that case, for some reason, the AlphaPose deep learning system is connecting those two points as well.
Real-Time Pose Estimation on video2.mp4
Now, let’s throw a multi-person video towards the AlphaPose system and see how the pose detections are.
python video_demo.py --video input/video2.mp4 --outdir outputs --save_video --sp
In clip 3, we can see that even with so many pose detections to handle, the AlphaPose deep learning system is quite accurate. It is easily giving all the correct pose estimations in almost all frames. Looks like the AlphaPose is working quite good for multi-person pose estimation.
Real-Time Pose Estimation on video3.mp4
Okay, now, a final challenge for the AlphaPose system. And this is going to be a real challenge.
python video_demo.py --video input/video3.mp4 --outdir outputs --save_video --sp
The following is the result.
Well, this is the one case, where the AlphaPose deep learning pose estimation system is failing. Although it is correctly estimating the poses of all the spectators, the pose estimations of the acrobat are very wrong when doing the tricks. To be fair, most probably, the models involved in the AlphaPose system would not have seen such poses during training. And this also means that we still have some challenges to solve in the world of deep learning based pose detections.
Summary and Conclusion
In this article, you learned about the AlphaPose deep learning real-time pose estimation system. Although we did not train our own model, still we got to see how well the model works while detecting multi-person poses in real-time. We also saw some cases where the AlphaPose system is failing. I hope that you are excited enough now to dive deeper into the world of deep learning based pose estimation. Maybe you will be able to improve many of the flaws that we found today.
If you have any doubts, thoughts, or suggestions, then please leave them in the comment section. I will surely address them.
You can contact me using the Contact section. You can also find me on LinkedIn, and X.

Hello,
I’m a Ph.D. student, and I’m following your wonderful explanations about machine vision. Several problems I have encounter and didn’t found any answers to yet:
1. How to deal with vision in a hard lightning environment? specifically, if I need to detect people in the street at night, where the street has ambient light, but it also affected from around shop windows (as in Manhattan)?
2. Can you write any blog about action recognitation? specifically, I’m interested in revealing actions during sports events.
Hello Eliran. I am glad that you have found my tutorials useful so far. Coming to your questions.
1. For low-lighting conditions, what I have observed is that you need to train the deep learning model to detect/classify objects/images in low-lighting conditions. You most probably need to collect very specific dataset for that. Although some models generalize better than others. But from experience I can tell that low lighting conditions are in general difficult to tackle unless specifically trained on.
2. There are two tutorials I can recommend for action recognition. Please check them out. I am sure they will help for getting started.
One is (you will be training your own model using PyTorch) => https://debuggercafe.com/action-recognition-in-videos-using-deep-learning-and-pytorch/
Second one (Using pre-trained model) => https://debuggercafe.com/human-action-recognition-in-videos-using-pytorch/
Hello, Sovit Ranjan Rath
Big thanks for such great article, i just have a question about requirements of alphapose.
I do not have a Nvidia GPU, i have AMD GPU instead.
Do i have any alternate way to run the alphapose on my laptop?
Thanks in advance.
Hello Mustafa. First of all, I am glad that you liked the post.
Now, coming to your point, I am afraid the PyTorch AMD is only available for ROCm architecture GPUs for now. Although you can try running the code on your laptop. It most probably will use the CPU and may not give a high FPS. But there is a high chance that it will work.
Hi i am facing error while running demo.py
storage = cls._new_shared_filename(manager, handle, size)
RuntimeError: No such file or directory at /pytorch/torch/lib/libshm/core.cpp:125
It seems like a PyTorch version issue. May I know which PyTorch version are you using?
Hello! My friends and I are trying to use alphapose following your steps, however we are getting stuck when trying to load the pre training. Could this be because “ntpath” wouldn’t install correctly for us? All of the other installs on the requirements.txt went fine.
Hello Will.
I need to check that again. I don’t exactly remember all the requirements. Need to run this manually again and then only I can confirm.
hi im trying to train model but i get this following error could I get an advice from you guys ?
Traceback (most recent call last):
File “D:\learning\Term 6\Tamol\Project\Clone\video_demo.py”, line 47, in
det_loader = DetectionLoader(data_loader, batchSize=args.detbatch).start()
File “D:\learning\Term 6\Tamol\Project\Clone\dataloader.py”, line 282, in __init__
self.det_model.cuda()
File “C:\Users\USER\AppData\Local\Packages\PythonSoftwareFoundation.Python.3.10_qbz5n2kfra8p0\LocalCache\local-packages\Python310\site-packages\torch\nn\modules\module.py”, line 905, in cuda
return self._apply(lambda t: t.cuda(device))
File “C:\Users\USER\AppData\Local\Packages\PythonSoftwareFoundation.Python.3.10_qbz5n2kfra8p0\LocalCache\local-packages\Python310\site-packages\torch\nn\modules\module.py”, line 797, in _apply
module._apply(fn)
File “C:\Users\USER\AppData\Local\Packages\PythonSoftwareFoundation.Python.3.10_qbz5n2kfra8p0\LocalCache\local-packages\Python310\site-packages\torch\nn\modules\module.py”, line 797, in _apply
module._apply(fn)
File “C:\Users\USER\AppData\Local\Packages\PythonSoftwareFoundation.Python.3.10_qbz5n2kfra8p0\LocalCache\local-packages\Python310\site-packages\torch\nn\modules\module.py”, line 797, in _apply
module._apply(fn)
File “C:\Users\USER\AppData\Local\Packages\PythonSoftwareFoundation.Python.3.10_qbz5n2kfra8p0\LocalCache\local-packages\Python310\site-packages\torch\nn\modules\module.py”, line 820, in _apply
param_applied = fn(param)
File “C:\Users\USER\AppData\Local\Packages\PythonSoftwareFoundation.Python.3.10_qbz5n2kfra8p0\LocalCache\local-packages\Python310\site-packages\torch\nn\modules\module.py”, line 905, in
return self._apply(lambda t: t.cuda(device))
File “C:\Users\USER\AppData\Local\Packages\PythonSoftwareFoundation.Python.3.10_qbz5n2kfra8p0\LocalCache\local-packages\Python310\site-packages\torch\cuda\__init__.py”, line 239, in _lazy_init
raise AssertionError(“Torch not compiled with CUDA enabled”)
AssertionError: Torch not compiled with CUDA enabled
Hello Sam. You will need to install PyTorch with CUDA support. Please check out the official installation page to choose the right command according to your hardware.
https://pytorch.org/get-started/locally/
thank you alot
sorry would you help me with this error too
xception in thread Thread-4 (update):
Traceback (most recent call last):
File “\lib\threading.py”, line 1016, in _bootstrap_inner
self.run()
File “C:\threading.py”, line 953, in run
self._target(*self._args, **self._kwargs)
File “dataloader.py”, line 675, in update
img = vis_frame(orig_img, result)
File\Clone\fn.py”, line 213, in vis_frame
polygon = cv2.ellipse2Poly((int(mX),int(mY)), (int(length/2), stickwidth), int(angle), 0, 360, 1)
TypeError: Can’t parse ‘axes’. Sequence item with index 1 has a wrong type
Try changing, stickwidth to int(stickwidth). So, finally, it will be
polygon = cv2.ellipse2Poly((int(mX),int(mY)), (int(length/2), int(stickwidth)), int(angle), 0, 360, 1)
I can’t thank you enough just my last problem is I have full json file with every img score on output folder but my avi file its only on frame there is a trick to fix that too?
Hello Sam. Are you saying that the JSON file contains scores but you want them on the frames as well?
the problem is my video file is not complete and don’t show to full video with alphapose diagrams like the one on the website ; but the json file is telling me all the frames get check and has its own score so i know the code is working,my only problem is with my output video that is not complete like the one on the website; its only 6Kb with one frame of the video
here is a link of my output for better understanding:
https://drive.google.com/file/d/1sGPnR73mxoC2jMaCATBl_19-gVovVAcG/view?usp=share_link
Hello Sam. Creating a new thread here.
I will need to take a look at the issue. Please allow me some time. It’s very difficult to conclude anything from the output.
today i was trying to make a video with the json file;
first problem was that i needed photos that get score in json file,to make a video of it ;so:
I try to use –image output and then put the images and the json file together for leading me to a video
but the code refuses to give me image instead of video with the error that my computer don’t support it
is there any similar project on github that i could use?
Maybe open pose will help you.
https://github.com/CMU-Perceptual-Computing-Lab/openpose
is there any help for this like what we got here
it’s very hard to understand this also can i ask for your help in these errors:
File “C:\\threading.py”, line 1016, in _bootstrap_inner
self.run()
File “\PythonSoftwareFoundation.Python.3.10_3.10.3056.0_x64__qbz5n2kfra8p0\lib\threading.py”, line 953, in run
self._target(*self._args, **self._kwargs)
File “dataloader_webcam.py”, line 423, in update
img = vis_frame(orig_img, result, img_width, img_height)
File “fn.py”, line 173, in vis_frame
cv2.circle(bg, (int(cor_x/2), int(cor_y/2)), 2, p_color[n], -1)
Hello Sam. I have not tried Open Pose before. Need to set it up and see what’s the issue.
How can i use it for real time from webcam ?. I mean i want to use it for tracking in real time with input from webcam or CCTV
Hello, to use the webcam, you will need to change the source code. Wherever it is reading the video from the command line, you need to do cv2.VideoCapture(0).
For CCTV, I am not very sure at the moment how to integrate with this code base.