
YOLOPv2 is a panoptic driving perception model for autonomous driving. It can carry out three different tasks. They are traffic object detection, drivable area segmentation, and lane detection (segmentation). This tutorial will take an entirely practical approach to YOLOPv2 PyTorch. We will carry out inference using the YOLOPv2 PyTorch pretrained model.
In the previous tutorial, we discussed the YOLOPv2 research paper. This included the model architecture, training strategy, parameters, hyperparameters, and results.
But we can learn even more by tinkering with the model and code. And the easiest way to do this is by using a pretrained model and running inference on a few images and videos. Thankfully, the authors of YOLOPv2 have made the demo script and the pretrained model open-source on GitHub. So, we can easily use it to fulfill all the experimental purposes that we wish for.
We will cover the following points in this tutorial:
- We will start with exploring the GitHub repository of YOLOPv2 a bit.
- Then we will use the Huggingface platform to run inference using YOLOPv2 on a single image.
- Next, we will move on to set up our local system for running inference using videos.
- While carrying out the inference, we will check out the following:
- FPS (Frames Per Second) on GPU.
- FPS on CPU.
- Detection and segmentation quality in different weather and lighting conditions.
- Finally, we can discuss some points on how we can improve the existing project even further.
Let’s jump into the tutorial now.
YOLOPv2 GitHub Repository
One of the best places to get the most out of any open source project is to explore their GitHub repository.
Just like any other YOLO model, YOLOPv2 also has one GitHub repository.
In this section, we will discuss a bit about the YOLOPv2 GitHub repository and what they provide.
As of writing this, the repository only provides the demo script for inference and the pretrained model. It does not yet contain the training scripts or the model architecture script.
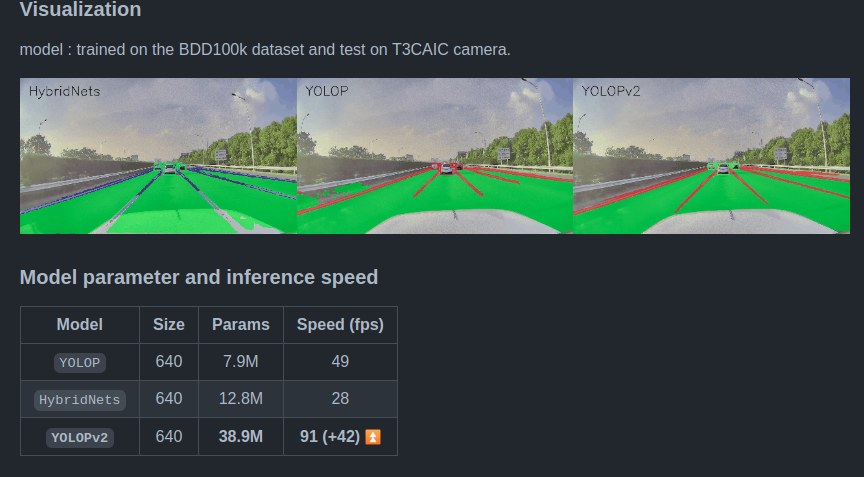
The repository also contains a detailed README file showcasing the training experiment results. The FPS and inference speed on the NVIDIA V100 GPU along with the output visualizations are also provided.
Checking it out is a good way to get familiar with the codebase.
For us, we will mostly need the pretrained model and demo.py script from GitHub. But we will discuss all that in detail when setting up the local system.
Download the Pretrained Model
You can click on the following link to directly download the YOLOPv2 pretrained model.
Download the YOLOPv2 pretrained model.
Further, we will see where to keep this model file in order to run inference locally.
YOLOPv2 Inference using Huggingface Spaces
The authors are also providing a Huggingface Spaces for running inference on images.
Before jumping into setting up our local system, it is a good way to know more about the kind of results we can expect on images using the web demo.
Let’s check it out.
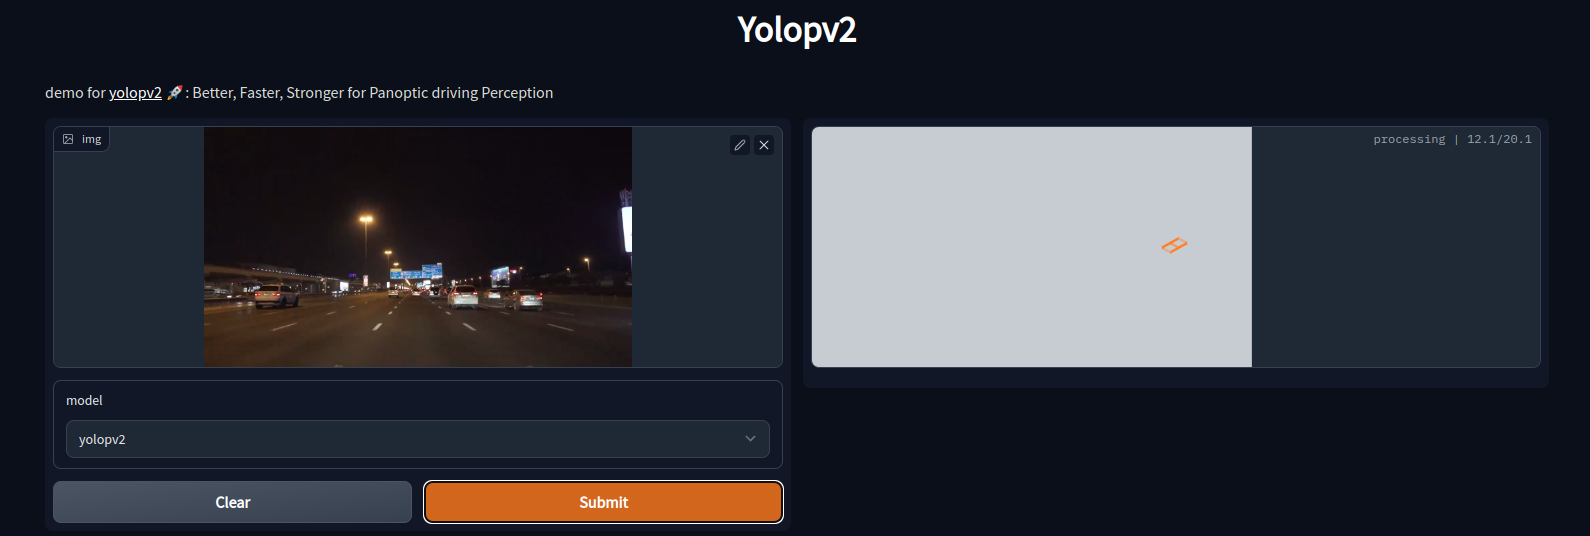
You can upload your own image or use the default image that is provided. The web demo screen should look similar to the following after uploading an image.
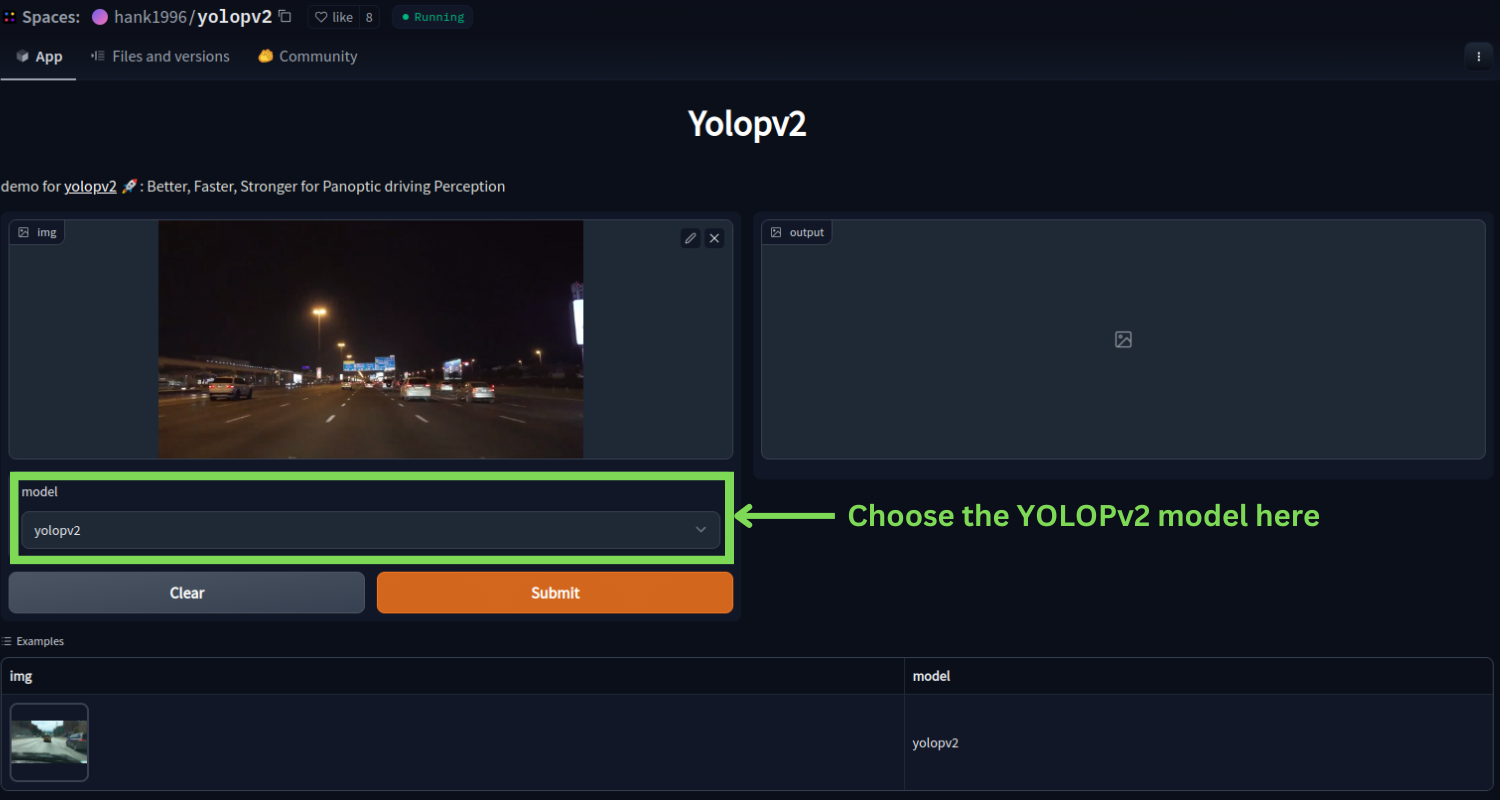
After uploading your own image, don’t forget to choose the yolopv2 model from the model dropdown selection. For experimentation purposes, the authors provide the yolop model option as well. But here, we are interested in the yolopv2 model.
Then you can click on the submit button and the prediction will start running. It will look like the following.
After a few seconds, you should get to see the output.
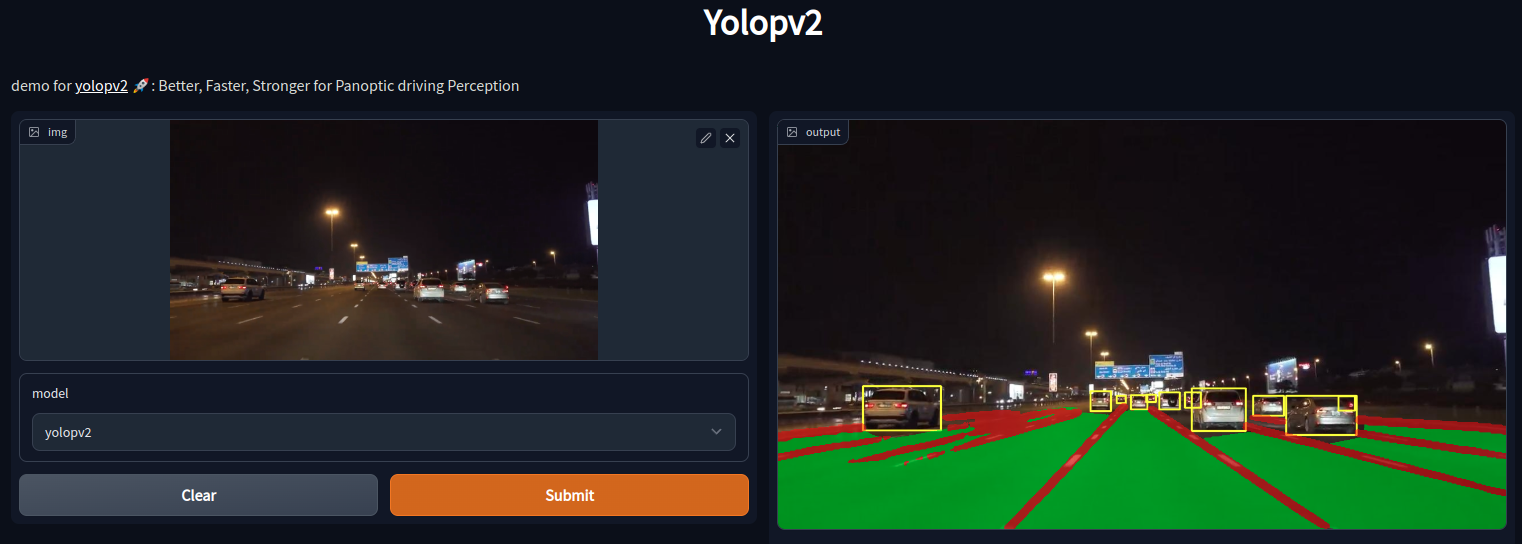
The results shown in the above image from YOLOPv2 inference look pretty good. At first sight, it appears that the model works well even in low-lighting conditions. But we will be able to draw more conclusions when running inference on videos. For that, we will need to set up our local system.
Directory Structure of the Project
Before we set up the local system for running YOLOPv2, let’s check out how the directory structure should be.
.
├── input
│   ├── image_1.png
│   ├── video_1.mp4
│   ├── video_2.mp4
│   ├── video_3.mp4
│   └── video_4.mp4
└── YOLOPv2
    ├── data
    │   ├── demo [15 entries exceeds filelimit, not opening dir]
    │   ├── log
    │   │   ├── results.txt
    │   │   └── test.log
    │   ├── weights
    │   │   ├── model.txt
    │   │   └── yolopv2.pt
    │   └── example.jpg
    ├── runs
    │   └── detect
    │       ├── gpu_outputs
    │       │   ├── image_1.png
    │       │   ├── video_1.mp4
    │       │   ├── video_2.mp4
    │       │   ├── video_3.mp4
    │       │   └── video_4.mp4
    │       ├── video_1_output
    │       │   └── video_1.mp4
    │       └── video_1_output2
    │           └── video_1.mp4
    ├── utils
    │   ├── __init__.py
    │   └── utils.py
    ├── custom_demo.py
    ├── demo.py
    ├── LICENSE
    └── requirements.txt
- Directly inside the project directory, we have the
inputdirectory. This can contain any images or videos that we want to run inference on. You may keep your own videos that you want to run inference on in this directory. - Then we have the cloned
YOLOPv2repository (directory). Thedata/weightsdirectory should contain the pretrained model. So, you can now copy theyolopv2.ptfile that we downloaded earlier and keep it in this folder. - The
runsdirectory will store any inference that we run. - The
utilsdirectory contains a utility script that is essential for running inference. - You can observe that we have a
demo.pyand acustom_demo.pyfile. Thedemo.pyfile is the original one that comes with the repository. But we will use a slightly modified version for which the code is present in thecustom_demo.pyfile. It is an almost exact copy of the original with a few minor changes.
When downloading the zip file for this tutorial, you will get access to the custom_demo.py script. You will just need to copy and paste it into the YOLOPv2 directory after cloning it.
Setting Up the Local System for Running Inference using YOLOPv2
Now, let’s set up the local system for YOLOPv2. It’s going to be pretty straightforward.
It is always better to create a new environment for a new project. So, I recommend creating a new Anaconda environment or Python virtual environment, whichever you prefer.
Download Code
Clone the Repository
The first step is to clone the repository.
git clone https://github.com/CAIC-AD/YOLOPv2.git
Enter the YOLOPv2 Directory
cd into the YOLOPv2 directory that we just cloned.
cd YOLOPv2
Install the Requirements
Finally, we just need to install all the requirements using the requirements.txt file.
pip install -r requirements.txt
It will take some time to install and after that, we are all set to run inference locally.
Inference using YOLOPv2 and PyTorch
Don’t forget to download the pretrained model from here and put it inside data/weights directory inside the YOLOPv2 directory.
As discussed before, we will use the custom_demo.py script for running inference. This script is almost the same as the original demo.py script with the following important changes:
- The inference output will be displayed on the screen when executing the script.
- The script also annotates the current frame’s FPS and prints the average FPS at the end.
These minor changes help us keep track of the visual results as well as the FPS.
For the inference experiments, we have videos with:
- Different lighting conditions.
- Different weather conditions.
- Heavy traffic.
- A scene from Indian road.
All of these will help us check how capable YOLOPv2 is at detecting traffic objects, segmenting the drivable area, and detecting lanes.
The results shown in this tutorial were obtained on a machine with:
- 10GB RTX 3080 GPU.
- 10th generation i7 CPU.
- 32 GB RAM.
YOLOPv2 Inference on GPU
Let’s start with the GPU inference.
For running the inference script, we can either provide the path to a single video file, or an entire directory containing all the video files.
Note: All the inference commands are run in a terminal within the YOLOPv2 directory.
The following command shows how to run the inference on a single video.
python custom_demo.py --source ../input/video_1.mp4 --device 0 --name video_1_output
We use the following command line arguments:
--source: This indicates the path to the source video or image.--device: We can pass the GPU device number (0,1,2, or3) orcpudepending on whether we want to run the inference on the CPU or the GPU. Here, we are running the inference on the GPU.--name: This will create a directory insideruns/detectwith the string that we pass to this argument for storing the results. It’s easier to track the results by providing a different name each time.
Before checking out the results, let’s run the inference on all the videos. We can do that simply by providing the path to the entire directory containing all the videos.
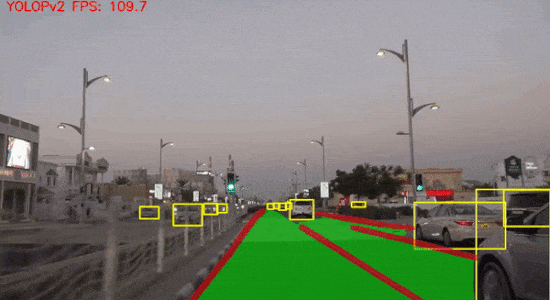
python custom_demo.py --source ../input/ --device 0 --name gpu_outputs
For all four videos, we are getting an FPS of 109.7 on the NVIDIA RTX 3080 GPU.
Now, it’s time to check the results.
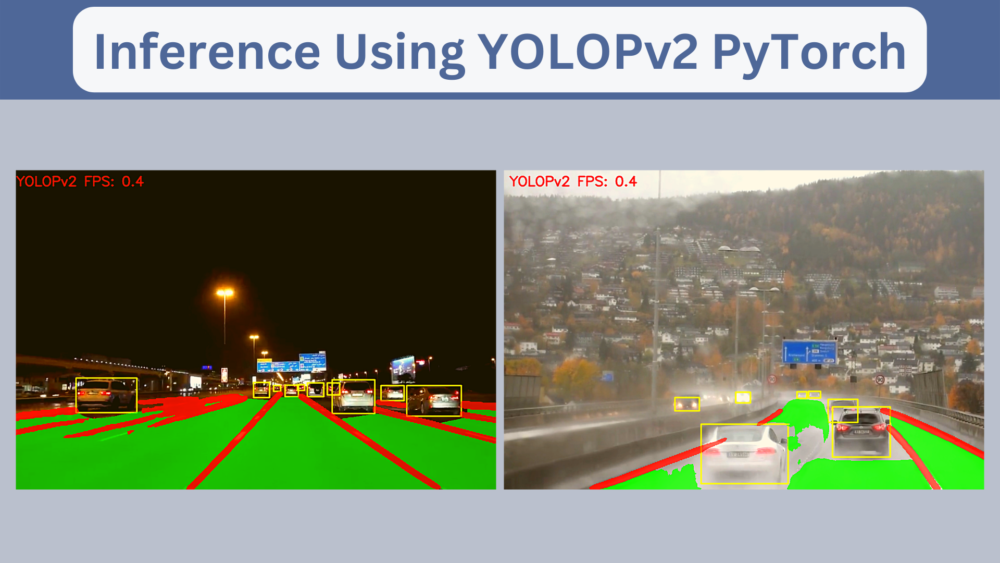
YOLOPv2 Inference Results in Heavy Traffic
The first thing that the eyes go to is the FPS. We are getting well over 100 FPS on every frame and sometimes 110 FPS as well. This is on par with what the authors publish in the paper. They report 91 FPS on average on a V100 GPU.
Coming to the detection results. The model is able to detect vehicles in both lanes. It is also able to detect vehicles that are much farther away. Moreover, taking a look at the left side of the road, we can infer something more. It is not a drivable area from the current car’s point of view. And the model is also not segmenting that part of the road as a drivable area. This also lines up with what the authors report in the paper.
Further, it is able to detect the lane lines pretty accurately apart from the places where they are very close. In those scenarios, they are merging with each other a bit.
YOLOPv2 Inference Results in Rainy Weather
YOLOPv2 is performing really well here. It’s true that there are false detections for traffic objects. But if you have gone through the previous two posts of YOLOP and HybridNets, then you will observe that YOLOPv2 is giving the best predictions among the three.
For the same videos, HybridNets comes close but has more false detections for the traffic objects. At least for this particular video, YOLOPv2 seems to be the best. The YOLOP (v1) results are not as good as either HybridNets or YOLOPv2.
YOLOPv2 Inference Results in Low Light Conditions
The above are the results from an evening-time driving video. Here also YOLOPv2 predicts the drivable area and lanes almost perfectly.
It is detecting some of the red sign boards on the right as traffic objects, but that may be due to the low lighting condition.
YOLOPv2 Inference Results on India Road and Dashboard View
This final video is particularly challenging. First of all, the BDD100K dataset does not contain any images from Indian roads. Some images may resemble similar conditions but it is still going to be a challenge for the model. Secondly, all the previous videos were dashcam videos. This one shows a recording within the car itself.
Some of the limitations of the model are quite apparent here. It is detecting the rearview mirror as a traffic object in this case. Also, it is not able to detect motorbikes as traffic objects. The reason for this is that mostly for YOLOPv2, YOLOP, and HybridNets training, the authors consider car, bus, truck, and train from the BDD100K dataset as the traffic objects. If we want the model to detect motorbikes as well, we will need to retrain it with an additional class.
But that does not mean that the above detections are bad. There will always be limitations in every deep learning model. Continuous improvement will surely make it better.
YOLOPv2 inference on CPU
For one final experiment, we will run the inference on the CPU. This is mostly to check the FPS that we can expect when a GPU is not available.
Following is the command.
python custom_demo.py --source ../input/video_1.mp4 --device cpu --name cpu_output
To run the inference on the CPU, we just need to change the --device flag to cpu.
Here are the results.
The detections remain the same. But this time, we are getting around 5.2 FPS on average. This is not a lot but again, this model is meant to leverage the power of GPU.
The YOLOPv2 CPU speed is almost the same as the YOLOP ONNX models when running on CPU runtime.
Takeaways and Further Improvements
In the above experiments and results, we were able to observe where the model excels and where it makes mistakes.
To improve the model:
- We can add more rainy weather images to the dataset.
- Add more night-time images.
- Also, add more traffic objects, like motorbikes.
But this means combining a few different datasets which may not be a simple job. The model needs to be retrained as well.
If you carry out any of the experiments, do share your results in the comment section.
Summary and Conclusion
In this tutorial, we took a practical approach to YOLOPv2. We started by checking out the Huggingface Spaces web demo. Then we saw how to set up the local system for inference. Next, we ran several inference experiments using the YOLOPv2 model under various traffic, weather, and lighting conditions. I hope that this post was helpful to you.
If you have any doubts, thoughts, or suggestions, please leave them in the comment section. I will surely address them.
You can contact me using the Contact section. You can also find me on LinkedIn, and X.

Thank you so much for your tutorial! It’s a big help! When using the model, how do you get the x/y screen positions for the drive-able space and lane?
Most probably, it would be stored in one of the output variables. But I cannot remember it exactly now as it has been some time since I wrote this post. I may have to check it out.
Hello, and thanks fort this well explained tutorial !
I slightly modified the code in order to display the class of the detected objects, and found that class is always #3 (that is, “motorcycle” for COCO dataset). Did you experience the same behavior or did I make something wrong ?
Thanks for your feedback !
The YOLOPv2 model is trained on the BDD100K dataset. If you are mapping from COCO class indices, then it will be wrong.
Hello. Thank you for letting me know a good way. Can I know how to process it in real time using a webcam?
If possible, I want to run it with Python code instead of commands. Thank you.
Hello.
Instead of providing a video file to –source, go into the script and just input 0 where the video is being read.
Just look for cv2.VideoCapture() and make it cv2.VideoCapture(0). That should use the webcam.
Thank you for your interest and quick response to the question.
But according to your answer
utils/utils.Replace self.cap = cv2.VideoCapture(path) with self.cap = cv2.VideoCapture(0) on the 467th line of py,
in the command window
python custom_demo.py –source 0 –device 0 –name RealTime
I tried typing it
It didn’t work.
Is there anything I missed?
Thank you for reading it.
*Camera is connected normally.
If you are already changing the Python code, you do not need to provide
–source 0.
This will cause issues. Just do cv2.VideoCapture(0) and it should run fine.
Thank you! Thanks to your help, we are able to process it in real time.
Can I ask you more questions later?
Hello, may I ask how to make the specific modifications and where they need to be made.I reported an error:Exception: ERROR: D:\YOLOPv2-main\0 does not exist
Sorry, I am still using the original demo file. I have successfully run it. Thank you very much!
Hello! I am currently having the same issue, I have changed the cv2.VideoCapture(path) to cv2.VideoCapture(0), however i encounter the same problem as songqi,Exception: ERROR: /home/jy/YOLOPv2/0 does not exist. I also noticed in the demopy, def make_parser(): (‘–source’, type=str, default=’data/example.jpg’, help=’source’), thus i changed the default=’0′ but i still get the same error
Hello PYPY.
Creating a new thread as the older one was maxed out for replies.
I am glad that I was of help.
Sure, you can ask more questions later.
Hello. How are you. Last time I asked you about real-time implementation through code. Instead of entering a command in the terminal, you want to run it through a different py file. Can I get a way?
command: python custom_demo.py –source RANDOM.mp4 –device 0 –name RealTime
Hi. I have not modified the code yet. By real-time do you mean you are looking for more FPS during inference?
Or is it something else that you are asking for?
Hi, I’m currently importing models by entering commands into the terminal and doing real-time inference. But instead of typing in the terminal.I want to modify the command in the .py file and make it enter. I think this is a simple problem, but I’m a basic beginner and I can’t solve it. So I ask you for help. Thank you.
Hello. I am a bit confused. Please clarify.
In the blog post, we do not control the model from the terminal. We just give the input video through the terminal. Is it something else that you are trying.
Hello! I am currently having the same issue, I have changed the cv2.VideoCapture(path) to cv2.VideoCapture(0), however i encounter the same problem as songqi,Exception: ERROR: /home/jy/YOLOPv2/0 does not exist. I also noticed in the demopy, def make_parser(): (‘–source’, type=str, default=’data/example.jpg’, help=’source’), thus i changed the default=’0′ but i still get the same error
Hello jy. In this one,
(‘–source’, type=str, default=’data/example.jpg’, help=’source’), thus i changed the default=’0′
Can you please change type=str to type=int, and default=’0′ to default=0
Let me know.
Hi, is the tracking algorithm useful in yolopv2? Also would it be difficult to implement velocity detection and distance detection based on your algorithm?
Hello Bob. Tracking would surely be useful for something like YOLOpV2 as it detects vehicles in real-time.
To implement velocity and distance algorithms, most probably you will need to modify the source code of the repository.
Thank you very much. Further, I would like to know what kind of tracking algorithm is used in YolopV2?
YOLOpv2 does not use any tracking algorithm implicitly. However, it will be really interesting to add one. Maybe I can write a post on that.
Thanks for your patience. I’m looking forward to your new work. Also, is the code currently provided to train YOLOpv2 on my own data set?
Hello Bob. Creating a new thread here.
This blog post only covers the inference part. However, it is surely possible to train the model on a new dataset. But I will need to figure it out how to do so.
I see. Thank you very much.
Welcome.
Thanks Sovit for the insightful post. I am working on a traffic management project, where I need to detect the road stopline (a short white version of the lane-line). This will enable me to detect vehicles crossing this stopline when the stopsign is detected. Is there a way/method you think I could use to categorize the detected lines. I have checked the source code, but couldnt figure out how to achieve this.
Hello Raheem. Most probably this pretrained model won’t help you much in accomplishing your task. However, fine-tuning an instance segmentation model like MaskRCNN may help you. I think this post will give you some ideas => https://debuggercafe.com/lane-detection-using-mask-rcnn/
can we calculate the width of the lane using yolopv2? if yes how can we do it
There is no direct way, Vipin. Because YOLOpv2 does not provide those dimensions. However, we can do some post processing upon the generated mask.
Once we get the mask from YOLOpv2, we can use OpenCV’s findContours method to get the contour and then the bounding box around it using boundingRect. This will give x, y, w, and h
width meaning the distance between two red lines.I can only find the thickness of the lane(red line) by the method you suggested. Can you tell me how can we calculate distance between two red lines?
I think applying the same contour technique to the green area (road) will give the width of the road, Vipin. Please let me know if I am understanding it wrongly.
I got it. thank you very much.
Welcome.
How can I ensure my model’s output resolution matches the input resolution? Currently, when I provide a 1080×720 input, the model returns a 1280×720 output. Because the lane line coordinates (masks) are generated based on the 1280px width, they are misaligned when plotted back onto the original 1080px image. Is there a way to force the output to maintain the original aspect ratio and dimensions to prevent this coordinate shift?
Hello Om. Even though the frame gets resized internally, the overlaying should follow the resizing criteria as well. I wrote this article a long time ago. Might need to check the code again. Is it possible to send the video to me via email so that I can test?
yes we can talk on mail and i can send u the image
what is ur email i cant find it on the site
got it.
Ok. Please send it. I will take a look.
i have sent it. pls check and reply.
Will check. I have replied with a question. Can you please revert back in email.