
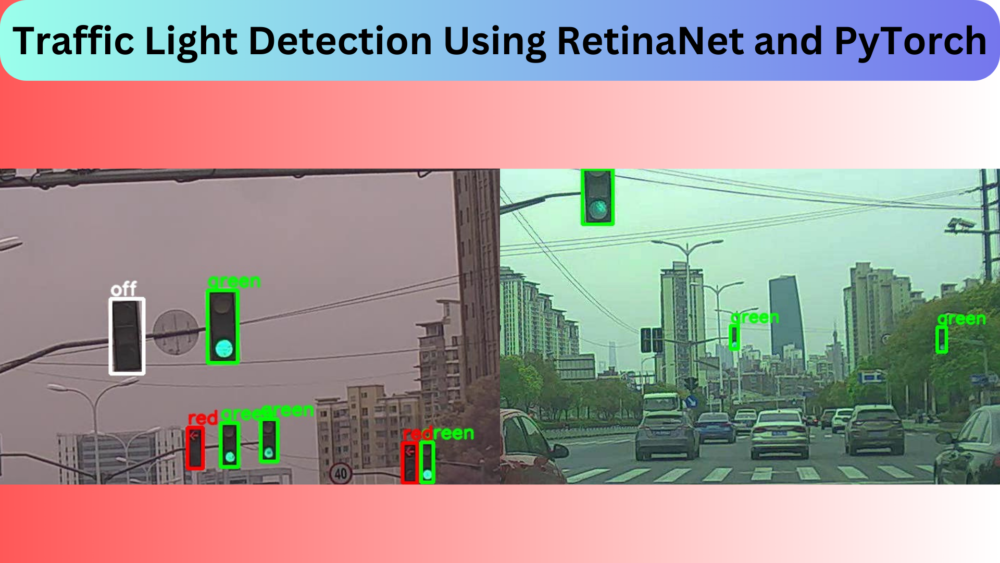
Traffic light detection is a complex problem to solve, even with deep learning. The objects, traffic lights, in this case, are small. Further, there are many factors that affect the detection process of a deep learning model. A proper training process, of course, is going to help to detect the model in even complex environments. In this article, we will try our best to train a traffic light detection model using RetinaNet and PyTorch.
Along the way, we will lay out the difficulties in the dataset, the process to train the RetinaNet model, and what worked and what did not work.
Before getting into the details of the article, here are the points that we will cover:
- We will start with a discussion of the traffic light dataset. This will include visualizing the ground truth images in various conditions as in the dataset.
- We will follow this with a discussion of the dataset preparation code, followed by model preparation and training.
- After training, we will run inference on new videos that are not part of the dataset. This will give us a proper idea of the capability of the trained model.
- Next, we will discuss what worked and what did not work during the training process.
- In the end, we will discuss some of the further steps that we can take to make this project even better.
We will discuss only the important coding parts in this article as it is not possible to cover the entire training pipeline in a single article. However, the entire code to train the model and run inference will be available via the download section. Further, this article may not achieve the best results but will go on to show what is the minimum effort required to get decent results on such difficult datasets.
The Traffic Light Detection Dataset
To train the RetinaNet model, we will use the S2TLD traffic light detection dataset. The original dataset was published by Thinklab@SJTU on GitHub under the MIT license. But because the download links sometimes may not work, I created a public dataset on Kaggle as well.
If you intend on doing the training experiments on your own system, please download the S2TLD_720x1280 Traffic Light Detection dataset.
Upon extracting, you should see the following directory structure.
S2TLD_720x1280
├── class.txt
├── normal_1
│   ├── Annotations
│   └── JPEGImages
└── normal_2
    ├── Annotations
    └── JPEGImages
The class.txt file contains the class names. There are 4 classes in this version of the dataset indicating the status and color of the traffic lights.
- red
- yellow
- green
- off
Further, the normal_2 directory contains 3785 samples and the normal_1 directory contains 779 samples. So, we will treat them as training and validation splits respectively.
All the images are 1280×720 in resolution and the annotations are in XML format.
Analysis of the S2TLD Traffic Light Detection Dataset
Let’s visualize some of the traffic light images along with their ground truth annotations. This will give us a better idea of the environment and challenges in the training images.
The above figure shows the annotations of all 4 classes. We can see that the objects are small in almost all cases. Also, the yellow and red traffic lights look a lot similar. Further, the images are taken at varying times of day. So, the environmental color also keeps changing.
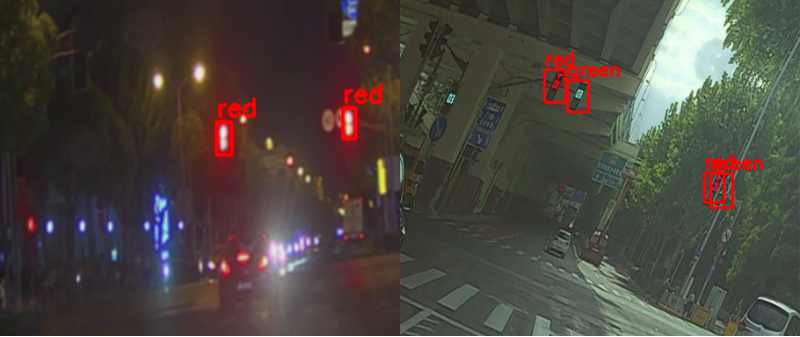
Also, take a look at the following night-time image.
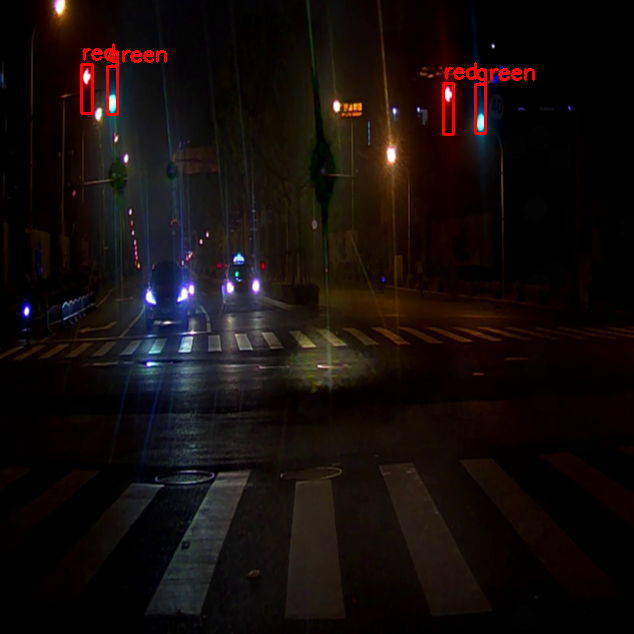
It is clear that the reflections and brake lights of vehicles make this even more challenging. As per the original repository, these are some of the factors that make this dataset challenging:
- Busy street scenes
- Dense stop-and-go traffic
- Strong changes in illumination/exposure
- Flickering/fluctuating traffic lights
- Multiple visible traffic lights
- Image parts that can be confused with traffic lights (e.g. large round tail lights)
Our training pipeline will have to be robust enough so that model is able to learn even in these scenarios.
Directory Structure for Traffic Light Detection using RetinaNet
Here is the entire directory structure for traffic light detection using RetinaNet.
├── inference_outputs
│   └── videos
├── input
│   ├── inference_data
│   └── S2TLD_720x1280
├── notebooks
│   └── visualizations.ipynb
├── outputs
│   ├── best_model.pth
│   ├── last_model.pth
│   ├── map.png
│   └── train_loss.png
├── config.py
├── custom_utils.py
├── datasets.py
├── eval.py
├── inference.py
├── inference_video.py
├── model.py
└── train.py
- The
inference_outputsdirectory will contain all the inference results for traffic light detection that we will carry out using the trained RetinaNet model. - The
inputdirectory contains the training dataset as well as the inference data. We have already seen the structure of the training data in the previous section. - We also have a notebook for visualizing the data in the
notebooksdirectory. - The
outputsdirectory contains all the outputs from the training. - Directly inside the parent project directory, we have 8 Python files. We get into the details of the necessary ones in the next section.
All the training and inference scripts and trained weights are provided via the download section of the article. If you wish to run the training experiments yourselves, please download the dataset before moving ahead.
PyTorch Version
This code base uses PyTorch 2.0.1. However, any version starting from 1.12.1 should work without issues.
Traffic Light Detection Using RetinaNet
Let’s jump into some of the important coding sections of the article.
Download Code
The Configuration File
First is the configuration file, i.e., config.py. This file defines some of the important training and dataset related parameters. These include:
- Batch size
- Resize shape for images
- Number of epochs to train for
- Number of workers for parallel processing of data
- Image and annotations directory paths for training & validation
- The classes in the dataset
- Also the root path for the output directory
import torch

BATCH_SIZE = 8 # Increase / decrease according to GPU memeory.
RESIZE_TO = 640 # Resize the image for training and transforms.
NUM_EPOCHS = 75 # Number of epochs to train for.
NUM_WORKERS = 4 # Number of parallel workers for data loading.

DEVICE = torch.device('cuda') if torch.cuda.is_available() else torch.device('cpu')

# Training images and XML files directory.
TRAIN_IMG = 'input/S2TLD_720x1280/normal_2/JPEGImages'
TRAIN_ANNOT = 'input/S2TLD_720x1280/normal_2/Annotations'
# Validation images and XML files directory.
VALID_IMG = 'input/S2TLD_720x1280/normal_1/JPEGImages'
VALID_ANNOT = 'input/S2TLD_720x1280/normal_1/Annotations'

# Classes: 0 index is reserved for background.
CLASSES = [
    '__background__', 'red', 'yellow', 'green', 'off'
]

NUM_CLASSES = len(CLASSES)

# Whether to visualize images after crearing the data loaders.
VISUALIZE_TRANSFORMED_IMAGES = False

# Location to save model and plots.
OUT_DIR = 'outputs'
Here, we are using a batch size of 8 and resizing the image to 640×640 resolution before feeding them to the RetinaNet model. If you run the training on your own system and run out of GPU memory (OOM), please reduce the batch size and continue further.
The Dataset Preparation Process
The datasets.py file contains all the dataset preparation code. One of the important aspects of dataset preparation is the augmentations for object detection. We define the augmentations in the custom_utils.py file.
We apply the following augmentations to the training set.
- HorizontalFlip
- Rotate
- RandomBrightnessContrast
- RandomGamma
- RandomFog
We use albumentations to apply the augmentations to the images. From the above, Gamma, Fog, and Contrast augmentations will replicate the real life scenarios to some extent. We can execute the datasets.py file to visualize the augmented images. Here are some examples.
python datasets.py
The above figure also gives us a perspective of how difficult the images can become in low-light settings.
You may also notice that we avoid any type of color augmentations. Traffic light detection relies heavily on the color of the lights as well. Color augmentations may affect the learning process of the model, especially to differentiate between red and yellow lights. Dataset preparation in deep learning is highly subjective to the data at hand and this is one such example.
The Training Script
The training script, train.py in our case, is the driver script that we will execute to start the training. This script:
- Defines the training and validation functions
- Initializes the datasets and data loaders
- Defines the optimizer
We are using the SGD optimizer with an initial learning rate of 0.001 and momentum of 0.9. Additionally, we also use the Step Learning Rate Scheduler to reduce the learning rate by a factor of 10 after 50 epochs.
Note: All training and inference experiments were carried out on a system with 10 GB RTX 3080 GPU, 10th generation i7 CPU, and 32 GB of RAM.
We can execute the following command to start the training for 75 epochs. We will monitor the mAP metric for saving the best model.
python train.py
The model reached the highest mAP of 44.696% on epoch 48. We can also run evaluation on the validation set using the best weights and should get the same numbers. The eval.py script runs the evaluation by taking the input directory and annotations path as arguments.
python eval.py --input-images input/S2TLD_720x1280/normal_1/JPEGImages/ --input-annots input/S2TLD_720x1280/normal_1/Annotations/
100|██████████████████████████████| 98/98 [00:19<00:00,  4.92it/s]
mAP_50: 81.813
mAP_50_95: 44.696
Analyzing the mAP Graph
Here is the mAP graph that we obtained from the training of the RetinaNet model on the traffic light detection dataset.
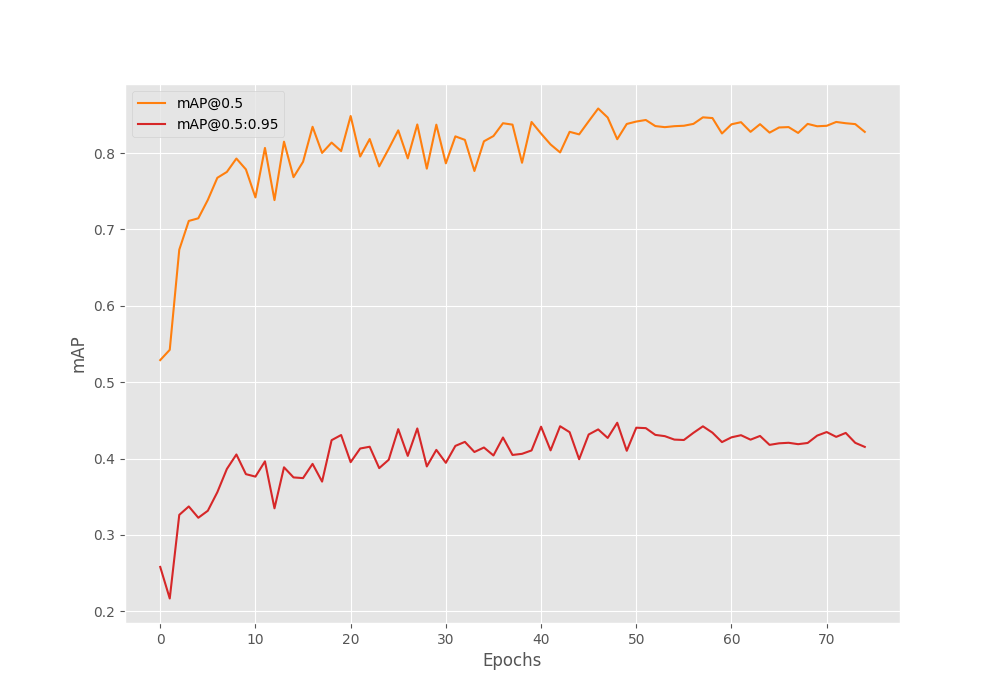
It seems that the model did not improve after the learning rate scheduler was applied. In fact, it feels like the performance stagnated after the scheduling. Maybe the training could have gone a bit longer with applying the learning rate scheduler.
This shows that deep learning training is subject to a lot of experiments.
Our next task is to run inference on images and videos.
Running Inference on Images
As we have the RetinaNet model trained on the traffic light detection dataset, let’s run some inference experiments. We will start with the image inference on the validation images and compare them with ground truth images.
We will use the inference.py script to run inference on images.
python inference.py --input input/S2TLD_720x1280/normal_1/JPEGImages/
The --input command line argument accepts the path to the directory containing images. By default, the score threshold is 0.25.
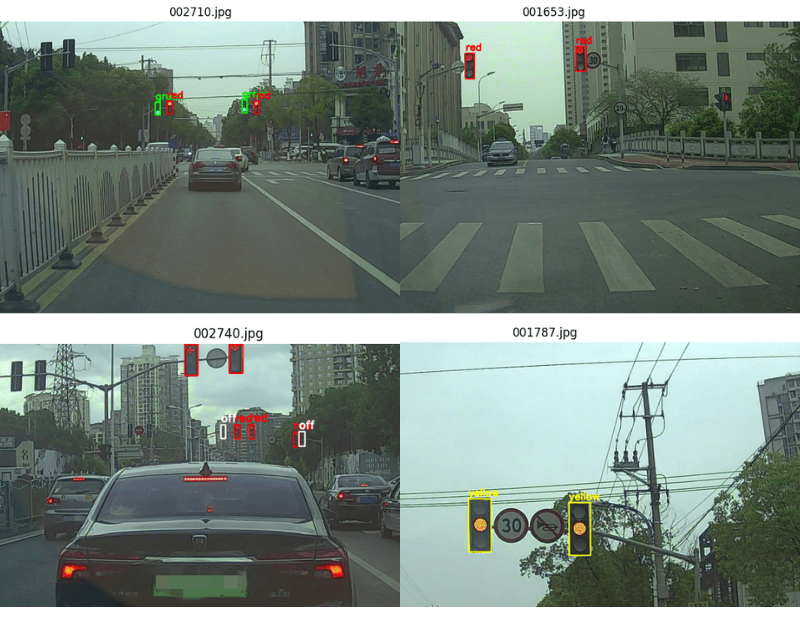
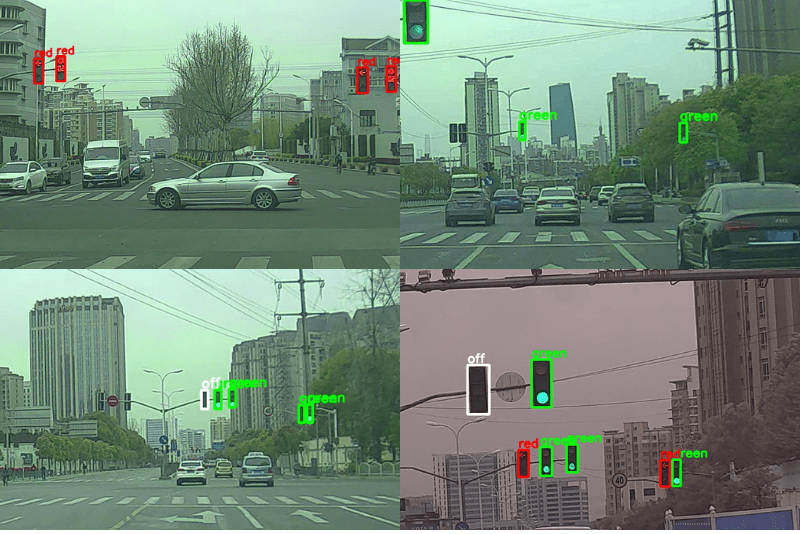
The following figure shows the images which have perfect predictions.
Now, let’s take a look at some of the predictions which have multiple boxes around the same objects, missed predictions, or even wrong ones.
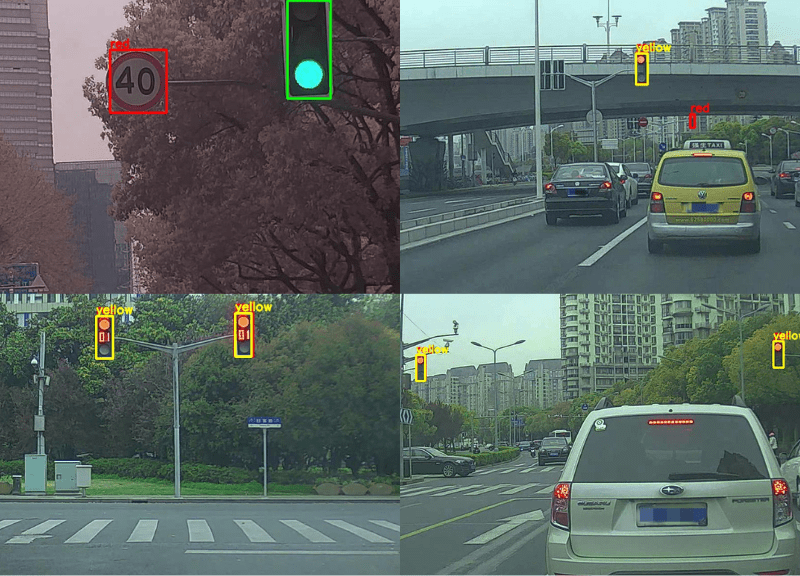
As we can see there is still a lot of room for improvement here. The model is detecting the yellow lights as red lights also in many cases.
Most of the above detections look good but they are from the same distribution. Let’s run some inference on videos to check the capability of the model.
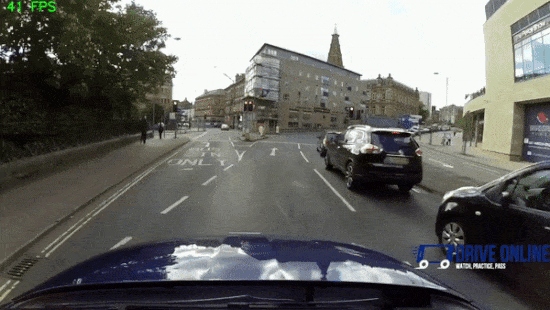
Running Inference on Videos
We can use the inference_video.py script for running inference on videos. Following is a usage example of the script.
python inference_video.py --input input/inference_data/video_1.mp4 --imgsz 640 --threshold 0.3
In the above command, we are providing the path to an input video, a score threshold of 0.3, and an image resolution of 640×640.
Here are the results from running inference on one YouTube video. The below result just shows the parts where traffic lights are present.
From the outset, we can see the wrong prediction of the toy hanging from the dashboard as a green light. Further, the model is not able to detect traffic lights that are very far away. Moreover, there is also misclassification between red and yellow light in some instances. And we can also see flickering in the detections in many cases.
The above results indicate that the although the training process was good and took a lot of effort, it is still not able to provide us with great results.
What Worked and What Did Not?
From the experiments, I found that training with more augmentation surely helps. Although it remains to be seen how the model performs with blur augmentations. Lower resolution training takes longer for reaching a respectable mAP. So, we can avoid that for now. Also, starting with a learning rate of 0.001 works best. It is even better if we can apply warm-up to the learning rate for the first few steps.
Further Improvements
There are quite a few steps that we can take to improve the results of traffic light detection using RetinaNet. Here are a few suggestions:
- More augmentations: We can apply blur and rain augmentations using albumentations to make the model see even more varied cases.
- Longer training and applying learning rate scheduler at a later point may also help.
- Training at a higher resolution or even multi-resolution training will surely help.
The above are only some points that can improve the results. You can try out more experiments if you wish to do so.
Summary and Conclusion
In this article, we tried to solve a real-world problem of traffic light detection using RetinaNet. We realized that training on real-world datasets is not that simple and achieving good results may take a lot of effort. After inference, we also discussed some points that we can improve upon. We will try to cover these points in future articles. I hope that this article was worth your time.
If you have any doubts, thoughts, or suggestions, please leave them in the comment section. I will surely address them.
You can contact me using the Contact section. You can also find me on LinkedIn, and X.
References

Hello, is there a way to use a smaller RetinaNet model. “RetinaNet_ResNet50_FPN_V2” which is used in this tutorial is bigger than 100MB in size. I want to train an object detection model for use on smartphones. I haven’t found a smaller model in the PyTorch Docs. For SSD there is the “SSDLite320” model which is smaller than “SSD300”. Is there a similar alternative for RetinaNet? Thanks in advance.
RetinaNet usually refers to the detection head and the use of focal loss in the detection pipeline. You can use a lighter backbone with the RetinaNet head if you wish. Although, I do not have an article right now, you may find something on the internet for sure.