
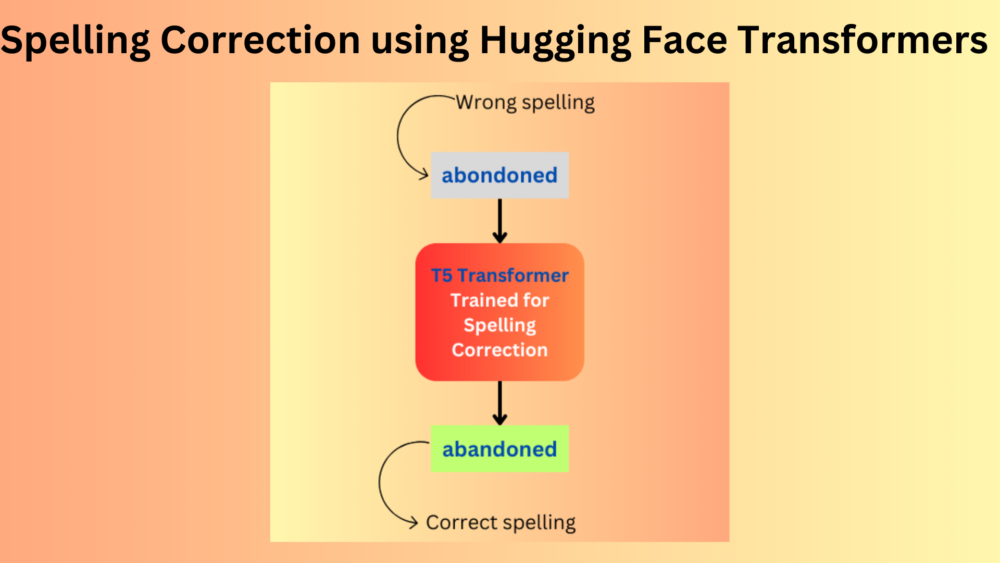
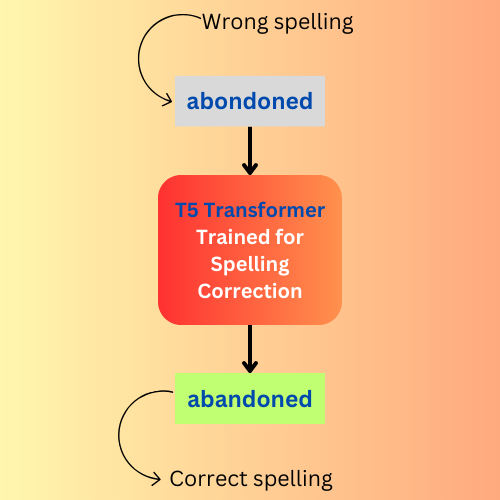
NLP models, especially Transformer models are good at many natural language tasks. Still, building something useful using Transformer models is difficult. I have started working on a new project using Transformers, focused on spelling and grammar correction, soon to be made open source. As of writing this, it is still in the early stages. In this blog post, we will go through the very first step in this large project. We will carry out spelling correction using the Hugging Face Transformers library.
We will begin small and simple, fine-tuning the T5 model on a very small dataset. This will give us an idea of the next step and what may or may not be possible in this area.
We will cover the following topics in this blog post
- We will start with a discussion of the dataset.
- Next is a brief discussion of the T5 Transformer model.
- Then, we will move on to the coding part which will include:
- Spelling correction dataset preparation for training the Hugging Face Transformers model.
- Tokenization of the dataset.
- Preparing the T5 model, the training arguments, and the trainer API.
- Finally, training the model and running inference on the validation data.
The Wikipedia Spelling Correction Dataset
We will use the Spelling Corrector dataset from Kaggle. This contains several text files along with a brief explanation of the purpose of the dataset.
Among these, we are the most interested in the wikipedia.txt file. This is the file that we will use for training our very simplistic spelling corrector.
It contains around 1920 correct and incorrect spelling pairs in the following format.
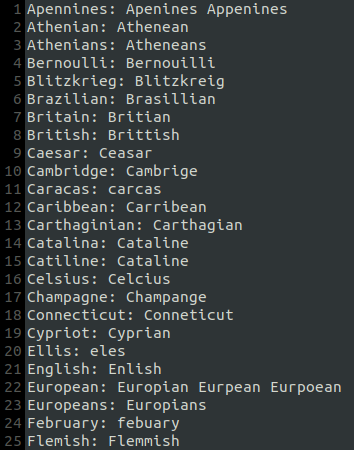
The left side contains the correct spelling and the right side the wrong spelling, separated by a colon. Scrolling a bit more reveals that some lines contain more than one wrong spelling example.
All in all, it is a very simple dataset with minimal overhead to getting started. Frankly, nothing more than a prototype can be built using this, and that’s exactly what we are aiming at here.
For now, you can go ahead and download the dataset. Extracting it will reveal the wikipedia.txt along with the other text files.
Project Directory Structure
Let’s take a look at the directory structure of the project.
├── input
│   ├── aspell.txt
│   ├── big.txt
│   ├── birkbeck.txt
│   ├── spell-testset1.txt
│   ├── spell-testset2.txt
│   └── wikipedia.txt
├── results_t5
│   ├── checkpoint-100
│   │   ├── config.json
│   │   ├── generation_config.json
│   │   ├── optimizer.pt
│   │   ├── pytorch_model.bin
│   │   ├── rng_state.pth
│   │   ├── scheduler.pt
│   │   ├── trainer_state.json
│   │   └── training_args.bin
│   ...
│   ├── added_tokens.json
│   ├── events.out.tfevents.1701614881.sovitdl.25156.0
│   ├── special_tokens_map.json
│   ├── spiece.model
│   └── tokenizer_config.json
└── t5_small.ipynb
- The
inputdirectory contains the extracted dataset and the wikipedia text file that we discussed in the previous section. - The
results_t5directory contains the trained checkpoints, trained tokenizer, and the Tensorboard logs. - Finally, we have the
t5_small.ipynbnotebook containing the code.
Required Libraries
We need the transformers and the datasets library from Hugging Face for running the code. PyTorch is used as the base library.
You can install the above using the following commands.
pip install transformers
pip install datasets
We can now move on to the coding part of creating a spelling correction model using Hugging Face Transformers.
The T5 Model: Text-to-Text Transfer Transformer
The T5 model was introduced by Google researchers in 2019 in a paper named Exploring the Limits of Transfer Learning with a Unified Text-to-Text Transformer.
In short, the aim was to create a Transformer model that could do different tasks based on the initial token that we provided to it.
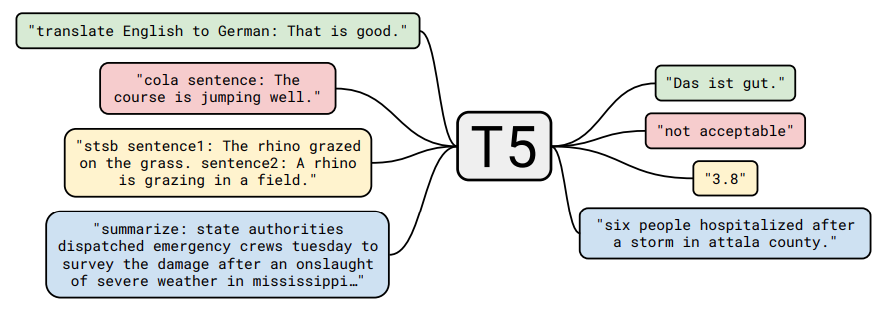
It could translate English to German, output whether a sentence makes sense or not, find out whether one sentence is a follow up to the previous, and even summarize long texts.
T5 perhaps was the starting point of all the best multi-tasking chat-based LLMs that we have today, like ChatGPT and Claude. Only today, mostly we chat with these models in a more natural tone.
The gist of all this is that we can train the T5 Transformer model on several complex tasks along with an initialization token which makes it so powerful.
If you wish to get in-depth knowledge about T5, surely give the paper a read.
Spelling Correction using the T5 Hugging Face Transformers Model
Let’s jump into the coding part now. How do we move about creating a spelling correction model using T5?
The process is neither too simple nor too complicated. On one hand, the Hugging Face Transformers API will handle a lot of the complex parts. On the other, getting a model to do precise spelling correction with limited data is a challenge.
Download Code
Let’s start with the import statements.
import torch

from transformers import (
    T5Tokenizer,
    T5ForConditionalGeneration,
    TrainingArguments,
    Trainer,
)
from datasets import load_dataset
Apart from torch, we also import:
T5Tokenizer: The tokenizer class for the T5 model. Each model in the Hugging Face Transformers library has their tokenizer configuration.T5ForConditionalGeneration: This class is used for initializing the T5 Transformer model.TrainingArgumentsandTrainer: Once we get the dataset ready in the proper format, the Transformers library provides classes to easily initialize the arguments and start the training.load_dataset: This function allows us to load datasets from various formats while making them compatible with the rest of the Transformers pipeline.
Prepare the Spelling Correction Dataset
Coming to one of the most integral parts of the code, preparing the spelling correction dataset.
First, let’s load the dataset and print a few samples.
dataset = load_dataset(
    'text',
    data_files='input/wikipedia.txt',
    split='train',
)
Generally, the load_dataset function allows us to load any dataset from Hugging Face. However, we can load local files as well. For this to happen correctly, we need to provide the file type, the path to the data files, and the split the dataset belongs to.
In our case, we have a text file and load it as a training set. Later, we will split it into a training and a validation set.
print(dataset)
Printing the dataset outputs the following.
Dataset({
    features: ['text'],
    num_rows: 1922
})
We have a text column as feature and 1922 rows. This checks out with the structure of the text file.
This is what printing one sample outputs.
print(dataset[0])
{'text': 'Apennines: Apenines Appenines'}
Everything seems to be correct with the structure of the dataset.
Now, we need to create a training and a validation split. Every dataset that we load using load_dataset has a train_test_split method. We can use that method for creating the splits.
dataset_full = dataset.train_test_split(shuffle=True, test_size=0.2)
dataset_train, dataset_valid = dataset_full['train'], dataset_full['test']
print(dataset_train)
print(dataset_valid)
We shuffle the default dataset, use 20% of the data for validation, and the rest for training. The split dataset has a train and test attribute respectively. We store one in dataset_train and the other in dataset_valid.
There are 1537 samples in the training set and 385 samples in the validation set.
Tokenizing the Dataset
The next step is the tokenization of the dataset. In short, tokenization assigns a numerical value to each word and breaks down larger words into multiple words if necessary. You can go through this excellent documentation to get an even better idea.
model_name = 't5-small'

tokenizer = T5Tokenizer.from_pretrained(model_name)

# Function to convert text data into model inputs and targets
def preprocess_function(examples):
    all_correct = [word.split(': ')[0] for word in examples['text']]
    all_wrong = [f"fix_spelling: {word.split(': ')[1].split(' ')[0]}" for word in examples['text']]
    # print('CORRECT')
    # print(all_correct)
    # print('WRONG')
    # print(all_wrong)
    model_inputs = tokenizer(
        all_wrong,
        max_length=32,
        truncation=True,
        padding='max_length'
    )

    # Set up the tokenizer for targets
    with tokenizer.as_target_tokenizer():
        labels = tokenizer(
            all_correct,
            max_length=32,
            truncation=True,
            padding='max_length'
        )

    model_inputs["labels"] = labels["input_ids"]
    return model_inputs
As we discussed earlier, every model has its tokenization configuration. So, it becomes necessary to pass the model name to the from_pretrained method of the Tokenizer class. Here, it is t5-small.
Now, coming to the preprocess_function. It accepts an example parameter. Each example contains samples from the dataset. We know that the first word is the correct one and the word(s) after the colon are the misspelled ones. According to that, we store the correct words in the all_correct list and the misspelled words on all_wrong list.
To keep things simple, we only use one incorrect word wherever there are multiple ones.
Then we create the input and target for the model. Here we need to take care that the input to the model is the wrong words and the target is the correct ones. Although there is only one word in a sample, we still pad each sample to a length of 32. Finally, we return the inputs.
Applying tokenization to the dataset is simple. We can use the map method of the datasets.
# Apply the function to the whole dataset
tokenized_train = dataset_train.map(
    preprocess_function,
    batched=True,
    num_proc=8
)
tokenized_valid = dataset_valid.map(
    preprocess_function,
    batched=True,
    num_proc=8
)
The map method accepts the tokenization function name, whether we want batched tokenization and the number of processes to use for tokenization.
Are you new to NLP and start with a simple problem statement? Then you should surely give the following blog posts a read.
- Getting Started with Text Classification using Pytorch, NLP, and Deep Learning
- Disaster Tweet Classification using PyTorch
Preparing the T5 Model for Spelling Correction
Loading a pretrained model from the Transformers library is just as easy.
# Load the pre-trained model.
model = T5ForConditionalGeneration.from_pretrained(model_name)

# Specify the device
device = torch.device("cuda" if torch.cuda.is_available() else "cpu")
model.to(device)

# Total parameters and trainable parameters.
total_params = sum(p.numel() for p in model.parameters())
print(f"{total_params:,} total parameters.")
total_trainable_params = sum(
    p.numel() for p in model.parameters() if p.requires_grad)
print(f"{total_trainable_params:,} training parameters.")
We use the from_pretrained method of the T5ForConditionalGeneration class and pass the model name. For now, no additional changes are needed.
The final model contains around 60.5 million parameters.
Defining the Training Arguments
The Transformers library makes it easy to define and modify the training arguments. Let’s take a look at how it’s done.
# Define the training arguments
out_dir = 'results_t5'
batch_size = 32
epochs = 100
training_args = TrainingArguments(
    output_dir=out_dir,
    num_train_epochs=epochs,
    per_device_train_batch_size=batch_size,
    per_device_eval_batch_size=batch_size,
    warmup_steps=500,
    weight_decay=0.01,
    logging_dir=out_dir,
    logging_steps=10,
    evaluation_strategy='steps',
    save_steps=100,
    eval_steps=100,
    load_best_model_at_end=True,
    save_total_limit=10,
    report_to='tensorboard',
    learning_rate=0.00005,
    dataloader_num_workers=8,
)
First, we define the output directory (out_dir) where all the trained model checkpoints, trained tokenizer, and the Tensorboard logs will be stored.
Second, we define the batch size and the number of training epochs.
Third, we initialize the TrainingArguments. In this step, we provide all the necessary arguments for our use case. For instance, the evaluation will happen after every 100 steps instead of each epoch and that’s when the model will be saved as well. The save_total_limit is 10, so only 10 trained weights will be stored on disk and the older ones will be overwritten as new ones are saved. This is a good way to manage disk space as Transformer models can be quite large. Also, the learning rate is 0.00005 with a warmup till the first 500 steps. The number of workers for the data loaders is 8.
The model was trained on a system with a 10th generation i7, 10 GB RTX 3080 GPU, and 32 GB of RAM. You can adjust the batch size and data loaders according to the system you are training on.
Initialize the Trainer and Start the Training
Before we start the training, we need to initialize the Trainer API.
trainer = Trainer(
    model=model,
    args=training_args,
    train_dataset=tokenized_train,
    eval_dataset=tokenized_valid,
)

history = trainer.train()
The Trainer class accepts the model, the arguments that we defined above, and the tokenized training & validation dataset.
Finally, we call the train method.
The training will take only a few minutes as it is not a very large dataset.
Here are the logs from the last few epochs.
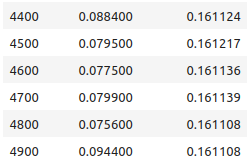
The validation loss was decreasing till the end of training.
Here is the loss graph from the Tensorboard logs.
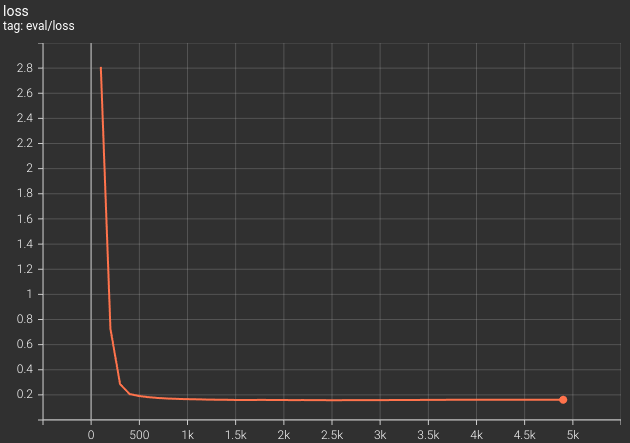
This makes a few things clearer. The validation loss has almost plateaued out. Maybe we can train only for a few more steps, then the model will overfit.
Finally, we save the tokenizer as well.
tokenizer.save_pretrained(out_dir)
Here, we used predefined tokenizers and models. However, it is possible to create a naive word based tokenizer and define our own Transformer model. In the Language Translation using PyTorch Transformer, we do just that. It will clear a lot of concepts if you are getting started with Transformers
Inference using the Trained Spelling Correction Model using Hugging Face Transformers
We can make the inference section standalone by importing the necessary packages and loading the pretrained model from the disk.
from transformers import T5ForConditionalGeneration, T5Tokenizer

model_path = f"results_t5/checkpoint-4900/"  # the path where you saved your model
model = T5ForConditionalGeneration.from_pretrained(model_path)
tokenizer = T5Tokenizer.from_pretrained('results_t5')
Our final spelling correction model was saved at 4900 steps and that’s the directory path we provide to the from_pretrained method. We also load the saved T5 tokenizer by providing the path to the results directory.
Next, we need to define a helper function for spelling correction inference.
def do_correction(text, model, tokenizer):
    input_text = f"fix_spelling: {text}"
    inputs = tokenizer.encode(
        input_text,
        return_tensors='pt',
        max_length=32,
        padding='max_length',
        truncation=True
    )

    # Get correct sentence ids.
    corrected_ids = model.generate(
        inputs,
        max_length=32,
        num_beams=5, # `num_beams=1` indicated temperature sampling.
        early_stopping=True
    )

    # Decode.
    corrected_sentence = tokenizer.decode(
        corrected_ids[0],
        skip_special_tokens=True
    )
    return corrected_sentence
The do_correction function simply accepts the raw text, the trained model, and the tokenizer.
First of all, it prepends the fix_spelling token to the beginning of each word. This needs to be the same as we did during training. Second, it encodes the text and creates the tokenized PyTorch tensors that match the training criteria. Third, we generate the correct spelling by calling the generate method of the model. We use beam search for text generation with 5 beams. Finally, we decode the output tokens into text format.
For brevity, we are skipping the discussion of beam search in this blog post. We will discuss different text decoding techniques in a future blog post.
Let’s define a few wrong spellings from the validation set and call the do_correction function.
sentences = [
    'mysogynist',
    'boundare',
    'abondoned',
    'transcripting'
]

for sentence in sentences:
    corrected_sentence = do_correction(sentence, model, tokenizer)
    print(f"ORIG: {sentence}\nPRED: {corrected_sentence}\n")

It seems that the model has corrected each spelling.
Summary and Conclusion
We built a simple spelling correction model using Hugging Face Transformers in this blog post. We used a pretrained T5 model for this. However, for such simple word-to-word corrections we can also use a simple LSTM or non-pretrained smaller custom Transformer model. We will try to do that in a future blog post. I hope that this article was worth your time.
If you have any doubts, thoughts, or suggestions, please leave them in the comment section. I will surely address them.
You can contact me using the Contact section. You can also find me on LinkedIn, and X.
References

4 thoughts on “Spelling Correction using Hugging Face Transformers”