
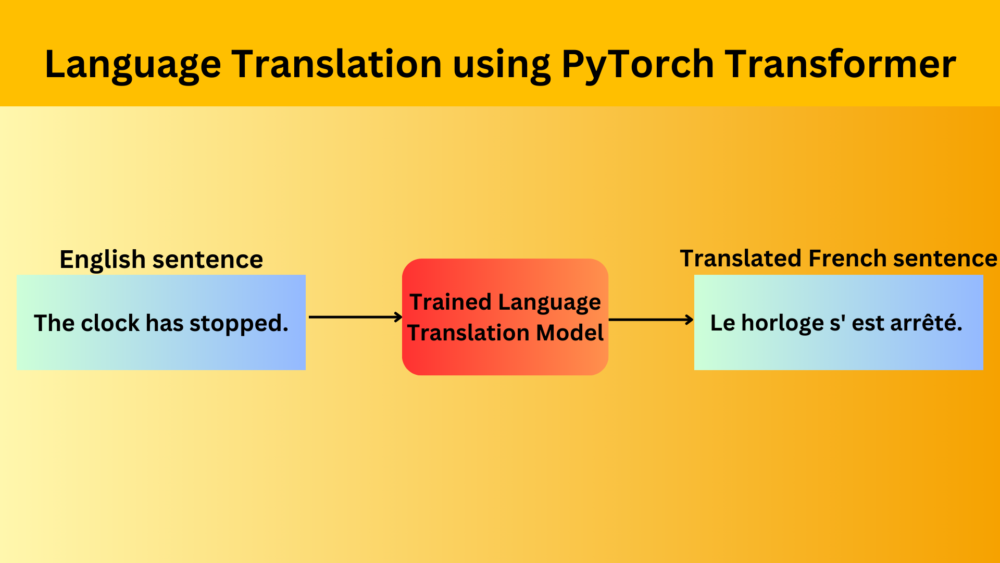
Machine translation is an essential component of natural language processing (NLP), and with the rise of deep learning, it has seen significant advancements. In this article, we will delve deep into the mechanism of Language Translation using PyTorch Transformer. We will utilize the robust capabilities of PyTorch nn.Transformer module for English to French translation.

We are going to cover the following points in this article
- We will start with a brief explanation of the translation dataset.
- Next, we cover the coding section. This covers each section in detail including:
- Dataset preparation.
- The language translation model.
- The training process.
- After training, we will carry out inference using the saved model and samples from the validation set.
The English-French Language Translation Dataset
In this article, we will use the English-French language translation dataset from Kaggle. If you wish to carry out training yourselves, please go ahead and download the dataset.
Opening the CSV file reveals the following structure.
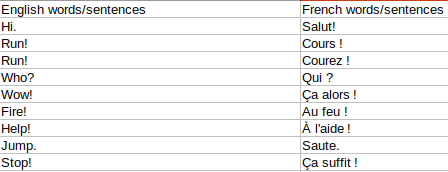
As we can see, all the English sentences are under the English words/sentences column. Similarly, all the French sentences are under the French words/sentences column.
There are a total of 175622 English-French pairs in the dataset.
The Directory Structure
The following block shows the final project directory structure.
├── input
│   └── eng_-french.csv
├── outputs
│   ├── loss.png
│   └── model.pth
└── eng_fr_nn_transformer.ipynb
- The
inputdirectory contains the final translation CSV file. - In the
outputsdirectory, we store the training results. These include the loss plots and the trained model. - The Jupyter Notebook containing all the code is present directly inside the parent project directory.
The Jupyter Notebook and the trained weights are available in the zip file via the download section. In case you plan on training the model, you will need to download the dataset and arrange it in the above structure. If you wish to run just inference, then after downloading the dataset, run each cell from the top till the initialization of the model. Then run all the cells after the inference section. This is needed as we require the vocabulary information for inference as well. We do not yet discuss the saving and loading of separate vocabulary files in this tutorial.
English to French Language Translation using PyTorch Transformer
The code that follows here is supposed to be executed in a Jupyter Notebook. So, we follow all the Jupyter Notebook conventions. The zip file is available for download along with this post.
Want to get an overview of the original Transformer model that started the NLP revolution? Check out the previous post about Transformer Neural Network where we summarize all the important components of the Attention is All You Need paper.
Download Code
Environment Setup
Let’s start with a one time setup where we need to install a few dependencies.
First, we need to install PyTorch with CUDA support. The following command is expected to be executed in an Anaconda environment. You can execute the following two commands in a terminal.
conda install pytorch torchvision torchaudio pytorch-cuda=11.7 -c pytorch -c nvidia
Second, we need to install SpaCy.
pip install -U spacy
Next, we will directly jump into the Jupyter Notebook.
!pip install -U portalocker
!python -m spacy download en_core_web_sm
!python -m spacy download fr_core_news_sm
- portalocker: It’s a library to ensure exclusive access to a file by locking it. This is typically used in data downloading or preprocessing tasks to avoid simultaneous writes.
- spacy: SpaCy is a leading NLP library that offers pre-trained tokenizers for various languages.
en_core_web_sm: This is a small English model, used for tokenization, part-of-speech tagging, and other basic NLP tasks.fr_core_news_sm: Similarly, this is the French counterpart for the same purposes.
By running the above commands, we ensure our environment has all the dependencies in place to proceed with the translation task.
Remember, if you’re working within a Jupyter Notebook environment, the ‘!’ at the start of a command allows you to run shell commands directly from the notebook.
Imports
Before we get our hands dirty with building the translation model, we need to lay the groundwork by importing essential libraries and modules. Let’s break down what each of these imports does:
from torchtext.data.utils import get_tokenizer
from torchtext.vocab import build_vocab_from_iterator
from typing import Iterable, List
from torch.nn.utils.rnn import pad_sequence
from torch.utils.data import DataLoader, Dataset
from timeit import default_timer as timer
from torch.nn import Transformer
from torch import Tensor
from sklearn.model_selection import train_test_split
from tqdm.auto import tqdm

import torch.nn as nn
import torch
import torch.nn.functional as F
import numpy as np
import math
import os
import pandas as pd
import matplotlib.pyplot as plt
- torchtext: A PyTorch-based library aiding in preprocessing text data.
get_tokenizer: Helps in tokenizing sentences into words.build_vocab_from_iterator: Assists in creating a vocabulary from an iterator.
- torch.nn.utils.rnn: Contains utilities for RNNs.
pad_sequence: Helps in padding sequences to ensure consistent sequence lengths, a common necessity in NLP.
- torch.utils.data: PyTorch’s utility for handling data.
DataLoader,Dataset: Essential for batch processing and managing datasets in PyTorch.
- timeit.default_timer: Helps in timing operations, which can be useful to gauge model training time.
- torch.nn.Transformer: The main star of our blog post. The Transformer model is a novel deep learning architecture that has significantly impacted NLP tasks.
- torch.Tensor: PyTorch’s multi-dimensional array.
- sklearn.model_selection.train_test_split: Used to split our dataset into training and testing sets.
- tqdm: A smart progress meter.
tqdm.autoautomatically chooses a suitable interface based on the environment. - torch.nn, torch, torch.nn.functional: Core PyTorch libraries for defining neural network architectures and operations.
- numpy: A fundamental package for scientific computing in Python.
- math, os: Basic Python modules for mathematical operations and OS-level operations, respectively.
- pandas: Data analysis library in Python.
- matplotlib.pyplot: Plotting library to visualize our results.
Now, to ensure reproducibility, we set a random seed for various libraries:
# Set seed.
seed = 42
np.random.seed(seed)
torch.manual_seed(seed)
torch.cuda.manual_seed(seed)
torch.backends.cudnn.deterministic = True
torch.backends.cudnn.benchmark = True
Dataset Preparation
Let’s dissect the dataset preparation steps for our English to French translation task using PyTorch nn.Transformer.
SRC_LANGUAGE = 'en'
TGT_LANGUAGE = 'fr'
We set up two constants, SRC_LANGUAGE and TGT_LANGUAGE, representing our source and target languages, respectively.
token_transform = {}
vocab_transform = {}
token_transform[SRC_LANGUAGE] = get_tokenizer('spacy', language='en_core_web_sm')
token_transform[TGT_LANGUAGE] = get_tokenizer('spacy', language='fr_core_news_sm')
We create dictionaries to hold tokenization (token_transform) and vocabulary transformations (vocab_transform) for both languages. SpaCy tokenizers are then initialized for both languages using get_tokenizer.
csv = pd.read_csv(
'input/eng_-french.csv',
usecols=['English words/sentences', 'French words/sentences']
)
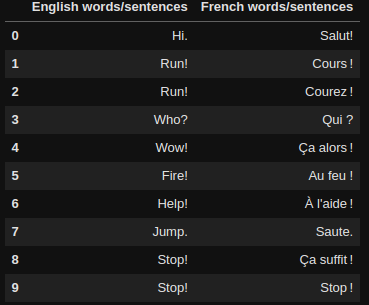
csv.head()
We’re reading our dataset from a CSV file, which contains columns for both English and French sentences
train_csv, test_csv = train_test_split(csv, test_size=0.1)
We split our dataset into training and testing subsets using train_test_split from scikit-learn. Here, 90% of the data is used for training, and the remaining 10% is reserved for testing.
The Custom Dataset Class for Language Translation
# Custom Dataset class.
class TranslationDataset(Dataset):
    def __init__(self, csv):
        self.csv = csv

    def __len__(self):
        return len(self.csv)

    def __getitem__(self, idx):
        return(
            self.csv['English words/sentences'].iloc[idx],
            self.csv['French words/sentences'].iloc[idx]
        )
A custom TranslationDataset class is defined, inheriting from PyTorch Dataset class. This class is essential for handling data in a way that’s efficient and compatible with PyTorch’s DataLoader. It takes in the data as a pandas DataFrame and provides methods to retrieve the length of the dataset and individual data points, in this case, pairs of English and French sentences.
Let’s initialize the dataset and print one pair of sample
train_dataset = TranslationDataset(train_csv)
valid_dataset = TranslationDataset(test_csv)

iterator = iter(train_dataset)
print(next(iterator))
Following is the output:
('They kept him waiting outside for a long time.', 'Ils le firent poireauter dehors.')
Helper Functions for Dataset Preparation
Next, we need helper functions to yield tokens during training. We also need to define some special tokens.
# Helper function to yield list of tokens.
def yield_tokens(data_iter: Iterable, language: str) -> List[str]:
    language_index = {SRC_LANGUAGE: 0, TGT_LANGUAGE: 1}

    for data_sample in data_iter:
        yield token_transform[language](data_sample[language_index[language]])

# Define special symbols and indices.
UNK_IDX, PAD_IDX, BOS_IDX, EOS_IDX = 0, 1, 2, 3
# Make sure the tokens are in order of their indices to properly insert them in vocab.
special_symbols = ['', '', '', '']

for ln in [SRC_LANGUAGE, TGT_LANGUAGE]:
    # Create torchtext's Vocab object.
    vocab_transform[ln] = build_vocab_from_iterator(
        yield_tokens(train_dataset, ln),
        min_freq=1,
        specials=special_symbols,
        special_first=True,
    )

# Set ``UNK_IDX`` as the default index. This index is returned when the token is not found.
# If not set, it throws ``RuntimeError`` when the queried token is not found in the Vocabulary.
for ln in [SRC_LANGUAGE, TGT_LANGUAGE]:
    vocab_transform[ln].set_default_index(UNK_IDX)
The yield_tokens function is a helper function that, given a dataset and a language, produces tokens for the specified language. This is used later on for building the vocabulary.
We also define indices for special symbols in our vocabulary:
UNK_IDX: Represents unknown words.PAD_IDX: Used for padding shorter sequences.BOS_IDX: Denotes the beginning of a sequence.EOS_IDX: Denotes the end of a sequence.
For both English and French, we build our vocabulary from the training dataset using build_vocab_from_iterator. This function generates a vocabulary that maps each unique token to a unique integer. The function also takes care of adding special symbols to the vocabulary.
We need a few more helper functions for transforms, tokenization, and numericalization of the sentences.
# helper function to club together sequential operations
def sequential_transforms(*transforms):
    def func(txt_input):
        for transform in transforms:
            txt_input = transform(txt_input)
        return txt_input
    return func

# function to add BOS/EOS and create tensor for input sequence indices
def tensor_transform(token_ids: List[int]):
    return torch.cat((torch.tensor([BOS_IDX]),
                      torch.tensor(token_ids),
                      torch.tensor([EOS_IDX])))

# `src` and `tgt` language text transforms to convert raw strings into tensors indices
text_transform = {}
for ln in [SRC_LANGUAGE, TGT_LANGUAGE]:
    text_transform[ln] = sequential_transforms(token_transform[ln], # Tokenization
                                               vocab_transform[ln], # Numericalization
                                               tensor_transform) # Add BOS/EOS and create tensor


# function to collate data samples into batch tensors
def collate_fn(batch):
    src_batch, tgt_batch = [], []
    for src_sample, tgt_sample in batch:
        src_batch.append(text_transform[SRC_LANGUAGE](src_sample.rstrip("\n")))
        tgt_batch.append(text_transform[TGT_LANGUAGE](tgt_sample.rstrip("\n")))

    src_batch = pad_sequence(src_batch, padding_value=PAD_IDX, batch_first=True)
    tgt_batch = pad_sequence(tgt_batch, padding_value=PAD_IDX, batch_first=True)
    return src_batch, tgt_batch
The sequential_transforms() function clubs together sequential operations. It makes it easier to execute a series of transformations on the input text in a streamlined manner.
The tensor_transform() function takes a list of token IDs and adds the BOS_IDX at the beginning and the EOS_IDX at the end. It then converts the entire sequence into a PyTorch tensor.
Next, we define transformations for both source and target languages. These transformations handle tokenization, numericalization, and tensor creation.
The collate_fn() function is a crucial function when working with DataLoader in PyTorch. It defines how to collate individual data points into batches. This function tokenizes the input sentences, pads them to the maximum length within the batch, and returns source and target batches.
Model and Training Hyperparameters
Let’s define the Language Transformer model and training hyperparameters.
SRC_VOCAB_SIZE = len(vocab_transform[SRC_LANGUAGE])
TGT_VOCAB_SIZE = len(vocab_transform[TGT_LANGUAGE])
EMB_SIZE = 192
NHEAD = 6
FFN_HID_DIM = 192
BATCH_SIZE = 192
NUM_ENCODER_LAYERS = 3
NUM_DECODER_LAYERS = 3
DEVICE = 'cuda'
NUM_EPOCHS = 50
- Vocabulary Size: The
SRC_VOCAB_SIZEandTGT_VOCAB_SIZEare the sizes of the source (English) and target (French) vocabularies, respectively. These sizes dictate how many unique words or tokens our model can recognize and generate. - Embedding Size: With
EMB_SIZEset to 192, we’re defining the size of the vector space in which words will be embedded. Think of it as converting words into a dense vector of fixed size, capturing semantic meanings. - Heads in Multi-Head Attention:
NHEAD, set to 6, represents the number of heads in the multi-head attention mechanism. Multi-head attention allows the model to focus on different parts of the input simultaneously. - Feed-Forward Network Dimension:
FFN_HID_DIMis the internal hidden dimension of the feed-forward networks present in the transformer. - Batch Size: The
BATCH_SIZEdetermines how many examples the model looks at before making a weight update. Larger batch sizes often lead to faster training, but there’s a trade-off in terms of generalization. - Encoder and Decoder Layers: The depth of our transformer is defined by
NUM_ENCODER_LAYERSandNUM_DECODER_LAYERS. More layers can capture more complex relationships but might also lead to longer training times and the risk of overfitting. - Device for Computation:
DEVICEindicates whether calculations will be done on a CPU or GPU. Using ‘cuda’ suggests GPU-based computation, enabling faster matrix calculations crucial for deep learning tasks. - Epochs:
NUM_EPOCHSdetermines how many times the model will see the entire dataset.
Preparing the PyTorch Language Translation Transformer Model
First, we need to define functions to generate masks for the source and target sentences.
def generate_square_subsequent_mask(sz):
    mask = (torch.triu(torch.ones((sz, sz), device=DEVICE)) == 1).transpose(0, 1)
    mask = mask.float().masked_fill(mask == 0, float('-inf')).masked_fill(mask == 1, float(0.0))
    return mask

def create_mask(src, tgt):
    src_seq_len = src.shape[1]
    tgt_seq_len = tgt.shape[1]

    tgt_mask = generate_square_subsequent_mask(tgt_seq_len)
    src_mask = torch.zeros((src_seq_len, src_seq_len),device=DEVICE).type(torch.bool)

    src_padding_mask = (src == PAD_IDX)
    tgt_padding_mask = (tgt == PAD_IDX)
    return src_mask, tgt_mask, src_padding_mask, tgt_padding_mask
Masks, such as those created in generate_square_subsequent_mask and create_mask, are crucial. They ensure certain positions in the input do not attend to subsequent positions, respecting the temporal nature of sequences.
Next, we define a class for Positional encoding.
class PositionalEncoding(nn.Module):
    def __init__(self, d_model, dropout, max_len=5000):
        """
        :param max_len: Input length sequence.
        :param d_model: Embedding dimension.
        :param dropout: Dropout value (default=0.1)
        """
        super(PositionalEncoding, self).__init__()
        self.dropout = nn.Dropout(p=dropout)

        pe = torch.zeros(max_len, d_model)
        position = torch.arange(0, max_len, dtype=torch.float).unsqueeze(1)
        div_term = torch.exp(torch.arange(0, d_model, 2).float() * (-math.log(10000.0) / d_model))
        pe[:, 0::2] = torch.sin(position * div_term)
        pe[:, 1::2] = torch.cos(position * div_term)
        pe = pe.unsqueeze(0)
        self.register_buffer('pe', pe)

    def forward(self, x):
        """
        Inputs of forward function
        :param x: the sequence fed to the positional encoder model (required).
        Shape:
            x: [sequence length, batch size, embed dim]
            output: [sequence length, batch size, embed dim]
        """

        x = x + self.pe[:, :x.size(1)]
        return self.dropout(x)
Since transformers don’t have a built-in notion of sequence order, PositionalEncoding injects information about the relative or absolute position of tokens in the sequence, using sinusoidal functions.
Then, we need to define a layer to transform tokens into embeddings.
class TokenEmbedding(nn.Module):
    def __init__(self, vocab_size: int, emb_size):
        super(TokenEmbedding, self).__init__()
        self.embedding = nn.Embedding(vocab_size, emb_size)
        self.emb_size = emb_size

    def forward(self, tokens: Tensor):
        return self.embedding(tokens.long()) * math.sqrt(self.emb_size)
Words or tokens are converted into vectors using embeddings. TokenEmbedding achieves this, scaling by the square root of the embedding dimension for stability.
Finally, we define the entire model.
class Seq2SeqTransformer(nn.Module):
    def __init__(
        self,
        num_encoder_layers: int,
        num_decoder_layers: int,
        emb_size: int,
        nhead: int,
        src_vocab_size: int,
        tgt_vocab_size: int,
        dim_feedforward: int = 512,
        dropout: float = 0.1
    ):
        super(Seq2SeqTransformer, self).__init__()
        self.transformer = Transformer(
            d_model=emb_size,
            nhead=nhead,
            num_encoder_layers=num_encoder_layers,
            num_decoder_layers=num_decoder_layers,
            dim_feedforward=dim_feedforward,
            dropout=dropout,
            batch_first=True
        )
        self.generator = nn.Linear(emb_size, tgt_vocab_size)
        self.src_tok_emb = TokenEmbedding(src_vocab_size, emb_size)
        self.tgt_tok_emb = TokenEmbedding(tgt_vocab_size, emb_size)
        self.positional_encoding = PositionalEncoding(
            emb_size, dropout=dropout)

    def forward(self,
                src: Tensor,
                trg: Tensor,
                src_mask: Tensor,
                tgt_mask: Tensor,
                src_padding_mask: Tensor,
                tgt_padding_mask: Tensor,
                memory_key_padding_mask: Tensor):
        src_emb = self.positional_encoding(self.src_tok_emb(src))
        tgt_emb = self.positional_encoding(self.tgt_tok_emb(trg))
        outs = self.transformer(src_emb, tgt_emb, src_mask, tgt_mask, None,
                                src_padding_mask, tgt_padding_mask, memory_key_padding_mask)
        return self.generator(outs)

    def encode(self, src: Tensor, src_mask: Tensor):
        return self.transformer.encoder(self.positional_encoding(
                            self.src_tok_emb(src)), src_mask)

    def decode(self, tgt: Tensor, memory: Tensor, tgt_mask: Tensor):
        return self.transformer.decoder(self.positional_encoding(
                          self.tgt_tok_emb(tgt)), memory,
                          tgt_mask)
Our main model, Seq2SeqTransformer, harnesses the power of the transformer architecture. It encompasses the encoder and decoder parts, both crucial for translation tasks. The encoder processes the input sequence (English sentences), and the decoder generates the output sequence (French translations).
We can now initialize the model and print the total number of parameters.
model = Seq2SeqTransformer(
    NUM_ENCODER_LAYERS,
    NUM_DECODER_LAYERS,
    EMB_SIZE,
    NHEAD,
    SRC_VOCAB_SIZE,
    TGT_VOCAB_SIZE,
    FFN_HID_DIM
).to(DEVICE)

# Total parameters and trainable parameters.
total_params = sum(p.numel() for p in model.parameters())
print(f"{total_params:,} total parameters.")
total_trainable_params = sum(
    p.numel() for p in model.parameters() if p.requires_grad)
print(f"{total_trainable_params:,} training parameters.")
print(model)
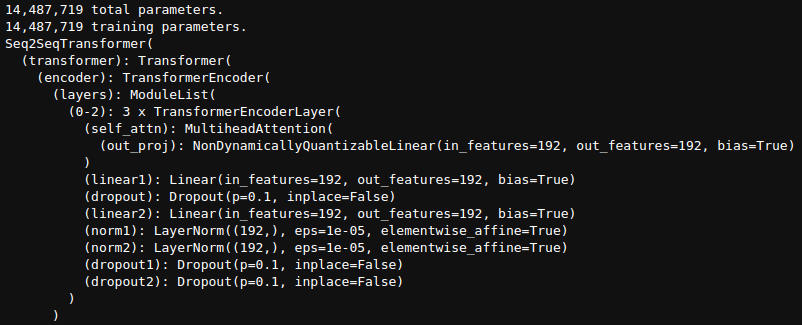
The model contains around 14.5 million parameters.
If you are new to NLP, then I will highly suggest starting with simple deep learning based classification tutorials. You can take a look at the following tutorials and posts to understanding the basics of NLP:
- Getting Started with Text Classification using Pytorch, NLP, and Deep Learning: The Hello World of NLP and Text Classification with the IMDB dataset.
- Disaster Tweet Classification using PyTorch: Tackling a real-world dataset with a simple embedding-based text classification model.
The Loss Function and the Optimizer
We need to define the loss function and the optimizer before we can start the training process.
loss_fn = torch.nn.CrossEntropyLoss(ignore_index=PAD_IDX)

optimizer = torch.optim.Adam(model.parameters(), lr=0.0001, betas=(0.9, 0.98), eps=1e-9)
To ensure our transformer model learns effectively, we’ve chosen the CrossEntropyLoss function. This is common for classification tasks like ours where the model has to predict the next word in the translated sentence. Specifically, we ignore the padding index (PAD_IDX) in the loss calculation to prevent skewing results. For optimization, the popular Adam optimizer is employed with a learning rate of 0.0001. This ensures our model updates its weights efficiently after each batch.
Data Loaders and Training & Validation Loops
The next code block defines the data loaders and the entirety of training and validation functions.
train_dataloader = DataLoader(train_dataset, batch_size=BATCH_SIZE, collate_fn=collate_fn)
def train_epoch(model, optimizer):
    print('Training')
    model.train()
    losses = 0

    for src, tgt in tqdm(train_dataloader, total=len(list(train_dataloader))):
        # print(" ".join(vocab_transform[SRC_LANGUAGE].lookup_tokens(list(src[0].cpu().numpy()))).replace("", "").replace("", ""))
        # print(" ".join(vocab_transform[TGT_LANGUAGE].lookup_tokens(list(tgt[0].cpu().numpy()))).replace("", "").replace("", ""))
        src = src.to(DEVICE)
        tgt = tgt.to(DEVICE)

        tgt_input = tgt[:, :-1]

        src_mask, tgt_mask, src_padding_mask, tgt_padding_mask = create_mask(src, tgt_input)

        logits = model(
            src,
            tgt_input,
            src_mask,
            tgt_mask,
            src_padding_mask,
            tgt_padding_mask,
            src_padding_mask
        )

        optimizer.zero_grad()

        tgt_out = tgt[:, 1:]
        loss = loss_fn(logits.view(-1, TGT_VOCAB_SIZE), tgt_out.contiguous().view(-1))
        loss.backward()

        optimizer.step()
        losses += loss.item()

    return losses / len(list(train_dataloader))


val_dataloader = DataLoader(valid_dataset, batch_size=BATCH_SIZE, collate_fn=collate_fn)
def evaluate(model):
    print('Validating')
    model.eval()
    losses = 0

    for src, tgt in tqdm(val_dataloader, total=len(list(val_dataloader))):
        # print(" ".join(vocab_transform[SRC_LANGUAGE].lookup_tokens(list(src[0].cpu().numpy()))).replace("", "").replace("", ""))
        # print(" ".join(vocab_transform[TGT_LANGUAGE].lookup_tokens(list(tgt[0].cpu().numpy()))).replace("", "").replace("", ""))
        src = src.to(DEVICE)
        tgt = tgt.to(DEVICE)

        tgt_input = tgt[:, :-1]

        src_mask, tgt_mask, src_padding_mask, tgt_padding_mask = create_mask(src, tgt_input)

        logits = model(
            src,
            tgt_input,
            src_mask,
            tgt_mask,
            src_padding_mask,
            tgt_padding_mask,
            src_padding_mask
        )

        tgt_out = tgt[:, 1:]
        loss = loss_fn(logits.view(-1, TGT_VOCAB_SIZE), tgt_out.contiguous().view(-1))
        losses += loss.item()

    return losses / len(list(val_dataloader))
We can see a few commented lines. You can uncomment those to see the final sentences with the padding before beginning the training. This also works as a way of sanity-checking that our data preparation, encoding, and decoding are working as expected.
Within the train_epoch function, we put the model into training mode. We process our input source (src) and target (tgt) tensors, masking the data appropriately using the create_mask function. The model then generates logits (unnormalized predictions). The loss, which quantifies how off our predictions are from the true translations, is calculated, back-propagated, and the optimizer updates the model weights.
The evaluate function computes the loss on the validation dataset. This helps us gauge how our Language Translation with PyTorch nn.Transformer model performs on unseen data, crucial for understanding its potential real-world performance.
The Training Loop
With everything set up, we loop through the desired number of epochs, training and validating the model at each epoch. The losses are tracked to monitor the model’s progression over time. This loop is the crux of our “Language Translation with PyTorch Transformer” system, ensuring the model iteratively learns from the data.
train_loss_list, valid_loss_list = [], []
for epoch in range(1, NUM_EPOCHS+1):
    start_time = timer()
    train_loss = train_epoch(model, optimizer)
    valid_loss = evaluate(model)
    end_time = timer()
    train_loss_list.append(train_loss)
    valid_loss_list.append(valid_loss)
    print((f"Epoch: {epoch}, Train loss: {train_loss:.3f}, Val loss: {valid_loss:.3f}, "f"Epoch time = {(end_time - start_time):.3f}s \n"))
By the end of training, the model reaches a validation loss of 1.345.
Saving Model and Loss Plots
Let’s create a new outputs directory and save the model and the loss plots.
os.makedirs('outputs', exist_ok=True)
def save_plots(train_loss, valid_loss):
    """
    Function to save the loss plots to disk.
    """
    # Loss plots.
    plt.figure(figsize=(10, 7))
    plt.plot(
        train_loss, color='blue', linestyle='-',
        label='train loss'
    )
    plt.plot(
        valid_loss, color='red', linestyle='-',
        label='validataion loss'
    )
    plt.xlabel('Epochs')
    plt.ylabel('Loss')
    plt.legend()
    plt.savefig(os.path.join('outputs', 'loss.png'))
    plt.show()
save_plots(train_loss_list, valid_loss_list)
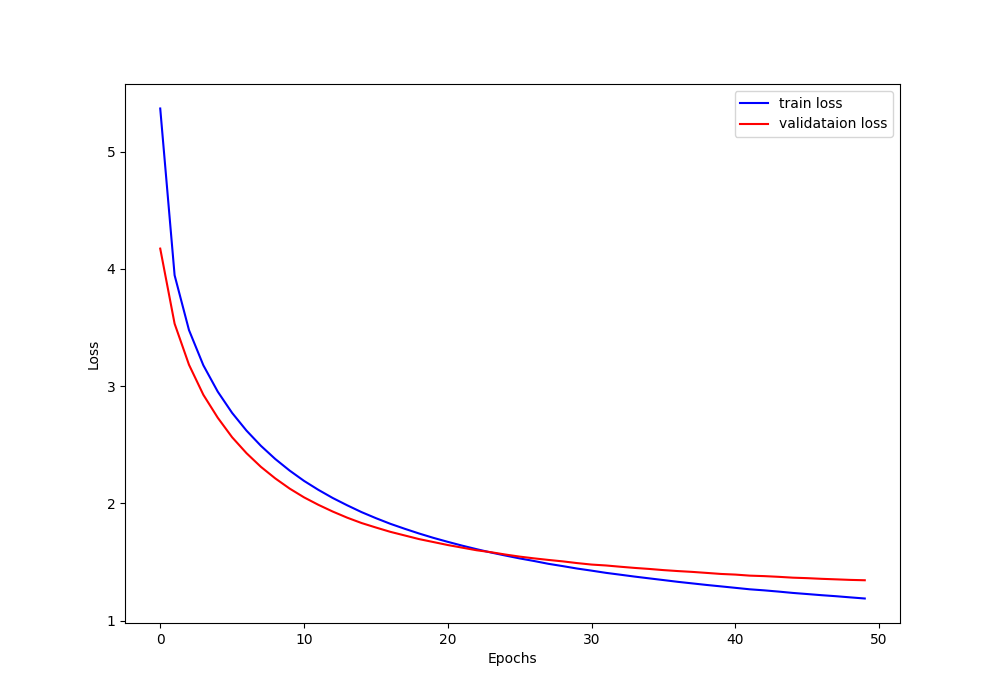
It’s quite clear that the loss has been decreasing till the end of the training. This means that we can easily train for a few more epochs to get even better results.
Now, save the model to disk.
torch.save(model, 'outputs/model.pth')
In the next section, we will load the model and carry out inference.
Inference using the Trained Language Translation Transformer Model
Now, that we have trained our PyTorch Transformer model for language translation, we are all set to carry out inference.
Inference involves taking a sentence in the source language and producing its equivalent in the target language.
We begin by loading our previously saved model. This step is essential to resume from where we left off without needing to retrain.
model = torch.load('outputs/model.pth')
We define two helper functions to carry out inference.
# Helper function to generate output sequence using greedy algorithm.
def greedy_decode(model, src, src_mask, max_len, start_symbol):
    src = src.to(DEVICE)
    src_mask = src_mask.to(DEVICE)

    memory = model.encode(src, src_mask)
    ys = torch.ones(1, 1).fill_(start_symbol).type(torch.long).to(DEVICE)
    for i in range(max_len-1):
        memory = memory.to(DEVICE)
        if i == 0:
            ys = ys.transpose(1, 0)
        tgt_mask = (generate_square_subsequent_mask(ys.size(1))
                    .type(torch.bool)).to(DEVICE)
        out = model.decode(ys, memory, tgt_mask)
        out = out
        prob = model.generator(out[:, -1])
        _, next_word = torch.max(prob, dim=1)
        next_word = next_word.item()
        ys = torch.cat([ys,
                        torch.ones(1, 1).type_as(src.data).fill_(next_word)], dim=1)
        if next_word == EOS_IDX:
            break
    return ys

# Translation function.
def translate(model: torch.nn.Module, src_sentence: str):
    model.eval()
    src = text_transform[SRC_LANGUAGE](src_sentence).view(1, -1)
    num_tokens = src.shape[1]
    src_mask = (torch.zeros(num_tokens, num_tokens)).type(torch.bool)
    tgt_tokens = greedy_decode(
        model,  src, src_mask, max_len=num_tokens + 5, start_symbol=BOS_IDX).flatten()
    return " ".join(vocab_transform[TGT_LANGUAGE].lookup_tokens(list(tgt_tokens.cpu().numpy()))).replace("", "").replace("", "")
To produce translations, we employ a method called “greedy decoding”. It’s a straightforward approach where, for each step, we pick the word with the highest probability as our next word in the sequence.
In this function:
- We start the translation with a predefined start symbol.
- For each subsequent word, we append the model’s prediction to the current sequence.
- This process continues until either we reach a predefined maximum length for the translation or the model generates an end-of-sequence (EOS) token.
Here’s what happens in the translate function:
- We set the model to evaluation mode. This disables operations like dropout.
- Then we convert the source sentence into its corresponding token representation.
- The
greedy_decodefunction is used to generate the translated sentence in token format. - Finally, the tokenized sentence is transformed back into a human-readable format, and special tokens (
In the next block, we choose a few English sentences from the validation split to carry out inference on. We create a list of lists to store the English and French sentences. This will make it easier for us to compare the ground truth and predicted French sentences.
# SRC, GT pairs from the validation set.
infer_sentences = [
    ["Take a seat.", "Prends place !"],
    ["I'm not scared to die", "Je ne crains pas de mourir."],
    ["You'd better make sure that it is true.", "Tu ferais bien de t'assurer que c'est vrai."],
    ["The clock has stopped.", "L'horloge s'est arrêtée."],
    ["Take any two cards you like.", "Prends deux cartes de ton choix."]
]

for sentence in infer_sentences:
    print(f"SRC: {sentence[0]}")
    print(f"GT: {sentence[1]}")
    print(f"PRED: {translate(model, sentence[0])}\n")
Here are the results.
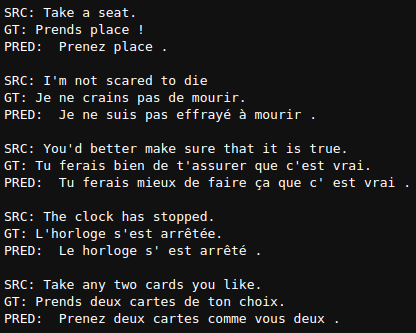
As we can see, the results are very good, if not perfect. In most cases, the predictions match the ground truth. Obviously, a person who is fluent in French would be a better judge.
Summary and Conclusion
We went through the entire pipeline of language translation using a Transformer model in this article. Although not entirely, we created a lot of components from scratch with detailed explanations. Now, you can take this further and try it with other languages. I hope that this article was worth your time.
If you have any doubts, thoughts, or suggestions, please leave them in the comment section. I will surely address them.
You can contact me using the Contact section. You can also find me on LinkedIn, and X.

2 thoughts on “Language Translation using PyTorch Transformer”