
Creating a fast image segmentation deep learning model can be a huge task. Especially one that runs fast on both GPU and CPU. There are a few things that we will need to compromise on, like using a smaller backbone that may not be as accurate. However, we will still take on the challenge in this article. In this article, we will build a fast and fairly accurate person segmentation model using EfficientNet Lite backbone models. We will use the PyTorch framework for this.
A fast image segmentation model has a lot of use cases and benefits. Just the first thing that comes to mind is the background blur in Google Meet. It has an option for a really fast and accurate background blur which uses person segmentation. How do we build such a model? Will it be fast and accurate as the model used by Google? We will not be able to build such a model in the first iteration. But with this blog post, we start a series of articles where we try to solve fast and accurate image segmentation models. Our target is a pretty good model which runs in real-time on the CPU.
Before getting into the technical details, here are the points that we will cover in this article.
- We will start with a discussion of the person segmentation dataset.
- Then we will move on to discuss the coding part.
- First, we will prepare the dataset by creating the training and validation splits.
- Second, most of our focus will be on the model and the decoder head.
- Third, we will also briefly discuss other parts of the training pipeline.
- Next, we will train the model and check its performance.
- Finally, we run inference on images and videos.
Note Before Moving Forward
Mostly, we will not achieve the best results in this article. This will be a starting point for a lot of articles that will come in the future and most probably become a complete project as well. Here, we will figure out the things that work, and that do not work, and how we need to proceed with creating a performant person segmentation model.
If you move forward with the article, I hope this is worth your time.
The Person Segmentation Dataset
We will use a Person Segmentation Dataset from Kaggle. This dataset contains 5678 images and masks. This may seem like a lot, but we need a lot of training data as well. We will be training a very small model and more data is always better.
If you wish to run the training experiments on your own, please go ahead and download the dataset. After extracting it, we find the following structure.
people_segmentation/
├── images [5678 entries exceeds filelimit, not opening dir]
├── masks [5678 entries exceeds filelimit, not opening dir]
├── segmentation
│   ├── train.txt
│   ├── trainval.txt
│   └── val.txt
└── README
The data extracts into the people_segmentation directory. The images are in JPG format and the masks are in PNG format. The segmentation subdirectory contains the text files with the train and validation splits. We will later use these text files for creating the splits.
For, now, let’s take a look at some images and their masks.
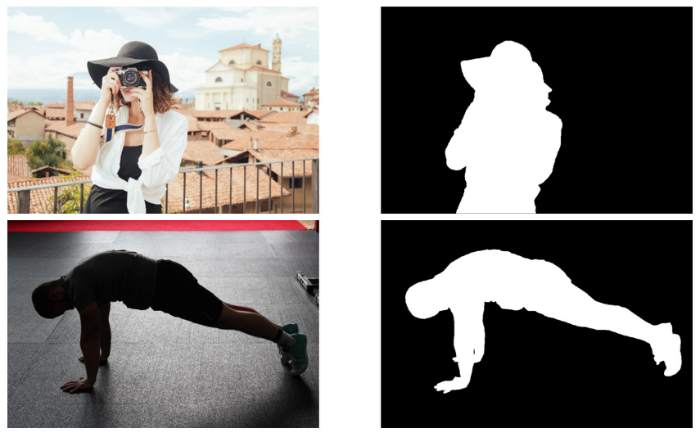
We can see that the dataset is quite varied with persons in different poses, angles, and environments. This dataset can prove to be a really good pretraining step for our person segmentation model.
The Project Directory Structure
Before we start training the EfficientNet Lite model on the person segmentation dataset, let’s take a look at the directory structure.
├── input
│   ├── inference_data
│   ├── people_segmentation
│   ├── train_images
│   ├── train_masks
│   ├── val_images
│   ├── val_masks
│   └── person-segmentation.zip
├── outputs
│   ├── inference_results_video
│   ├── valid_preds
│   ├── accuracy.png
│   ├── best_model_iou.pth
│   ├── best_model_loss.pth
│   ├── loss.png
│   ├── miou.png
│   └── model.pth
├── weights
│   ├── efficientnet_lite0.pth
│   ├── efficientnet_lite1.pth
│   ├── efficientnet_lite2.pth
│   ├── efficientnet_lite3.pth
│   └── efficientnet_lite4.pth
├── config.py
├── create_sets.py
├── datasets.py
├── efficientnet_lite.py
├── engine.py
├── inference_image.py
├── inference_video.py
├── metrics.py
├── segmentation_model.py
├── train.py
└── utils.py
- We have already seen the content of
input/people_segmentationdirectory in the previous section. After creating the training and validation splits, we will have thetrain_images,train_masks,val_images, andval_masksdirectories. - Next, we have the
outputsdirectory that will contain all the training and inference related outputs. - The
weightsdirectory contains the pretrained weights for the EfficientNet Lite models. We will discuss the details of these in the modeling section. - Directly inside the parent project directory, we have all the Python files that we need for training, dataset preparation, and inference.
All the EfficienetNet Lite pretrained weights, person segmentation trained weights and Python files will be available via the download section of this article. If you wish to run training, please download the dataset and arrange it as shown in the above tree structure. We will prepare the dataset splits in the next section.
PyTorch Version and Other Dependencies
This code base has been developed using PyTorch 2.0.1. Although any PyTorch version starting from 1.13.1 should work.
We also use Albumentations for image and mask augmentation. Please install Albumentations using the following command:
pip install -U albumentations --no-binary qudida,albumentations
There are other minor dependencies that you can install as you need them while executing the code.
Person Segmentation with EfficientNet Lite Models
Let’s get into the technical discussion now. This will mostly involve the discussion of the model and a little bit of dataset preparation & augmentation as well.
Download Code
Creating the Training and Validation Splits
Before we get to any other part of the person segmentation using EfficientNet Lite model, let’s prepare the training and validation splits.
The create_sets.py script contains the code for that. It accepts the path to an input directory, a text file, and an output directory to create the dataset splits. As we need to split both, the images and masks into the training and validation splits, we need to execute the script four times.
We can execute the following commands within the parent project directory. First, let’s split the images.
python create_sets.py --src-dir input/people_segmentation/images/ --dest-dir input/train_images --txt input/people_segmentation/segmentation/train.txt
In the above command, we use the following arguments:
--src-dir: Path to the directory where the images are present.--dest-dir: The destination directory where the training images will be copied.--txt: Path to the text file containing the names of the image files to go into the destination directory.
As we provide the path to the train.txt file, the script will only copy those image files from the source directory to the destination directory.
We can repeat a very similar command by just changing the path to the val.txt file to prepare the validation images directory.
python create_sets.py --src-dir input/people_segmentation/images/ --dest-dir input/val_images --txt input/people_segmentation/segmentation/val.txt
Our image directories are ready. Now, let’s do the same for the masks.
python create_sets.py --src-dir input/people_segmentation/masks/ --dest-dir input/train_masks --txt input/people_segmentation/segmentation/train.txt
python create_sets.py --src-dir input/people_segmentation/masks/ --dest-dir input/val_masks --txt input/people_segmentation/segmentation/val.txt
Our training and validation splits for the images and masks are ready.
The EfficientNet Lite Models
As you may already have noticed, there are two model files in the codebase. One is efficientnet_lite.py and the other one is segmentation_model.py.
The former is the complete EfficientNet Lite model that can be used for image classification tasks. The latter is the semantic segmentation model that will use the encoder from the EfficientNet Lite model.
However, we do not write the EfficientNet Lite model here from scratch. Instead, we use a great implementation from RangiLyu on GitHub.
The EfficientNet Lite models remove the SE (Squeeze and Excite) layers and replace the Swish activation with ReLU6. This makes the models more edge device friendly. So, these are somewhat different compared to the PyTorch pretrained EfficientNet models.
There are 5 different implementations of the EfficientNet Lite models, from efficientnet-lite0 to efficientnet-lite4. All of these come with the pretrained weights that you can find within the weights directory after downloading the zip file for this article.
Although we will not go into the details of the EfficientNet Lite models in this article, we will understand how we build a light-weight semantic segmentation model by using the EfficientNet Lite encoder.
EfficientNet Lite Based Semantic Segmentation Model
Let’s discuss how we move about building the semantic segmentation model using the EfficientNet Lite as the encoder.
Simply put, apart from the classification layers, the other layers of the EfficientNet Lite model will act as the encoder. The features from the last encoder layer will go into a decoder (segmentation head). As we do not need the final image classification head from the original model, we will discard it.
For the encoder, we choose the EfficientNet Lite0 model. It is the smallest among all with only 4.7 million parameters. After removing the classification head, the parameters will reduce further.
For the decoder, we will use the most simple one possible. We will use the FCN32s semantic segmentation head.
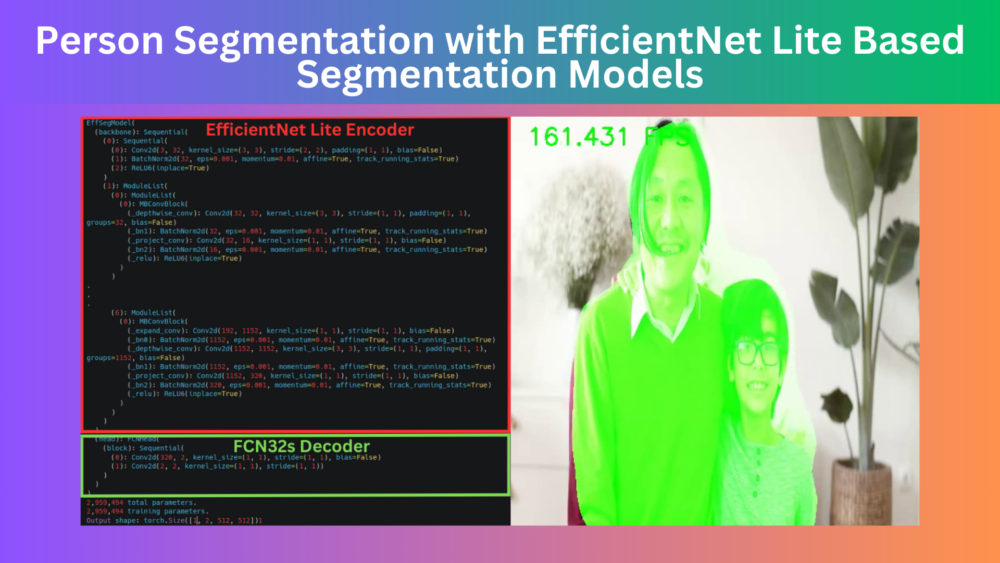
Here is the entire code to prepare the EfficientNet Lite based semantic segmentation model. We can find this code in segmentation_model.py file.
from efficientnet_lite import build_efficientnet_lite

import torch
import torch.nn as nn
import torch.nn.functional as F

class FCNHead(nn.Module):
    def __init__(self, in_channels, num_classes):
        super(FCNHead, self).__init__()
        self.block = nn.Sequential(
            nn.Conv2d(in_channels, num_classes, (1, 1), padding=0, bias=False),
            nn.Conv2d(num_classes, num_classes, 1)
        )

    def forward(self, x):
        return self.block(x)

class EffSegModel(nn.Module):
    def __init__(self, num_classes=1, pretrained=True):
        super().__init__()
        model_name = 'efficientnet_lite0'
        # EfficientNet model with 1000 out features to load the weights.
        model = build_efficientnet_lite(model_name, 1000)
        if pretrained:
            model.load_state_dict(torch.load(f"weights/{model_name}.pth"))
        self.backbone = nn.Sequential(*list(model.children())[:-4])

        self.head = FCNHead(320, num_classes)

    def forward(self, x):
        size = x.size()[2:]
        x = self.backbone[0](x)
        for module_layer in self.backbone[1]:
            for layer in module_layer:
                x = layer(x)

        x = self.head(x)
        x = F.interpolate(x, size, mode='bilinear', align_corners=True)
        return x
At the very beginning, we import the build_efficientnet_lite function from efficientnet_lite module. We will use this to build the entire EfficientNet Lite0 model.
Then we have the FCNHead class. It builds a very simple Sequential block consisting of two Conv2d layers. It is very similar to the original FCN32s head as per the Caffe implementation.
Next, we have the EffSegModel class that will initialize the entire model and do the forward pass as well.
First, we initialize the EfficientNet Lite0 model with the classification head. This is because we need to load the ImageNet pretrained weights on line 25 and all the layers need to match for that. Second, we build the backbone by discarding the pooling, dropout, and the final fully connected layer on line 26.
Finally, we build the FCN head by passing the number of input channels as 320 and the number of classes. The number of input channels is 320 because it has to match the number of output channels from the last layer of the backbone.
The Final Segmentation Model
The segmentation_model.py file contains a main block (if __name__ == '__main__'). We can execute the file to check the model architecture and the output shape.
Here is the truncated output from the terminal if we print the structure of the semantic segmentation model.
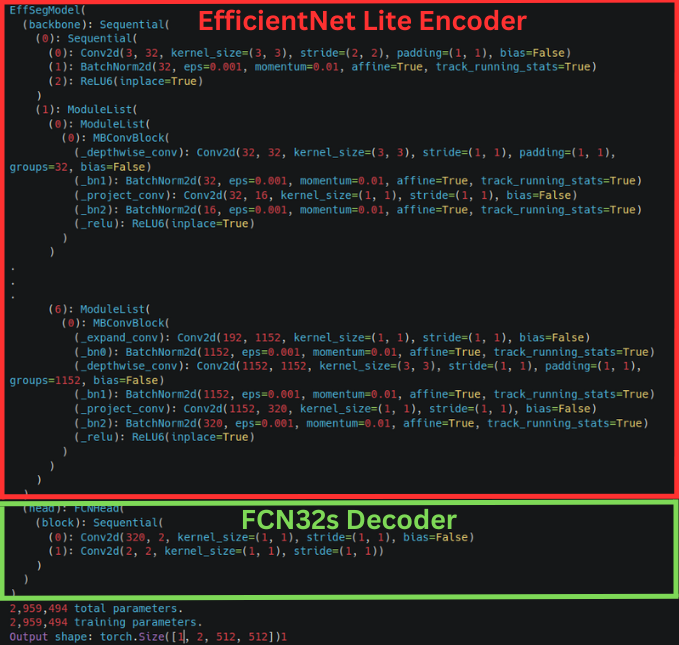
Before the FCN head, everything is part of the EfficientNet Lite backbone. That works as the image encoder for the model. The layers in the FCNHead block make up the decoder.
As we can see, the final Conv2d layer of ModuleList 6 has 320 output channels. This is the same as the number of input channels in the first Conv2d layer of the FCNHead.
Dataset Preparation and Augmentations
The datasets.py contains the code to prepare the datasets and the data loaders. We are applying some augmentation to the training data as well. As we are using a relatively small model with a weak decoder, we apply some basic augmentation to prevent overfitting.
We use the HorizontalFlip and Rotate augmentation from Albumentations. There are a few other augmentations that are commented out in the code. Using them may make the dataset relatively difficult for the model to learn at this stage.
Training the EfficientNet Lite Based Person Segmentation Model
Let’s get down to training the model. As we have more than 5000 images and a very simple model, we need to train for quite a large number of epochs.
Note: The training experiment was done on a 16 GB P100 GPU.
We can execute the following command in the parent project directory to start the training.
python train.py --imgsz 512 512 --lr 0.01 --batch 8 --epochs 100
We are training with a square resolution of 512×512, a learning rate of 0.01, and for 100 epochs. The batch size is 8.
Here are the truncated outputs from the terminal.
EPOCH: 1
Training
100%|████████████████████| 639/639 [03:06<00:00,  3.42it/s]
Validating
100%|████████████████████| 71/71 [00:16<00:00,  4.41it/s]

Best validation loss: 0.20589601615784872

Saving best model for epoch: 1


Best validation IoU: 0.8031395442110303

Saving best model for epoch: 1

Train Epoch Loss: 0.3084, Train Epoch PixAcc: 0.8745, Train Epoch mIOU: 0.731762
Valid Epoch Loss: 0.2059, Valid Epoch PixAcc: 0.9074 Valid Epoch mIOU: 0.803140
--------------------------------------------------
.
.
.
EPOCH: 100
Training
100%|████████████████████| 639/639 [02:55<00:00,  3.65it/s]
Validating
100%|████████████████████| 71/71 [00:15<00:00,  4.66it/s]

Best validation IoU: 0.888333461022802

Saving best model for epoch: 100

Train Epoch Loss: 0.0682, Train Epoch PixAcc: 0.9706, Train Epoch mIOU: 0.923810
Valid Epoch Loss: 0.1064, Valid Epoch PixAcc: 0.9468 Valid Epoch mIOU: 0.888333
--------------------------------------------------
TRAINING COMPLETE
We are monitoring the pixel accuracy and mean IoU (Intersection Over Union). There are two best models that are saved to the disk. One is according to the least cross-entropy loss and another is according to the highest mean IoU.
The model kept improving till the very end of training. On epoch 100, we have the best validation mean IoU of 88.83%.
Let’s take a look at the loss and mean IoU graphs.
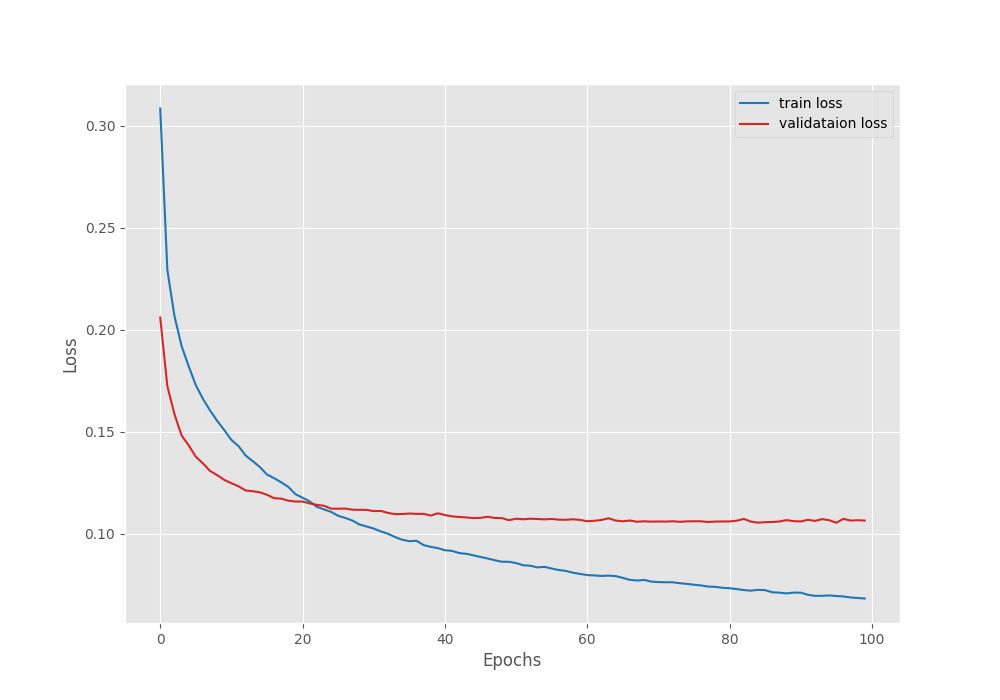
The validation loss seems to have almost plateaued out by the last epoch.
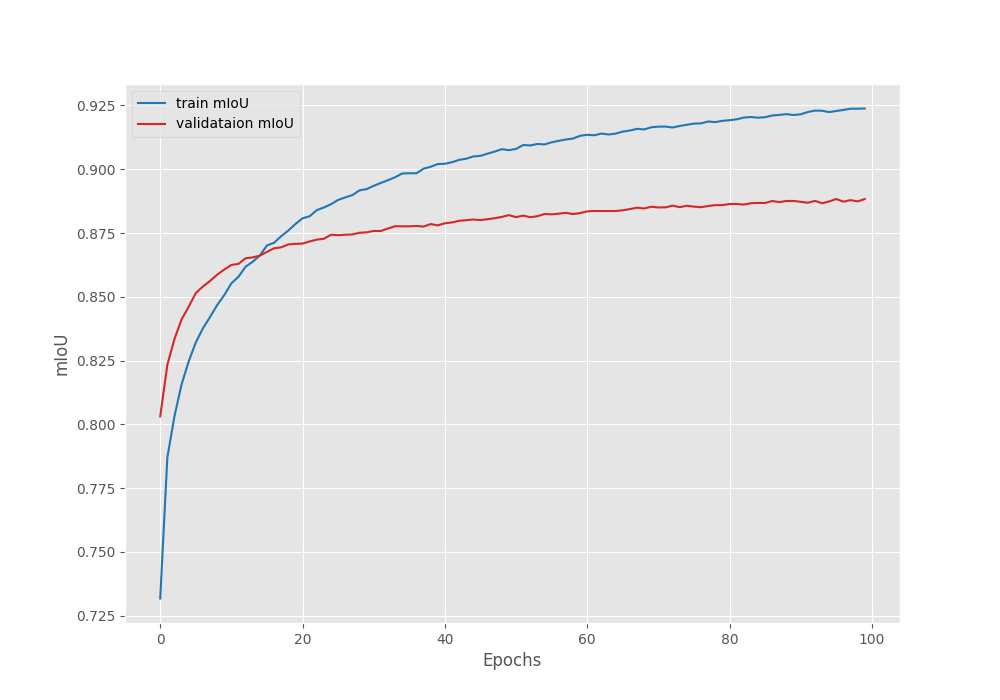
It seems that the validation mean IoU is still improving. Most probably, we can train it for around 20 more epochs without overfitting.
Inference on Videos
As we have the best model with us now, let’s carry out inference on some unseen data and check the performance. We will carry out inference on videos.
We will start with a video on which the model performs relatively well. For all inference experiments, we will use the model saved according to the best mean IoU.
Note: All the inference experiments were carried out on a machine with a 10 GB RTX 3080 GPU unless otherwise mentioned.
The inference_video.py file contains the code to carry out the inference. You can find all the videos that we use here in the input/inference_data directory.
python inference_video.py --model outputs/best_model_iou.pth --imgsz 512 512 --input input/inference_data/video_3.mp4
We use the following command line arguments in the above command:
--model: Path to the weight file that we want to use.--imgsz: The image resolution for resizing. As we trained with 512×512 resolution, so, we run inference with the same resolution.--input: Path to the input video.
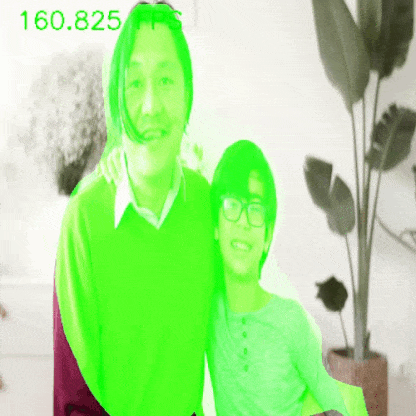
Here are the results.
The results are not too bad to be fair. The model is mostly detecting the two persons as well, still the results are quite good for such a small model. In fact, we are getting more than 150 FPS on average using this 2.9 million parameters semantic segmentation model.
But it does not perform well on all videos. Here are some cases where it fails.
In this case, the model is not able to segment the shirt. Most probably, it is facing some difficulty as the white shirt matches a lot with the white background.
In this case, the model is able to know where the person is. But the segmentation map is more like a blog rather than the shape of a person.
On a side note, the EfficientNet Lite based person segmentation model runs at an average of 18-19 FPS on a 10th generation Intel i7 CPU. It has only 2.9 million parameters which make that possible. Do give it a try on your own system.
Summary and Conclusion
In this article, we built a very simple person segmentation model using the EfficientNet Lite model. We used a simple FCN decoder head to create a less than 3 million parameters model. Although the results were not too good, they were not bad either. With more data, augmentations, and training, the model will be able to perform very well. We will slowly keep on improving on this line of work in future posts. I hope that this article was worth your time.
If you have any doubts, thoughts, or suggestions, please leave them in the comment section. I will surely address them.
You can contact me using the Contact section. You can also find me on LinkedIn, and X.
References

1 thought on “Person Segmentation with EfficientNet Lite Based Segmentation Models”