
The field of image segmentation has seen drastic changes in recent years due to deep learning techniques. Vision Transformers have a big role to play in this. Namely, there are three major image segmentation techniques in deep learning. They are semantic segmentation, instance segmentation, and panoptic segmentation. Traditionally, each task demands a different type of architecture. But with Mask2Former, a Transformer based image segmentation model, we can use the same architecture for different tasks. In this article, we will cover Mask2Former, mainly, its approach to the different image segmentation techniques, the architecture, and also inference using Hugging Face Transformers.
Mask2Former was introduced by Cheng et al. in the paper Masked-attention Mask Transformer for Universal Image Segmentation. The aim is to create a universal image segmentation model that we can train for different segmentation problems without changes to the architecture. To know the details, let’s go through the article.
We will cover the following topics in this article
- First, we will start with the issues in the field of image segmentation and the contributions of the Mask2Former paper.
- Second, we will cover the Mask2Former architecture.
- Third, we will discuss some results from the paper and its advantages over other segmentation models.
- Finally, we will run image and video inference with Mask2Former using Hugging Face Transformers.
Traditional Approach to Image Segmentation Architecture
There are three primary techniques in image segmentation: semantic, instance, and panoptic segmentation. Until very recently, the focus was on building specialized deep learning architectures for each technique. A model architecture that works well on semantic segmentation tasks may not work for instance segmentation and panoptic segmentation. Such specialized architectures lead to more effort and time consumed for building different types of models for each task.
To address this issue, Mask2Former enters as a universal image segmentation architecture. The same model can be trained for all three segmentation tasks while retaining excellent performance on each. As such, the Mask2Former makes four major improvements to the field of deep learning based image segmentation.
- First, the masked attention in the Transformer decoder restricts attention to localized features. This leads to faster convergence and better performance.
- Second, multi-scale high-resolution features lead to better segmentation of small objects.
- Third, several optimizations such as learnable queries, removing dropout, and switching order between cross and self-attention.
- Fourth, calculating loss on a few randomly sampled points from the predicted mask. This leads to 3x GPU memory saving during training.
Now, let’s understand the Mask2Former architecture that leads to the above contributions and improvements.
The Mask2Former Architecture
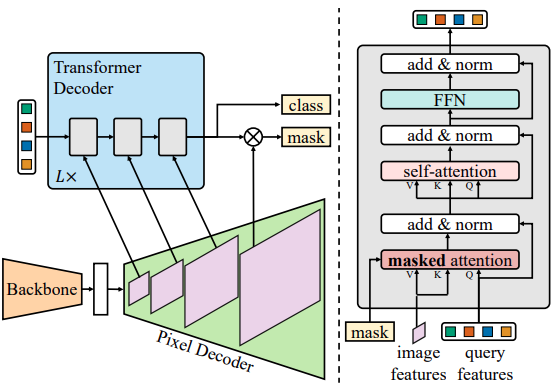
The Mask2Former architecture consists of three components:
- A backbone for feature extraction.
- A pixel decoder for upsampling the low-resolution features from the backbone to high resolution features.
- And a Transformer decoder that converts the features from the pixel decoder into mask predictions.
The Mask2Former architecture is based on the MaskFormer meta architecture by Cheng et al. The primary component (and improvement) is the Transformer Decoder with Masked Attention. This gives Mask2Former a boost in segmentation accuracy.
Simply put, the Transformer Decoder does not attend to the entire feature map. Instead, the masked attention operation extracts localized features by constraining cross-attention to the foreground region of the predicted mask.
There are two other improvements as well.
- Instead of always feeding high-resolution features to the Transformer decoder, the Mask2Former uses a feature pyramid network. It consists of both, high and low-resolution features. At a time, a single resolution feature from the multi-scale feature maps goes to the Transformer decoder. This helps the model to learn the segmentation maps of both large and small objects.
- The authors also propose a set of other improvements. Firstly, they switch, the order of self and cross-attention. This is part of the masked attention. Secondly, they make the query features learnable which are fed to the Transformer decoder. Thirdly, they remove dropout which leads to faster training.
Another major update is improving the training efficiency through a reduction in GPU memory consumption. Instead of using the entire mask for loss calculation, Mask2Former samples K random points from the predicted mask for loss calculation which reduces the GPU memory usage by 3x.
There are a lot of other details in the paper regarding the Mask2Former architecture. I highly recommend going through the paper once to get all the details.
Mask2Former Performance Analysis
Let’s go through a brief performance analysis of the Mask2Former model here for each of the segmentation tasks.
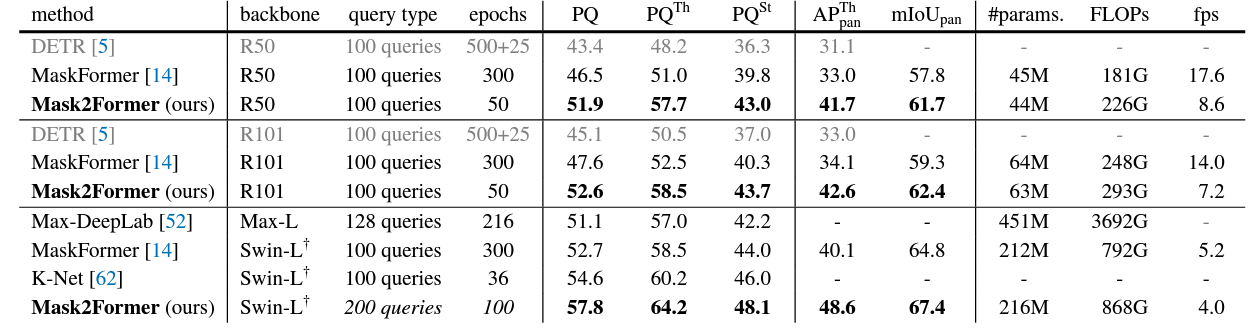
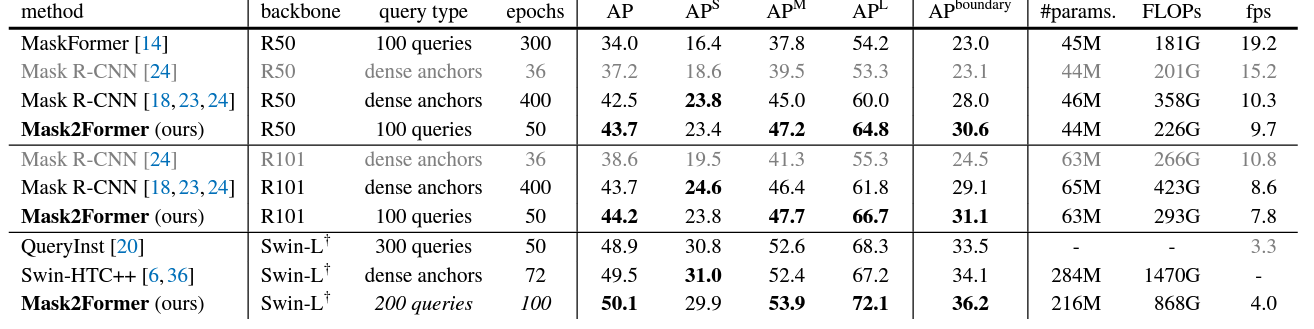
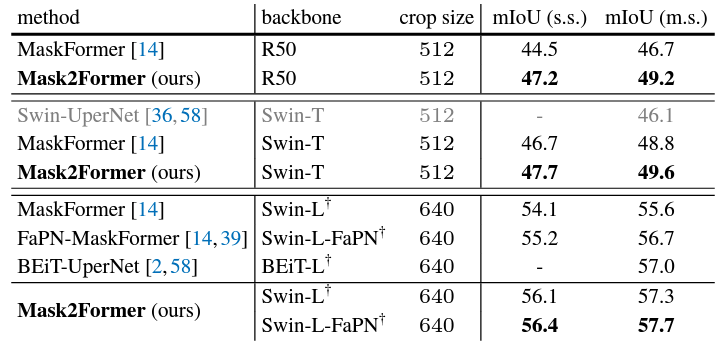
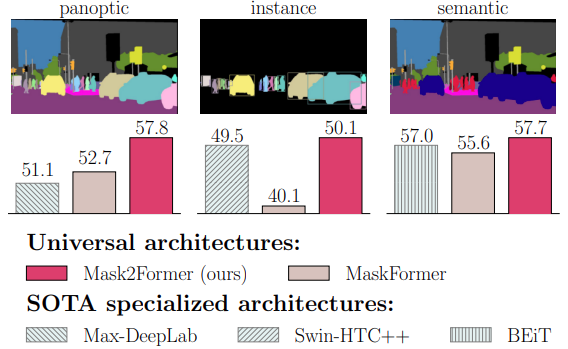
From the above figures, it is clear that Mask2Former performs better than most models on the three segmentation tasks. However, observing with a bit more detail reveals that the FPS is much lower than other models, even for the smallest of Mask2Former models. This is one potential drawback for Mask2Former when considering running it on resource-constrained devices.
Inference using Mask2Former
In this section, we will follow through with the inference using Maks2Former using the Hugging Face Transformers.
We will run inference on both, images and videos.
Project Directory Structure
Let’s check the project directory first.
├── input
│   ├── image_1.jpg
│   ├── image_2.jpg
│   ├── video_1.mp4
│   └── video_2.mp4
├── outputs
│   ├── image_1.jpg_instance
│   ├── image_1.jpg_panoptic
│   ├── image_1.jpg_semantic
│   ├── video_1.mp4
│   └── video_2.mp4
├── color_palette.py
├── mask2former_infer_image.py
├── mask2former_infer_video.py
├── model.py
└── utils.py
- The
inputandoutputsdirectories contain the input that we will pass through the Mask2Former and their respective outputs. - In the root project directory, we have the Python files and utility scripts which we will go over in detail later.
Dependencies
We need the transformers library before we move ahead to the coding part.
pip install transformers
All the Python files and input files are downloadable via the download section.
Download Code
Color Palettes for Segmentation Maps
We will use the semantic segmentation model pretrained on the ADE20K dataset and panoptic & instance segmentation model pretrained on the COCO dataset. To map the predicted maps to RGB segmentation maps, we need an RGB color mapper list. That’s what the color_palette.py file accomplishes.
The COCO dataset has 182 classes including stuff and things for panoptic segmentation. For instance segmentation, it is 80 classes which are the same as the detection classes. The ADE20K dataset contains 150 classes. The following code block shows the truncated lists for both.
COCO_INSTANCE_CATEGORIES = [
    [220, 20, 60],
    [119, 11, 32],
    [0, 0, 142],
    [0, 0, 230],
    ...
]

COCO_PANOPTIC_CATEGORIES = [
    [0, 0, 0],
    [128, 0, 0],
    [0, 128, 0],
    [128, 128, 0],
    [0, 0, 128],
    [128, 0, 128],
    [0, 128, 128],
    [128, 128, 128],
    [64, 0, 0],
    ...
]

ADE_CATEGORIES = [
    [120, 120, 120],
    [180, 120, 120],
    [6, 230, 230],
    [80, 50, 50],
    [4, 200, 3],
    [120, 120, 80],
    ...
]
Feel free to go through all values after downloading the code. We could also use random RGB colors for inference. However, dealing with the real RGB values of each dataset provides more insights about the task.
Helper Scripts
We need a few helper functions for the visualization of the segmentation maps. These helper functions will go into the utils.py file.
The Mask2Former model outputs 2D segmentation maps. We need to convert these into RGB masks first. The following draw_segmentation_map function does that.
import numpy as np
import cv2

def draw_segmentation_map(labels, palette):
    """
    :param labels: Label array from the model.Should be of shape
        . No channel information required.
    :param palette: List containing color information.
        e.g. [[0, 255, 0], [255, 255, 0]]
    """
    # create Numpy arrays containing zeros
    # later to be used to fill them with respective red, green, and blue pixels
    red_map = np.zeros_like(labels).astype(np.uint8)
    green_map = np.zeros_like(labels).astype(np.uint8)
    blue_map = np.zeros_like(labels).astype(np.uint8)

    for label_num in range(0, len(palette)):
        index = labels == label_num
        red_map[index] = np.array(palette)[label_num, 0]
        green_map[index] = np.array(palette)[label_num, 1]
        blue_map[index] = np.array(palette)[label_num, 2]

    segmentation_map = np.stack([red_map, green_map, blue_map], axis=2)

    return segmentation_map
The function accepts the 2D array and a color palette list that we defined earlier. It returns the RGB segmentation map that we can later use to overlay on top of the original image. Following is the overlay function.
def image_overlay(image, segmented_image):
    """
    :param image: Image in RGB format.
    :param segmented_image: Segmentation map in RGB format.
    """
    alpha = 0.2 # transparency for the original image
    beta = 1.0 # transparency for the segmentation map
    gamma = 0 # scalar added to each sum

    segmented_image = cv2.cvtColor(segmented_image, cv2.COLOR_RGB2BGR)
    image = np.array(image)
    image = cv2.cvtColor(image, cv2.COLOR_RGB2BGR)
    cv2.addWeighted(image, alpha, segmented_image, beta, gamma, image)

    return image
This function accepts the original RGB image and the RGB segmentation map and overlays them using OpenCV’s addWeighted function.
The Mas2Former Model
Now, let’s get to defining the MaskFormer model using the transfomers library. The code for this remains in the model.py file.
from transformers import Mask2FormerForUniversalSegmentation, AutoImageProcessor

def load_model(task='semantic'):
    if task == 'instance':
        image_processor = AutoImageProcessor.from_pretrained(
            'facebook/mask2former-swin-large-coco-instance'
        )
        model = Mask2FormerForUniversalSegmentation.from_pretrained(
            'facebook/mask2former-swin-large-coco-instance'
        )

    if task == 'semantic':
        image_processor = AutoImageProcessor.from_pretrained(
            'facebook/mask2former-swin-large-ade-semantic'
        )
        model = Mask2FormerForUniversalSegmentation.from_pretrained(
            'facebook/mask2former-swin-large-ade-semantic'
        )

    if task == 'panoptic':
        image_processor = AutoImageProcessor.from_pretrained(
            'facebook/mask2former-swin-large-coco-panoptic'
        )
        model = Mask2FormerForUniversalSegmentation.from_pretrained(
            'facebook/mask2former-swin-large-coco-panoptic'
        )

    return model, image_processor
First, we import the Mask2FormerForUniversalSegmentation and AutoImageProcessor classes. The former is for loading the model and the latter is for loading the preprocessing function. Each image has to go through a certain preprocessing step before we can feed it to the model. This is necessary to ensure that each image is in the same format as it was during the training of the model. To reduce the overhead from the developer’s side, transformers provides the class that we can use to do such preprocessing in one shot.
The load_model function accepts a task parameter. This is necessary because we will be experimenting with semantic, instance, and panoptic segmentation. Based on the task, we load the image processor and the model.
For instance segmentation, we load a COCO pretrained model with the Swin transformer backbone. The panoptic segmentation model is similar but trained on the COCO panoptic dataset. The semantic segmentation model has been trained on the ADE20K data with a large Swin transformer backbone.
Image Inference using Mask2Former
We are done with all the utilities and model preparation. Let’s get to the image inference part. The mask2former_infer_image.py file contains the code for this.
Starting with the import statements and the argument parser.
from PIL import Image
from model import load_model
from color_palette import (
    COCO_INSTANCE_CATEGORIES,
    COCO_PANOPTIC_CATEGORIES,
    ADE_CATEGORIES
)
from utils import draw_segmentation_map, image_overlay

import argparse
import torch
import cv2
import os

parser = argparse.ArgumentParser()
parser.add_argument(
    '--input',
    default='input/image_1.jpg'
)
parser.add_argument(
    '--task',
    default='semantic'
)
args = parser.parse_args()
We import the color palette lists and the helper functions from the utils module. For the command line arguments, we have one for passing the path to the input image and another for the segmentation task that we want to perform.
Next is loading creating the output directory, loading the model and image processor, and preprocessing the image.
out_dir = 'outputs'
os.makedirs(out_dir, exist_ok=True)

device = torch.device('cuda:0' if torch.cuda.is_available() else 'cpu')

model, processor = load_model(args.task)
model = model.to(device).eval()

image = Image.open(args.input)
inputs = processor(image, return_tensors='pt').to(device)
We read the image using PIL and pass it to the image processor. The return_tensors='pt' tells the functions to return PyTorch tensors as we are using the PyTorch library here.
Now, we need to forward pass the preprocessed tensor through the model, and apply post processing to the outputs.
with torch.no_grad():
    outputs = model(**inputs)

# Model predicts class_queries_logits of shape `(batch_size, num_queries)`
# and masks_queries_logits of shape `(batch_size, num_queries, height, width)`
class_queries_logits = outputs.class_queries_logits
masks_queries_logits = outputs.masks_queries_logits

if args.task == 'semantic':
    pred_map = processor.post_process_semantic_segmentation(
        outputs, target_sizes=[image.size[::-1]]
    )[0]
    mask = pred_map
    categories = ADE_CATEGORIES

if args.task == 'instance':
    pred_map = processor.post_process_instance_segmentation(
        outputs, target_sizes=[image.size[::-1]]
    )[0]
    mask = pred_map['segmentation']
    categories = COCO_CATEGORIES

if args.task == 'panoptic':
    pred_map = processor.post_process_panoptic_segmentation(
        outputs, target_sizes=[image.size[::-1]]
    )[0]
    mask = pred_map['segmentation']
    categories = COCO_CATEGORIES

seg_map = draw_segmentation_map(mask, categories)
result = image_overlay(image, seg_map)

save_name = args.task + '_' + args.input.split(os.path.sep)[-1]
cv2.imwrite(os.path.join(out_dir, save_name), result)
cv2.imshow('Image', result)
cv2.waitKey(0)
The outputs contain two attributes, class_queries_logits and masks_queries_logits that we extract on lines 36 and 37.
Based on the task that we pass to the task argument, we apply the post processing to the outputs. Here also, we do not need to apply the post processing manually to obtain the 2D masks. Instead, we call either of the three functions:
post_process_semantic_segmentationpost_process_instance_segmentationpost_process_panoptic_segmentation
The functions accept the output from the model and the target size for resizing the masks. For semantic segmentation, it directly outputs the masks. However, for instance segmentation and panoptic segmentation, it outputs a dictionary with the 'segmentation' key containing the mask.
Then, we pass the 2D mask to the draw_segmentation_mask function to obtain the RGB mask. Next, we pass the original image and RGB mask to the image_overlay function to obtain the final result. Finally, we save the result to disk.
Executing Script for Image Inference
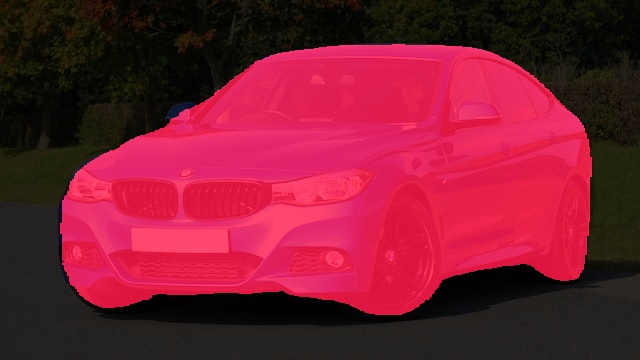
Let’s start with the execution of the semantic segmentation task on an image.
python mask2former_infer_image.py --input input/image_1.jpg --task semantic
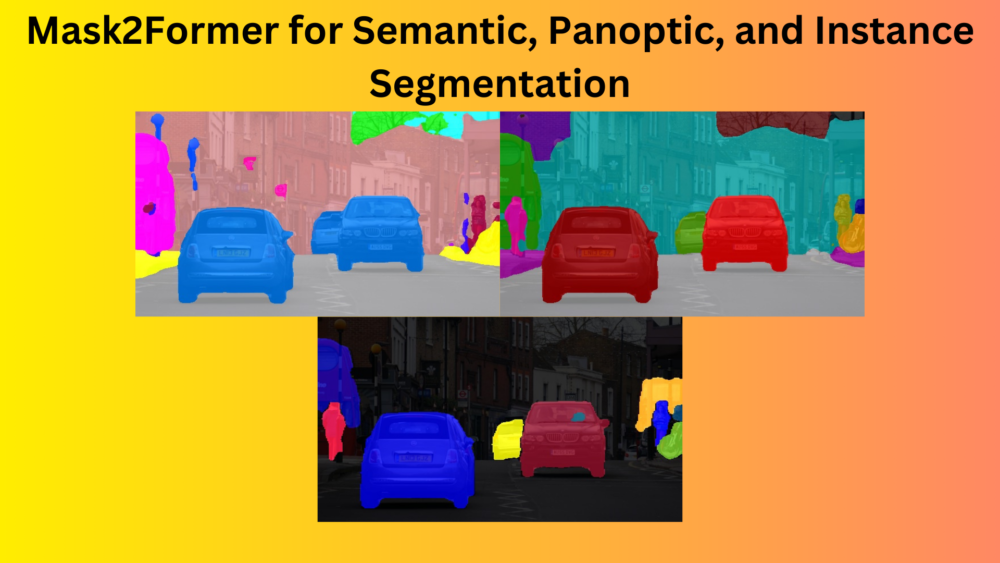
Here are the results.
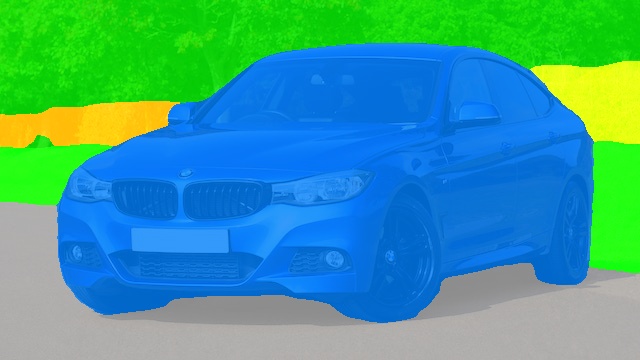
Because the ADE20K dataset has 150 classes, it can segment the car, the grass, and even the vegetation in the background.
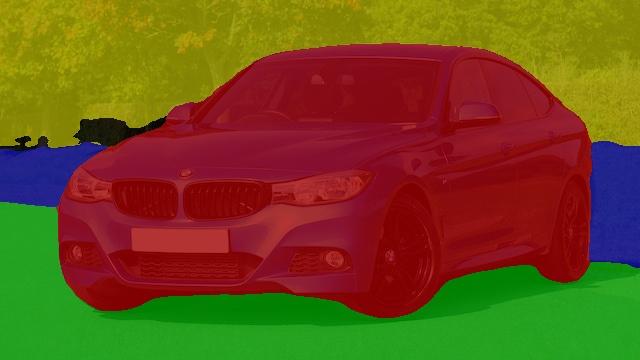
Now, let’s run the instance segmentation task.
python mask2former_infer_image.py --input input/image_1.jpg --task instance
Similarly, for panoptic segmentation, we just need to change the task.
python mask2former_infer_image.py --input input/image_1.jpg --task panoptic
Here are the results for all three segmentation tasks on another image.
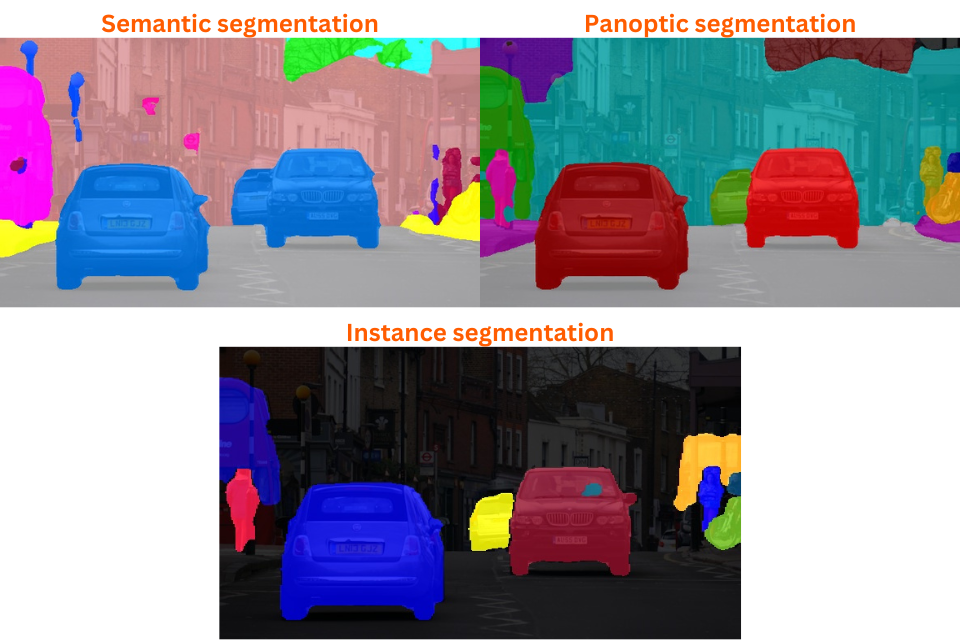
As we can see, panoptic segmentation is segmenting the different instances of persons & vehicles, and the buildings as well. It is a combination of semantic and instance segmentation.
Interestingly, instance and panoptic segmentation models are performing better for person segmentation compared to semantic segmentation.
If you are interested to know more about person segmentation using deep learning, you can take a look at these two posts.
- Person Segmentation with EfficientNet Lite Based Segmentation Models: Here, we use an EfficientNet Lite encoder with a FCN32s decoder to train a very light-weight person segmentation model.
- Training SegFormer for Person Segmentation: In this one, we fine-tune the SegFormer-B1 model for person segmentation
Video Semantic Segmentation using Mask2Former
Now, let’s dive into carrying out semantic segmentation on a video using the Mask2Former ADE20K pretrained model.
The code for this goes into the mask2former_infer_video.py file. The code till the loading of the model remains mostly similar.
from PIL import Image
from model import load_model
from color_palette import ADE_CATEGORIES
from utils import draw_segmentation_map, image_overlay

import argparse
import torch
import cv2
import time
import os

parser = argparse.ArgumentParser()
parser.add_argument(
    '--input',
    default='input/video_1.mp4'
)
args = parser.parse_args()

out_dir = 'outputs'
os.makedirs(out_dir, exist_ok=True)

device = torch.device('cuda:0' if torch.cuda.is_available() else 'cpu')

model, processor = load_model('semantic')
model = model.to(device).eval()
This time, we pass the path to a video instead of an image.
Next is loading the video, extracting its metadata, and defining the output path.
cap = cv2.VideoCapture(args.input)
frame_width = int(cap.get(3))
frame_height = int(cap.get(4))
vid_fps = int(cap.get(5))
save_name = args.input.split(os.path.sep)[-1].split('.')[0]

# Define codec and create VideoWriter object.
out = cv2.VideoWriter(
    f"{out_dir}/{save_name}.mp4",
    cv2.VideoWriter_fourcc(*'mp4v'),
    vid_fps,
    (frame_width, frame_height)
)

frame_count = 0 # To count total frames.
total_fps = 0 # To get the final frames per second.
Finally, we carry out similar operations as we did for a single image, but this time on each frame of the video.
while cap.isOpened():
    ret, frame = cap.read()

    if ret:
        frame_count += 1
        # frame = cv2.resize(frame, resize)
        image = Image.fromarray(frame).convert('RGB')
        inputs = processor(image, return_tensors='pt').to(device)

        start_time = time.time()

        with torch.no_grad():
            outputs = model(**inputs)

        # Model predicts class_queries_logits of shape `(batch_size, num_queries)`
        # and masks_queries_logits of shape `(batch_size, num_queries, height, width)`
        class_queries_logits = outputs.class_queries_logits
        masks_queries_logits = outputs.masks_queries_logits

        pred_map = processor.post_process_semantic_segmentation(
            outputs, target_sizes=[image.size[::-1]]
        )[0]

        mask = pred_map

        mask = mask.cpu()
        seg_map = draw_segmentation_map(mask, ADE_CATEGORIES)
        result = image_overlay(image, seg_map)

        end_time = time.time()

        fps = 1 / (end_time - start_time)
        total_fps += fps

        cv2.putText(
            result,
            f"FPS: {fps:.1f}",
            (15, 25),
            cv2.FONT_HERSHEY_SIMPLEX,
            fontScale=1,
            color=(0, 0, 255),
            thickness=2,
            lineType=cv2.LINE_AA
        )

        end_time = time.time()

        out.write(result)

        cv2.imshow('Image', result)
        # Press `q` to exit
        if cv2.waitKey(1) & 0xFF == ord('q'):
            break

    else:
        break

# Release VideoCapture().
cap.release()
# Close all frames and video windows.
cv2.destroyAllWindows()

# Calculate and print the average FPS.
avg_fps = total_fps / frame_count
print(f"Average FPS: {avg_fps:.3f}")
Along with the overlayed segmentation map, we also annotate the FPS on top of each frame.
We can execute the following command to run it.
python mask2former_infer_video.py --input input/video_1.mp4
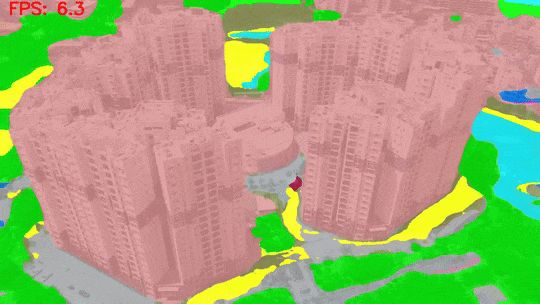
Here are the results when running on an RTX 3080 GPU.
Here is another video.
In both cases, we can see that the ADE20K pretrained Mask2Former model can segment various objects including buildings, grass, and vegetation. There is a bit of flickering as well when the model is getting confused between grassland and other vegetation. However, the most striking part is the FPS, which is not very high. Even on a high-end GPU, we are barely getting 6 FPS.
Summary and Conclusion
In this article, we covered the Mask2Former model. We went through its architecture and carried out inference for various segmentation tasks on images and videos. We noticed that Mask2Former is slow for real-time applications. However, it contains real potential if we can fine-tune it for more specific tasks. That is what we will accomplish in the next article. We will fine-tune the Mask2Former model for a very specific real-world task. I hope that this article was worth your time.
If you have any doubts, thoughts, or suggestions, please leave them in the comment section. I will surely address them.
You can contact me using the Contact section. You can also find me on LinkedIn, and X.
References

I found that the program always runs on the CPU when I run it. Did I miss any settings? I ran it on vscode.
Hi. The code is set to run on CUDA as we are specifically setting the computation device. However, please ensure that you have installed PyTorch with CUDA support.
Thank you for your reminder. I just found out that I installed the wrong python version and cuda version.