
In the last few articles, we explored how to create simple and multi-agent workflows using LangGraph and Amazon Bedrock models. However, creating the agent orchestration layer is only one part of the process. For these agents to be usable, we need to deploy them. If we go the manual route, then we need to provision infrastructure, manage resources, and also scale resources up and down as and when necessary. However, Amazon Bedrock AgentCore simplifies that process to a great extent. In this article, we will cover an introduction to Bedrock AgentCore and check the process from creating agents to their deployment.
Bedrock AgentCore provides a managed environment for deploying and running agents without requiring us to manually provision and manage the underlying infrastructure. However, the process can be slightly confusing when getting started. Also, understanding where each component is and what they do is crucial to expand the capabilities of these agents later on. This article has a simple aim – we bootstrap an agent using Bedrock AgentCore, deploy it into our Amazon Web Services account, and invoke it with simple prompts.
What are we going to cover while getting started with Bedrock AgentCore?
- Setting up AgentCore locally
- Bootstrapping an agent with AgentCore CLI interactive mode, powered by the LangGraph library
- Understanding the important parts of the codebase
- Deploying the agent into our AWS account
- Testing the deployed agent via CLI and Python script
Why Do We Need Bedrock AgentCore?
To be extremely clear, we do not necessarily need Bedrock AgentCore. However, it reduces the entire deployment overhead into just a few lines of command, and that perhaps is its major selling point.
After we have created an agent with AgentCore, we get the following benefits:
- Run a few commands to deploy it into our AWS account
- Can choose between different deployment options
- Can create invocable endpoints in the AgentCore Runtime dashboard with just a few clicks
- Monitor the runtime easily; CloudWatch and observability are built-in
- Do not need to worry about scaling or managing resources as everything is serverless
These are just a few of the major benefits. As we play around more with AgentCore, we will discover new things.
Prerequisites
For the setup and bootstrapping steps, we are closely following this official Amazon documentation. Before moving ahead, we need to have the following prerequisites completed:
- AWS account
- Node.js 20+ installed system-wide
- Python 3.10+ installed system-wide
- AWS CLI installed
- AWS permissions: Make sure that AWS CLI is configured with credentials that have permissions required to deploy AgentCore resources
- Model access: The bootstrapping process uses Claude models by default. Depending on the AWS account and model access configuration, you may encounter usage limits while experimenting with them. For the experiments in this article, we will switch to the Amazon Nova Pro model.
Installing AgentCore CLI
After installing Node.js, we can run the following command to install AgentCore CLI.
npm install -g @aws/agentcore
Apart from the above, please make sure that you have completed the rest of the prerequisite steps.
You can check all the available options via agentcore --help command.
Usage: agentcore [options] [command] Build and deploy Agentic AI applications on AgentCore Options: -V, --version output the version number -h, --help Display help Commands: add [subcommand] Add resources to project config. dev|d [options] [prompt] Launch local dev server, or invoke an agent locally. deploy|dp [options] Deploy project infrastructure to AWS via CDK. exec [options] [command...] Open an interactive shell or run a one-shot command in a deployed agent container. create [options] Create a new AgentCore project evals View saved eval and batch eval results from past runs. feedback [options] [message] Send feedback about the AgentCore CLI to the team. fetch Fetch access info for deployed resources. help Display help topics import [options] Import a runtime, memory, or starter toolkit into this project. invoke|i [options] [prompt] Invoke a deployed agent endpoint. logs|l [options] Stream or search agent runtime logs. package|pkg [options] Package agent artifacts without deploying. pause Pause a deployed resource (online eval config, A/B test). view View job history and details batch-evaluations [options]View batch evaluation jobs and their results. remove [subcommand] Remove resources from project config. resume Resume a paused resource (online eval config, A/B test). run Run evaluations, batch evaluations, or optimization recommendations. status|s [options] Show deployed resource details and status. stop Stop a running batch evaluation or A/B test. promote Promote resources telemetry Manage anonymous usage analytics preferences. traces|t View and download agent traces. update [options] Check for and install CLI updates validate [options] Validate agentcore/ config files. config-bundle|cb Manage configuration bundles (use bundle name from agentcore.json, not the ID) config [key] [value] Adjust global configuration settings such as telemetry opt-out status dataset Manage dataset content and versions archive Archive (delete) a batch evaluation or recommendation on the service and clear local history. export Export a harness to a Strands runtime agent.
As AgentCore is constantly evolving, you might see different options available in the future. For the same reason, we are also avoiding discussing the directory structure of the project here, as what we see in this article might not match exactly what the library creates via bootstrapping in the future.
However, a downloadable zip file is available with this article with all the commands in a README file and a shell script containing the bootstrapping and deployment commands.
Download Code
More article on Bedrock and LLM Agents:
- Amazon Bedrock Multimodal Chat and Text RAG
- Amazon Bedrock and LangGraph – Simple Agents and Tool Use
- Stateful AWS Bedrock LangGraph Agents – Getting Started
- Building an Orchestrator-Worker Agent System with LangGraph and Amazon Bedrock
Creating Our First Agent using Bedrock AgentCore
Let’s get to the interesting part. We will create our first agent using AgentCore now. Go to the directory of your choice and follow along with the following CLI commands. There are two ways to create and manage agents via AgentCore: the AgentCore CLI mode or AgentCore CLI interactive mode. We will use the interactive mode in this article.
agentcore create
Executing agentcore create will start the process of creating a new AgentCore project, and it will ask us for a new project name. Further, it asks for the type of agent we want to create, the framework, and the deployment configuration of our choice, among others.
The following video shows all the choices we have made to create a new project.
After we have created the project, we can see the following directory structure.
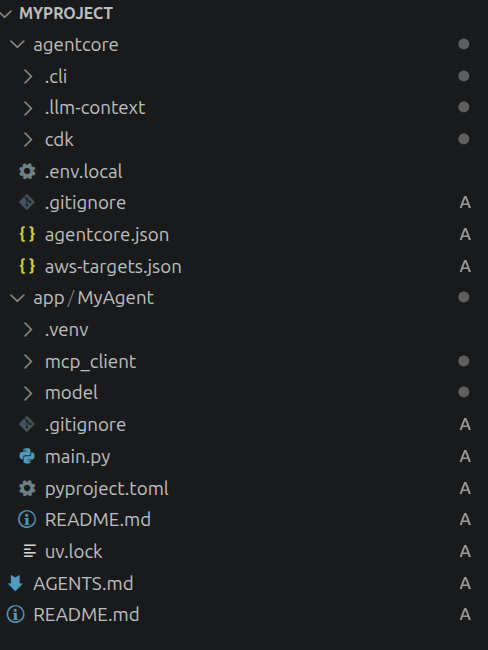
Let’s understand some of the important components from the above directory structure:
app/MyAgent/model/load.py: This Python file contains the LLM we want to use for our agentic workflows. As we saw above, the default model is one of the Bedrock Claude models. However, we can go ahead and change theMODEL_IDvariable to Amazon Nova Pro from Amazon Bedrock. You can use any other model you prefer as well.app/MyAgent/mcp_client/client.py: We can use this script to configure MCPs. However, one of the interesting facts is that AgentCore comes bundled with Exa web search MCP. So, our agents have the capability to search the internet by default.-
agentcore/aws-targets.json: This will contain all the deployment target details as we move ahead to deploy our agent further in the article. Initially, it would be empty. We have chosen CDK as our deployment configuration.
Starting the Local Development Server
We can test our agents locally using the local development server. Enter the project directory and execute the following command to start the server.
cd MyProject

agentcore dev
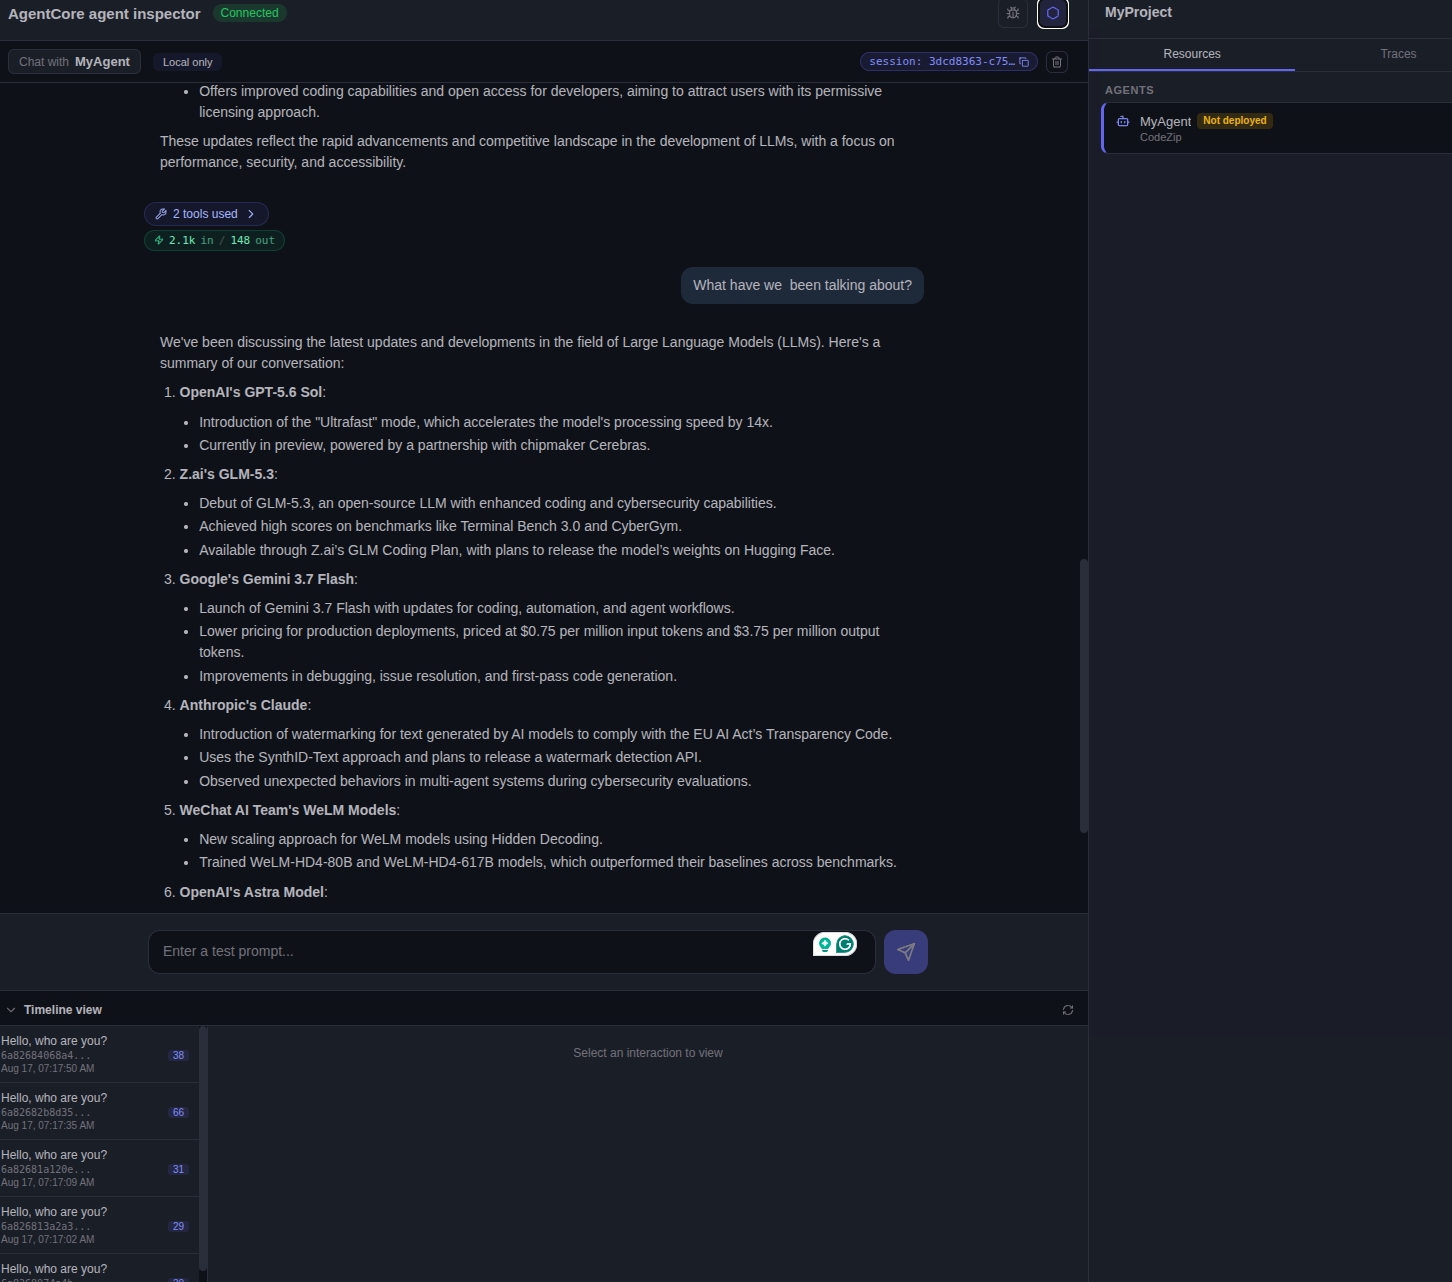
We can check whether our agent orchestration is working properly or not, ask the agent to search the internet, and furthermore, it also comes with built-in per-session memory management. Although we have not configured either short-term or long-term memory, LangGraph manages the memory per chat session via the InMemorySaver module.
Deploying the Agent
Next, we will deploy the agent to our AWS accounts. We can do so by executing the agentcore deploy command in the terminal. The following video shows the entire process.
We can use the agentcore status command to check the deployment status as well. The result will also provide with an ARN which is basically the endpoint that we can use for invocation. Before we make an invocation, let’s check out the AgentCore Runtime dashboard.
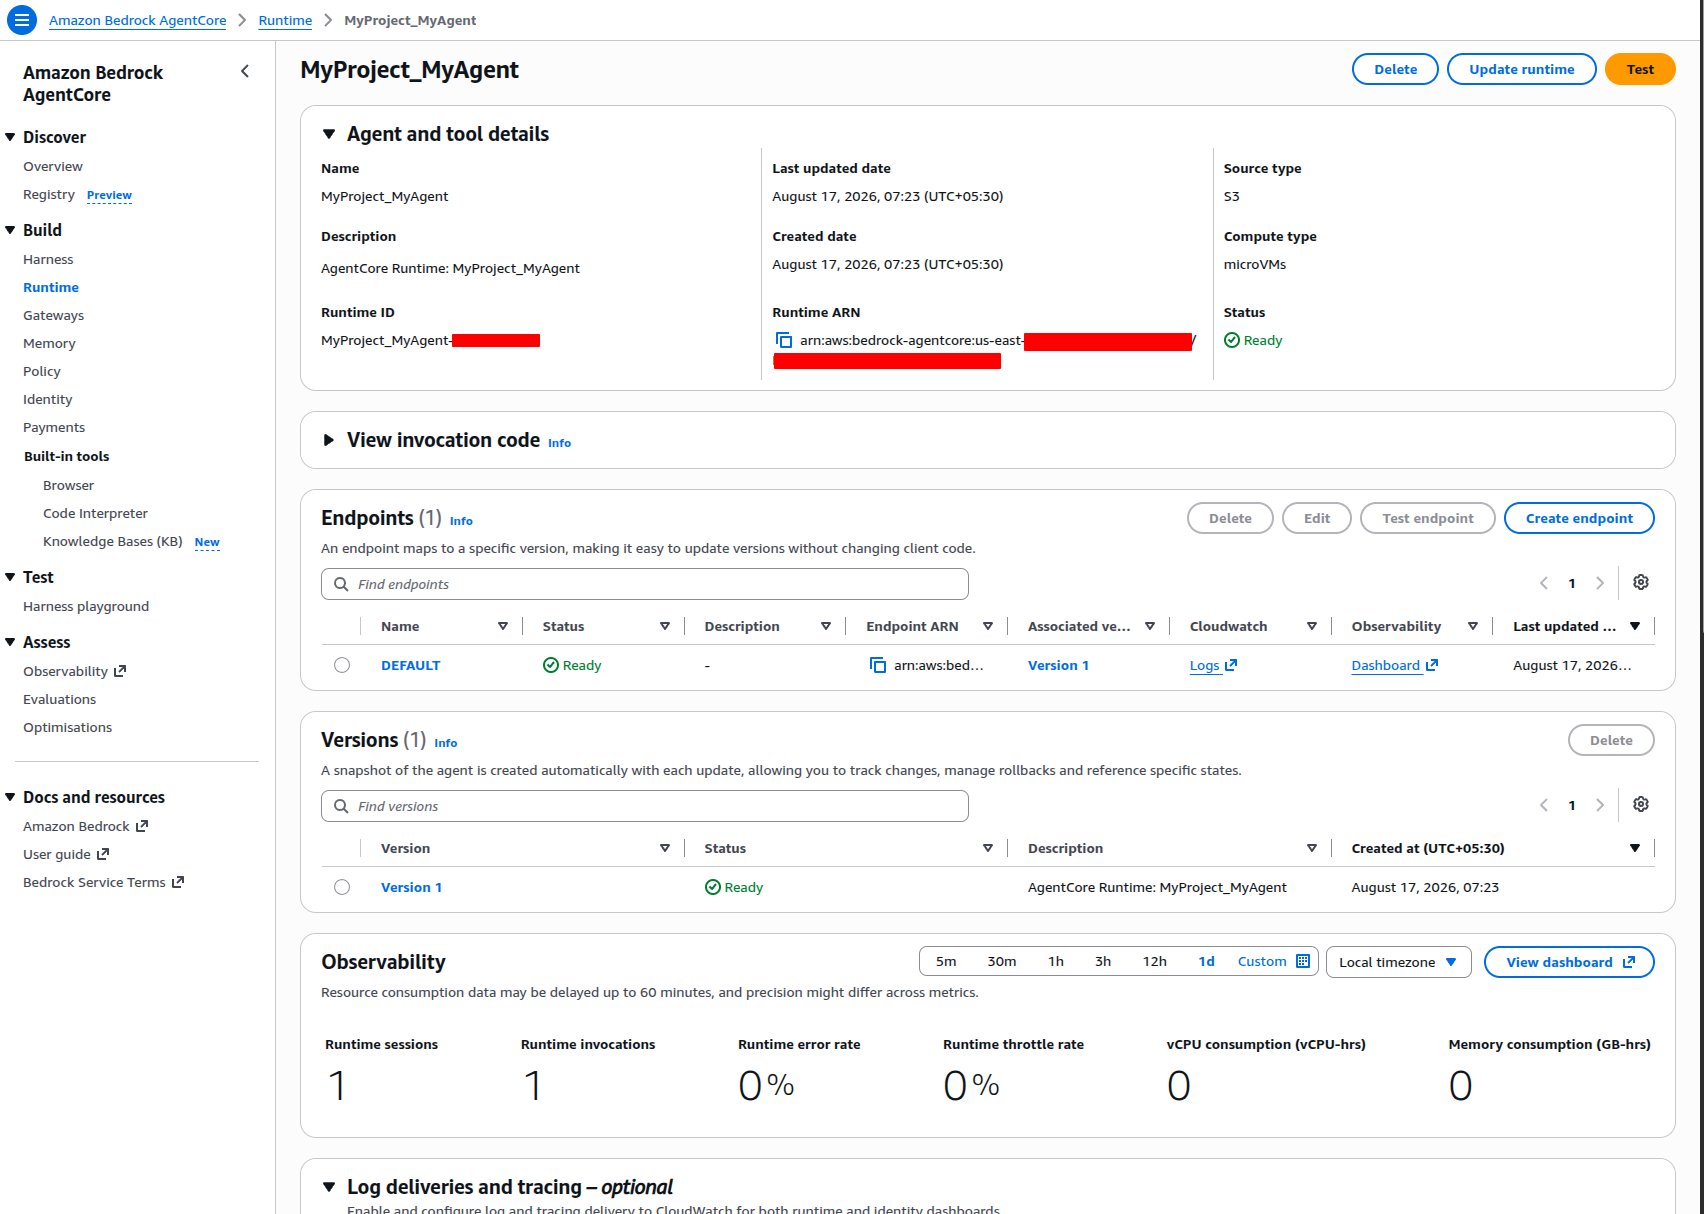
Here, we can find the details of our deployed agent, along with:
- The runtime ARN
- The logs and dashboard
- And observability
Invoking the Deployed Agent
We can invoke the deployed agent via 3 methods:
- Directly test in the Runtime console
- Via AWS Bedrock AgentCore CLI
- And the Python
boto3package
Let’s test via the Runtime console first. Click on the DEFAULT link and then on the Test endpoint button at the top right corner. You should see an input box where you can modify the JSON payload and click on the Run button.
The following is an example.
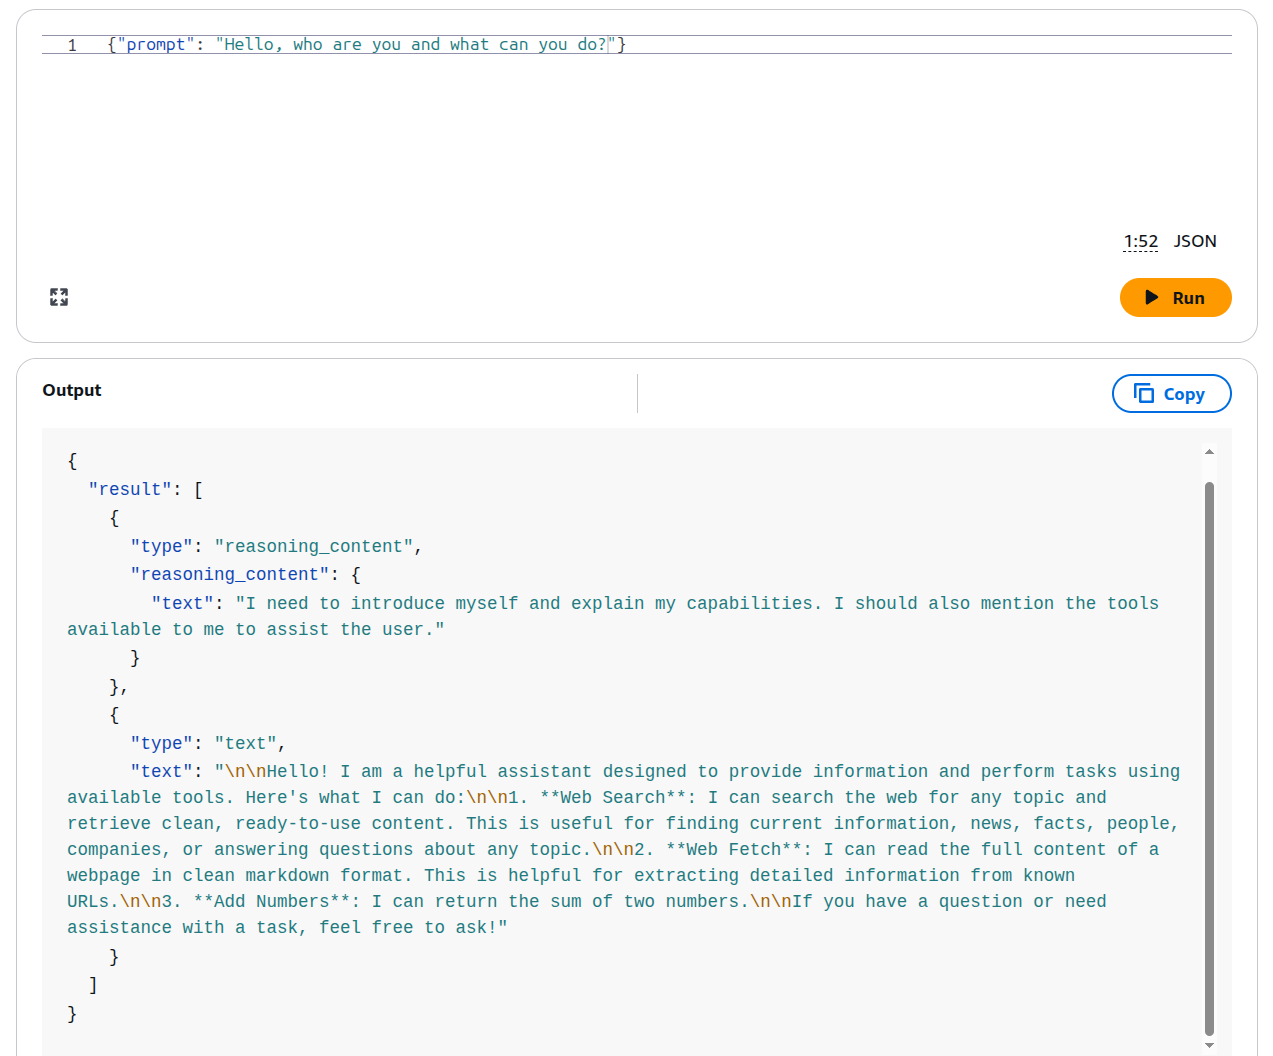
If we use a reasoning model, then we get the reasoning content and the final response as well.
Next, we will try the CLI route. The following is the syntax for using the AgentCore CLI invocation command.
# Generate a UUID (36 chars, always valid)
SESSION_ID=$(uuidgen)
# or
SESSION_ID="session-$(date +%s)-$(openssl rand -hex 16)"

aws bedrock-agentcore invoke-agent-runtime \
  --agent-runtime-arn arn \
  --runtime-session-id "$SESSION_ID" \
  --payload $(echo -n '{"prompt": "Hello"}' | base64) \
  --region us-east-1 \
  response.json && cat response.json
We generate a session ID, provide the ARN, session ID, payload in base64 format, along with the region. Replace the arn placeholder with your own ARN and execute via CLI to get a response. You should get a response similar to the following.
{"result": "Hello! How can I assist you today? If you have a question or need information on a specific topic, feel free to ask."}
Finally, we will try using the AWS Python SDK.
import json
import uuid
import boto3

agent_arn = "Agent ARN"
prompt = "Who are you and what can you do?"

# Initialize the Amazon Bedrock AgentCore client
agent_core_client = boto3.client('bedrock-agentcore')

# Prepare the payload
payload = json.dumps({"prompt": prompt}).encode()

# Invoke the agent
response = agent_core_client.invoke_agent_runtime(
    agentRuntimeArn=agent_arn,
    runtimeSessionId=str(uuid.uuid4()),
    payload=payload,
    qualifier="DEFAULT"
)

content = []
for chunk in response.get("response", []):
    content.append(chunk.decode('utf-8'))
print(json.loads(''.join(content)))
Replace the agent_arn with your ARN and execute the script. The response should be similar to the following.
{
  "result": [
    {
      "type": "reasoning_content",
      "reasoning_content": {
        "text": "I need to explain who I am and what capabilities I have. I should describe my role as a helpful assistant and list the tools available to me, including how they can be used to assist the user."
      }
    },
    {
      "type": "text",
      "text": "I’m a helpful assistant designed to provide information and perform tasks using a set of specialized tools. Here’s what I can do:\n\n1. **Web Search**\n   Search the web for current information, news, facts, people, companies, and answers to a wide range of questions.\n\n2. **Web Fetch**\n   Read and extract the full content of a webpage from a known URL, presenting it in a clean, easy-to-use format.\n\n3. **Add Numbers**\n   Calculate the sum of two numbers using a simple arithmetic function.\n\nIf you have a question or need help with a task, feel free to ask!"
    }
  ]
}
Deleting Resources
Although the entire AgentCore deployment on AWS is serverless, meaning we do not incur cost when we do not invoke the agents, it is still better to clean up resources when not using them for an extended period. First, we need to remove the local configuration using the following command and then redeploy.
agentcore remove all

agentcore deploy
Executing the above two commands yields output similar to the following:
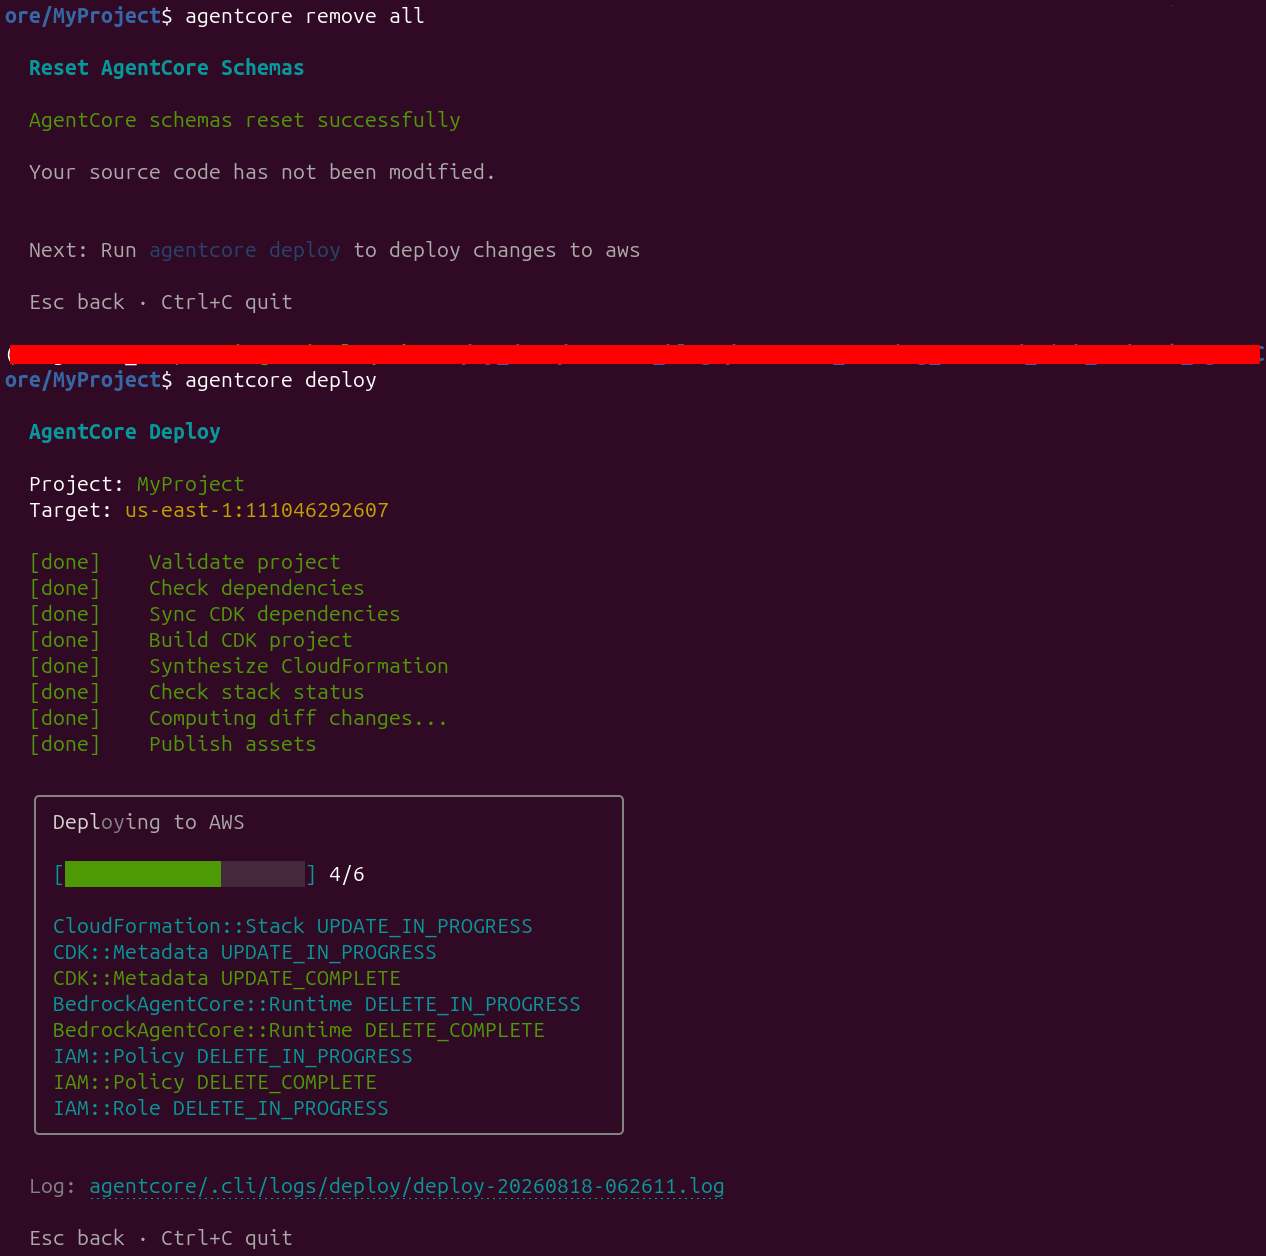
Furthermore, if we check the AgentCore Runtime dashboard, we will observe that the resources are no longer visible there.
Summary and Conclusion
In this article, we covered a short introduction to Bedrock AgentCore. We started with understanding why AgentCore is useful, moved on to bootstrap a simple project using AgentCore, deployed it on AWS, tested it, and also covered how to remove resources. In future articles, we will cover more complex projects using AgentCore. I hope this article was helpful for you.
If you have any questions, thoughts, or suggestions, please leave them in the comment section. I will surely address them.
You can contact me using the Contact section. You can also find me on LinkedIn, and X.