
PyTorch is an open-source machine learning library. It is based on Torch library but specifically written for Python language. Recently PyTorch has been gaining much more traction and popularity for deep learning research and development alike.
The best thing about PyTorch is that it is very python-like and intuitive. If you know the Python programming language, then you will find PyTorch really friendly.
This is the first part of the article: Deep Learning with PyTorch.
Part 1: Installing PyTorch and Covering the Basics.
In this article, we will get to know about the PyTorch library, install it and cover all the basic stuff.
Getting to Know PyTorch
PyTorch is developed by Facebook and it is mainly intended as a replacement for NumPy. NumPy is a great Python library for scientific computations. It makes matrix operations really easy to carry out.
Now you may have a thought, why do we need PyTorch when we already have NumPy for scientific computations and matrix operations?
Speed, efficiency, and use of resources are where PyTorch shines the most. PyTorch can take advantage of a GPU for all the scientific operations. Moreover, it makes deep learning development much easier and accessible than NumPy. Due to the usage of GPU, PyTorch is much faster when doing any matrix (Tensor) operations. We will get into the details while covering the code part of this article.
Installing PyTorch
Now, as we have had a bit of a background about PyTorch, now is a good time to install the library.
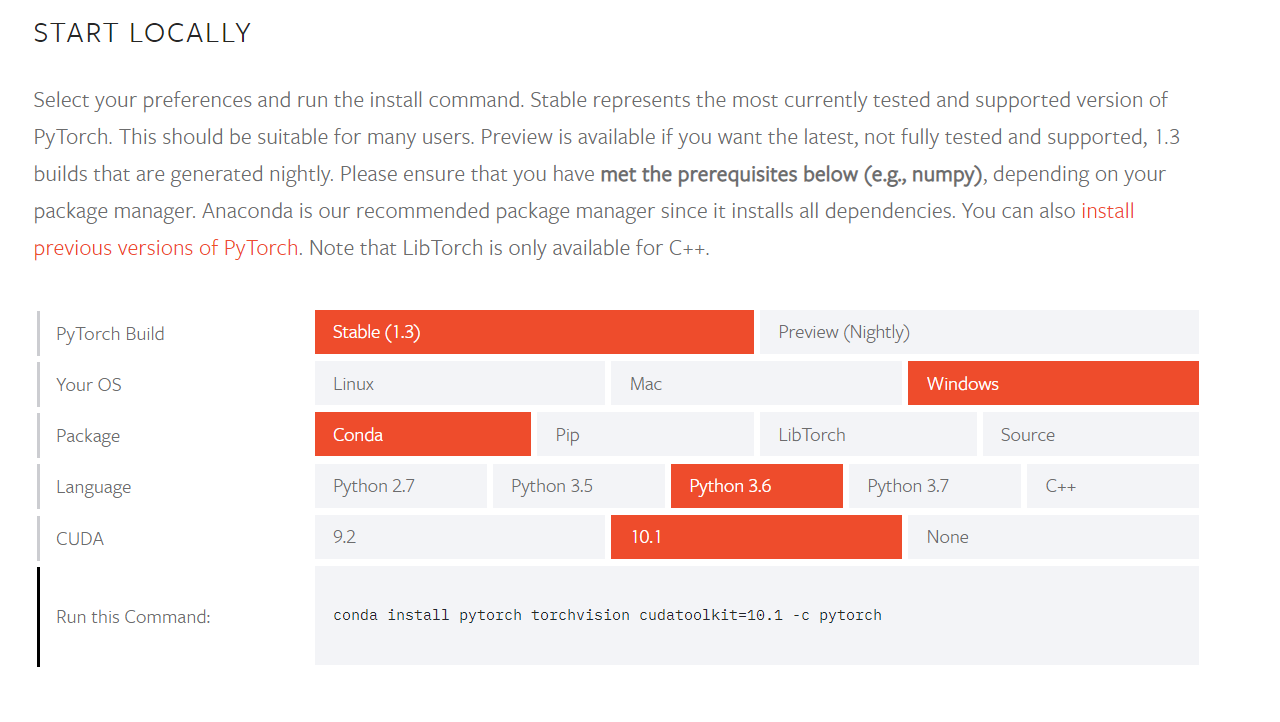
To install PyTorch on your system, head over here and install the library as per your system configuration. The website provides a really easy way to choose among the requirements and configuration and you should not be facing any difficulty.
I hope that by now you are done with the installation of PyTorch and ready to move forward.
Basic Tensor Operations in PyTorch
In this section, we will cover the very useful tensor operations that PyTorch supports. This will form the basis of what will follow in the future articles of the series.
First of all, we need to import torch, and we are all set to get into action.
import torch
Creating a Tensor in PyTorch
Let’s begin with creating a Tensor with PyTorch. We can create a new tensor in PyTorch by using the torch.tensor() method.
x = torch.tensor([12, 5])
print(x)
So, in the above code block, we have passed [12, 5] as the argument to the method. And the following is the output of the above code:
tensor([12, 5])
That wasn’t so difficult, was it?
Getting the Dimensions of a Tensor
Okay, moving ahead, suppose we want to print the dimension of our tensor that we have just created. Then we just need to use the size() method in PyTorch for that.
print(x.size())
torch.Size([2])
Creating a Tensor with All Zeros or All Ones
PyTorch also makes it easy to create tensors that have all the values as zeros (0s) or all the values as ones (1s). The following code shows how to do it.
x = torch.zeros(3, 3)
print(x)
tensor([[0., 0., 0.],
        [0., 0., 0.],
        [0., 0., 0.]])
x = torch.ones(3, 3)
print(x)
tensor([[1., 1., 1.],
        [1., 1., 1.],
        [1., 1., 1.]])
Not only that. We can also create a tensor with random values. We can use the torch.rand() method and just have to give the number of rows and number of columns. That will create a tensor with random values and the dimensions corresponding to the rows and columns.
x = torch.rand(5, 5)
print(x)
print(x.size())
tensor([[0.5384, 0.8217, 0.0441, 0.2394, 0.3914],
        [0.4037, 0.0700, 0.7670, 0.7841, 0.5100],
        [0.3447, 0.6017, 0.3833, 0.0232, 0.6743],
        [0.9243, 0.6905, 0.0823, 0.7950, 0.0610],
        [0.3406, 0.0822, 0.4965, 0.4256, 0.9440]])
torch.Size([5, 5])
Using dtype and Addition of Tensors
This part is going to be a bit important. Here, we will learn the importance of dtype while creating tensors. Let’s create two tensors and try to add them.
# addition without dtype
x = torch.ones(3, 3)
y = torch.tensor([[2, 1, 3],
                  [3, 3, 3],
                  [1, 2, 5]])
print(x+y)
When you execute the above code, then you will get the following Runtime Error.
RuntimeError: expected device cpu and dtype Float but got device cpu and dtype Long
We get this error because the data types of both the tensors, x and y do not match. When we print the dtype of both the tensors, then we get the following output.
print(x.dtype)
print(y.dtype)
torch.float32
torch.int64
We have x as torch.float32 while y as torch.int64.
So, how can we avoid this? We just need to provide the same dtype argument while creating the tensors and then we can add the tensors without nay trouble.
# addition with dtype
x = torch.ones(3, 3, dtype=torch.double)
y = torch.tensor([[2, 1, 3],
                  [3, 3, 3],
                  [1, 2, 5]], dtype=torch.double)
print(x+y)
tensor([[3., 2., 4.],
        [4., 4., 4.],
        [2., 3., 6.]], dtype=torch.float64)
In PyTorch, there are quite a few ways to add tensors. Let’s look at some more ways on how to add tensors.
We can use the torch.add() method to add tensors.
# you can also use torch.add
print(torch.add(x, y))
The above code will give you the same result as doing x+y.
You can also create an empty tensor and use that to store the addition of tensors. To create an empty tensor, use the following code:
res = torch.empty(3, 3, dtype=torch.double)
Also, don’t forget to provide the dtype argument while creating en empty tensor as well. This is essential as to the type of tensor data you will store in it.
Then, to store the result of the addition of tensors in res, we need to provide out=res as a second argument while calling torch.add. Let’s do that now.
torch.add(x, y, out=res)
print(res)
tensor([[3., 2., 4.],
        [4., 4., 4.],
        [2., 3., 6.]], dtype=torch.float64)
Resizing of Tensors
The resizing of tensors is also one of the important properties that we will be using while building neural networks in PyTorch. PyTorch provides its own view() method to resize tensors.
Let’s carry out some basic resizing operations.
# resizing
x = torch.ones(3, 3)
print(x)
y = x.view(9)
print(y)
z = x.view(-1)
print(z)
tensor([[1., 1., 1.],
        [1., 1., 1.],
        [1., 1., 1.]])
tensor([1., 1., 1., 1., 1., 1., 1., 1., 1.])
tensor([1., 1., 1., 1., 1., 1., 1., 1., 1.])
You can see that when we give x.view(9), then the 3×3 tensor flattens into a single dimension. Note that even after flattening, it is still a tensor. So, do not get confused that tensors in deep learning only refer to multidimensional matrices.
You can also use x.size(-1) to resize a tensor as we have done above.
Using GPU for Tensor Operations
PyTorch is very well known for utilizing GPU for carrying out tensor operations. If you have an NVidia GPU, then you can transfer all the tensors to the GPU memory to carry out the operations.
Using GPU for tensor operations is much faster than using a CPU. First of all, we need to get hold of the GPU so that we can use it for our operations. For that, we can use the torch.device() method. The following code will get hold of the CUDA device that is available in your system.
device = torch.device('cuda')
There are many ways of using the GPU. We can create a tensor directly in the GPU memory. We need to provide the argument device=device while creating a tensor. This will ensure that the tensor is created in the CUDA device memory.
x = torch.ones(5, 5, device=device)
We can also just create a tensor and transfer it to the CUDA device memory. PyTorch provides to() method to transfer tensors to and from CUDA devices. The following code shows how to do that:
y = torch.ones(5, 5, dtype=torch.float)
y = y.to(device)
Now that we have both our tensors on the GPU, let’s try to add them.
print(x+y)
tensor([[2., 2., 2., 2., 2.],
        [2., 2., 2., 2., 2.],
        [2., 2., 2., 2., 2.],
        [2., 2., 2., 2., 2.],
        [2., 2., 2., 2., 2.]], device='cuda:0')
This addition operation took place on the GPU.
You can also transfer all the tensors back to the CPU by using the following code. Again, we can use the to() method to do so.
x = x.to('cpu')
y = y.to('cpu')
Summary and Conclusion
In this article, you got to know the basics of PyTorch along with the installation and some important tensor operations. We will dive deeper into the deep learning part with PyTorch in the future articles. If you want to know more about tensor operations, consider visiting this PyTorch tutorial.
Leave your thoughts about the article in the comment section and I will try my best to address them. If you need to contact me, you can find me LinkedIn, and Twitter.

6 thoughts on “Deep Learning with PyTorch: Installing PyTorch and Covering the Basics”