
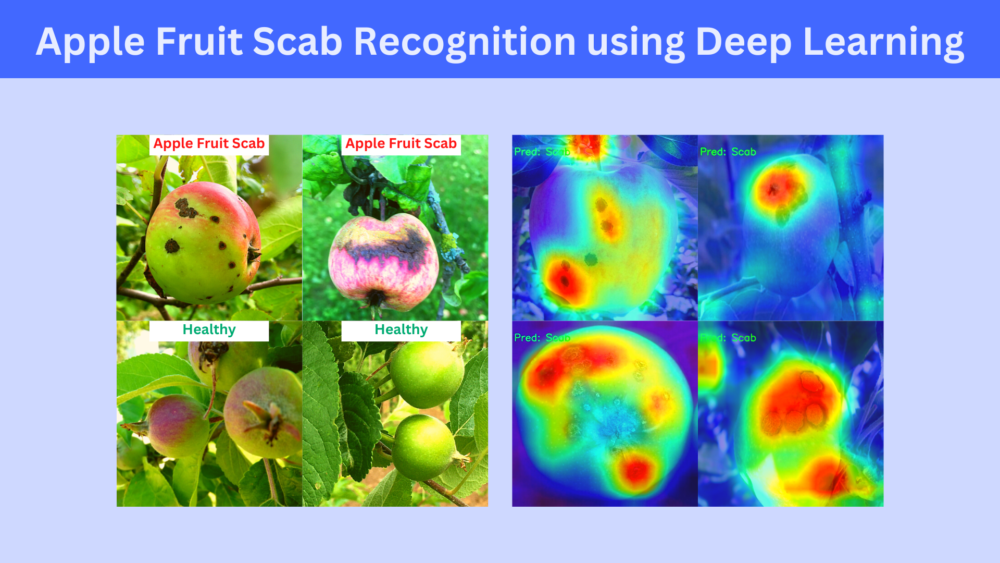
Plant pathogens not only affect leaves of a fruit-bearing plant but the fruit itself as well. One such disease is the apple scab disease. It affects both, the leaves of the apple tree and the fruits as well. But deep learning can help us recognize such diseases. We will continue with our apple scab recognition using deep learning series. In this tutorial, we will use deep learning with the PyTorch framework for scab recognition in the apple fruit.
In the last post, we used deep learning and PyTorch to recognize scab diseases in apple leaves. This time, we will detect them in the apple fruits.

But this time, it is going to be a much more challenging problem. We will be training our deep learning model on a much smaller dataset (less than 200 apple scab disease images!). But we will do all we can to train the best model possible.
We will cover the following points in this tutorial:
- We will start with the exploration of the apple fruit scab recognition dataset.
- In the code exploration section, we will discover all the methods that we are employing to make the training successful.
- After training the model, we will test it on a held-out set and visualize the class activation maps also.
- Next, we will carry out inference on some images from the internet.
- Finally, we will discuss how to expand this project to make it even more effective.
In case you have not gone through it yet, the previous post covers apple scab recognition in the apple leaves using deep learning and PyTorch. It will surely help to get a better context of the topic that we cover in this tutorial.
The Apple Fruit Scab Recognition Dataset
To train the deep learning model here, we will use the Apple Fruit Scab (AppleScabFDs) Recognition dataset from Kaggle.
The dataset contains images of healthy apples & pears, and those affected with the scab symptoms.
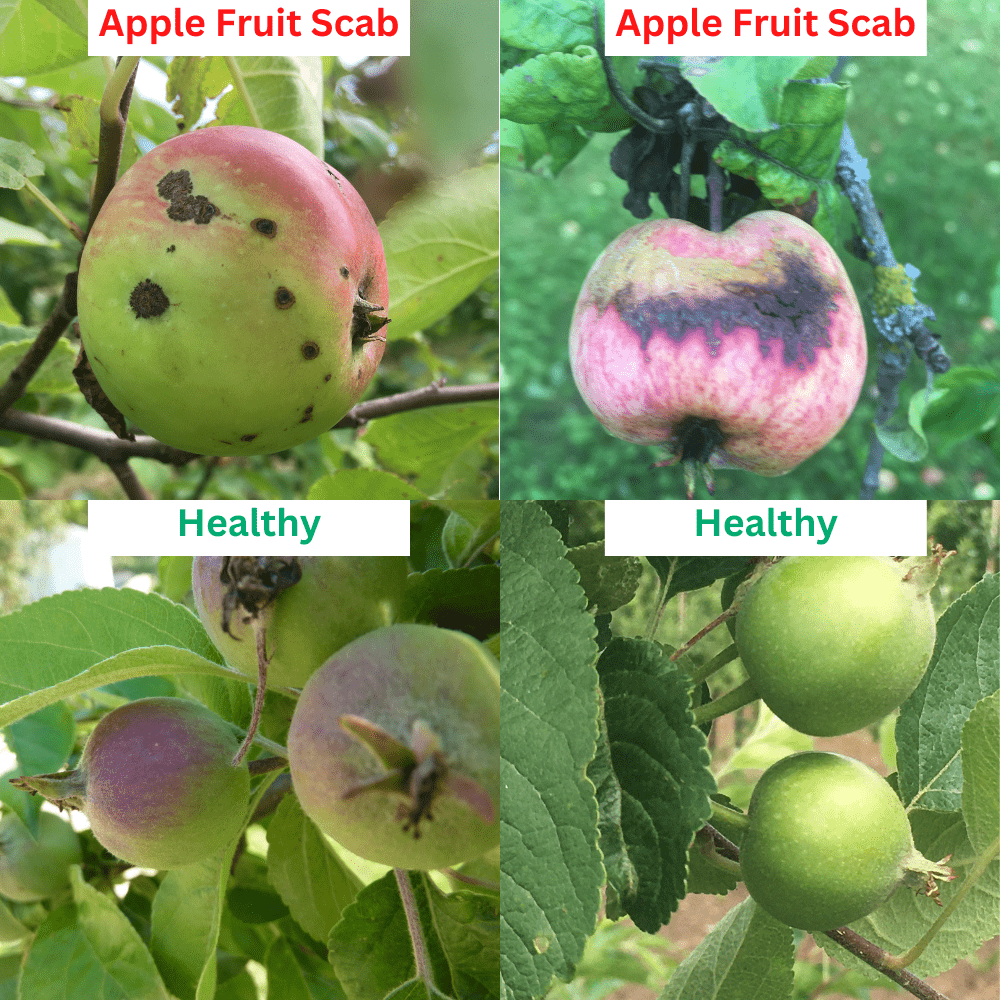
There are images belonging to two classes in the dataset:
- Healthy: Apples and pears that are not affected by any disease.
- Scab: Apples and pears that are affected by scab disease.
Out of the box, the dataset contains 90 images for the Healthy class and 207 images for the Scab class. Further, we will sample out some images from each class for testing (not to be used in validation as well). This will leave us with less than 200 images for training for the Scab class. It is difficult to achieve generalizability with any deep learning model using such a small dataset. But we will do our best.
For now, you may go ahead and download the dataset from here. In the next section, we will see how to structure it after extracting it.
Project Structure
Let’s take a look at the project directory structure.
├── input
│   ├── AppleScabFDs
│   │   ├── Healthy
│   │   └── Scab
│   ├── inference_data
│   │   ├── image_1.png
│   │   ...
│   │   └── image_4.jpg
│   └── test
│       ├── Healthy
│       └── Scab
├── outputs
│   ├── cam_results [40 entries exceeds filelimit, not opening dir]
│   ├── inference_results
│   │   ├── image_1.png
│   │   ...
│   │   └── image_4.jpg
│   ├── test_results [40 entries exceeds filelimit, not opening dir]
│   ├── accuracy.png
│   ├── best_model.pth
│   ├── loss.png
│   └── model.pth
└── src
    ├── cam.py
    ├── datasets.py
    ├── inference.py
    ├── model.py
    ├── prepare_test_data.py
    ├── test.py
    ├── train.py
    └── utils.py
- The
inputfolder contains all the data that we will use in this project. After extracting the dataset you should get the respective images in theAppleScabFDsfolder. Later we will also sample a few images from this into thetestfolder. Theinference_datafolder contains a few images from the internet that we will use after training, validation, and testing. - We save any result from the training, testing, or inference in the
outputsfolder. This includes plots, trained models, and resulting images as well. - The
srcfolder contains all the Python files that we need to train and test the deep learning model for apple fruit scab recognition.
When downloading the zip file you will get access to all the Python files along with the proper folder structure. You just need to download the dataset and arrange it as shown above.
PyTorch Version
The code for this project has been developed using PyTorch 1.12.0.
You will need at least PyTorch version 1.12.0 to run the code locally. If you wish to do so, you can install the latest version of PyTorch from here.
Apple Fruit Scab Recognition using Deep Learning and PyTorch
While discussing the coding section, we will not dive deep into the Python files. Almost all the code is the same as the previous post apart from a few changes to the class names and folder names. We will only get into the necessary details of some of the code. All the code files are available for download.
Split the Dataset into a Training and a Test Set
We will split the dataset into a training and test set. To do that, we will simply move a few files from each class into the input/test directory and let the remaining files stay in the input/AppleScabFDs directory.
Download Code
The code to do this is in the prepare_test_data.py file.
Executing the file using the following command will move 20 images each from the Healthy and Scab class into the test directory.
python prepare_test_data.py
After running this script, there will be 70 and 187 images from the Healthy and Scab classes respectively in the AppleScabFDs directory. We will further have to divide this into a validation and training set during the training of the deep learning model.
Such a small dataset is going to make the learning process a bit more difficult.
The Dataset Preparation for Apple Fruit Scab Recognition
The dataset preparation is going to be a simple yet important part of the pipeline.
The datasets.py file contains the code to prepare the training and validation datasets and data loaders.
Here are a few important points that affect the accuracy metrics and the training process:
- We are resizing the images to 512×512 size. We are keeping the training image size deliberately higher as lower resolution images did not give good results. In fact, 224×224 images were not able to cross 90% validation accuracy.
- The validation split is 15% and the rest of the images will be used for training.
- We are using quite a few augmentation techniques. This is important to bring enough variability into the dataset as there are fewer than 200 images for training. We are using the following augmentations from
torchvision.transforms:- Resize
- RandomHorizontalFlip
- RandomVerticalFlip
- RandomRotation
- ColorJitter
- GaussianBlur
- RandomAdjustSharpness
- Further, as we will use a pretrained model, so we are applying the ImageNet mean and standard deviation while normalizing the images.
Following are some of the images from the dataset after applying the above-mentioned augmentations.

The rest of the code prepares the dataset and data loaders.
The Deep Learning Model
We are using a pretrained ResNet34 model from torchvision.models and fine tuning it on the apple fruit scab recognition dataset.
The model preparation code is present in the model.py file.
We changed the final Linear layer’s (classification head) out_features to match the number of classes in our dataset. This is the only structural change that we do to the ResNet34 model.
Training the Model for Apple Fruit Scab Recognition
It is now time to run the training script and start the training procedure.
The train.py is the driver script that runs the training. There are a few command line arguments that we will discuss shortly.
All the training, testing, and inference experiments were done on a machine with 10GB RTX 3080 GPU, 32 GB RAM, and an i7 10th generation CPU.
Execute the following command in the terminal/command line within the src directory to start the training.
python train.py --epochs 50 --learning-rate 0.0005
- The
--epochsargument accepts an integer indicating the number of epochs that we intend to train the deep learning model for. Here, we are training it for 50 epochs. --learning-rateaccepts a float value for the learning rate. As we are using a pretrained model, so the learning rate is slightly lower, that is, 0.0005.
Following is the truncated output from the terminal.
[INFO]: Number of training images: 219
[INFO]: Number of validation images: 38
[INFO]: Classes: ['Healthy', 'Scab']
Computation device: cuda
Learning rate: 0.0005
Epochs to train for: 50

[INFO]: Loading pre-trained weights
[INFO]: Fine-tuning all layers...
21,285,698 total parameters.
21,285,698 training parameters.
[INFO]: Epoch 1 of 50
Training
100%|████████████████████████████████████████████████████████████████████| 14/14 [00:08<00:00,  1.70it/s]
Validation
100%|██████████████████████████████████████████████████████████████████████| 3/3 [00:02<00:00,  1.46it/s]
Training loss: 0.717, training acc: 67.580
Validation loss: 0.596, validation acc: 76.316

Best validation loss: 0.5955725709597269

Saving best model for epoch: 1

--------------------------------------------------
.
.
.
[INFO]: Epoch 50 of 50
Training
100%|████████████████████████████████████████████████████████████████████| 14/14 [00:07<00:00,  1.80it/s]
Validation
100%|██████████████████████████████████████████████████████████████████████| 3/3 [00:01<00:00,  1.73it/s]
Training loss: 0.021, training acc: 99.543
Validation loss: 0.099, validation acc: 94.737
--------------------------------------------------
TRAINING COMPLETE
For the above training experiment, the best model according to the least validation loss was saved at epoch 26. For that epoch, the validation loss was 0.084 and the validation accuracy was 94.73%.
Analyzing the Results
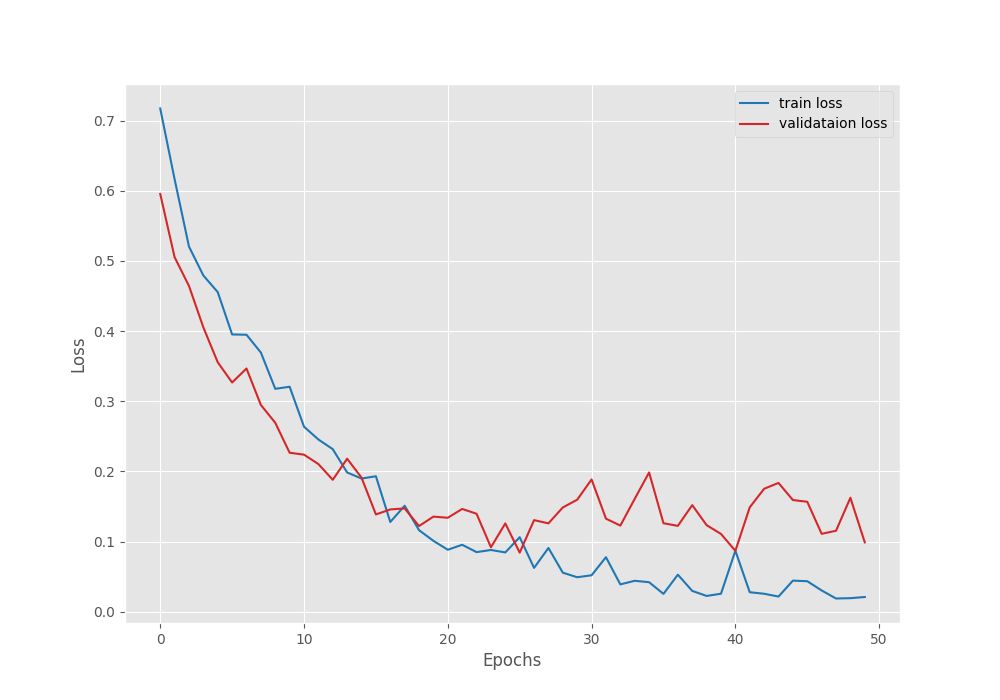
Let’s take a look at the accuracy and loss plots.
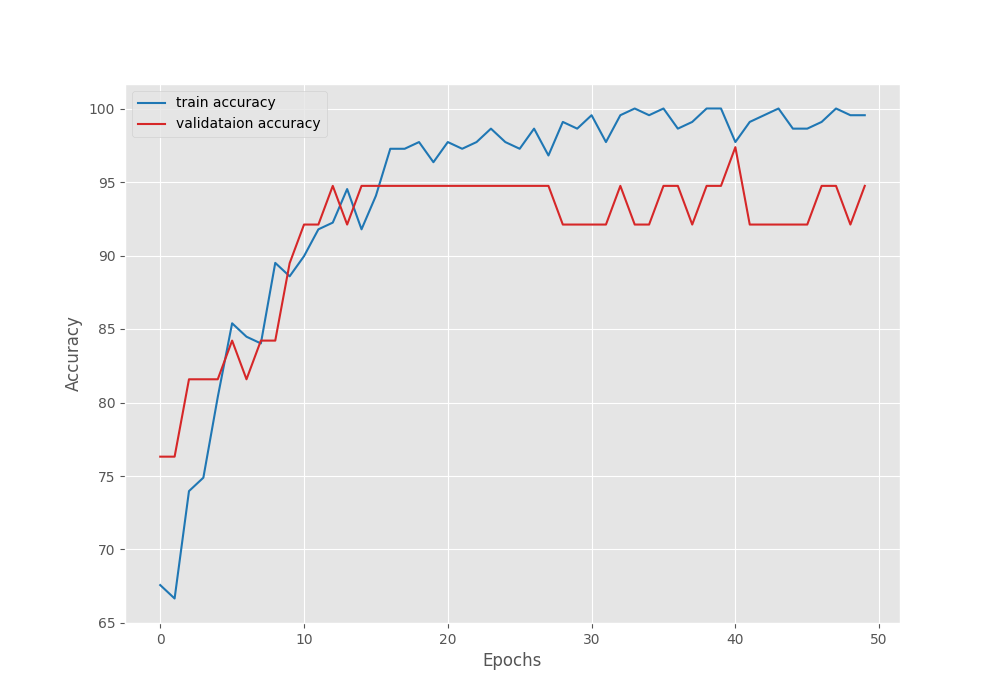
Although the training accuracy is increasing till the end of the training, the validation accuracy is showing a lot of plateaus. This is typical with less number of validation samples and when the model does not get enough data to train on.
We can also see that the validation loss is increasingly fluctuating after epoch 26, the point where the best model was saved.
Testing the Trained Model and Visualizing the Class Activation Maps
We already have the trained model with us. Let’s run it on the test set that we prepared earlier. Remember that we have only 20 images from each class to test on. Also, we did not have many training samples.
The test.py file contains the testing script. Run the following command within the src directory to carry out testing of the model.
python test.py
Following is the output.
[INFO]: Not loading pre-trained weights
[INFO]: Freezing hidden layers...
Testing model
100%|████████████████████████████████████████████████████████████████████| 40/40 [00:02<00:00, 14.40it/s]
Test accuracy: 100.000%
Interestingly, we have 100% test accuracy. One thing that may have happened is that test images have been sampled from the same set as the training one. So, they are pretty much similar due to which the model was able to classify all of them correctly.
Still, let’s take a look at the class activation maps on the test images.
The cam.py file contains the code for that.
We can run it using the following command.
python cam.py
All the class activation map results are saved in the outputs/cam_results file.
The following are some of the resulting images.
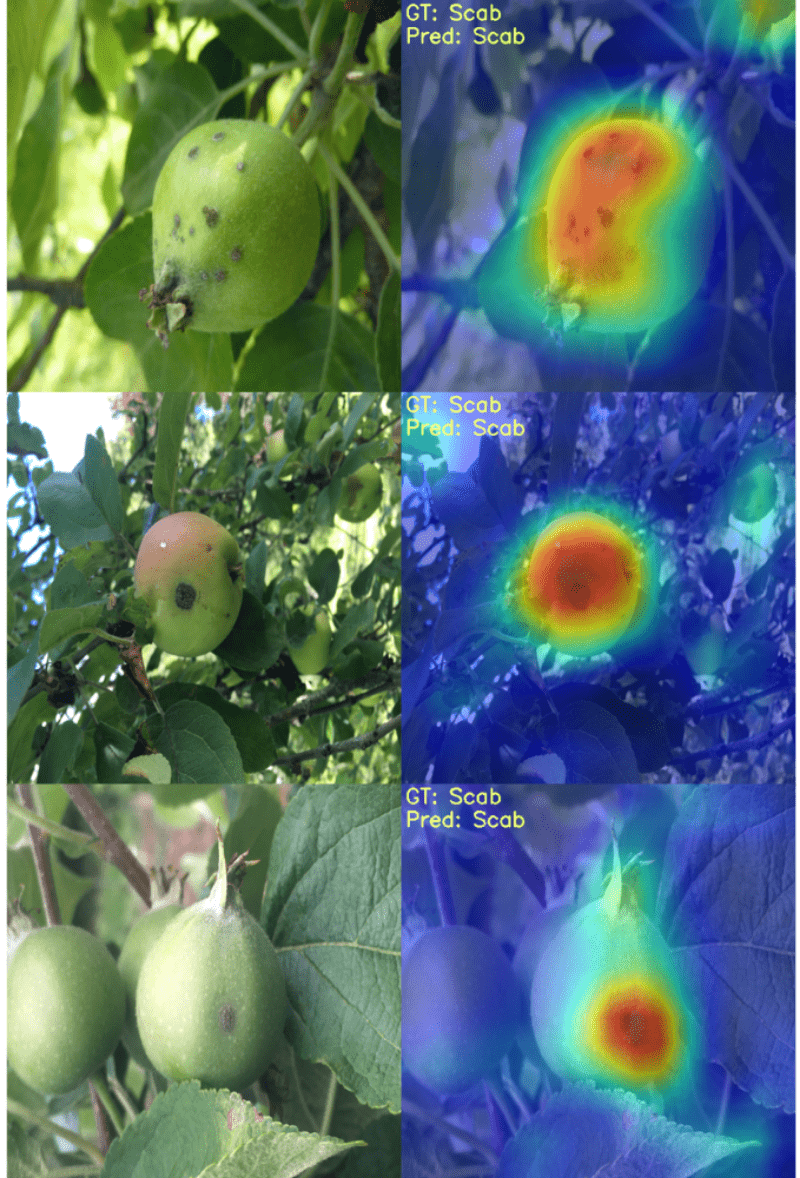
The model is mostly focusing on the part of the apple fruit which is affected by scab while predicting the Scab class.
But as we discussed earlier, the test images are very similar to the training images. Let’s pick a few images from the internet and run inference on them.
Running Inference on New Images for Apple Fruit Scab Recognition
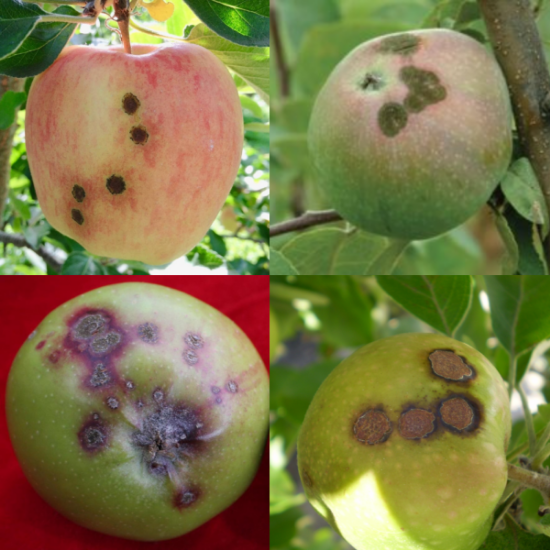
We will run inference on the following four images.
We can do so by executing the inference.py script.
python inference.py
You should see output similar to the following on the terminal.
Inference on image: 1
Inference on image: 2
Inference on image: 3
Inference on image: 4
And the following are the four image results that are stored in the outputs/inference_results directory.

The model is able to predict all the image classes correctly. In fact, it is pretty much focusing on all the right places while doing so.
It looks like, even though we trained on a very small dataset, the model was able to learn all the vital features of the apple fruit scab correctly.
Further Improvements
This project can be taken a notch up. Classifying apple fruit scabs is only the first step.
What if we can exactly locate the area on an apple affected by scab disease? We can do so using object detection.
In the next blog post, we are going to do exactly that.
We will train a Faster RCNN object detection model to detect the areas affected by the scab disease. This is going to be really fun and a good learning experience also.
Summary and Conclusion
In this tutorial, we trained a ResNet34 deep learning model for apple fruit scab recognition. After training the model, we also ran inference on some unseen images from the internet. I hope that this was a good learning experience for you.
If you have any doubts, thoughts, or suggestions, please leave them in the comment section. I will surely address them.
You can contact me using the Contact section. You can also find me on LinkedIn, and X.
Image Credits Used for Inference
image_1.png: https://www.agric.wa.gov.au/pome-fruit/managing-apple-scab-western-australiaimage_2.jpg: https://www.onlinepestcontrol.com/apple-scab-and-treatment/image_3.jpg: http://applescout.ca.uky.edu/scabimage_4.jpg: https://ca.decisionaid.systems/articles/apple_scab_venturia_inaequalis

1 thought on “Apple Fruit Scab Recognition using Deep Learning and PyTorch”