
Deep Learning and computer vision have immense potential in the field of exercise and workout analysis. It can recognize whether someone is doing an exercise wrongly and suggest changes according to the situation. But for this, the deep learning model first has to recognize a particular exercise. To tackle that, in this blog post, we will train a CNN based deep learning model for workout recognition.
Convolutional neural networks are great at image analysis and recognition. With the host of pretrained models out there, we can build interesting applications which solve real-world problems. We this post, we will try to build a simple exercise recognizer using a CNN based deep learning model. At the end of this post, we will also discuss some ways to take this project even further.
Before jumping into the depth of this post, here are the important points that we will cover:
- We will start with a discussion of the dataset. We will use a dataset consisting of several thousand images of different exercises.
- Then we will move on to the preparation of the model. There are some important considerations that we will make while preparing the pretrained model. We will discuss this in depth.
- Next, we will discuss the preparation of the dataset.
- Then, we will move over to the training of the model.
- After training, we will run inference experiments on unseen images and videos from the internet to check the robustness of our model.
The Workout Recognition Dataset
To train our workout recognition CNN model in this tutorial, we will use the Workout/Exercise Images from Kaggle.
This dataset contains almost 13900 images across 22 different exercises (classes). Workout images belonging to a particular class/workout remain in the folder with the same name. Each workout has at least 500 images and some go up to 900 images.
The following are the names of all the classes in this dataset.
- barbell biceps curl
- lat pulldown
- pull up
- leg extension
- plank
- lateral raises
- deadlift
- chest fly machine
- push up
- tricep dips
- hip thrust
- decline bench press
- squat
- shoulder press
- t bar row
- tricep pushdown
- russian twist
- romanian deadlift
- bench press
- hammer curl
- leg raises
- incline bench press
Here are some of the ground truth images from the dataset.
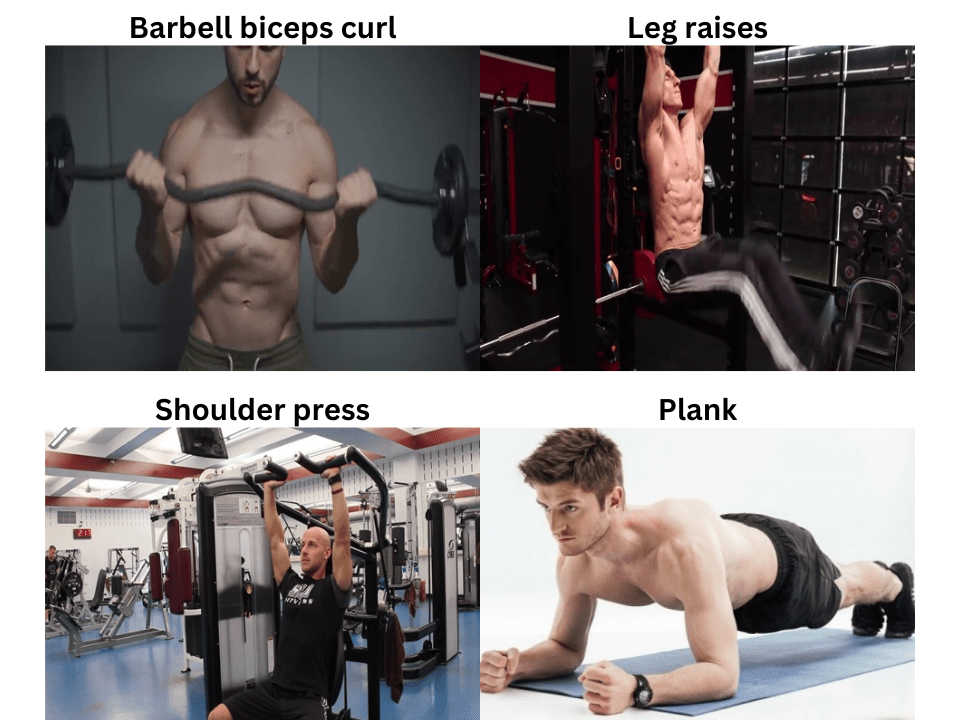
Almost all of the images have been sourced from videos. So, they appear to be sequential images when going through the directory. For this reason, we will need to shuffle the dataset before training our model.
If you plan on training the model, you can go ahead and download the dataset. After extracting, you should see the following directories.
├── barbell biceps curl [705 entries exceeds filelimit, not opening dir]
├── bench press [625 entries exceeds filelimit, not opening dir]
├── chest fly machine [527 entries exceeds filelimit, not opening dir]
├── deadlift [530 entries exceeds filelimit, not opening dir]
├── decline bench press [514 entries exceeds filelimit, not opening dir]
├── hammer curl [546 entries exceeds filelimit, not opening dir]
├── hip thrust [557 entries exceeds filelimit, not opening dir]
├── incline bench press [729 entries exceeds filelimit, not opening dir]
├── lateral raises [843 entries exceeds filelimit, not opening dir]
├── lat pulldown [646 entries exceeds filelimit, not opening dir]
├── leg extension [586 entries exceeds filelimit, not opening dir]
├── leg raises [514 entries exceeds filelimit, not opening dir]
├── plank [993 entries exceeds filelimit, not opening dir]
├── pull up [615 entries exceeds filelimit, not opening dir]
├── push up [601 entries exceeds filelimit, not opening dir]
├── romanian deadlift [555 entries exceeds filelimit, not opening dir]
├── russian twist [522 entries exceeds filelimit, not opening dir]
├── shoulder press [512 entries exceeds filelimit, not opening dir]
├── squat [742 entries exceeds filelimit, not opening dir]
├── t bar row [668 entries exceeds filelimit, not opening dir]
├── tricep dips [698 entries exceeds filelimit, not opening dir]
└── tricep pushdown [625 entries exceeds filelimit, not opening dir]
In the next section, we will see how to structure the entire project.
Project Directory Structure
Let’s check out the entire project directory structure for workout recognition using CNN.
├── inference_data
│   ├── barbell_bicep_curl.jpg
│   ├── bench_press.jpg
│   ├── deadlift.jpg
│   ├── hammer_curl.jpg
│   ├── lat_pulldown.jpg
│   ├── plank.mp4
│   └── push_up.mp4
├── input
│   ├── barbell biceps curl
│   ├── bench press
│   ...
│   ├── tricep dips
│   └── tricep pushdown
├── outputs
│   ├── inference_results
│   ├── accuracy.png
│   ├── best_model.pth
│   ├── loss.png
│   └── model.pth
└── src
    ├── class_names.py
    ├── datasets.py
    ├── inference.py
    ├── inference_video.py
    ├── model.py
    ├── train.py
    └── utils.py
- The
inference_datadirectory contains a few images and videos that are not part of the dataset. We will use this to run inference experiments after training the model. - After downloading and extracting the dataset, we put it in the
inputdirectory. - Next, the
outputsdirectory contains all the outputs from training and inference. - And the
srcdirectory contains all the source code files.
You will get access to the inference data, the source code files, and the trained weights when downloading the zip file that comes with this post. If you plan on training your own model as well, please download the dataset from Kaggle before moving further.
The PyTorch Version
We are using PyTorch 2.0.0 for this project. Please ensure to have PyTorch version >= 1.13.0 for smooth running.
Working Recognition using CNN and Deep Learning
From here on, we will have a more technical discussion. As all the source code is available via the downloaded file, we will only discuss the code of some of the most important sections only. These include the preparation of the model, the data processing and augmentation, and the command line arguments for the training script.
Download Code
The CNN Model for Workout Recognition
We are going to use a pretrained ResNet50 model and fine-tune it on this dataset. Here is the code that goes into the model.py file.
from torchvision import models

import torch.nn as nn

def build_model(fine_tune=True, num_classes=10):
    model = models.resnet50(weights='DEFAULT')
    if fine_tune:
        print('[INFO]: Fine-tuning all layers...')
        for params in model.parameters():
            params.requires_grad = True
    if not fine_tune:
        print('[INFO]: Freezing hidden layers...')
        for params in model.parameters():
            params.requires_grad = False
    model.fc = nn.Linear(in_features=2048, out_features=num_classes, bias=True)
    return model
The build_model function accepts two parameters:
fine_tune: A boolean parameter that tells the code to retrain all the layers of the ResNet50 model if we passTrue.num_classes: A parameter accepting the number of classes in the dataset.
Apart from that, we modify the final linear layer of the model, i.e., model.fc. The out_channels should be equal to the number of classes in the dataset. We make that change on line 15 in the above code block.
The Dataset Preparation
Two of the most important parts of the dataset preparation are the transforms and the augmentations. To make the learning process more robust and prevent overfitting, we apply a few augmentations. The following code block shows a part of datasets.py that defines the training and validation transforms.
### Part of datasets.py ###

# Training transforms
def get_train_transform(image_size):
    train_transform = transforms.Compose([
        transforms.Resize((image_size, image_size)),
        transforms.CenterCrop(224),
        transforms.RandomHorizontalFlip(p=0.5),
        transforms.RandomRotation(35),
        transforms.ToTensor(),
        transforms.Normalize(
            mean=[0.485, 0.456, 0.406],
            std=[0.229, 0.224, 0.225]
        )
    ])
    return train_transform

# Validation transforms
def get_valid_transform(image_size):
    valid_transform = transforms.Compose([
        transforms.Resize((image_size, image_size)),
        transforms.CenterCrop(224),
        transforms.ToTensor(),
        transforms.Normalize(
            mean=[0.485, 0.456, 0.406],
            std=[0.229, 0.224, 0.225]
        )
    ])
    return valid_transform
While applying the transforms, first we resize the images to 256×256 resolution. Then we apply a center crop to the images to make them 224×224 dimensions. This helps in achieving a bit higher accuracy. This may be because almost all the persons performing any exercise are in the center of the image. So, by removing the unwanted region from the image, the model just gets to focus on the exercise. Other than that, we also apply the ImageNet normalization values as we are using a pretrained model.
Also, we apply two more augmentations to the training set. They are horizontal flipping and random rotation. This further prevents overfitting while training the model.
Other Utility Functions
We also have a utils.py file that holds a lot of helper functions and classes. These include a function to save the plots, the final model, and also the class to save the best model.
Other than that, we have a class_names.py file which contains a list with all the class names. We will use this during inference to annotate the images/frames with the predicted class names.
Fine Tuning the ResNet50 CNN Model for Workout Recognition
The train.py is the driver script that will help us in training the model. It supports quite a few command line arguments for easier control of the fine-tuning process.
-
--epochs: The number of epochs we want to train the model for. --learning-rate: This argument controls the initial learning rate of the optimizer.--batch-size: This accepts an integer defining a batch size for the data loader.--fine-tune: A boolean argument controlling whether to train all the layers of the model or not.--save-name: The name of the model file which is to be saved to the disk.--scheduler: A boolean argument controlling whether to apply learning rate scheduling or not.
All the training experiments were carried out on a machine with 10 GB RTX 3080 GPU, 10th generation i7 CPU, and 32 GB of RAM.
To start the training, you may open up the terminal in the src directory and execute the following command.
python train.py --epochs 10 --batch-size 64 --fine-tune --scheduler
Here, we are training the model for 10 epochs, with a batch size of 64, while fine-tuning all the layers and applying a learning rate scheduler. The learning rate scheduler applies after 7 epochs.
The following is the truncated output from the terminal.
[INFO]: Number of training images: 12468
[INFO]: Number of validation images: 1385
[INFO]: Classes: ['barbell biceps curl', 'bench press', 'chest fly machine', 'deadlift', 'decline bench press', 'hammer curl', 'hip thrust', 'incline bench press', 'lat pulldown', 'lateral raises', 'leg extension', 'leg raises', 'plank', 'pull up', 'push up', 'romanian deadlift', 'russian twist', 'shoulder press', 'squat', 't bar row', 'tricep dips', 'tricep pushdown']
Computation device: cuda
Learning rate: 0.001
Epochs to train for: 10

[INFO]: Fine-tuning all layers...
ResNet(
  (conv1): Conv2d(3, 64, kernel_size=(7, 7), stride=(2, 2), padding=(3, 3), bias=False)
  (bn1): BatchNorm2d(64, eps=1e-05, momentum=0.1, affine=True, track_running_stats=True)
  (relu): ReLU(inplace=True)
  (maxpool): MaxPool2d(kernel_size=3, stride=2, padding=1, dilation=1, ceil_mode=False)
.
.
.
  (avgpool): AdaptiveAvgPool2d(output_size=(1, 1))
  (fc): Linear(in_features=2048, out_features=22, bias=True)
)
23,553,110 total parameters.
23,553,110 training parameters.
Adjusting learning rate of group 0 to 1.0000e-03.
[INFO]: Epoch 1 of 10
Training
100%|████████████████████| 195/195 [00:35<00:00,  5.54it/s]
Validation
100%|████████████████████| 22/22 [00:02<00:00, 10.75it/s]
Training loss: 0.461, training acc: 87.544
Validation loss: 0.274, validation acc: 91.986

Best validation loss: 0.27431226487864147

Saving best model for epoch: 1

Adjusting learning rate of group 0 to 1.0000e-03.
--------------------------------------------------
.
.
.
[INFO]: Epoch 10 of 10
Training
100%|████████████████████| 195/195 [00:37<00:00,  5.22it/s]
Validation
100%|████████████████████| 22/22 [00:02<00:00, 10.24it/s]
Training loss: 0.005, training acc: 99.856
Validation loss: 0.068, validation acc: 98.845

Best validation loss: 0.06834395979537723

Saving best model for epoch: 10

Adjusting learning rate of group 0 to 1.0000e-04.
--------------------------------------------------
TRAINING COMPLETE
The model reached the best validation accuracy of 98.84% on the last epoch.
Let’s take a look at the accuracy and loss graphs to get a better idea of the learning process.
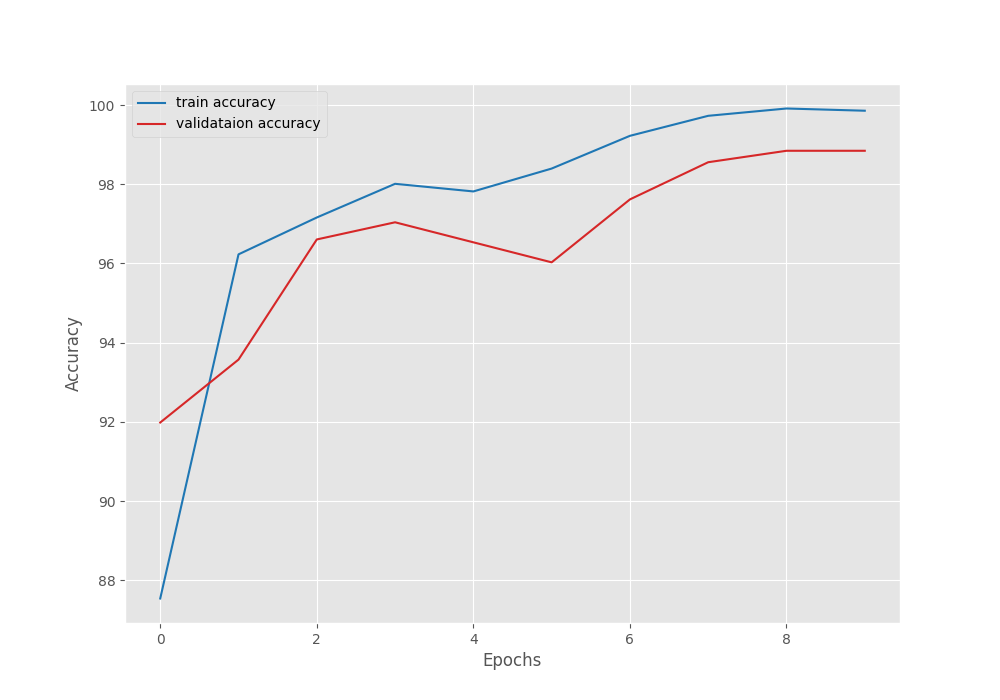
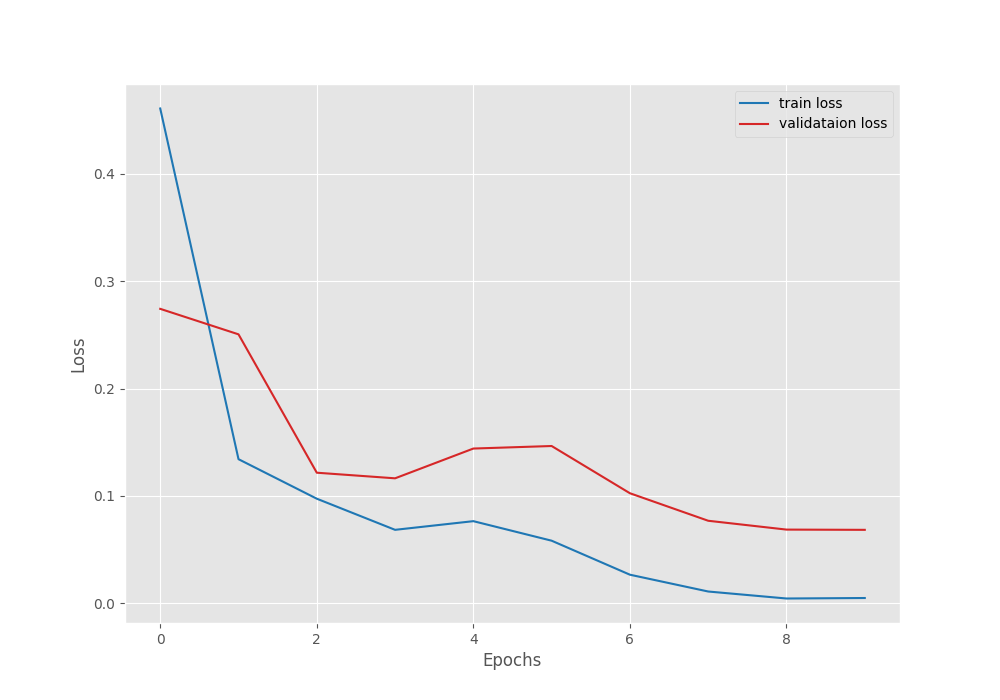
From the above two figures, it is clear that both, the loss and the accuracy were deteriorating after 5 epochs. The learning rate scheduler again put both of them into an improving trend.
Inference on Images
We have a few images in the inference_data directory which the model has not seen before. Let’s run inference on these images and check how the model performs.
The code for inference on images resides in the inference.py script.
There are five images with .jpg extension in the inference_data directory. The inference script accepts the path to a directory and carries out inference on all images with a .jpg extension. Further, the names of the images indicate the workout. Namely, these are the images in the directory.
barbell_bicep_curl.jpgbench_press.jpgdeadlift.jpghammer_curl.jpglat_pulldown.jpg
All the image and video inference experiments were carried out on a machine with 10 GB RTX 3080 GPU, 10th generation i7 CPU, and 32 GB of RAM.
We can execute the following command to start the image inference process.
python inference.py --input ../inference_data/
In the above command, we just use the --input command line argument to provide the path to the inference directory.
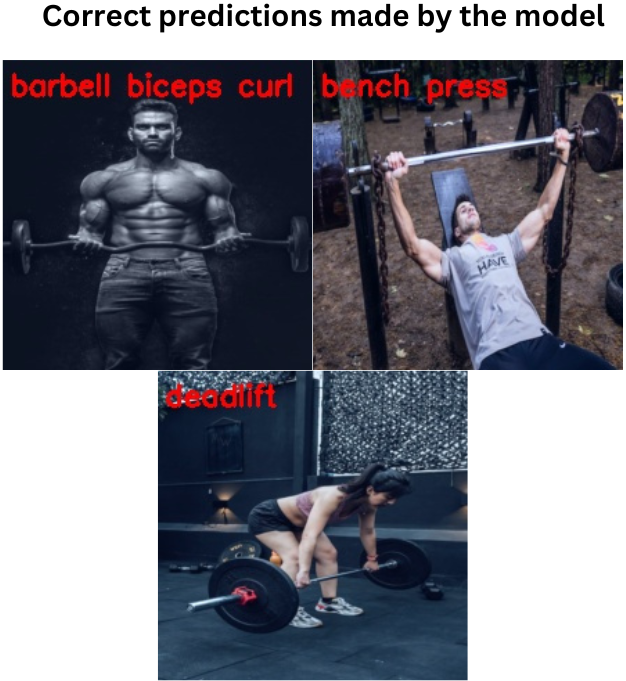
The model predicted the following workouts correctly.
The following are the images whose workout class the model was not able to predict correctly.
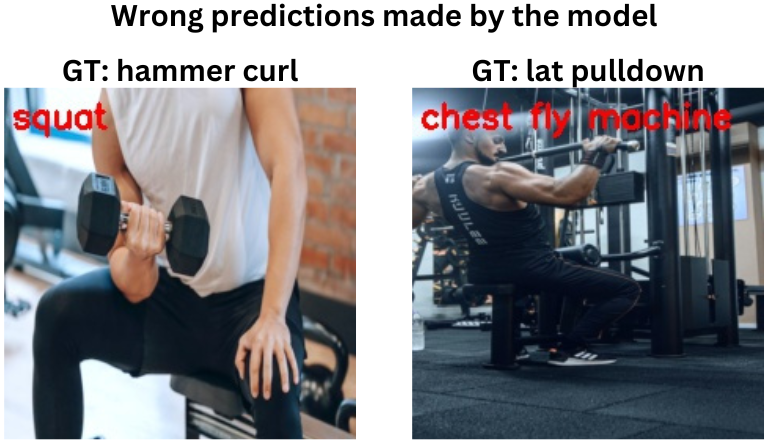
In the case of the lat pulldown exercise, it is understandable that the model predicts it chest fly machine. If you take a look at both the images in the ground truth folders, sometimes, it may not be very clear for the deep learning model to distinguish between them. Still, it looks like the model is doing pretty well after training.
Inference on Videos
Now, we will run inference on videos to check the real-time performance and the robustness of the model with moving scenes.
The inference_video.py script holds the code for inference on videos for workout recognition using CNN.
The inference_data directory contains two videos that we will carry out inference on. While executing the script, we need to provide the path to the input video.
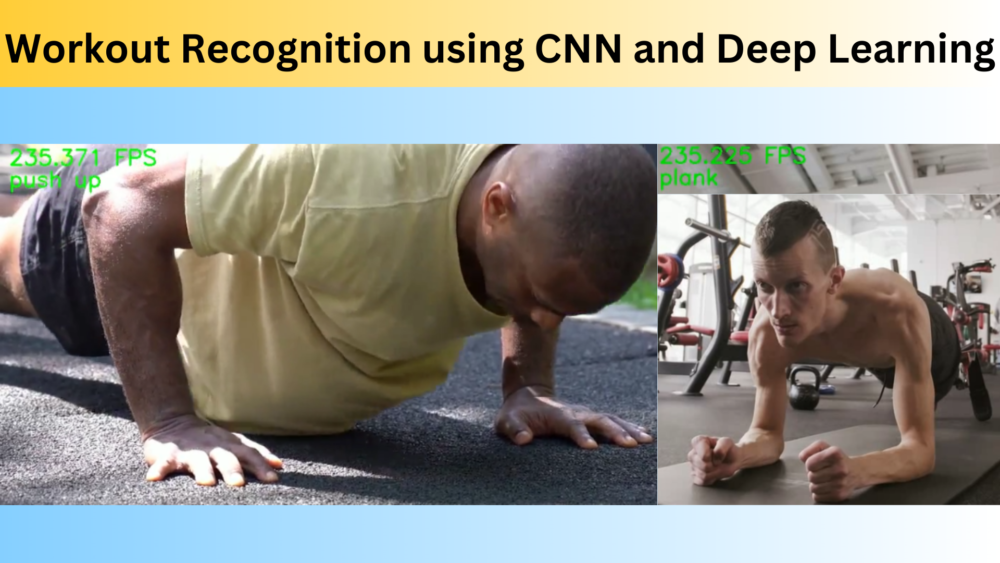
First, let’s try to run inference on a plank workout video.
python inference_video.py --input ../inference_data/plank.mp4
The model is performing really well here. It is predicting the plank exercise correctly in all the frames.
Now, a second experiment with the push-up exercise which looks very similar to plank.
python inference_video.py --input ../inference_data/push_up.mp4
Interestingly, the model did not classify the exercise as plank even in a single frame. Our CNN model seems pretty robust at workout recognition.
Further Improvements
Till now, our CNN based workout recognition model is working extremely well. Obviously, we can train longer with more augmentations and learning rate scheduler to make it even better. But there are some other ways to improve the model too.
- Using a person detector and then cropping the person to recognize the exercise he/she is performing.
- Collecting more data from the internet and doing some kind of auto-annotation using the already trained model that we have. Then training for even more epochs on the larger dataset.
The above two steps are time-consuming but will surely lead to the improvement of the model.
Summary and Conclusion
In this tutorial, we trained a convolutional neural network for workout recognition. After training, we also carried inference on unseen data. Along with that, we also discussed some improvement points. I hope that this tutorial was helpful to you.
If you have any doubts, thoughts, or suggestions, please leave them in the comment section. I will surely address them.
You can contact me using the Contact section. You can also find me on LinkedIn, and X.
Further Reading
- Human Action Recognition using 2D CNN with PyTorch
- Human Action Recognition in Videos using PyTorch
- Action Recognition in Videos using Deep Learning and PyTorch
