
The first ever GPT model was released by OpenAI in 2018. Since then, we have seen tremendous research and models based on the same architecture. Although GPT1 is old by today’s standards, GPT2 still holds fairly well for many fine-tuning tasks. In this article, we will dive into fine-tuning GPT2 for text generation. In particular, we will teach the model to generate detective stories based on Arthur Conan Doyle’s Sherlock Holmes series.
GPTs and similar large language models can be fine-tuned for various text generation tasks. With this article, we will start simple. As GPT2 is already proficient in generating coherent text for the most part, teaching it to generate detective stories should be simple.
We will cover the following topics in this article
- We will start with why we chose GPT2 for the detective story text generation purpose.
- Next is dataset preparation. This section will cover how we curate the Sherlock Holmes stories for training.
- Generating detective stores using the pretrained model.
- Then, we will move to the coding part which includes:
- Processing and tokenization of the dataset.
- Loading the pretrained GPT2 model.
- Training the GPT2 for text generation.
- Finally, use the trained model for generating new stories.
Why use GPT2 for Text Generation Fine-Tuning?
GPT2 is one of the few models on the Hugging Face Hub with 5 different scales.
GPT2 Base with 124 million parameters, GPT2 Medium with 355 million parameters, GPT2 Large with 774 million parameters, and GPT2 Extra Large with 1.5 billion parameters. In addition to this, we also have DistilGPT2 with 82 million parameters. The last one is the least performant in terms of quality of generation, however cheap to fine-tune.

In this article, we will use the DistilGPT2 model. From experiments, I found that fine-tuning the DistilGPT2 model was enough for generating complex text like detective stories. Furthermore, with 82 million parameters, the DisltilGPT2 is not resource-hungry as well.
We can also fine tune GPT2 and other language models for various tasks like spelling correction and grammar correction as well. We will cover more such applications using LLMs in future articles.
The Sherlock Holmes Dataset
We source the Sherlock Holmes short stories and novels from the Project Gutenberg website. It contains several hundred thousand free ebooks useful for training language models.
There are 5 text files containing the short stories and novels. A little bit of manual processing was also done to the text. The text files originally contained the source of the file, the novel name, and the table of contents which are not necessary for our use case. These have been removed so that the model learns only the part that belongs to the stories.
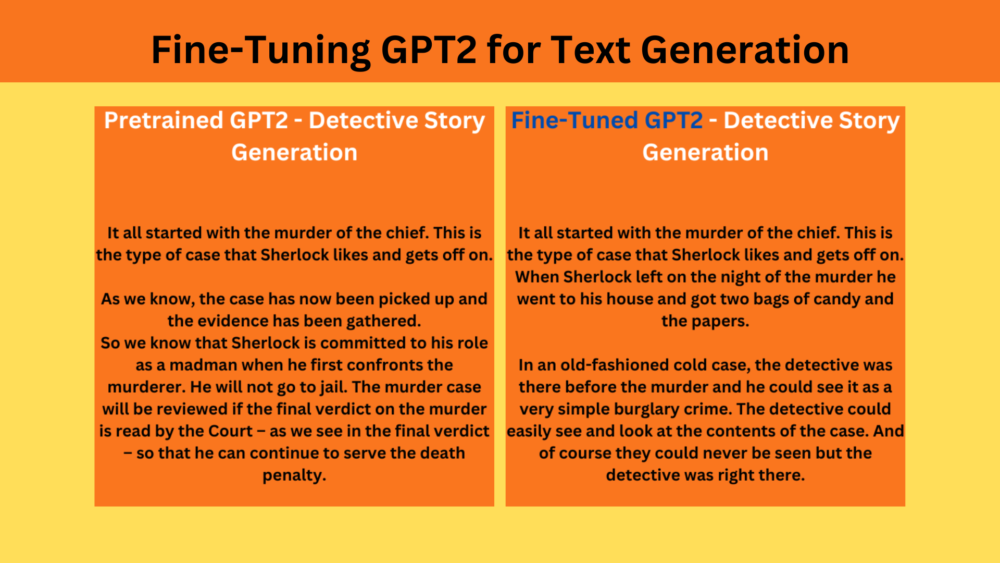
Baseline Detective Story Generation using Pretrained GPT2
Let’s use the pretrained GPT2 model to create a baseline generation. This will give us a proper idea of where the model lacks currently and where it should improve.
Download Code
Using pretrained transformer models with the transformers library is straightforward. First, import the necessary libraries.
from transformers import AutoModelForCausalLM, AutoTokenizer, pipeline

import torch
Second, load the pretrained DistilGPT2 model and the tokenizer.
model = AutoModelForCausalLM.from_pretrained('distilbert/distilgpt2', device_map='cuda')
tokenizer = AutoTokenizer.from_pretrained('distilbert/distilgpt2')
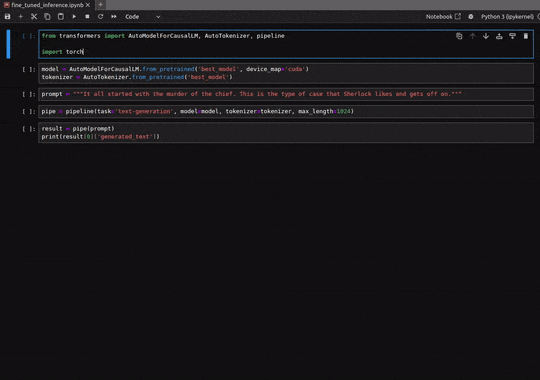
Third, define the prompt, and the text generation pipeline, and generate the text.
prompt = """It all started with the murder of the chief. This is the type of case that Sherlock likes and gets off on."""

pipe = pipeline(task='text-generation', model=model, tokenizer=tokenizer, max_length=1024)

result = pipe(prompt)
print(result[0]['generated_text'])
Here is a part of the output.

The language, phrasing, and grammar seem correct. However, the flow of the story and reasoning does not make much sense. This is what we want the model to learn when we train it on the Sherlock Holmes detective stories.
Project Directory Structure for Fine-Tuning GPT2
Following is the directory structure of the project.
├── best_model
│   ├── config.json
│   ├── generation_config.json
│   ├── merges.txt
│   ├── model.safetensors
│   ├── special_tokens_map.json
│   ├── tokenizer_config.json
│   ├── tokenizer.json
│   └── vocab.json
├── input
│   ├── pg2097.txt
│   ├── pg221.txt
│   ├── pg3070.txt
│   ├── pg3289.txt
│   └── pg834.txt
├── logs
│   ├── checkpoint-13500
│   ├── checkpoint-15000
│   └── runs
├── distilgpt2_sherlock_training.ipynb
├── fine_tuned_inference.ipynb
├── pretrained_distilgpt2.ipynb
└── requirements.txt
- The
best_modeldirectory contains the model with the least loss after the training is completed. - The
inputdirectory contains the dataset that includes the Sherlock Holmes novels and short stories. We have 5 text files in total. - During training, we save two intermediate checkpoints and the Tensorboard logs which are present in the
logsdirectory. - There are three Jupyter Notebooks. One for inference using the pretrained model that we ran in the previous section, one for training, and another for using the trained model.
Major Dependencies and Requirements
We need the PyTorch framework and libraries from Hugging Face to run the code. These include:
- transformers
- datasets
- evaluate
- accelerate
The requirements.txt file contains all the major libraries that we need. You can use it to install all in one go.
pip install -r requirements.txt
The article comes with a downloadable zip file that contains the three notebooks, datasets, and the best trained model. You can download it and run inference in case you do not wish to run the training experiments.
Fine-Tuning GPT2 for Text Generation
Let’s jump into the code now. As we are using Hugging Face libraries here, the process becomes much simpler.
All the training code resides in the distilgpt2_sherlock_training.ipynb notebook. The following code block contains the import statements.
from datasets import load_dataset
from transformers import (
    AutoTokenizer,
    AutoModelForCausalLM,
    TrainingArguments,
    Trainer,
    DataCollatorForLanguageModeling,
)

import torch
import os
We are importing the modules to load the dataset, the tokenizer, the model, training arguments, and data collation.
As we are solving a text generation problem here, so, we import the AutoModelForCausalLM which loads a pretrained model for language modeling.
Training and Dataset Configuration
In the next code block, we define various training and dataset preparation related configurations.
batch_size = 8
num_workers = os.cpu_count()
max_steps = 255
bf16 = True
fp16 = False
gradient_accumulation_steps = 64
context_length = 512
logging_steps = 50
save_steps = 50
learning_rate = 0.00001
model_name = 'distilbert/distilgpt2'
batch_size: We will be using a batch size of 8 while training. The training experiment shown here was done on a 10 GB RTX 3080 GPU. If you have more or less VRAM, you can adjust the batch size accordingly.
num_workers: This represents the number of parallel workers for dataset preparation and data loading. We are using all the available threads in the system here.max_steps: The number of steps to train the GPT2 model. This is set to 15000.bf16andfp16: Newer NVIDIA GPUs (RTX series and current A series) can load and run models in BF16 format which is often slightly faster to train. In case you have older GPUs (P100, T4), you can choosefp16=True. However, both cannot beTrueat the same time.gradient_accumulation_steps: In NLP and particularly in text generation pretraining and LLM training, higher batch sizes yield better results. Above, we have set a batch size of 64. However, we can also choose the number of batches after which to backpropagate the gradients. This is the number of batches we want to accumulate the gradients for before backpropagation. This is set to 2 here. This means that the effective batch size becomes 512. A higher batch size makes the gradient calculation more stable.context_length: This setting indicates the number of tokens per sample. As our files are continuous texts, we cannot load the entire story into a single sample. That will surely lead to Out Of Memory errors. So, we divide each sample into 512 tokens.logging_steps: The number of steps after which to run evaluation and log results to Tensorboard.save_steps: The number of steps after which to save a model checkpoint to disk.learning_rate: Base learning rate for the optimizer.model_name: This is the model tag from Huggin Face Hub indicating that we want to use the DistilGPT2 model.
Dataset Loading
When loading datasets from local directories, the steps become a bit different compared to directly loading from the hub.
dataset_raw = load_dataset('text', data_files='input/*', split='train')
print(dataset_raw)
In the above code block, we use the load_dataset function. However, the first argument is the dataset type we want to load. When loading local datasets, it supports various formats, like JSON, CSV, and text files. Here, we have the dataset in text file format.
Next is the data_files argument which tells the function to load all files in the input directory. When loading local datasets, we always need to provide a split, which in this case is 'train'.
Then we can divide the entire dataset into a training and validation set.
full_dataset = dataset_raw.train_test_split(test_size=0.05, shuffle=False)
dataset_train = full_dataset['train']
dataset_valid = full_dataset['test']

print(dataset_train)
print(dataset_valid)
We use the train_test_split attribute of the dataset and prepare the training and validation sets. We do not shuffle the dataset as we do not want the order of the text to get messed up. In a detective story, the flow of conversations is quite important and the model needs to learn that.
Following is the result of printing the above datasets.

The final training split contains 42147 rows of data and the validation set contains 2219 rows of data.
Tokenization of the Dataset
The next step is the tokenization of the dataset. Essentially, in tokenization, we convert each unique word into a unique number. However, other details go on behind the scenes which is out of the scope of this article. The AutoTokenizer makes the process much easier here.
First, load the AutoTokenizer, initialize the padding token as the end of sentence token, and define the data collator.
tokenizer = AutoTokenizer.from_pretrained(model_name)

tokenizer.pad_token = tokenizer.eos_token
data_collator = DataCollatorForLanguageModeling(tokenizer=tokenizer, mlm=False)
Here, mlm=False indicates that we are not carrying out Masked Langauge Modeling. Instead, we are carrying out Causal Language Modeling.
Next, we need to define a preprocessing function and tokenize the datasets.
def preprocess_function(example):
    final_tokens = tokenizer(
        example['text'],
        max_length=context_length,
        truncation=True
    )
    return final_tokens

tokenized_train = dataset_train.map(
    preprocess_function,
    num_proc=num_workers,
    remove_columns=dataset_train.column_names,
)
tokenized_valid = dataset_valid.map(
    preprocess_function,
    num_proc=num_workers,
    remove_columns=dataset_valid.column_names,
)
The preprocess_function function accepts one example at a time. As we saw earlier, the text data is present in the 'text' column. So, we pass the example['text'] to the tokenizer, the maximum length for each sample, and tell it to truncate longer sentences.
Then we map the training and validation sets to the preprocessing function.
If you wish to know how to implement a naive dictionary-based tokenizer from scratch, then this NLP text classification article will help you a lot. In the article, we cover the tokenization and modeling entirely from scratch.
There is still a bit of work to do. As we are training the model for text generation here, it needs to learn to predict the next token. So, we need to group texts such that they become continuous sentences.
def group_texts(examples):
    concatenated_examples = {k: sum(examples[k], []) for k in examples.keys()}
    total_length = len(concatenated_examples[list(examples.keys())[0]])
    if total_length >= context_length:
        total_length = (total_length // context_length) * context_length
    result = {
        k: [t[i : i + context_length] for i in range(0, total_length, context_length)]
        for k, t in concatenated_examples.items()
    }
    result["labels"] = result["input_ids"].copy()
    return result
The above function will group texts according to the context length that we have provided and return the inputs and targets. You may notice that the input and target are the same here. When dealing with Causal Language Modeling using the transformers library the forward method of the model makes the input one token less compared to the target token. This is because the model has to learn to predict the next token.
Finally, we create the language modeling dataset that will be used for training.
lm_dataset_train = tokenized_train.map(
    group_texts, num_proc=num_workers, batched=True
)
lm_dataset_valid = tokenized_valid.map(
    group_texts, num_proc=num_workers, batched=True
)
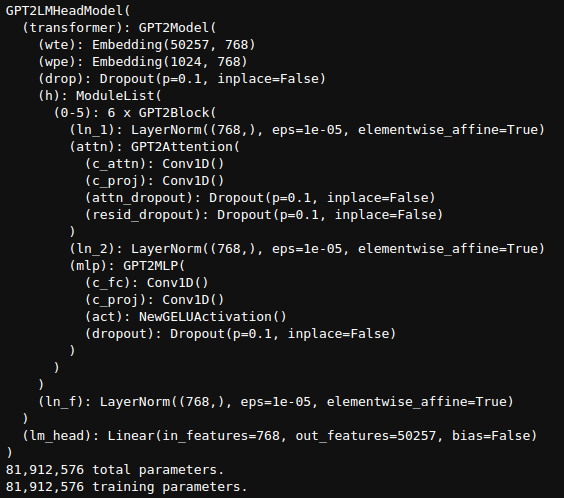
Loading the DistilGPT2 Model
Loading the model is straightforward with the transformers library.
if bf16:
    model = AutoModelForCausalLM.from_pretrained(model_name).to(dtype=torch.bfloat16)
else:
    model = AutoModelForCausalLM.from_pretrained(model_name)

print(model)
# Total parameters and trainable parameters.
total_params = sum(p.numel() for p in model.parameters())
print(f"{total_params:,} total parameters.")
total_trainable_params = sum(
    p.numel() for p in model.parameters() if p.requires_grad)
print(f"{total_trainable_params:,} training parameters.")
We load the model in FP16 or BF16 mode based on the configuration.
The final model contains 81,912,576 parameters.
Do you wish to create a casual language model from scratch along with a tokenizer? These two articles will help you get started.
Defining the Training Arguments and Starting the Training
As with any other Hugging Face + Transformers training, we need to define the training arguments and the trainer pipeline, then start the training.
training_args = TrainingArguments(
    output_dir='logs',
    evaluation_strategy='steps',
    weight_decay=0.01,
    load_best_model_at_end=True,
    per_device_train_batch_size=batch_size,
    per_device_eval_batch_size=batch_size,
    logging_strategy='steps',
    save_strategy='steps',
    logging_steps=logging_steps,
    save_steps=save_steps,
    save_total_limit=2,
    bf16=bf16,
    fp16=fp16,
    report_to='tensorboard',
    max_steps=max_steps,
    dataloader_num_workers=num_workers,
    gradient_accumulation_steps=gradient_accumulation_steps,
    learning_rate=learning_rate,
    lr_scheduler_type='constant',
)

trainer = Trainer(
    model=model,
    args=training_args,
    train_dataset=lm_dataset_train,
    eval_dataset=lm_dataset_valid,
    data_collator=data_collator,
    tokenizer=tokenizer,
)

history = trainer.train()
The training_args mostly defines the arguments that we initialized in the configuration section. One important argument is the lr_scheduler_type that we set to 'constant' here. This tells the pipeline not to apply any scheduling and keep the learning constant throughout the training. From experiments, I found that constant scheduling was important to get good results.
Next, we initialize the Trainer pipeline and start the training.
Here are the logs from the last few epochs and the loss graph.

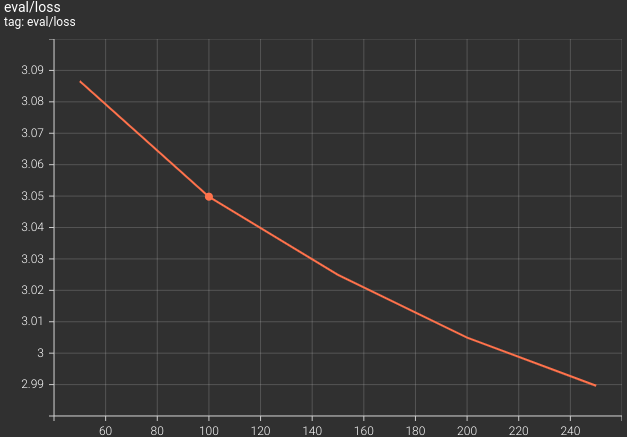
The validation loss was decreasing till the end of the training. This is a good sign as we can confirm that the model has not overfit on the dataset. In fact we could train the model for much longer.
Finally, we need to save the best model and the tokenizer.
model.save_pretrained('best_model')
tokenizer.save_pretrained('best_model')
This ends the entire training process of GPT2 for text generation here. Next, we will move on to the inference.
Inference using the Fine-Tuned GPT2 Model
Using the fine-tuned GPT2 model for inference is quite straightforward. We can follow the same process as when using the pretrained model while only changing the model path.
The fine_tuned_inference.ipynb notebook.
from transformers import AutoModelForCausalLM, AutoTokenizer, pipeline

import torch

model = AutoModelForCausalLM.from_pretrained('best_model', device_map='cuda')
tokenizer = AutoTokenizer.from_pretrained('best_model')

prompt = """It all started with the murder of the chief. This is the type of case that Sherlock likes and gets off on."""

pipe = pipeline(task='text-generation', model=model, tokenizer=tokenizer, max_length=1024)

result = pipe(prompt)
print(result[0]['generated_text'])
The following is part of the text that is generated.
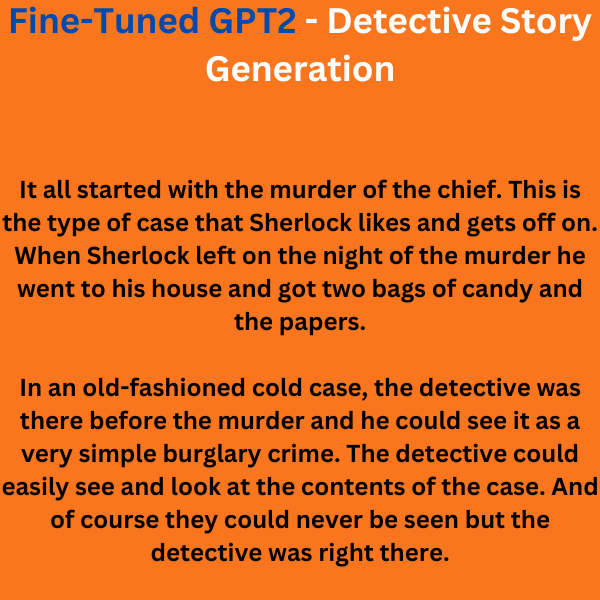
It looks like the model can pick up some elements, words, and phrases of a detective story from the training set. However, it is not able to do it entirely well. The sentences still seem disconnected. There are a few ways we can improve the results here, but not without retraining.
Takeaways and Improvements
The model learned the basis of a detective story, however, is not able to generate completely reliable stories. We can carry out a few steps to fix this:
- Remember that the text is edited with the table of content and extra Gutenberg website information have been removed. However, the end of each text file still contains licensing and other information which can throw off the model. Removing them can improve the results to a good extent. After all, a good model is only as good as the data that it is trained on.
- Using a larger model like the GPT2 Base model may also help. There is a chance that the DistilGPT2 model is not capable enough to generate very accurate detective stories.
- Collect more detective stories from Arthur Conan Doyle’s collection. More clean data always helps to train a better model.
Summary and Conclusion
In this article, we trained a DistilGPT2 model for text generation. Our attempt was to train the model to generate detective stories. The final result was not very good but we got to know the process and how we can improve the results as well. In future articles, we will dive into more complext problems and supervised fine-tuning tasks. I hope that this article was worth your time.
If you have any doubts, thoughts, or suggestions, please leave them in the comment section. I will surely address them.
You can contact me using the Contact section. You can also find me on LinkedIn, and Twitter.
References

Download code link is not working.
Hello, can you please try disabling ad blockers or DuckDuckGo if you have them enabled?