
In this article, we will explore different Torchvision backbones for DeepLab segmentation head.
Semantic segmentation is a crucial task for many computer vision applications. There are several libraries, pretrained models, and segmentation heads available as well. However, customizing segmentation models with different backbones may prove to be difficult.
But why do we want to try out different backbones with DeepLab segmentation heads? In semantic segmentation, different tasks may require different speed-accuracy tradeoffs. We may need to explore different architectures without wanting to install different libraries because of licensing reasons.

Furthermore, most of the time, we do not even want to change the entire architecture or write one from scratch. We may just want to change the backbone and keep the segmentation head architecture the same. This is where the modularity of Torchvision and PyTorch comes into play. It lets us plug almost any Torchvision classification backbone with the DeepLab segmentation head, of course, with a bit of custom coding.
Which Torchvision Backbone Architecture Are We Going To Use With DeepLab?
To understand the process better, we will explore four different segmentation architectures:
- The default DeepLabV3 ResNet50 model with its internal code and loading the pretrained weights.
- Switching the ResNet50 backbone with ResNet18 and making the necessary changes to accommodate the different backbone.
- Diving in a bit further and adding MobileNet backbones to understand the process even better with different architectures.
Note: The model preparation code and architecture are not meant to be modular here. With this article, we start the exploration with more focus on understanding rather than modularity and abstraction. In future articles, we will expand it with different backbone architectures.
What Dataset Are We Going To Train The Model On?
To keep the experiments as close to real-world settings as possible, we will use the Pascal VOC semantic segmentation dataset.
You can find the dataset here on Kaggle.
As the dataset is publicly available, we can install the kaggle package and download the dataset using the API command.
Installing the Kaggle package.
pip install kaggle
Download the dataset.
kaggle datasets download -d sovitrath/voc-2012-segmentation-data
You should see the following structure after extracting the dataset locally.
voc_2012_segmentation_data/
├── train_images [1464 entries exceeds filelimit, not opening dir]
├── train_labels [1464 entries exceeds filelimit, not opening dir]
├── valid_images [1449 entries exceeds filelimit, not opening dir]
└── valid_labels [1449 entries exceeds filelimit, not opening dir]
We have training and validation datasets for both, the RGB images and the masks. There are 1464 training samples and 1449 validation samples.
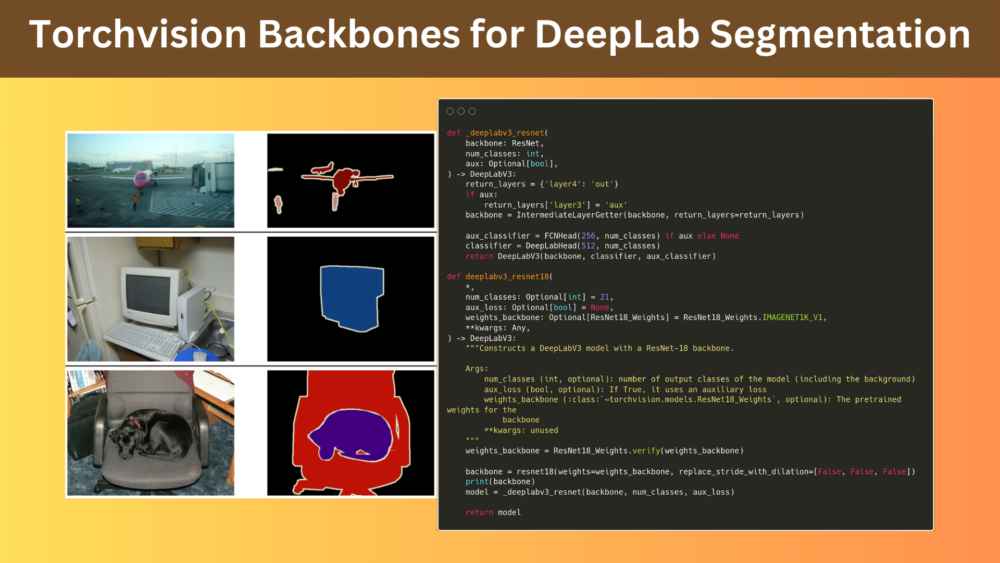
Here are a few samples of RGB images and their corresponding masks from the training set.

Project Directory Structure
Now, let’s take a look at the entire project directory structure.
├── input
│   ├── inference_data
│   └── voc_2012_segmentation_data
├── notebooks
│   └── augmentations.ipynb
├── outputs
│   ├── inference_results
│   ├── inference_results_video
│   └── resnet18_aux_scd45_e60_b32
├── src
│   ├── config.py
│   ├── custom_deeplab_mbv3large.py
│   ├── custom_deeplab_mbv3small.py
│   ├── custom_deeplab_resnet18.py
│   ├── custom_deeplab_resnet50.py
│   ├── datasets.py
│   ├── engine.py
│   ├── inference_image.py
│   ├── inference_video.py
│   ├── metrics.py
│   ├── train.py
│   └── utils.py
└── requirements.txt
- The
inputdirectory contains the Pascal VOC dataset that we downloaded above and the inference data. - The
notebooksdirectory contains the code to visualize a few samples from the dataset. - We have the training and inference results in the
outputsdirectory. - The
srcdirectory contains all the Python source code files. - And we also have a requirements file to install the dependencies.
All the source code files, trained weights, and inference data is downloadable via the download section.
Download Code
Do ensure that the dataset is structured in the above format before moving further.
You can install the rest of the requirements using the requirements.txt file.
pip install -r requirements.txt
That’s all the setup that we need.
Let’s jump into the technical coding part now.
Using Different Torchvision Backbones for DeepLab Segmentation Head
We will not be going over all the code in this article. The entire codebase it quite large. We will only go over the model files, the training commands for the experiments, and the results. However, feel free to explore the following articles to learn more about semantic segmentation models in general and fine-tuning semantic segmentation as well.
- Multi-Class Semantic Segmentation Training using PyTorch
- Train PyTorch DeepLabV3 on Custom Dataset
- Leaf Disease Segmentation using PyTorch DeepLabV3
- Semantic Segmentation using PyTorch FCN ResNet50
The Original DeepLabV3 ResNet50 Code
Let’s start with the pretrained DeepLabV3 Resnet50 code. Instead of just importing the model from Torchvision, let’s check out the underlying code a bit. This is the code in the custom_deeplab_resnet50.py file.
"""
Modified from torchvision.models.segmentation.deeplabv3_resnet50
URL: https://github.com/pytorch/vision/blob/main/torchvision/models/segmentation/deeplabv3.py
"""

from torchvision.models.resnet import ResNet
from torchvision.models import resnet50, ResNet50_Weights
from torchvision.models.segmentation.deeplabv3 import DeepLabV3, DeepLabHead, DeepLabV3_ResNet50_Weights
from torchvision.models.segmentation.fcn import FCNHead
from torchvision.models._utils import IntermediateLayerGetter, _ovewrite_value_param
from typing import Optional, Any

def _deeplabv3_resnet(
    backbone: ResNet,
    num_classes: int,
    aux: Optional[bool],
) -> DeepLabV3:
    return_layers = {'layer4': 'out'}
    if aux:
        return_layers['layer3'] = 'aux'
    backbone = IntermediateLayerGetter(backbone, return_layers=return_layers)

    aux_classifier = FCNHead(1024, num_classes) if aux else None
    classifier = DeepLabHead(2048, num_classes)
    return DeepLabV3(backbone, classifier, aux_classifier)

def deeplabv3_resnet50(
    *,
    weights: Optional[DeepLabV3_ResNet50_Weights] = None,
    progress: bool = True,
    num_classes: Optional[int] = None,
    aux_loss: Optional[bool] = None,
    weights_backbone: Optional[ResNet50_Weights] = ResNet50_Weights.IMAGENET1K_V1,
    **kwargs: Any,
) -> DeepLabV3:
    """Constructs a DeepLabV3 model with a ResNet-50 backbone.

    Reference: `Rethinking Atrous Convolution for Semantic Image Segmentation <https://arxiv.org/abs/1706.05587>`__.

    Args:
        weights (:class:`~torchvision.models.segmentation.DeepLabV3_ResNet50_Weights`, optional): The
            pretrained weights to use. See
            :class:`~torchvision.models.segmentation.DeepLabV3_ResNet50_Weights` below for
            more details, and possible values. By default, no pre-trained
            weights are used.
        progress (bool, optional): If True, displays a progress bar of the
            download to stderr. Default is True.
        num_classes (int, optional): number of output classes of the model (including the background)
        aux_loss (bool, optional): If True, it uses an auxiliary loss
        weights_backbone (:class:`~torchvision.models.ResNet50_Weights`, optional): The pretrained weights for the
            backbone
        **kwargs: unused
    """
    weights = DeepLabV3_ResNet50_Weights.verify(weights)
    weights_backbone = ResNet50_Weights.verify(weights_backbone)

    if weights is not None:
        weights_backbone = None
        num_classes = _ovewrite_value_param('num_classes', num_classes, len(weights.meta['categories']))
        aux_loss = _ovewrite_value_param('aux_loss', aux_loss, True)
    elif num_classes is None:
        num_classes = 21

    backbone = resnet50(weights=weights_backbone, replace_stride_with_dilation=[False, True, True])
    model = _deeplabv3_resnet(backbone, num_classes, aux_loss)

    if weights is not None:
        model.load_state_dict(weights.get_state_dict(progress=progress, check_hash=True))

    return model

if __name__ == '__main__':
    model = deeplabv3_resnet50()
    print(model)
The code is a modification of the Torchvision DeepLabV3 file and implements the parts necessary for DeepLabV3 ResNet50. Calling the deeplabv3_resnet50 function from the above file will load the pretrained weights and create the model which can be used for further fine-tuning.
Let’s focus on a few important points from the above code:
- In the
_deeplabv3_resnetfunction, we get the output from the last residual block of the ResNet50 model. - If we want the auxiliary outputs for calculating auxiliary loss, then we get the output from the third residual block as well.
- According to the above two, the FCN head and the DeepLab segmentation head are defined. The input channels of 1024, and 2048 respectively represent the output channels from these two blocks of the backbone. This in-turn creates the final
DeepLabV3model by passing the backbone (ResNet50 in this case), the auxiliary classifier, and the DeepLab head classifier. - Now, concentrating on the
deeplabv3_resnet50function. The ResNet50 backbone weights and the DeepLabV3 pretrained weights are passed by default here. So, the final model that is created contains the DeepLabV3 pretrained weights (lines 57 to 62).
All in all, calling the function creates the DeepLabV3 ResNet50 model just as it would have when importing from Torchvision.
The question arises, “what can we do to use a smaller backbone like ResNet18?”.
Using ResNet18 Backbone from Torchvision for DeepLab Segmentation
As it turns out, we can easily do some modifications to the above code to replace the ResNet50 backbone with the ResNet18 one. The following is the code in custom_deeplab_resnet18.py file.
"""
DeepLabV3 ResNet18 backbone.
"""

from torchvision.models.resnet import ResNet
from torchvision.models import resnet18, ResNet18_Weights
from torchvision.models.segmentation.deeplabv3 import DeepLabV3, DeepLabHead
from torchvision.models.segmentation.fcn import FCNHead
from torchvision.models._utils import IntermediateLayerGetter
from typing import Optional, Any

def _deeplabv3_resnet(
    backbone: ResNet,
    num_classes: int,
    aux: Optional[bool],
) -> DeepLabV3:
    return_layers = {'layer4': 'out'}
    if aux:
        return_layers['layer3'] = 'aux'
    backbone = IntermediateLayerGetter(backbone, return_layers=return_layers)

    aux_classifier = FCNHead(256, num_classes) if aux else None
    classifier = DeepLabHead(512, num_classes)
    return DeepLabV3(backbone, classifier, aux_classifier)

def deeplabv3_resnet18(
    *,
    num_classes: Optional[int] = 21,
    aux_loss: Optional[bool] = None,
    weights_backbone: Optional[ResNet18_Weights] = ResNet18_Weights.IMAGENET1K_V1,
    **kwargs: Any,
) -> DeepLabV3:
    """Constructs a DeepLabV3 model with a ResNet-18 backbone.

    Args:
        num_classes (int, optional): number of output classes of the model (including the background)
        aux_loss (bool, optional): If True, it uses an auxiliary loss
        weights_backbone (:class:`~torchvision.models.ResNet18_Weights`, optional): The pretrained weights for the
            backbone
        **kwargs: unused
    """
    weights_backbone = ResNet18_Weights.verify(weights_backbone)

    backbone = resnet18(weights=weights_backbone, replace_stride_with_dilation=[False, False, False])
    print(backbone)
    model = _deeplabv3_resnet(backbone, num_classes, aux_loss)

    return model

if __name__ == '__main__':
    model = deeplabv3_resnet18()
    print(model)
    # Calculate model parameters.
    total_params = sum(p.numel() for p in model.parameters())
    print(f"{total_params:,} total parameters.")
    total_trainable_params = sum(p.numel() for p in model.parameters() if p.requires_grad)
    print(f"{total_trainable_params:,} training parameters.")
- Firstly, we import the ResNet18 model and its ImageNet pretrained weights instead of ResNet50.
- The extraction of layers for the DeepLab and FCN head remains the same as all ResNet models have the same number of residual blocks.
- However, the number of input channels to the FCN and DeepLab head reduces to 256 and 512 respectively as they are the output channels from
layer3andlayer4in ResNet18.
One major drawback, we build a model with ImageNet pretrained weights only. This custom model does not have semantic segmentation pretrained weights. We will see the results after fine-tuning in one of the further sections.
Building DeepLab Segmentation with MobileNet Backbones
Above, we created the DeepLab segmentation model with the ResNet18 backbone. It was easy because it was a slightly modified version of the one with the ResNet50 backbone.
To further understand the process, let’s take a look at the code that builds the DeepLab segmentation model with MobileNetV3 Small backbone. The following code is present in custom_deeplab_mbv3small.py.
from torchvision.models import mobilenet_v3_small, MobileNet_V3_Small_Weights
from torchvision.models.segmentation.deeplabv3 import DeepLabV3, DeepLabHead
from torchvision.models.segmentation.fcn import FCNHead
from torchvision.models._utils import IntermediateLayerGetter
from typing import Optional, Any

def _deeplabv3_mobilenetv3(
    backbone,
    num_classes: int,
    aux: Optional[bool],
) -> DeepLabV3:
    return_layers = {'12': 'out'}
    if aux:
        return_layers['9'] = 'aux'
    backbone = IntermediateLayerGetter(backbone, return_layers=return_layers)

    aux_classifier = FCNHead(96, num_classes) if aux else None
    classifier = DeepLabHead(576, num_classes)
    return DeepLabV3(backbone, classifier, aux_classifier)

def deeplabv3_mobilenetv3_small(
    *,
    num_classes: int = 21,
    aux_loss: Optional[bool] = None,
    weights_backbone: Optional[MobileNet_V3_Small_Weights] = MobileNet_V3_Small_Weights.IMAGENET1K_V1,
    **kwargs: Any,
) -> DeepLabV3:
    """Constructs a DeepLabV3 model with a MobileNetV3-Small backbone."""

    backbone = mobilenet_v3_small(weights=weights_backbone, dilated=True).features
    model = _deeplabv3_mobilenetv3(backbone, num_classes, aux_loss)

    return model

if __name__ == '__main__':
    model = deeplabv3_mobilenetv3_small()

    print(model)

    # Calculate model parameters.
    total_params = sum(p.numel() for p in model.parameters())
    print(f"{total_params:,} total parameters.")
    total_trainable_params = sum(p.numel() for p in model.parameters() if p.requires_grad)
    print(f"{total_trainable_params:,} training parameters.")
This one is also quite straightforward. We start with building the backbone in the deeplabv3_mobilenetv3_small function. However, this time we get the output from the 12th layer of the features attribute, and the auxiliary output from the 9th layer. We initialize the FCN head and the DeepLab head according to that and create the final model.
This gives us a complete idea of how we can create DeepLab segmentation models with different backbones.
Training the DeepLabV3 ResNet18 Model
The codebase contains training and inference scripts as well. Although our primary aim is to learn about the process of attaching different Torchvision backbones to the DeepLab segmentation head, let’s train the ResNet18 model on the Pascal VOC dataset. This will also validate that our model is working correctly and will tell us about the improvements that we may need to make.
Remember that we using an ImageNet pretrained backbone. So, the results may not be as good because we have around 1400 training samples.
Note: At the moment, the train.py script has been hard-coded to use DeepLabV3 with the ResNet18 backbone. You can import the other models for your own experiments.
We can execute the following command in the src directory to start the training.
python train.py --epochs 60 --batch 32 --imgsz 416 512 --milestones 45 --aux-loss --name resnet18_aux_scd45_e60_b32
Following are the command line arguments that we are using:
--epochs: The number of epochs that we want to train the model for.--batch: The batch size of the data loader.--imgsz: Image size for the dataset preparation. It accepts two values, in the form of (height, width).--milestones: This is an optional argument defining the milestones (epochs) for the learning rate scheduler. If we pass any value, then the Multi-Step Learning Rate Scheduler will be applied at those epochs. It also accepts multiple arguments.--aux-loss: A boolean argument defining whether we want to use the auxiliary output for loss calculation or not. In most cases, we will get better results with this.--name: The project directory that will be created to store the artifacts in theoutputsdirectory.
Following are the outputs from the last few epochs.
EPOCH: 57
Training
100%|████████████████████| 46/46 [01:08<00:00,  1.49s/it]
Validating
100%|████████████████████| 46/46 [00:21<00:00,  2.13it/s]

Best validation loss: 0.6806669766488282

Saving best model for epoch: 57


Best validation IoU: 0.4049814614454856

Saving best model for epoch: 57

Train Epoch Loss: 0.6102, Train Epoch PixAcc: 0.8973, Train Epoch mIOU: 0.494694
Valid Epoch Loss: 0.6807, Valid Epoch PixAcc: 0.8679 Valid Epoch mIOU: 0.404981
--------------------------------------------------
EPOCH: 58
Training
100%|████████████████████| 46/46 [00:37<00:00,  1.23it/s]
Validating
100%|████████████████████| 46/46 [00:18<00:00,  2.55it/s]

Best validation loss: 0.679952283916266

Saving best model for epoch: 58

Train Epoch Loss: 0.5994, Train Epoch PixAcc: 0.9000, Train Epoch mIOU: 0.506303
Valid Epoch Loss: 0.6800, Valid Epoch PixAcc: 0.8678 Valid Epoch mIOU: 0.404948
--------------------------------------------------
EPOCH: 59
Training
100%|████████████████████| 46/46 [00:33<00:00,  1.38it/s]
Validating
100%|████████████████████| 46/46 [00:18<00:00,  2.48it/s]
Train Epoch Loss: 0.6041, Train Epoch PixAcc: 0.8986, Train Epoch mIOU: 0.503773
Valid Epoch Loss: 0.6869, Valid Epoch PixAcc: 0.8670 Valid Epoch mIOU: 0.401517
--------------------------------------------------
EPOCH: 60
Training
100%|████████████████████| 46/46 [00:33<00:00,  1.39it/s]
Validating
100%|████████████████████| 46/46 [00:19<00:00,  2.38it/s]
Train Epoch Loss: 0.5892, Train Epoch PixAcc: 0.9024, Train Epoch mIOU: 0.507429
Valid Epoch Loss: 0.6870, Valid Epoch PixAcc: 0.8670 Valid Epoch mIOU: 0.402548
--------------------------------------------------
TRAINING COMPLETE
We get the best Mean IoU of 40.49% on epoch 57 and that is model that we will use for inference.
Following are the loss, pixel accuracy, and Mean IoU graphs.


Inference using the Custom ResNet18 Backbone DeepLab Segmentation Model
Although we have scripts for both, image and video inference, we will focus on the video inference here.
The code is present in the inference_video.py script and it resizes all frames to a height of 416 and width of 512, the same that we used for training.
Furthermore, during the loading of the model state dictionary, we are using strict=False.
model.load_state_dict(ckpt['model_state_dict'], strict=False)
This is because, during inference, we no longer need the auxiliary head, and trying to load the weights will result in a “missing keys” error.
All the inference experiments were carried out on a machine with RTX 3080 GPU, 10th generation i7 CPU, and 32 GB of RAM.
Let’s try on a simple video of just people walking.
python inference_video.py --model ../outputs/resnet18_aux_scd45_e60_b32/best_model_iou.pth --input ../input/inference_data/videos/video_1.mp4
Clearly, we are getting an average of 121 FPS here. This is very high, however, the segmentation maps are not high-resolution. Furthermore, we can see that in-between, the model also predicts segmentation maps of some other classes.
Let’s try the script on another video.
python inference_video.py --model ../outputs/resnet18_aux_scd45_e60_b32/best_model_iou.pth --input ../input/inference_data/videos/video_2.mp4
This time, the model is able to segment the nearby horse somewhat well. However, it has the same issues with the horses at the back.
Further Improvements
Can we make the results better while keeping the parameter count of 20 million parameters and still getting nearly 100 FPS during video inference?
Here are the improvements that we can try next.
- Training on higher resolution images, maybe 512×640 (height x width).
- Using FPN in the backbone network.
- Trying out the improvements provided in the DeepLabV3+ paper.
We will try to tackle these future scopes in the next few articles.
More Articles on Segmentation
Here are a few more segmentation articles that you should give a read.
- Fine-Tuning SegFormer for Multi-Class Segmentation
- Fine Tuning Mask2Former
- YOLOP for Object Detection and Segmentation
- Inference Using YOLOPv2 PyTorch
Summary and Conclusion
In this article, we built custom DeepLab segmentation models with Torchvision backbones. We explored custom architectures with ResNet18 and MobileNetV3 backbones. Along with that, we also ran training experiments on the Pascal VOC segmentation dataset, and inference on real-life videos. At the moment, the results are not that good. We will try to improve them in future articles. I hope that this article was worth your time.
If you have any doubts, thoughts, or suggestions, please leave them in the comment section. I will surely address them.
You can contact me using the Contact section. You can also find me on LinkedIn, and X.

2 thoughts on “Torchvision Backbones for DeepLab Segmentation”